事の始まり
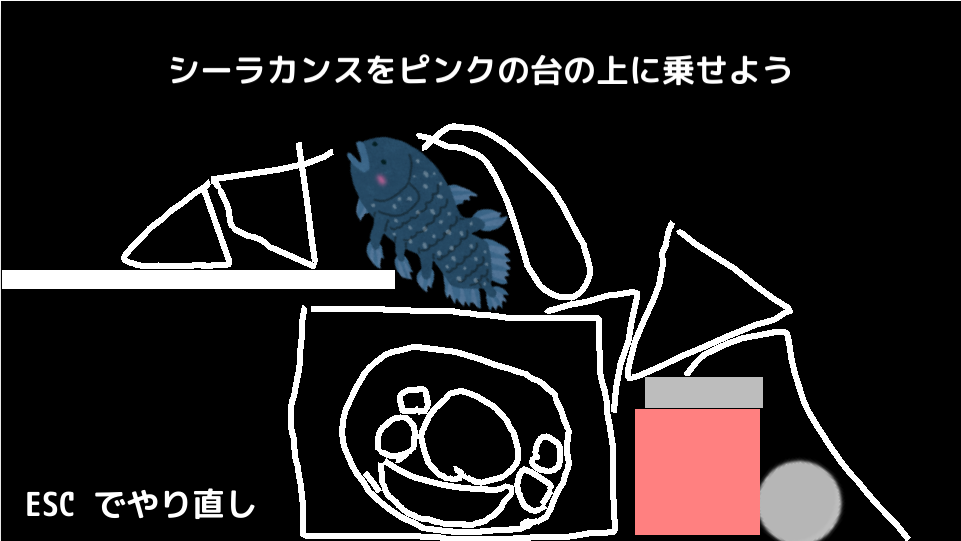
・Unityで物理演算ゲーム(なぞった形にオブジェクトが作られる。まぁ言ってしまえば「Q (https://www.youtube.com/watch?v=E4RNuXFU9ww) 」のようなもの)の作り方が有りそうで無くて。
試しに作ってみたらそれっぽく出来たので、軽く晒してみます。
こういうものが作れる
ざっくり3つのフェイズに分けると
1.なぞった形でMeshが生成される
2.Meshの形に沿った当たり判定(Collider)を設定
3.Rigibody2Dを付ける事であとは動きを物理演算に委譲する。
これが出来れば大体完成なのです。 簡単そうに見えますね?
1.なぞった形でMeshが生成
まず、指が通った位置を毎フレーム保存していきます。
private List<Vector2> vlist= new List<Vector2>();
public void Update()
{
        if (Input.GetMouseButton(0))
        {
            var pos = Camera.main.ScreenToWorldPoint(Input.mousePosition);
            vlist.Add(pos);
        }
}
ちなみにposはVector3型ですがVector2に代入すると勝手にzが消されるので好都合です。
どんなに滑らかな線に見えても、ポイントからポイントは直線
仮に曲線を描いたとしても、あるフレームとその次のフレームのマウスの位置は直線です。
この「直線の連続」を元に自由曲線な幅のあるMeshを作成していきます。
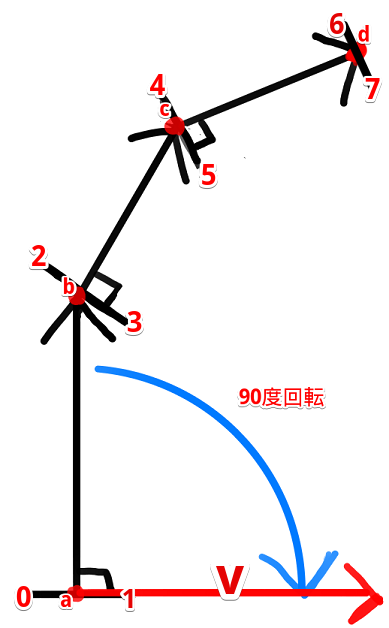
仮にこのドラッグされたポイントがABCDの4点だとして
描いた線に太さが必要なので、点a→点b,点b→点c、点c→点d…のそれぞれの直線に対して直行する長さwidthのvを求めます。
直行するということは90度回転したものになるので
\left( \begin{array}{ccc} \cos \theta & -\sin \theta \\ \sin \theta & \cos \theta \end{array}\right)
cos90=0,sin90=1なので、xとyを入れ替えて、yに-1をかければ良いだけです。
そうして得られたvecを正規化(長さを1に)して、widthをかけてあげたものをドラッグ位置に引いたものと足したものをMeshの頂点として追加していきます。
これを順に頂点配列に入れていくと、実際になぞった線に対して、(便宜上)左が0,2,4,6...と偶数番目に入り、右が1,3,5,7...と奇数番目に入ります。
        var vCnt = vlist.Count;
        var vertices = new List<Vector3>();
        for (int i = 0; i < vCnt-1; i++)
        {
            var currentPos = vlist[i];
            var nextPos = vlist[i + 1];
            var vec = currentPos - nextPos;//今と、一つ先のベクトルから、進行方向を得る
            if(vec.magnitude < 0.01f)continue;  //あまり頂点の間が空いてないのであればスキップする
            var v =  new Vector2(-vec.y,vec.x).normalized * width; //90度回転させてから正規化*widthで左右への幅ベクトルを得る

            //指定した横幅に広げる
            vertices.Add(currentPos-v);
            vertices.Add(currentPos+v);
        }
indexの作成
Meshとして成り立たせる為にはさらに、1ポリゴンを何番目の頂点で構成するか。が必要になります。これをindexやindicesと呼びます。
通常はtriangles(三角形)の集まりとしてindexを設定していくんですが、MeshクラスのSetIndicesのパラメータにMeshTopology.Quads(四角形)というのがあったので試しに使ってみたところ上手く行ったので今回はそれを使っています。
このindexには面(昔はFaceって呼んでたね?)として構成したい頂点四つを時計周り(
両面ぽいので逆時計でも良さそう)に指定する必要があります。
最初は点a→点b0の四角で0→2→3→1で1つ作成、次は一つずれて点b→点cで、2→4→5→3・・・
とやっていくと、(n+0)→(n+2)→(n+3)→(n+1)で、nを2ずつ増やせば良さそうな事がわかります。
あとは、この頂点配列とindex配列をmeshにセットするだけです。
        var indices = new List<int>();
        for (int index = 0; index < vertices.Count-2; index+=2)
        {
            indices.Add(index);
            indices.Add(index+2);
            indices.Add(index+3);
            indices.Add(index+1);
        }

        mesh.SetVertices(vertices);
        mesh.SetIndices(indices.ToArray(),MeshTopology.Quads,0);
これでMeshは作成されました。
2.Meshの形に沿った当たり判定(Collider)を設定
次に、このMeshにピッタリハマるColliderを付ける必要があります。
前述の通り曲線も細かい多角形でしかないのでPolygonCollider2Dというのが使えそうです。
このPolygonColliderに用意されているSetPathメソッドで構成する頂点を渡すことが出来るのですが、この頂点の渡し方が多角形をぐるりと一筆書きでなぞる形式である必要があります。
なので、(仮に)作ったMeshの左下側からスタートして、右上側から返ってくる一筆書きを考えると
0,2,4,6,8,10...と偶数が小さい順で通り、次は帰りで逆に11,9,7,5,3,1と逆に奇数の大きい順で通れば良さそうです。

        var polyColliderPos = new List<Vector2>();
        //偶数を小さい順に
        for (int index = 0; index < mesh.vertices.Length; index+=2)
        {
            var pos = mesh.vertices[index];
            polyColliderPos.Add(pos);
        }
        //奇数を大きい順に
        for (int index = mesh.vertices.Length-1; index > 0; index-=2)
        {
            var pos = mesh.vertices[index];
            polyColliderPos.Add(pos);
        }
完成
3.Rigibody2Dを付ける事であとは動きを物理演算に委譲する。
は見たままなので特に解説ありません。
強いて言うなら
rigibody.useAutoMass = true;
とすることで、Objectの重さを自動計算しているので、小さいオブジェクトは軽く、大きい(長くなぞった)オブジェクトは重くなっています。
それらを踏まえて、無理やり1クラスにまとめたコードが以下になります。
using UnityEngine;
using System.Collections.Generic;

public class DrawLine : MonoBehaviour
{
    [SerializeField] private float width;
    private GameObject targetObject;
    private Mesh mesh;
    private List<Vector2> vlist = new List<Vector2>();

    private void CreateMesh(Mesh mesh,List<Vector2> vlist)
    {
        mesh.Clear();

        var vCnt = vlist.Count;
        var vertices = new List<Vector3>();
        for (int i = 0; i < vCnt-1; i++)
        {
            var currentPos = vlist[i];
            var nextPos = vlist[i + 1];
            var vec = currentPos - nextPos;//今と、一つ先のベクトルから、進行方向を得る
            if(vec.magnitude < 0.01f)continue;  //あまり頂点の間が空いてないのであればスキップする
            var v =  new Vector2(-vec.y,vec.x).normalized * width; //90度回転させてから正規化*widthで左右への幅ベクトルを得る

            //指定した横幅に広げる
            vertices.Add(currentPos-v);
            vertices.Add(currentPos+v);
        }

        var indices = new List<int>();
        for (int index = 0; index < vertices.Count-2; index+=2)
        {
            indices.Add(index);
            indices.Add(index+2);
            indices.Add(index+3);
            indices.Add(index+1);
        }

        mesh.SetVertices(vertices);
        mesh.SetIndices(indices.ToArray(),MeshTopology.Quads,0);
    }

    public void Update()
    {
        if (Input.GetMouseButtonDown(0))
        {
            targetObject = new GameObject("MeshObject");
            var meshRenderer = targetObject.AddComponent<MeshRenderer>();
            meshRenderer.sharedMaterial = Resources.GetBuiltinResource<Material>("Sprites-Default.mat");
            var meshFilter = targetObject.AddComponent<MeshFilter>();
            mesh = new Mesh();
            meshFilter.mesh = mesh;
            vlist.Clear();
        }
        if (Input.GetMouseButton(0) && targetObject != null)
        {
            var pos = Camera.main.ScreenToWorldPoint(Input.mousePosition);

            //既にあるオブジェクトに当たりそうならそこで生成を辞める
            if (Physics2D.CircleCast(pos, 0.2f, Vector2.zero))
            {
                Finish();
                return;
            }

            vlist.Add(pos);
            CreateMesh(mesh,vlist);
        }
        if (Input.GetMouseButtonUp(0) && targetObject != null)
        {
            Finish();
        }
    }

    private void Finish()
    {
        if (mesh.vertexCount < 4)
        {
            Destroy(targetObject);
            return;
        }
        var rigibody = targetObject.AddComponent<Rigidbody2D>();
        rigibody.useAutoMass = true;
        var polyColliderPos = CreateMeshToPolyCollider(mesh);
        var polyCollider = targetObject.AddComponent<PolygonCollider2D>();
        polyCollider.SetPath(0,polyColliderPos.ToArray());
        targetObject = null;
    }

    private List<Vector2> CreateMeshToPolyCollider(Mesh mesh)
    {
        var polyColliderPos = new List<Vector2>();
        //偶数を小さい順に
        for (int index = 0; index < mesh.vertices.Length; index+=2)
        {
            var pos = mesh.vertices[index];
            polyColliderPos.Add(pos);
        }
        //奇数を大きい順に
        for (int index = mesh.vertices.Length-1; index > 0; index-=2)
        {
            var pos = mesh.vertices[index];
            polyColliderPos.Add(pos);
        }
        return polyColliderPos;
    }
}
最後に
-
1クラスに収める為にAddComponentしまくったりと無理がありますが、普通に作るならある程度ComponentをアタッチしたPrefabを作っておいて、InstantiateしてからMeshを生成したほうが筋が良いと思います。
-
明らかにMesh生成に無駄があります。(毎回vertices,indicesを作る必要は無いはず)
-
マジックナンバー多いね
冒頭に置いたサンプルのprojectは
https://github.com/divide-by-zero/UnityPhysixGameSample
に置きましたので興味がある方はどうぞ。

