転職に向けたandroidの勉強の記録をしこしこ追記して残していきます。
乱雑ですが、お許しください、
参考資料
Day1 アプリのレイアウト作成
android:layout_width="wrap_content"
android:layout_height="match_parent"
wrap_content・・・最低限のサイズ
match_parent・・・親要素と同じサイズ
android:layout_marginTop="10dp"
android:paddingTop="10sp"
layout_marginTop・・・マージンの場合は「layout_」を忘れず!!
paddingTop・・・htmlと似ている
dp(dpi)・・・ px = dp * (dpi / 160) で成り立つ
80dp(dpi)=画面の半分
sp・・・スケール非依存のピクセル
解像度とユーザーが設定したフォントサイズにあわせて自動的にスケール
android:gravity="right"
android:layout_gravity="right"
android:gravity・・・htmlでいう「float」。その要素の内部に適用される
android:layout_gravity・・・htmlでいう「float」。その要素自身に適用される
<LinearLayout ...>
   android:orientation="vertical"
</LinearLayout>
<LinearLayout ...>
   android:orientation="horizontal"
</LinearLayout>
android:orientation・・・LinearLayout時の拡張方向の属性
vertical/horizontal・・・垂直方向/水平方向
<LinearLayout ...>
    <TextView
        android:layout_width="wrap_content"
        android:layout_height="wrap_content"
        android:text="1"
        android:layout_weight="1" />
    <TextView
        android:layout_width="wrap_content"
        android:layout_height="wrap_content"
        android:text="2"
        android:layout_weight="2" />
</LinearLayout>
⇒
隣に配置系
android:layout_above・・・指定したidのViewの上に配置します
android:layout_below・・・指定したidのViewの下に配置します
android:layout_toLeftOf・・・指定したidのViewの左に配置します
android:layout_toRightOf・・・指定したidのViewの右に配置します
縦横の調節系
android:layout_alignTop・・・指定したidのViewの上端にあわせて配置します
android:layout_alignBottom・・・指定したidのViewの下端にあわせて配置します
android:layout_alignLeft・・・指定したidのViewの左端にあわせて配置します
android:layout_alignRight・・・指定したidのViewの右端にあわせて配置します
中央配置系
android:layout_centerVertical・・・親となるViewの縦方向の中央に配置します
android:layout_centerHorizontal・・・親となるViewの横方向の中央に配置します
android:layout_centerInParent・・・親となるViewの中央に配置します
その他
android:layout_alignBaseline・・・指定したidのViewのベースラインにあわせて配置します
android:layout_alignParentBottom・・・親となるViewの下端にあわせて配置します
android:layout_alignParentLeft・・・親となるViewの左端にあわせて配置します
android:layout_alignParentRight・・・親となるViewの右端にあわせて配置します
android:layout_alignParentTop・・・親となるViewの上端にあわせて配置します
Day2 アプリのレイアウト作成(続き)
両端固定で中央広々とするレイアウト(Relativeのみ)
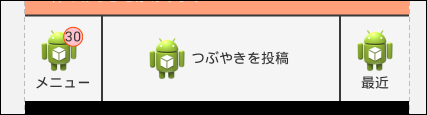
↓
  <!--左ボタン-->
    <RelativeLayout
        android:id="@+id/menu1"
        android:layout_width="wrap_content"
        android:layout_height="wrap_content"
        android:layout_alignParentBottom="true"
        android:padding="10dp"
        android:background="@drawable/button_state_list">

    <..................>

    </RelativeLayout>

    <!--左バー-->
    <RelativeLayout
        android:id="@+id/bar1"
        android:layout_width="2dp"
        android:layout_height="match_parent"
        android:layout_alignTop="@+id/menu1"
        android:layout_toRightOf="@+id/menu1"
        android:background="#393939">


    </RelativeLayout>

    <!--中央ボタン-->
    <RelativeLayout
        android:id="@+id/menu2"
        android:layout_width="match_parent"
        android:layout_height="wrap_content"
        android:layout_alignBottom="@+id/menu1"
        android:layout_alignTop="@+id/bar2"
        android:layout_toLeftOf="@+id/bar2"
        android:layout_toRightOf="@+id/bar1"
        android:background="@drawable/button_state_list">

    <..................>

    </RelativeLayout>

    <!--右バー-->
    <RelativeLayout
        android:id="@+id/bar2"
        android:layout_width="2dp"
        android:layout_height="match_parent"
        android:layout_alignTop="@+id/bar1"
        android:layout_toLeftOf="@+id/menu3"
        android:background="#393939">

    </RelativeLayout>

    <!--右ボタン-->
    <RelativeLayout
        android:id="@+id/menu3"
        android:layout_width="wrap_content"
        android:layout_height="wrap_content"
        android:layout_alignParentBottom="true"
        android:layout_alignParentRight="true"
        android:layout_alignTop="@+id/bar2"
        android:padding="10dp"
        android:background="@drawable/button_state_list">

    <..................>

    </RelativeLayout>
Day3 ActivityとFragment
Activity MVCでいうController