はじめに
BitVisor の開発の際,当然BitVisor からのログを見る手段が必要である.
BitVisor には以下のような方法でログを出力できる.
- ゲストOS上からVMMCALLを発行
- VGAへ出力
- IEEE 1394 経由で出力
- シリアル経由で出力
- ネットワーク経由で出力
この中で,今回はネットワーク経由でのログ出力の方法について書く.
イメージとしては,こんな感じである.

動作確認環境
実験用マシン
CPU: Intel(R) Core(TM) i7-4790K CPU @ 4.00GHz
NIC: Ethernet controller: Intel Corporation Device 15a1
開発用マシン
OS: Gentoo (Linux 3.14.14-gentoo #7 SMP)
GCC: gcc (Gentoo 4.8.4 p1.5, pie-0.6.1) 4.8.4
GNU make: GNU Make 4.1
BitVisor のネットワーク経由のログ出力機能は,Intel Pro 1000 NIC, RTL 8169 NIC, Broadcom NIC, Intel X540 NIC あたりに対応している(たぶん).
BitVisor のビルド
まずはクローン
$ hg clone https://ftakaaki@bitbucket.org/bitvisor/bitvisor
$ cd bitvisor/
.config の生成
ビルドの前に設定のために以下のコマンドを叩く
$ make config
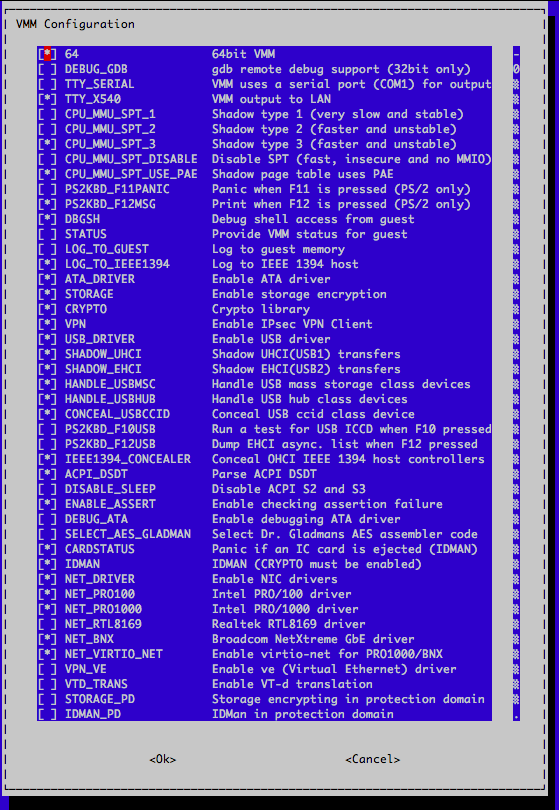
以下のような画面が出る.
今回は,Intel の NIC を使うので,NET_DRIVER と NET_PRO1000 がセットされていることを確認する.
make config の結果,.config というファイルが生成される.
これは,Linux の .config のようなものである.
defconfig の編集
次に,もう一つの設定ファイルである defconfig の設定を編集する.
まずは,defconfig のテンプレートである defconfig.tmpl から defconfig へファイルをコピーする.
$ cp defconfig.tmpl defconfig
次に,defconfig を編集する.
# emacs defconfig
$ diff -u defconfig.tmpl defconfig
--- defconfig.tmpl      2015-12-01 22:12:41.000000000 +0900
+++ defconfig   2015-12-01 23:21:27.000000000 +0900
@@ -132,19 +132,19 @@
                .ignore_tsc_invariant = 0,
                .unsafe_nested_virtualization = 0,
                .tty_mac_address = {
-                       0xFF, 0xFF, 0xFF, 0xFF, 0xFF, 0xFF
+                        0x01, 0x23, 0x45, 0x67, 0x89, 0xab, # 開発用マシンのNICのMACアドレス
                },
                .tty_syslog = {
                        .enable = 0,
                        .src_ipaddr = { 0, 0, 0, 0 },
                        .dst_ipaddr = { 0, 0, 0, 0 },
                },
-               .tty_pro1000 = 0,
+               .tty_pro1000 = 1,
                .tty_rtl8169 = 0,
                .tty_x540 = 0,
                .tty_ieee1394 = 0,
                .driver = {
-                       .pci = "",
+                       .pci = "driver=pro1000,tty=1",
                },
                .iccard = {
                        .enable = 0,
実験用マシンのNICがRealtek NIC なら,driver=pro1000 の部分を driver=rtl8169, Broadcom NIC なら driver=bnx とすると良いらしい.
ビルド
ビルドは単純に make コマンドを叩くと良い.
$ make -j4
BitVisor のインストール
以下参照
- BitVisor 1.1 のマニュアル 6章 (GRUB とかから起動したい人はこちら) http://sourceforge.net/projects/bitvisor/files/bitvisor/documents/manual/bitvisor-1.1-manual-japanese.pdf/download
- iPXE でBitVisor をブートしよう(iPXE でネットワークブートしたいという方はこちら) http://tokikane-tec.blogspot.jp/2015/02/ipxe-bitvisor.html
開発用マシン(ログ受信側)のセットアップ
以下のperl スクリプトを実行して待つ.
$|=1;

use Socket;
use Time::HiRes qw(usleep gettimeofday tv_interval);

socket(S, PF_INET, SOCK_DGRAM, 0);
bind(S, pack_sockaddr_in(10101,INADDR_ANY));

$last_is_newline = 0;
while(recv(S,$buf,1,0)){
    if($last_is_newline){
        my ($sec, $msec) = gettimeofday();
        printf ("[%d.%06d] ", $sec, $msec);
    }
    print $buf;

    if($buf eq "\n"){
        $last_is_newline = 1;
    }else{
        $last_is_newline = 0;
    }
}
(元々,受信用のスクリプトは BitVisor の core/tty.c の中にコメントで書かれている.https://bitbucket.org/bitvisor/bitvisor/src/cc32c7634f7e547904ddf27ba0e657cfdd94be06/core/tty.c?at=default&fileviewer=file-view-default#tty.c-173
上記のスクリプトは僕がタイムスタンプを表示するように少し手を加えたもの.
1行目にタイムスタンプがつかないのは許して.)
結果
開発用マシンでこんなログが見れる.
PCI: 25 devices found
[1448978457.500282]MCFG [0] 0000:00-7F (F0000000,8000000)
[1448978457.505019]Starting a virtual machine.
[1448978457.506072]Loading MBR.
ログが出ないな思った時は,Device ID の追加が必要かも
新しいネットワークカードを使うと,BitVisor のドライバが対応してない場合がある.
大抵の場合は,BitVisor のドライバ内にあるデバイスドライバのリストに,新しいデバイス ID を登録するだけでよかったりする(駄目なこともあるかもしれないが).
例えば,今回の動作環境だと,Pro1000 の15a1 というデバイスIDがBitVisor のデバイスドライバ内に無いので,以下のように追加する.
diff -r cc32c7634f7e drivers/net/pro1000.c
--- a/drivers/net/pro1000.c     Mon Nov 30 18:16:31 2015 +0900
+++ b/drivers/net/pro1000.c     Tue Dec 01 23:49:35 2015 +0900
@@ -1684,6 +1684,7 @@
                          "8086:1503|"
                          "8086:150c|"
                          "8086:1525|"
+                         "8086:15a1|"
                          "8086:0438|"
                          "8086:043a|"
                          "8086:043c|"
