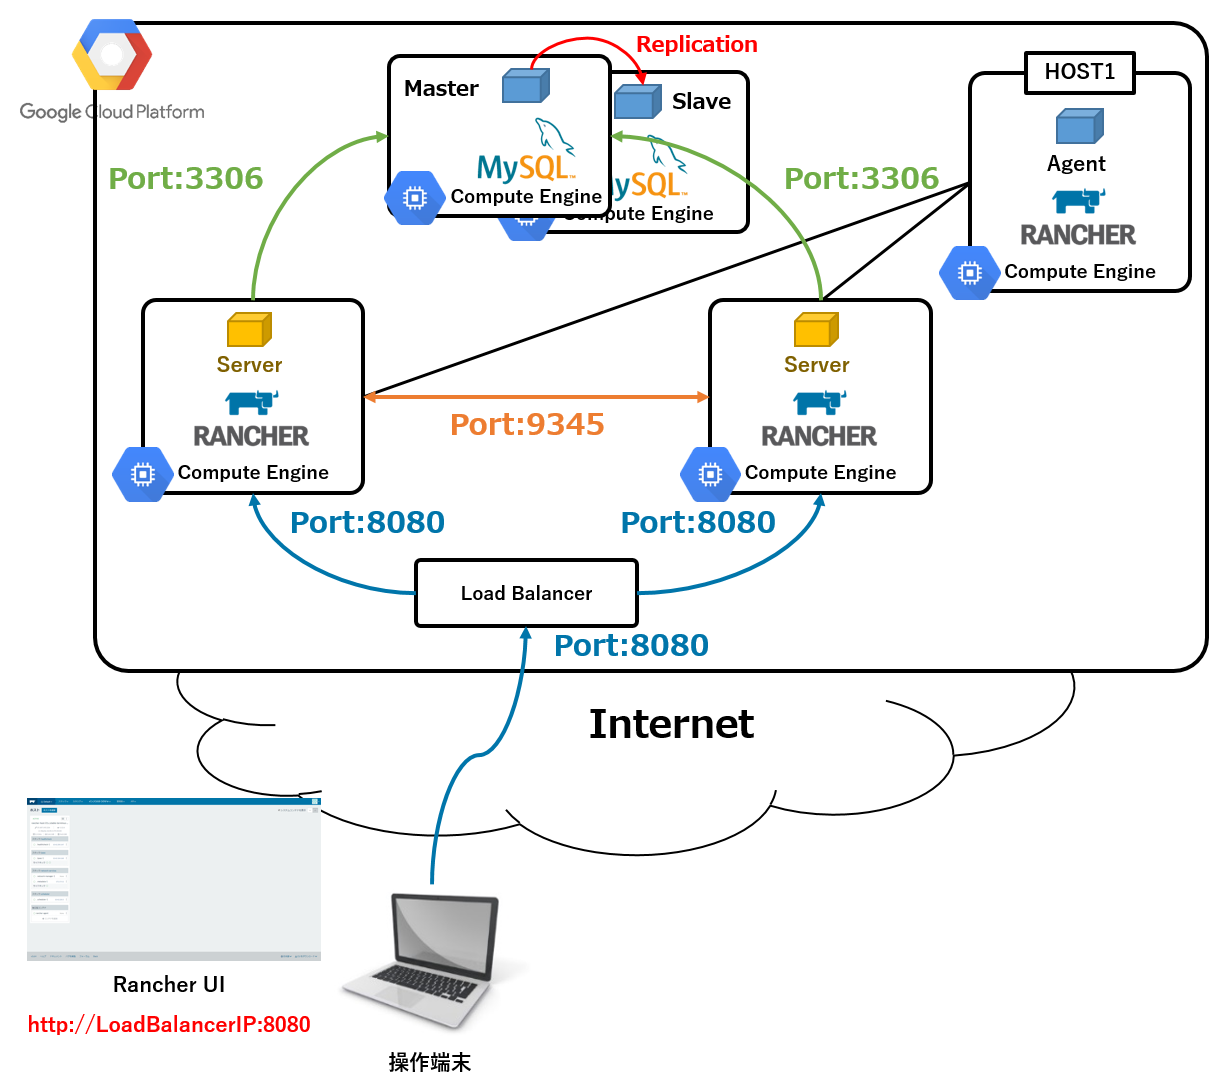
RancherServerの冗長構成を検討してみました。
やろうと思えば色々な構成が組めると思いますが、シンプルにMySQLコンテナーを2ホストに1コンテナーずつ稼働させて、MasterとSlave構成にしてレプリケーションします。GCPのロードバランサを1台用意し、その配下に2ホストそれぞれにRancherServerコンテナーを稼働させます。この環境に新規ホストを1台追加する構成で試してみました。
以下構成図となります。
1.ホストの準備
インスタンスの作成
Compute Engineで以下の5インスタンスを作成します。
| 項目 | 入力概要 |
|---|---|
| ゾーン | asia-southeast1-c |
| マシンタイプ | vCPUx1 |
| ブートディスク | Ubuntu 16.04 LTS |
| ファイアウォール | HTTP トラフィックを許可する、HTTPS トラフィックを許可するの両方をチェックします。 |
※他のクラウドベンダー、オンプレミス環境でも構いません。
GCPでは、デフォルトでファイアウォールが設定されていて、ホスト間でのコンテナの通信が行えないため、
設定を変更する必要があります。
GCPのダッシュボードで、「ネットワーキング」-「ファイアウォール」を選択して、ファイアウォールルールを作成します。
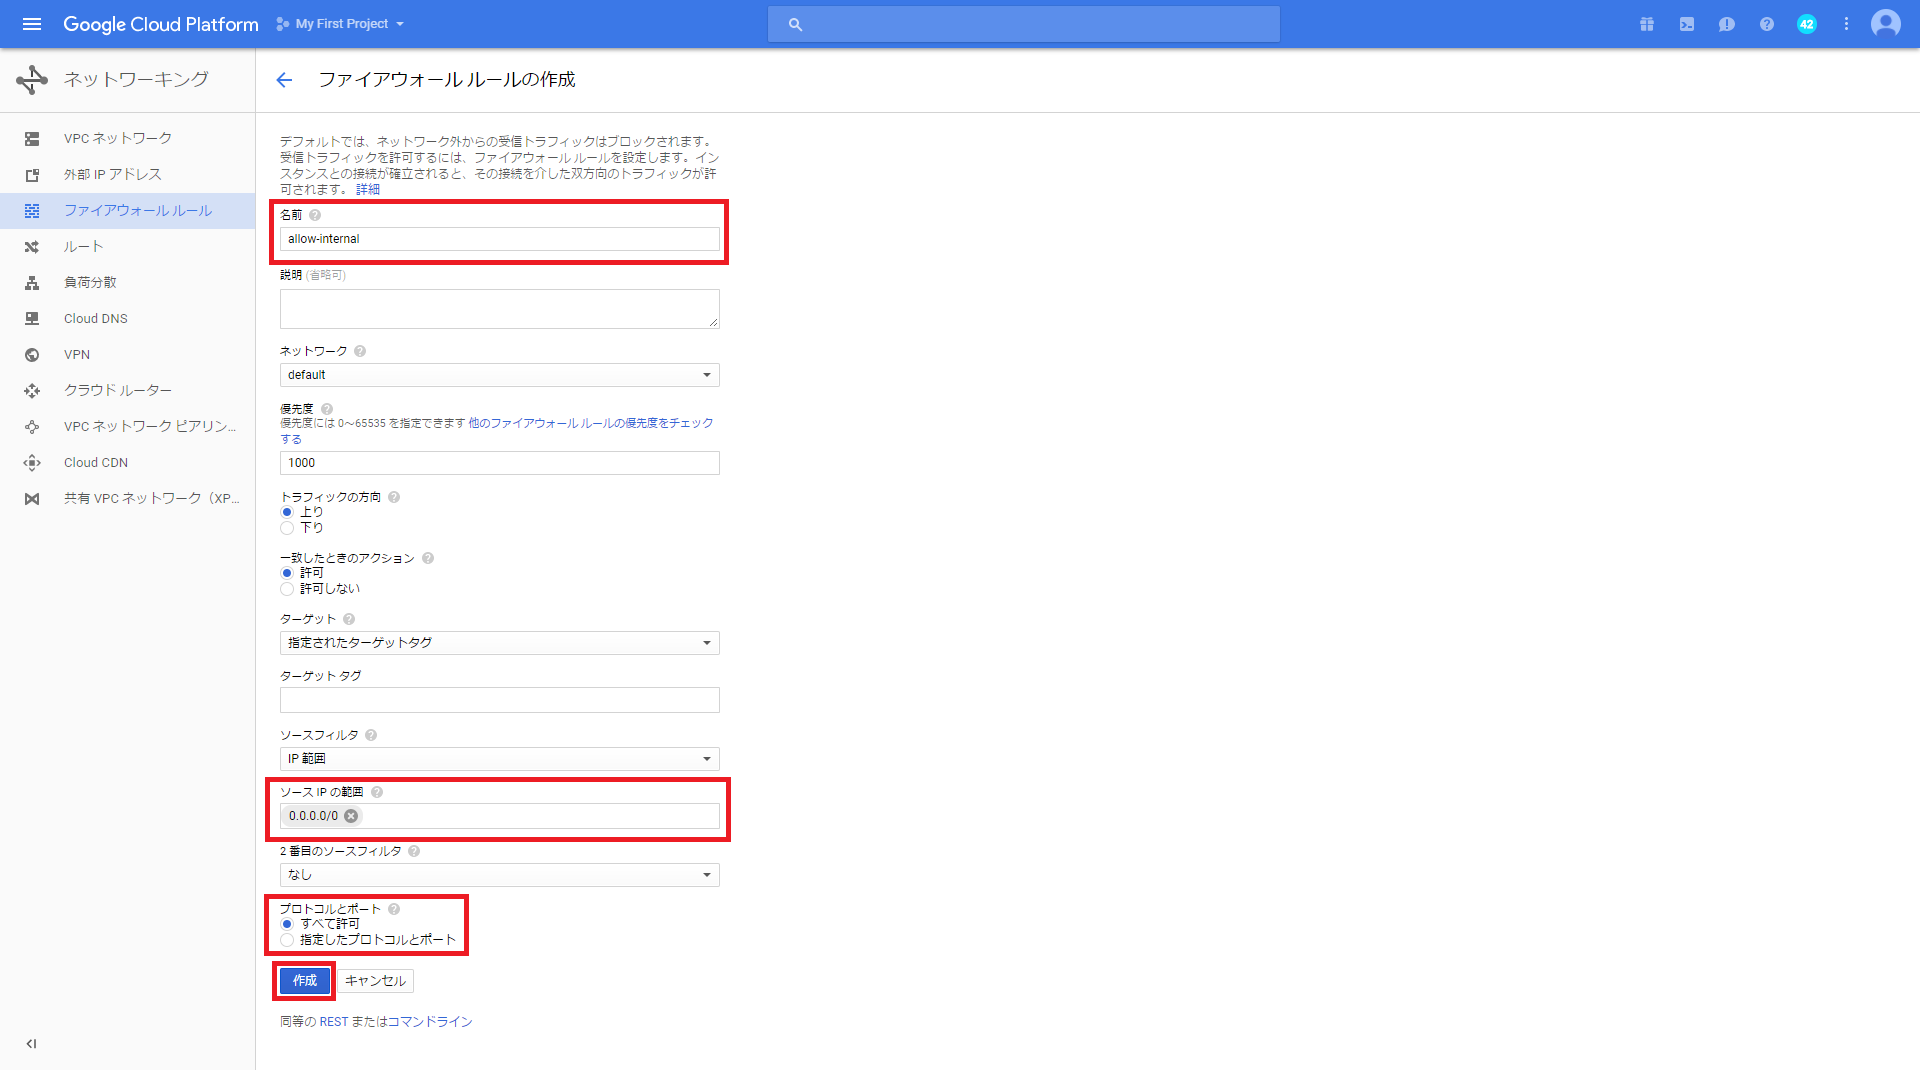
名前は任意名、ソースIPの範囲は0.0.0.0/0、プロトコルとポートは全て許可とします。
今回はお試しということで、全許可にしています。
最後に「作成」ボタンをクリックします。
rootパスワードの設定
GCPではrootのパスワードがデフォルトでは設定されていないので、まずはrootのパスワードを設定します。
5インスタンスに任意のパスワードを設定します。
$ sudo passwd root
Dockerのインストール
Dockerをインストールします。RancherとDockerのバージョンがサポートしているものとそうでないものがあるので、Support Versionで確認します。
kubernetesサポートを考慮して、1.12.6で試してみました。
5インスタンスにDockerをインストールします。
$ curl https://releases.rancher.com/install-docker/1.12.6.sh | sh
.
.
.
Client:
 Version:      1.12.6
 API version:  1.24
 Go version:   go1.6.4
 Git commit:   78d1802
 Built:        Tue Jan 10 20:26:30 2017
 OS/Arch:      linux/amd64

Server:
 Version:      1.12.6
 API version:  1.24
 Go version:   go1.6.4
 Git commit:   78d1802
 Built:        Tue Jan 10 20:26:30 2017
 OS/Arch:      linux/amd64
.
.
.
Remember that you will have to log out and back in for this to take effect!
2.MasterDBの構築
以下コマンドを実行します。
$ su -

# docker run --name mysql -e MYSQL_ROOT_PASSWORD=password -p 3306:3306 -d mysql:latest --server-id=1001 --log-bin=mysql-bin --gtid-mode=on --enforce-gtid-consistency=on --log-slave-updates
コンテナーIDを調べた後に、execでコンテナーに入り、RancherServerのDB設定、Slaveとのレプリケーション設定を行います。
# docker ps
CONTAINER ID        IMAGE               COMMAND                  CREATED             STATUS              PORTS                    NAMES
43549b5d6daa        mysql:latest        "docker-entrypoint.sh"   About an hour ago   Up About an hour    0.0.0.0:3306->3306/tcp   mysql

# docker exec -it 43549b5d6daa bash

# mysql -u root -p
Enter password:
Welcome to the MySQL monitor.  Commands end with ; or \g.
Your MySQL connection id is 3
Server version: 5.7.19-log MySQL Community Server (GPL)

Copyright (c) 2000, 2017, Oracle and/or its affiliates. All rights reserved.

Oracle is a registered trademark of Oracle Corporation and/or its
affiliates. Other names may be trademarks of their respective
owners.

Type 'help;' or '\h' for help. Type '\c' to clear the current input statement.

mysql> CREATE DATABASE IF NOT EXISTS cattle COLLATE='utf8_general_ci' CHARACTER SET='utf8'; ←RancherServerのDB設定
Query OK, 1 row affected (0.01 sec)

mysql> GRANT ALL ON cattle.* TO 'cattle'@'%' IDENTIFIED BY 'cattle'; ←RancherServerのDB設定
Query OK, 0 rows affected, 1 warning (0.01 sec)

mysql> CREATE USER 'repl'@'35.189.138.157' IDENTIFIED BY 'repl'; ←Slaveとのレプリケーション設定、@以降のIPはSlaveDBホストのIPになります。
Query OK, 0 rows affected (0.00 sec)

mysql> GRANT REPLICATION SLAVE ON *.* TO 'repl'@'35.189.138.157'; ←Slaveとのレプリケーション設定、@以降のIPはSlaveDBホストのIPになります。
Query OK, 0 rows affected (0.00 sec)

mysql> exit
Bye

exit ←MySQLコンテナーからログアウト

# exit ←rootからログアウト

$ exit ←ホストからログアウト
3.SlaveDBの構築
以下コマンドを実行します。
$ su -

# docker run --name mysql -e MYSQL_ROOT_PASSWORD=password -p 3306:3306 -d mysql:latest --server-id=1002 --log-bin=mysql-bin --gtid-mode=on --enforce-gtid-consistency=on --log-slave-updates --read_only
コンテナーIDを調べた後に、execでコンテナーに入り、レプリケーション設定を行います。
# docker ps
CONTAINER ID        IMAGE               COMMAND                  CREATED             STATUS              PORTS                    NAMES
e25a708fc78b        mysql:latest        "docker-entrypoint.sh"   31 seconds ago      Up 30 seconds       0.0.0.0:3306->3306/tcp   mysql

# docker exec -it e25a708fc78b bash

# mysql -u root -p
Enter password:password

Welcome to the MySQL monitor.  Commands end with ; or \g.
Your MySQL connection id is 3
Server version: 5.7.19-log MySQL Community Server (GPL)

Copyright (c) 2000, 2017, Oracle and/or its affiliates. All rights reserved.

Oracle is a registered trademark of Oracle Corporation and/or its
affiliates. Other names may be trademarks of their respective
owners.

Type 'help;' or '\h' for help. Type '\c' to clear the current input statement.

mysql> CHANGE MASTER TO MASTER_HOST='35.187.217.93',MASTER_USER='repl',MASTER_PASSWORD='repl',MASTER_AUTO_POSITION=1,MASTER_PORT=3306; ←レプリケーション設定
Query OK, 0 rows affected, 2 warnings (0.03 sec)

mysql> START SLAVE; ←レプリケーション設定
Query OK, 0 rows affected (0.00 sec)

mysql> show databases; ←RancherServerのDBであるcattleが表示されていればレプリケーションできています。
+--------------------+
| Database           |
+--------------------+
| information_schema |
| cattle             |
| mysql              |
| performance_schema |
| sys                |
+--------------------+
5 rows in set (0.00 sec)

mysql> exit
Bye

exit ←MySQLコンテナーからログアウト

# exit ←rootからログアウト

$ exit ←ホストからログアウト
4.RancherServerの構築
1台目のホストにRancherサーバのインストールします。
オプションの「--db-host」には、MasterDBホストの外部IP、「--advertise-address」は1台目のRancherServerホストの外部IPアドレスを指定します。
$ su -

# docker run -d --restart=unless-stopped -p 8080:8080 -p 9345:9345 rancher/server:latest --db-host 35.187.217.93 --db-port 3306 --db-user cattle --db-pass cattle --db-name cattle --advertise-address 35.189.150.141
Unable to find image 'rancher/server:latest' locally
latest: Pulling from rancher/server
6599cadaf950: Pull complete
23eda618d451: Pull complete
f0be3084efe9: Pull complete
52de432f084b: Pull complete
a3ed95caeb02: Pull complete
e75cd91a1dc5: Pull complete
997f1b48f59f: Pull complete
313c28fb4e37: Pull complete
2a0730d1275c: Pull complete
8848fbebd2c8: Pull complete
906504ea9ea6: Pull complete
9329940f8e65: Pull complete
e849debd7945: Pull complete
4883bd135dd2: Pull complete
605c6a0fe940: Pull complete
274bc004c933: Pull complete
4233fc4db319: Pull complete
ba0ac72d3fe4: Pull complete
71a704057dbe: Pull complete
Digest: sha256:77f6bcdb51b2f8d3e2cfd7601e6e2731fc92ff88a71ac7cbf6165a01d97de7b8
Status: Downloaded newer image for rancher/server:latest
051d7c66b9d8ae3dd248548d213ec47693c10795762ed74fa39ad73272a99a65

# exit ←rootからログアウト

$ exit ←ホストからログアウト
2台目のホストにRancherサーバのインストールします。
オプションの「--db-host」には、MasterDBホストの外部IP、「--advertise-address」は2台目のRancherServerホストの外部IPアドレスを指定します。
$ su -

# docker run -d --restart=unless-stopped -p 8080:8080 -p 9345:9345 rancher/server:latest --db-host 35.187.217.93 --db-port 3306 --db-user cattle --db-pass cattle --db-name cattle --advertise-address 35.189.150.141
Unable to find image 'rancher/server:latest' locally
latest: Pulling from rancher/server
6599cadaf950: Pull complete
23eda618d451: Pull complete
f0be3084efe9: Pull complete
52de432f084b: Pull complete
a3ed95caeb02: Pull complete
e75cd91a1dc5: Pull complete
997f1b48f59f: Pull complete
313c28fb4e37: Pull complete
2a0730d1275c: Pull complete
8848fbebd2c8: Pull complete
906504ea9ea6: Pull complete
9329940f8e65: Pull complete
e849debd7945: Pull complete
4883bd135dd2: Pull complete
605c6a0fe940: Pull complete
274bc004c933: Pull complete
4233fc4db319: Pull complete
ba0ac72d3fe4: Pull complete
71a704057dbe: Pull complete
Digest: sha256:77f6bcdb51b2f8d3e2cfd7601e6e2731fc92ff88a71ac7cbf6165a01d97de7b8
Status: Downloaded newer image for rancher/server:latest
78f8b4691d435543a02184b75e114c23b94dcd6de2df477c85dc5e288a710455

# exit ←rootからログアウト

$ exit ←ホストからログアウト
5.ロードバランサの構築
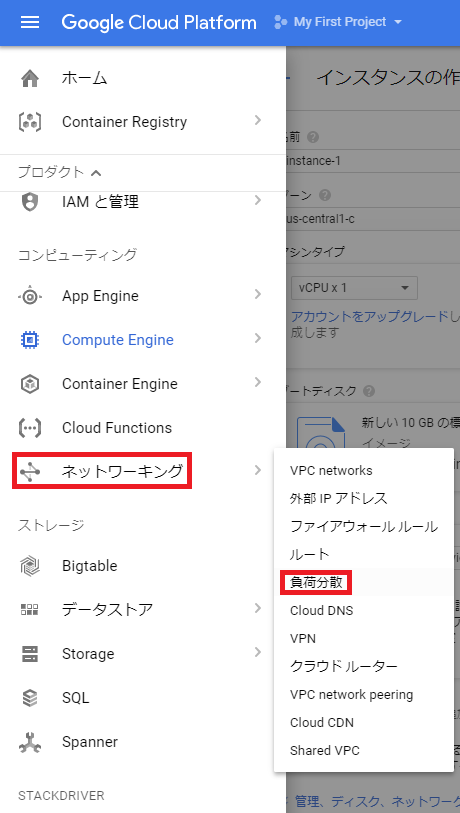
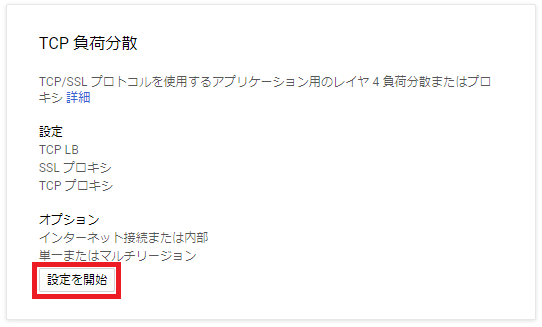
GCPのダッシュボード左メニュー[ネットワーキング]-[負荷分散]を選択します。
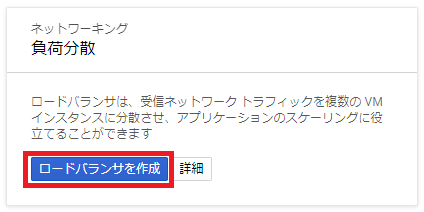
「ロードバランサを作成」ボタンをクリックします。
「TCP 負荷分散」の「設定を開始」ボタンをクリックします。
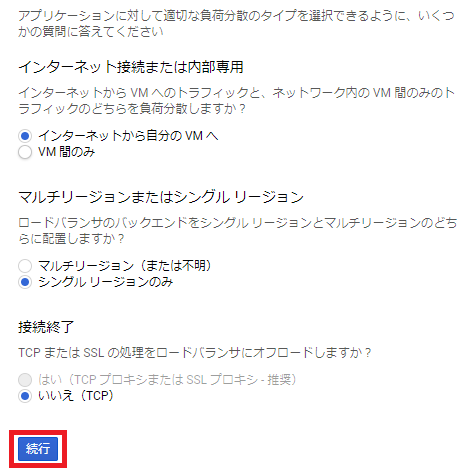
デフォルトの設定でよいので、「続行」ボタンをクリックします。
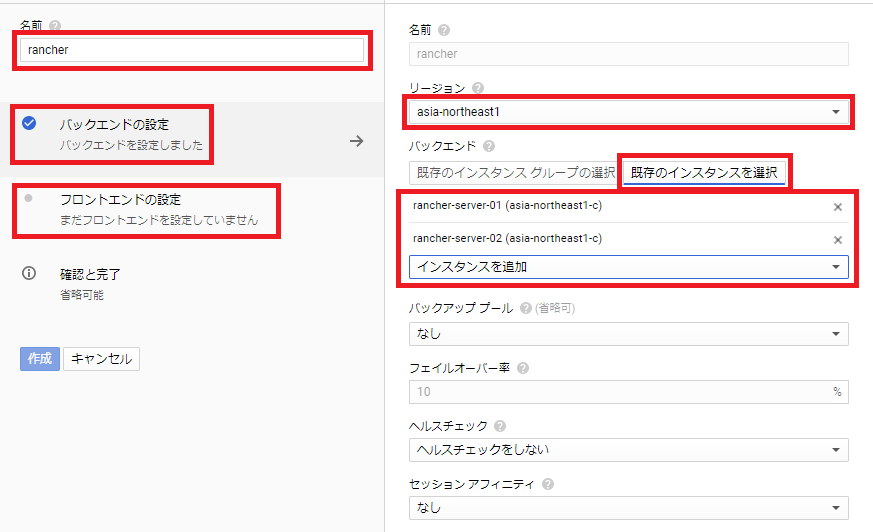
「名前」には、任意の名を入力します。「バックエンドの設定」を選択して、「リージョン」は、RancherServerホストのリージョンを選択します。「バックエンド」は、RancherServerの2ホストを追加します。最後に「フロントエンド」の設定を選択します。
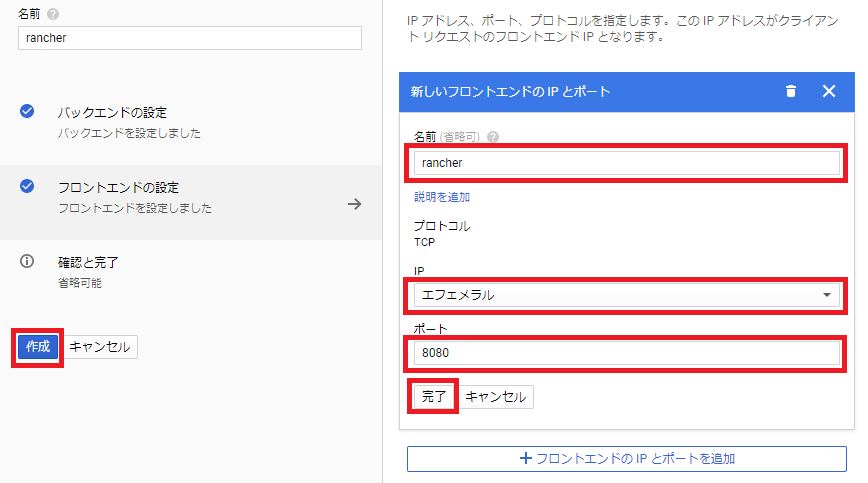
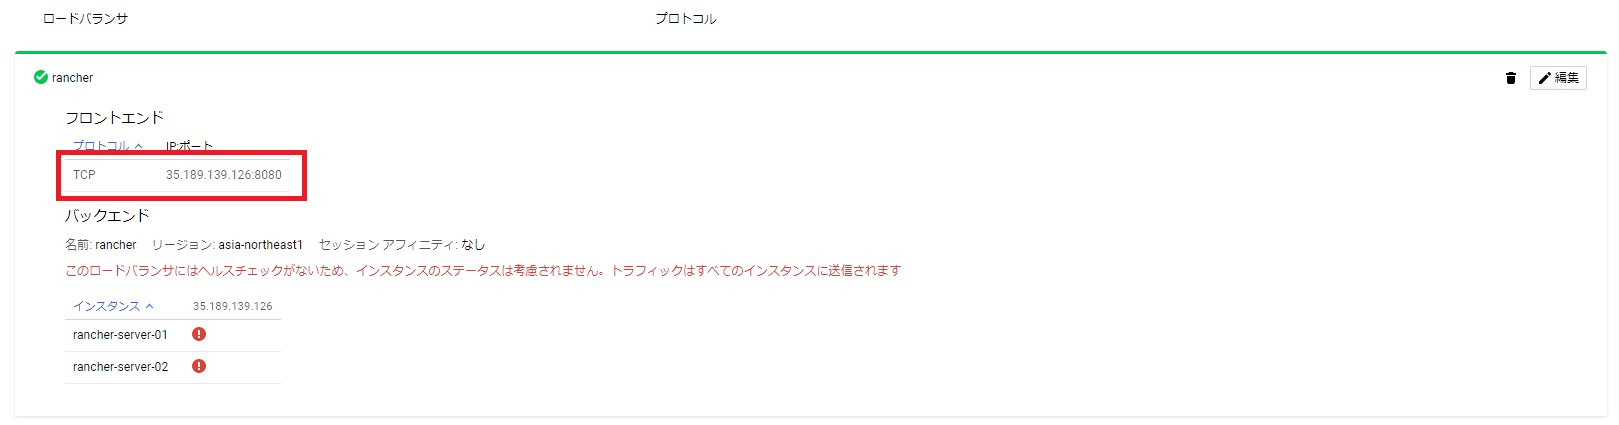
「名前」には、任意の名を入力します。「IP」は今回お試しということで動的にふられるエフェメラルにしますが、IPを作成して固定させても構いません。「ポート」を8080にして、「完了」ボタンをクリックして、最後に「作成」ボタンをクリックします。
赤枠のロードバランサの代表IP:8080にブラウザでアクセスします。
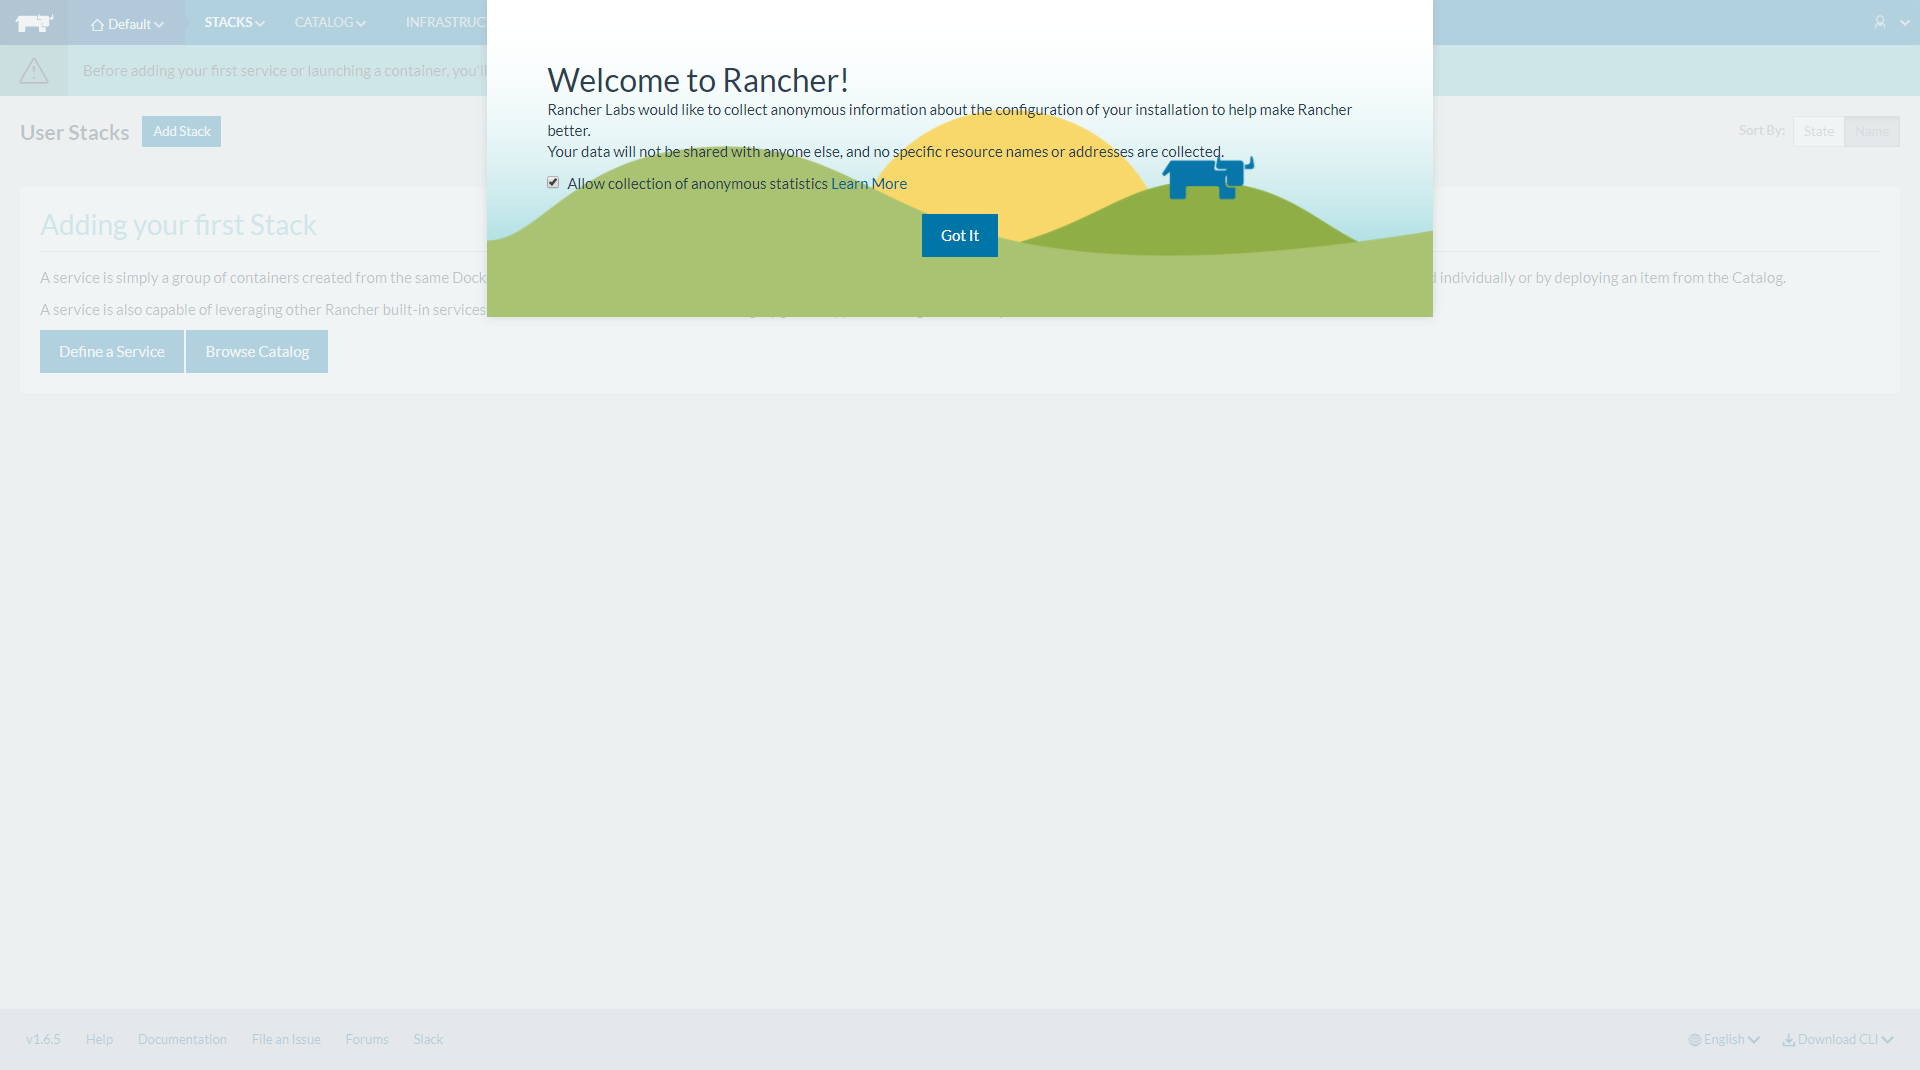
Rancher Serverの初期画面が表示されます。
6.ホスト追加して確認
ロードバランサから接続し、ホストを追加した後、個別に2台のRancher Serverに接続して、ホストが追加されていることを確認します。
ロードバランサ経由

Rancher-Server-01

Rancher-Server-02
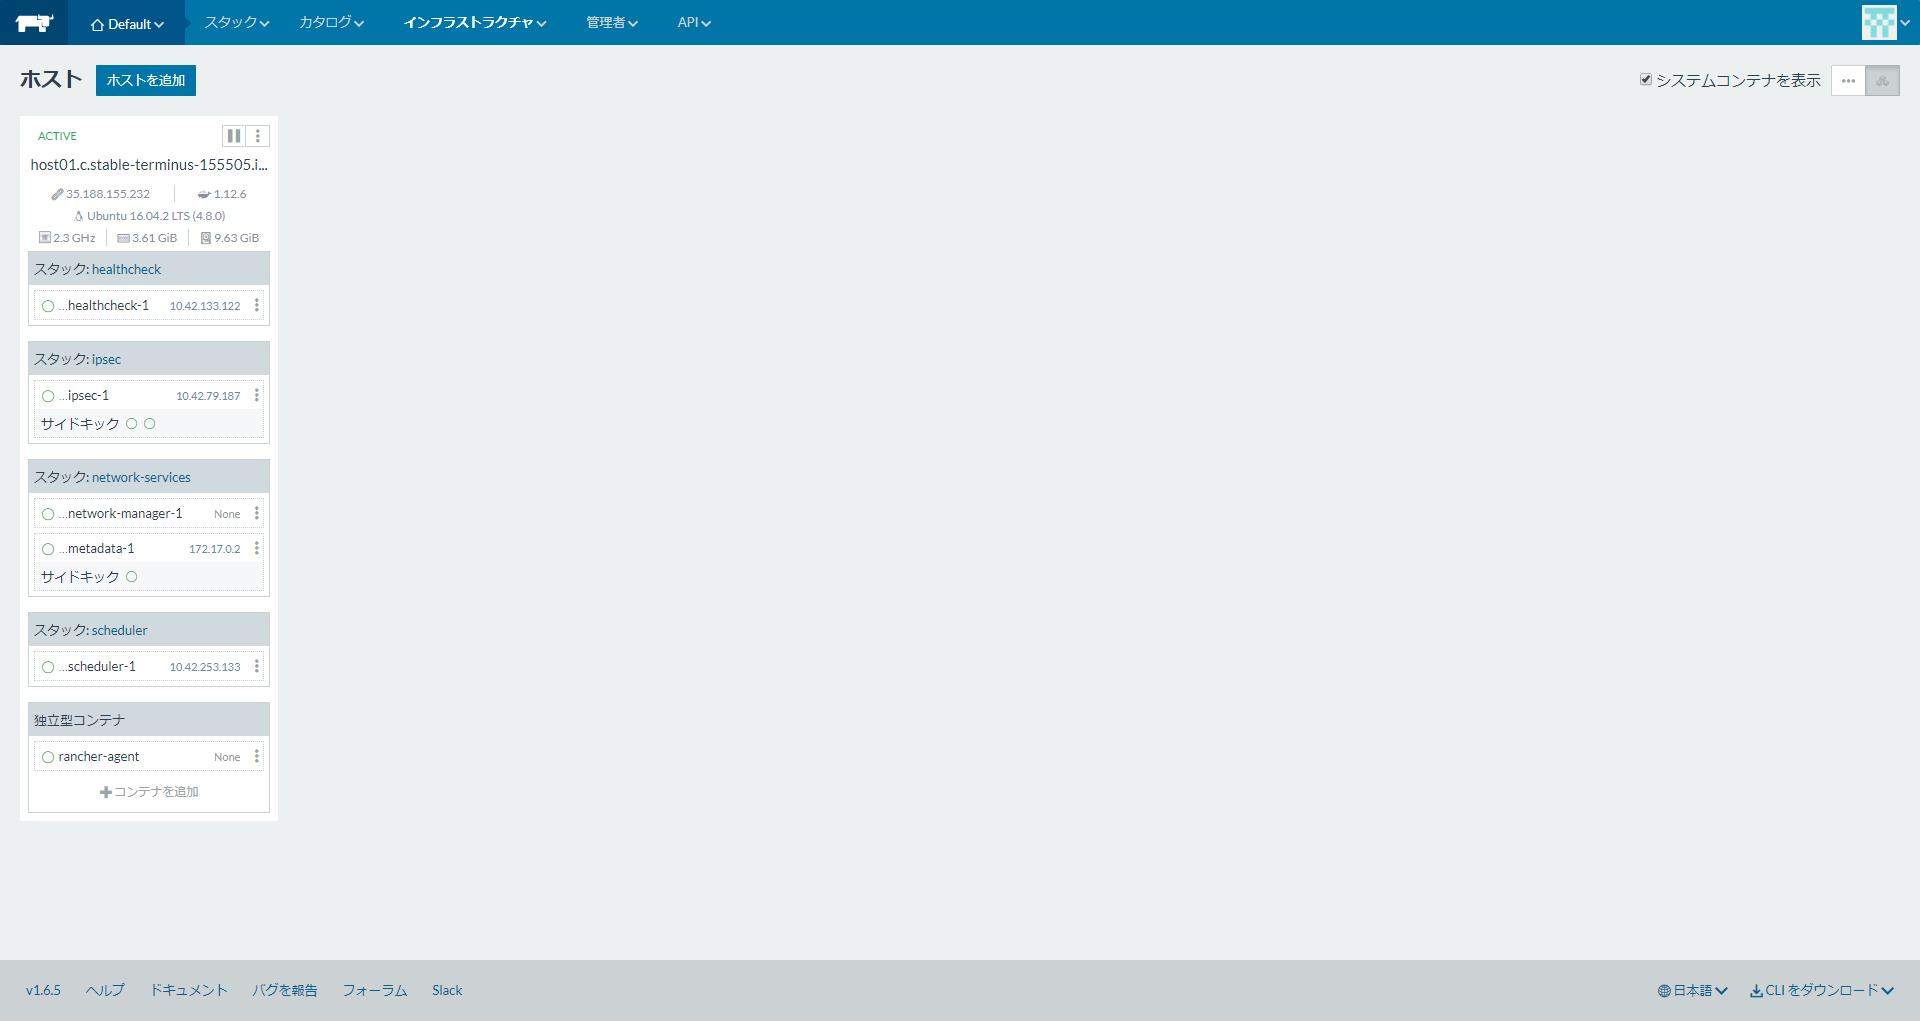
冗長されていることを確認できました。
7.その他
今回は2つのMySQL用ホストを用意し、さらにMySQLコンテナーでレプリケーション構成にしました。コンテナーの場合、勝手に落ちてしまう可能性もあるので、コンテナにせずにMySQLホストにすることやコンテナーにする場合もSlave側はvolumeを使ってDBをホストにマウントして、定期的にdumpしてバックアップを取得するなど、色々な構成を組めると思います。