初めに
こんにちは。CYBIRDエンジニア Advent Calendar
13日目の@cy-kenta-takahashiです。
新卒2年目でiOSアプリ開発を担当しております。
12日目は@Nate-River56さんのガトリング砲をぶっ放した話でした。
業務ではあまり関わりはないのですが、キャラの個性とテッキーさに度肝を抜かれる日々を過ごしています。
スプラトゥーンは既に手放しているので、お誘いは見なかったことにします。
内容について
今回はUIPageViewControllerを使った漫画ビューアの実装について記載します。
画面回転時の見開き表示がメインになりますので、見開き表示させたくない方は見なくても実装できると思います。
基本的な設定から
新規プロジェクト作成からテンプレートを「Page-Based Application」を選んで作成しましょう。
まずは日本の漫画ビューア向けの設定からしていきましょう。
- (void)viewDidLoad {
    [super viewDidLoad];

    // デフォルトは左開きなので、日本向けに右開きへ変更
    NSMutableDictionary *opt = [NSMutableDictionary dictionary];
    [opt setObject:[NSString stringWithFormat:@"%ld", (long)UIPageViewControllerSpineLocationMax] forKey:UIPageViewControllerOptionSpineLocationKey];

    // ページめくり型からスクロール型へと変更
    self.pageViewController = [[UIPageViewController alloc]    initWithTransitionStyle:UIPageViewControllerTransitionStyleScroll navigationOrientation:UIPageViewControllerNavigationOrientationHorizontal options:opt];

    // (以下省略)
}
// 日本向けの右開きに変更したため、ページ加算の扱いを入れ替える
- (UIViewController *)pageViewController:(UIPageViewController *)pageViewController viewControllerBeforeViewController:(UIViewController *)viewController {
    NSUInteger index = [self indexOfViewController:(DataViewController *)viewController];
    if (index == NSNotFound) {
        return nil;
    }

    index++;
    if (index == [self.pageData count]) {
        return nil;
    }
    return [self viewControllerAtIndex:index storyboard:viewController.storyboard];
}

- (UIViewController *)pageViewController:(UIPageViewController *)pageViewController viewControllerAfterViewController:(UIViewController *)viewController {
    NSUInteger index = [self indexOfViewController:(DataViewController *)viewController];
    if ((index == 0) || (index == NSNotFound)) {
        return nil;
    }

    index--;
    return [self viewControllerAtIndex:index storyboard:viewController.storyboard];
}
UIPageViewControllerの罠
さて、お次は見開き設定を加えましょう。
# pragma mark - UIPageViewController delegate methods

- (UIPageViewControllerSpineLocation)pageViewController:(UIPageViewController *)pageViewController spineLocationForInterfaceOrientation:(UIInterfaceOrientation)orientation {
お、回転周りを良しなにしてくれそうなDelegateがありますね。
UIPageViewControllerSpineLocationMidを返せば見開き表示になりそうですね。
さすがAppleさん。一応使い方を見に行きましょう。
// Delegate may specify a different spine location for after the interface orientation change. Only sent for transition style 'UIPageViewControllerTransitionStylePageCurl'.
// Delegate may set new view controllers or update double-sided state within this method's implementation as well.
うん、ページめくり型の設定でしか使えないみたいですね。
早くアップデートでスクロール型にも対応してほしいですね。Appleさん。
というわけで独自の実装を加えていきましょう。
デフォルトで入っているViewとLabelは削除してベースとなるViewの背景色を黒色にします。
回転制御
まずは端末の回転制御を加えていきましょう。
- (BOOL)shouldAutorotate {
	// 回転許可
	return YES;
}

- (UIInterfaceOrientationMask)supportedInterfaceOrientations {
	// 回転方向
	return UIInterfaceOrientationMaskAll;
}

- (void)viewWillTransitionToSize:(CGSize)size withTransitionCoordinator:(id<UIViewControllerTransitionCoordinator>)coordinator {
	// 回転開始時に呼ばれる
	[super viewWillTransitionToSize:size withTransitionCoordinator:coordinator];

	[coordinator animateAlongsideTransition:^(id<UIViewControllerTransitionCoordinatorContext>  _Nonnull context) {
		// ヘッダーやフッターを実装する際はここで非表示にする方が良い
	} completion:^(id<UIViewControllerTransitionCoordinatorContext>  _Nonnull context) {
		// 回転後のページ番号を取得し、設定する
		NSInteger pageNo = [self.modelController indexOfViewController:[self.pageViewController.viewControllers objectAtIndex:0]];

		DataViewController *startingViewController = [self.modelController viewControllerAtIndex:pageNo storyboard:self.storyboard];
		NSArray *viewControllers = @[startingViewController];
		[self.pageViewController setViewControllers:viewControllers direction:UIPageViewControllerNavigationDirectionForward animated:NO completion:nil];
    }];
}
見開き表示対応
回転制御が出来たので、後はそれぞれに端末向きによって挙動を変化させるだけですね。
ここから少し厄介な設計になります。もうちょっと綺麗にまとめたいですね...。
ここ以降で出てくる「spreadFlag」という変数は巻表紙の有無です。
ここでは必要となる場所で仮の値を入れていますが、本来は漫画データを管理するクラスを作成して取得するようにしましょう。
まずは先ほどRootViewControllerに記載した箇所に見開き表示時の制御を追記します。
- (void)viewWillTransitionToSize:(CGSize)size withTransitionCoordinator:(id<UIViewControllerTransitionCoordinator>)coordinator {
	// 回転開始時に呼ばれる
	[super viewWillTransitionToSize:size withTransitionCoordinator:coordinator];

	[coordinator animateAlongsideTransition:^(id<UIViewControllerTransitionCoordinatorContext>  _Nonnull context) {
		// ヘッダーやフッターを実装する際はここで非表示にする
	} completion:^(id<UIViewControllerTransitionCoordinatorContext>  _Nonnull context) {
		// 回転後のページ番号を取得し、設定する
		NSInteger pageNo = [self.modelController indexOfViewController:[self.pageViewController.viewControllers objectAtIndex:0]];
		UIInterfaceOrientation orientation = [[UIApplication sharedApplication] statusBarOrientation];
		BOOL spreadFlag = NO;

		switch (orientation) {
			case UIInterfaceOrientationUnknown:
			break;
			case UIInterfaceOrientationPortrait: {
				DataViewController *startingViewController = [self.modelController viewControllerAtIndex:pageNo storyboard:self.storyboard];
				NSArray *viewControllers = @[startingViewController];
				[self.pageViewController setViewControllers:viewControllers direction:UIPageViewControllerNavigationDirectionForward animated:NO completion:nil];
			}
			break;
			case UIInterfaceOrientationPortraitUpsideDown: {
				DataViewController *startingViewController = [self.modelController viewControllerAtIndex:pageNo storyboard:self.storyboard];
				NSArray *viewControllers = @[startingViewController];
				[self.pageViewController setViewControllers:viewControllers direction:UIPageViewControllerNavigationDirectionForward animated:NO completion:nil];
			}
			break;
			case UIInterfaceOrientationLandscapeLeft: {
				if((spreadFlag && pageNo % 2 == 0 && pageNo != 0) || (!spreadFlag && pageNo % 2 != 0 && pageNo != 0)){
					// 見開き左ページ時、基準を右ページに合わせる
					// この処理をしないと「左基準見開きページ」「右基準見開きページ」が生成される時がある
					DataViewController *startingViewController = [self.modelController viewControllerAtIndex:pageNo - 1 storyboard:self.storyboard];
					NSArray *viewControllers = @[startingViewController];
					[self.pageViewController setViewControllers:viewControllers direction:UIPageViewControllerNavigationDirectionForward animated:NO completion:nil];
				}
				else {
					DataViewController *startingViewController = [self.modelController viewControllerAtIndex:pageNo storyboard:self.storyboard];
					NSArray *viewControllers = @[startingViewController];
					[self.pageViewController setViewControllers:viewControllers direction:UIPageViewControllerNavigationDirectionForward animated:NO completion:nil];
				}
			}
			break;
			case UIInterfaceOrientationLandscapeRight:
			{
				if((spreadFlag && pageNo % 2 == 0 && pageNo != 0) || (!spreadFlag && pageNo % 2 != 0 && pageNo != 0)){
					// 見開き左ページ時、基準を右ページに合わせる
					// この処理をしないと「左基準見開きページ」「右基準見開きページ」が生成される時がある
					DataViewController *startingViewController = [self.modelController viewControllerAtIndex:pageNo - 1 storyboard:self.storyboard];
					NSArray *viewControllers = @[startingViewController];
					[self.pageViewController setViewControllers:viewControllers direction:UIPageViewControllerNavigationDirectionForward animated:NO completion:nil];
				}
				else {
					DataViewController *startingViewController = [self.modelController viewControllerAtIndex:pageNo storyboard:self.storyboard];
					NSArray *viewControllers = @[startingViewController];
					[self.pageViewController setViewControllers:viewControllers direction:UIPageViewControllerNavigationDirectionForward animated:NO completion:nil];
				}
			}
			break;
		}
    }];
}
DataViewControllerにページ情報を渡すため、ヘッダーに追加をします。
@property (strong, nonatomic) id dataObject;
@property (strong, nonatomic) NSArray *dataObjectArray;
@property (nonatomic) NSUInteger index;
次に見開き時のページ表示を記載します。
漫画ビューアは巻表紙の有無によって見せ方が異なるので、その分岐も記載しておきましょう。
ここがなかなかに厄介でした。
今回は分かりやすく左ページを灰色、右ページを白色の背景にし、ページ中央にLabelを設置しています。
漫画ビューアではこの部分をImageViewにし、dataObjectから画像を取得するようにしましょう。
@interface DataViewController ()

@property (strong, nonatomic) UIView *rightPageView;
@property (strong, nonatomic) UIView *leftPageView;
@property (strong, nonatomic) UILabel *rightViewLabel;
@property (strong, nonatomic) UILabel *leftViewLabel;

@end

@implementation DataViewController

- (void)viewDidLoad {
	[super viewDidLoad];

	// ScrollViewにImageViewを追加する
	UIInterfaceOrientation orientation = [[UIApplication sharedApplication] statusBarOrientation];

	switch (orientation) {
		case UIInterfaceOrientationUnknown:
		break;
		case UIInterfaceOrientationPortrait:
		[self addViewWithScrollViewLongitudinal];
		break;
		case UIInterfaceOrientationPortraitUpsideDown:

		[self addViewWithScrollViewLongitudinal];
		break;
		case UIInterfaceOrientationLandscapeLeft:

		[self addViewWithScrollViewBeside];
		break;
		case UIInterfaceOrientationLandscapeRight:

		[self addViewWithScrollViewBeside];
		break;
	}
}
- (void)addViewWithScrollViewLongitudinal {
	// 縦
	CGRect rightViewRect = CGRectMake(0, 0, self.view.frame.size.width, self.view.frame.size.height);
	_rightPageView = [[UIView alloc] initWithFrame:rightViewRect];
	_rightPageView.backgroundColor = [UIColor whiteColor];
	CGRect rightLabelRect = CGRectMake(rightViewRect.size.width / 2 - 60, rightViewRect.size.height / 2 - 25, 120, 50);
	_rightViewLabel = [[UILabel alloc] initWithFrame:rightLabelRect];
	_rightViewLabel.text = _dataObject;
	_rightViewLabel.textAlignment = NSTextAlignmentCenter;
	[_rightPageView addSubview:_rightViewLabel];
	[self.view addSubview:_rightPageView];
}
- (void)addViewWithScrollViewBeside {
	// 巻表紙の有無を取得する
	BOOL spreadFlag = NO;

	// 横
	if((_index == 0 && spreadFlag) || (_index == [_dataObjectArray count] - 1 && (([_dataObjectArray count] % 2 == 0 && spreadFlag) || ([_dataObjectArray count] % 2 != 0 && !spreadFlag)))) {
		// コミック表紙があり最初のページ or 最後のページが1枚(表紙の有無で最終ページ判断が変わる)
		// 縦画面と同様のレイアウトを使用する
		if(_index == 0) {
			// 最初のページ
			CGRect leftViewRect;
			if(self.view.frame.size.height < self.view.frame.size.width) {
				// 縦に合わせる
				leftViewRect = CGRectMake((self.view.frame.size.width / 2) - ((771 * self.view.frame.size.height) / 1200), 0,
											(771 * self.view.frame.size.height) / 1200, self.view.frame.size.height);
			}
			else {
				// 横に合わせる
				leftViewRect = CGRectMake(0, (self.view.frame.size.height / 2) - (((1200 * (self.view.frame.size.width / 2)) / 771) / 2),
											self.view.frame.size.width / 2, (1200 * (self.view.frame.size.width / 2)) / 771);
			}

			_leftPageView = [[UIView alloc] initWithFrame:leftViewRect];
			_leftPageView.backgroundColor = [UIColor grayColor];
			CGRect leftLabelRect = CGRectMake(leftViewRect.size.width / 2 - 60, leftViewRect.size.height / 2 - 25, 120, 50);
			_leftViewLabel = [[UILabel alloc] initWithFrame:leftLabelRect];
			_leftViewLabel.text = _dataObject;
			_leftViewLabel.textAlignment = NSTextAlignmentCenter;
			[_leftPageView addSubview:_leftViewLabel];
			[self.view addSubview:_leftPageView];
		}
		else if(_index == [_dataObjectArray count] - 1) {
			CGRect rightViewRect;
			if(self.view.frame.size.height < self.view.frame.size.width) {
				// 縦に合わせる
				rightViewRect = CGRectMake(self.view.frame.size.width / 2, 0,
											(771 * self.view.frame.size.height) / 1200, self.view.frame.size.height);
			}
			else {
				// 横に合わせる
				rightViewRect = CGRectMake(self.view.frame.size.width / 2, (self.view.frame.size.height / 2) - (((1200 * (self.view.frame.size.width / 2)) / 771) / 2),
											self.view.frame.size.width / 2, (1200 * (self.view.frame.size.width / 2)) / 771);
			}

			_rightPageView = [[UIView alloc] initWithFrame:rightViewRect];
			_rightPageView.backgroundColor = [UIColor whiteColor];
			CGRect rightLabelRect = CGRectMake(rightViewRect.size.width / 2 - 60, rightViewRect.size.height / 2 - 25, 120, 50);
			_rightViewLabel = [[UILabel alloc] initWithFrame:rightLabelRect];
			_rightViewLabel.text = _dataObject;
			_rightViewLabel.textAlignment = NSTextAlignmentCenter;
			[_rightPageView addSubview:_rightViewLabel];
			[self.view addSubview:_rightPageView];
		}
	}
	else {
		if(_index == [_dataObjectArray count] - 1 && (([_dataObjectArray count] % 2 != 0 && spreadFlag) || ([_dataObjectArray count] % 2 == 0 && !spreadFlag))) {
		// index値が最後のページ and 見開きの左ページ
		// 縦画面:最後のページ → 端末回転 → 見開き表示の際に見開き左ページを1度参照するのでエラー回避用
		return;
		}

		// それ以外のページ
		CGRect rightViewRect;
		if(self.view.frame.size.height < self.view.frame.size.width) {
			// 縦に合わせる
			rightViewRect = CGRectMake(self.view.frame.size.width / 2, 0,
										(771 * self.view.frame.size.height) / 1200, self.view.frame.size.height);
		}
		else {
			// 横に合わせる
			rightViewRect = CGRectMake(self.view.frame.size.width / 2, (self.view.frame.size.height / 2) - (((1200 * (self.view.frame.size.width / 2)) / 771) / 2),
										self.view.frame.size.width / 2, (1200 * (self.view.frame.size.width / 2)) / 771);
		}

		_rightPageView = [[UIView alloc] initWithFrame:rightViewRect];
		_rightPageView.backgroundColor = [UIColor whiteColor];
		CGRect rightLabelRect = CGRectMake(rightViewRect.size.width / 2 - 60, rightViewRect.size.height / 2 - 25, 120, 50);
		_rightViewLabel = [[UILabel alloc] initWithFrame:rightLabelRect];
		_rightViewLabel.text = _dataObject;
		_rightViewLabel.textAlignment = NSTextAlignmentCenter;
		[_rightPageView addSubview:_rightViewLabel];
		[self.view addSubview:_rightPageView];

		CGRect leftViewRect;
		if(self.view.frame.size.height < self.view.frame.size.width) {
			// 縦に合わせる
			leftViewRect = CGRectMake((self.view.frame.size.width / 2) - ((771 * self.view.frame.size.height) / 1200), 0,
										(771 * self.view.frame.size.height) / 1200, self.view.frame.size.height);
		}
		else {
			// 横に合わせる
			leftViewRect = CGRectMake(0, (self.view.frame.size.height / 2) - (((1200 * (self.view.frame.size.width / 2)) / 771) / 2),
										self.view.frame.size.width / 2, (1200 * (self.view.frame.size.width / 2)) / 771);
		}

		_leftPageView = [[UIView alloc] initWithFrame:leftViewRect];
		_leftPageView.backgroundColor = [UIColor grayColor];
		CGRect leftLabelRect = CGRectMake(leftViewRect.size.width / 2 - 60, leftViewRect.size.height / 2 - 25, 120, 50);
		_leftViewLabel = [[UILabel alloc] initWithFrame:leftLabelRect];
		_leftViewLabel.text = _dataObjectArray[_index + 1];
		_leftViewLabel.textAlignment = NSTextAlignmentCenter;
		[_leftPageView addSubview:_leftViewLabel];
		[self.view addSubview:_leftPageView];
	}
}
そして最後にModelControllerにて見開き時のページ番号の取り扱いも追記します。
- (DataViewController *)viewControllerAtIndex:(NSUInteger)index storyboard:(UIStoryboard *)storyboard {
	// Return the data view controller for the given index.
	if (([self.pageData count] == 0) || (index >= [self.pageData count])) {
		return nil;
	}

	// Create a new view controller and pass suitable data.
	DataViewController *dataViewController = [storyboard instantiateViewControllerWithIdentifier:@"DataViewController"];
	dataViewController.dataObject = self.pageData[index];
	dataViewController.dataObjectArray = self.pageData;
	dataViewController.index = index;
	return dataViewController;
}

- (UIViewController *)pageViewController:(UIPageViewController *)pageViewController viewControllerBeforeViewController:(UIViewController *)viewController {
	NSUInteger index = [self indexOfViewController:(DataViewController *)viewController];
	if (index == NSNotFound) {
		return nil;
	}

	index++;

	UIInterfaceOrientation orientation = [[UIApplication sharedApplication] statusBarOrientation];
	BOOL spreadFlag = NO;

	switch (orientation) {
		case UIInterfaceOrientationUnknown:
		break;
		case UIInterfaceOrientationPortrait:
		break;
		case UIInterfaceOrientationPortraitUpsideDown:
		break;
		case UIInterfaceOrientationLandscapeLeft:
			if(spreadFlag && index != 1 && index % 2 == 0) {
				index++;
			}
			else if(!spreadFlag && (index % 2 != 0 )) {
				index++;
			}
		break;
		case UIInterfaceOrientationLandscapeRight:
			if(spreadFlag && index != 1 && index % 2 == 0) {
				index++;
			}
			else if(!spreadFlag && (index % 2 != 0 )) {
				index++;
			}
		break;
	}

	if (index == [self.pageData count]) {
		return nil;
	}
	return [self viewControllerAtIndex:index storyboard:viewController.storyboard];
}

- (UIViewController *)pageViewController:(UIPageViewController *)pageViewController viewControllerAfterViewController:(UIViewController *)viewController {
	NSUInteger index = [self indexOfViewController:(DataViewController *)viewController];
	if ((index == 0) || (index == NSNotFound)) {
		return nil;
	}

	index--;

	UIInterfaceOrientation orientation = [[UIApplication sharedApplication] statusBarOrientation];
	BOOL spreadFlag = NO;
	switch (orientation) {
		case UIInterfaceOrientationUnknown:
		break;
		case UIInterfaceOrientationPortrait:
		break;
		case UIInterfaceOrientationPortraitUpsideDown:
		break;
		case UIInterfaceOrientationLandscapeLeft:
			if(index != 0 && ((spreadFlag && index % 2 == 0) || (!spreadFlag && index % 2 != 0))) {
 				index--;
			}
		break;
		case UIInterfaceOrientationLandscapeRight:
			if(index != 0 && ((spreadFlag && index % 2 == 0) || (!spreadFlag && index % 2 != 0))) {
				index--;
			}
		break;
	}

	return [self viewControllerAtIndex:index storyboard:viewController.storyboard];
}
動かしてみましょう
まずはspreadFlagをNOにした際の画面。
1ページ目
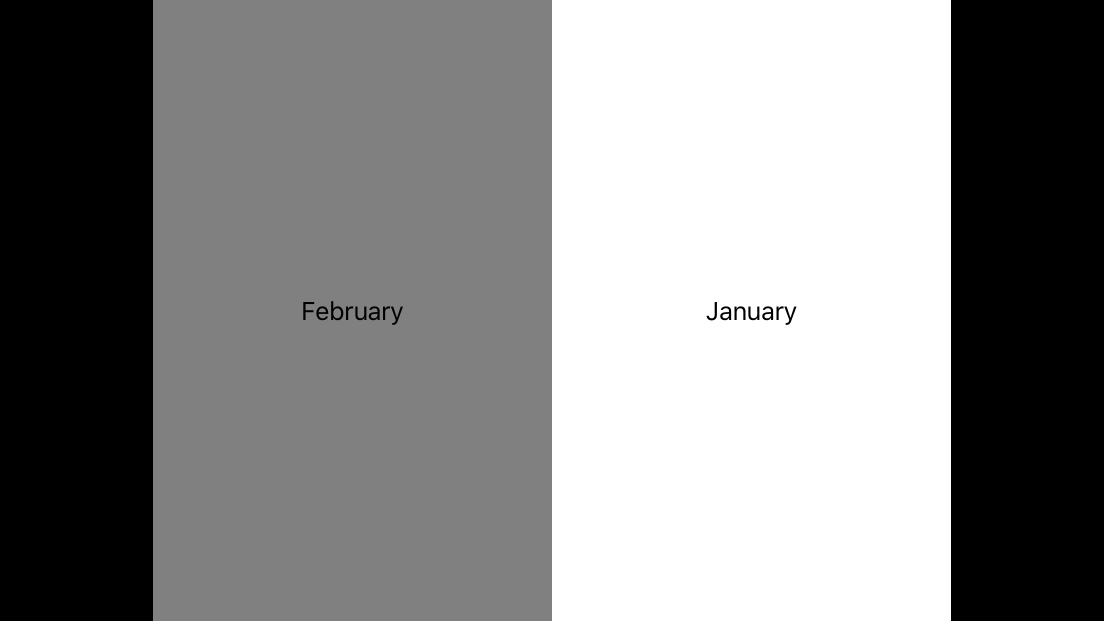
2ページ目

最終ページ

次にspreadFlagをYESにした際の画面。
1ページ目

2ページ目

最終ページ
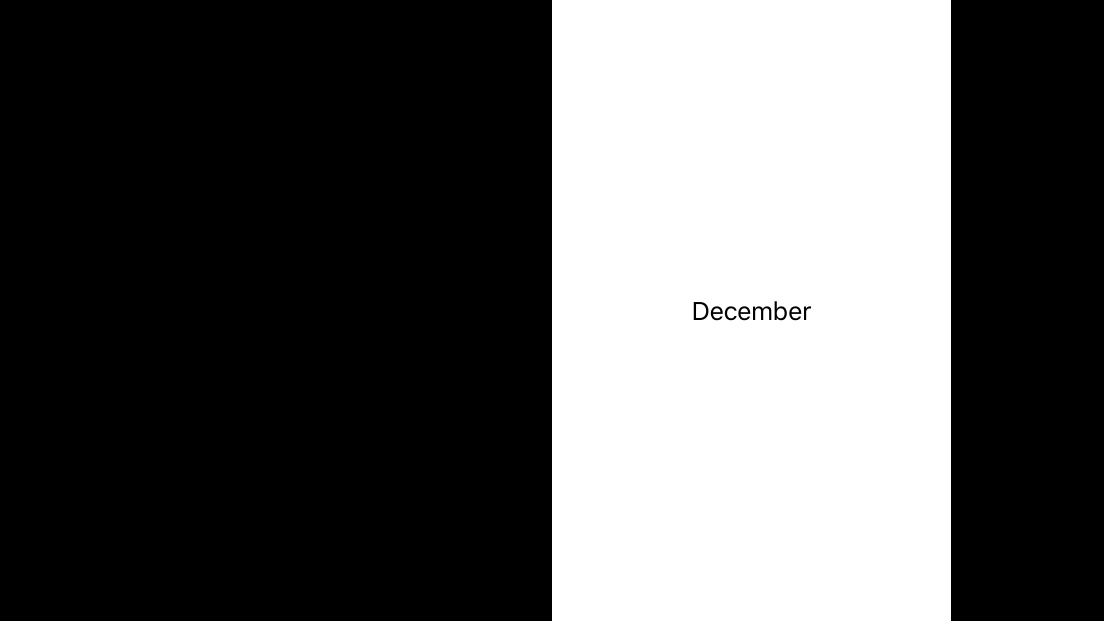
巻表紙が追加され、見開き時のページ表示が変わっているのが分かるかと思います。
最後に
いかがだったでしょうか?
UIPageViewControllerで漫画ビューアを実装したいけど、スクロール型の見開き表示に対応してなくて挫折する方は多いと思います。
(僕もUIScrollViewControllerで無理矢理やろうかと試行錯誤していました。)
漫画ビューアでは他にもヘッダー、フッター表示やタップ制御など、機能はたくさんありますので、またの機会に語れればなと思います。
まだまだ手の入れようがある設計かもしれませんが、少しでもみなさんの助けになると嬉しいです。
CYBIRDエンジニア Advent Calendar明日は、@kanachaさんの「Growth Push SDKのサポートが停止するらしいので、最新のGrowthbeat SDKに載せ変えようとしたらめちゃくちゃ苦戦した話」です!
去年に引き続き僕の同期です。少し言語のジャンルは違えど、同じアプリエンジニアとして、どういった点で苦戦したのか楽しみですね!