このレシピで作るもの
WebGL ライブラリの「GLBoost」と、3D 物理演算ライブラリである「Oimo.js」を用いてドミノ倒し風の年賀状を作ってみます。
※ この記事は、一昨年に「コードレシピ」で書いた「Three.js + Oimo.js でドミノっぽい年賀状を作ってみる」の GLBoost 移植版です。

準備するもの
今回必要なものは以下のようになります。
- glboost.js … 3D 表示ライブラリ
- oimo.js … 3D 物理演算ライブラリ
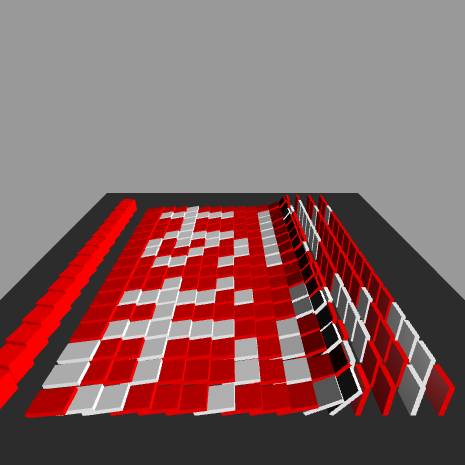
- 16x16サイズのドット絵
作っていくもの
今回のレシピで作っていくファイルは以下のようになります。
- index.html
- index.js
index.html を作る
index.html を以下のように記述してください。
<!-- oimo.js 1.2 -->
<script src="http://jsrun.it/assets/a/E/n/5/aEn5I"></script>

<!-- glboost.js r1 -->
<script src="https://cdn.rawgit.com/emadurandal/GLBoost/revision/r1/build/glboost.js"></script>

<canvas id="world"></canvas>
index.js を書いていく
雛形コピーした後、dataSet ~ の箇所に、ドット絵を描いていきます。
"白" は白色、"赤" は赤色といった感じです。
// □□□■□□□□□□□□□□□□
// □■■■■■■□□■□□□■□□
// □□□■□□□□□■□■■■■■
// □□□■□□□□□■□□□■□□
// □□■■■■■□□■□□□■□□
// □■□■□■□■□■□□□■□□
// □■□□■□□■□■□□□■□□
// □□■■□□■□□■□□■□□□
// □□□□□□□□□□□□□□□□
// □□□■□□■□□□□□□□□□
// □■■■■■□■□□■□□■□□
// □□□■□□□□□□■■■■■□
// □■■■■■■□□■□■□■□■
// ■□□■□□□■□■□■□■□■
// ■□□■□□□■□■□□■□□■
// □■■□□□■□□□■■□□■□
var dataSet = [
    "赤","赤","赤","白","赤","赤","赤","赤","赤","赤","赤","赤","赤","赤","赤","赤",
    "赤","白","白","白","白","白","白","赤","赤","白","赤","赤","赤","白","赤","赤",
    "赤","赤","赤","白","赤","赤","赤","赤","赤","白","赤","白","白","白","白","白",
    "赤","赤","赤","白","赤","赤","赤","赤","赤","白","赤","赤","赤","白","赤","赤",
    "赤","赤","白","白","白","白","白","赤","赤","白","赤","赤","赤","白","赤","赤",
    "赤","白","赤","白","赤","白","赤","白","赤","白","赤","赤","赤","白","赤","赤",
    "赤","白","赤","赤","白","赤","赤","白","赤","白","赤","赤","赤","白","赤","赤",
    "赤","赤","白","白","赤","赤","白","赤","赤","白","赤","赤","白","赤","赤","赤",
    "赤","赤","赤","赤","赤","赤","赤","赤","赤","赤","赤","赤","赤","赤","赤","赤",
    "赤","赤","赤","白","赤","赤","白","赤","赤","赤","赤","赤","赤","赤","赤","赤",
    "赤","白","白","白","白","白","赤","白","赤","赤","白","赤","赤","白","赤","赤",
    "赤","赤","赤","白","赤","赤","赤","赤","赤","赤","白","白","白","白","白","赤",
    "赤","白","白","白","白","白","白","赤","赤","白","赤","白","赤","白","赤","白",
    "白","赤","赤","白","赤","赤","赤","白","赤","白","赤","白","赤","白","赤","白",
    "白","赤","赤","白","赤","赤","赤","白","赤","白","赤","赤","白","赤","赤","白",
    "赤","白","白","赤","赤","赤","白","赤","赤","赤","白","白","赤","赤","白","赤"
];
表示までの流れ
Oimo.js を用いた、物理演算コードの基本的な流れとしては、
- 物理演算の準備を行う
- 物理演算用のオブジェクトを設定する(形とサイズと位置を指定)
- 表示用のオブジェクトを設定する(形と色とサイズと位置を指定)
という感じです。
function init() {
      :
    // 物理演算の準備
    world = new OIMO.World();

    // 床を作成する
    createGround();

    // ドミノを作成する
    createDomino();

    // ドミノ碑を倒す為の立方体を配置する
    createCube();
      :
}
function createGround() {
    // 床の物理演算用のオブジェクトを設定
    var ground = new OIMO.Body({
        size: [400, 40, 400],
        pos: [0, -50, 0],
        world: world
    });

    // 表示用のオブジェクトを設定
    var geometry = glBoostContext.createCube(new GLBoost.Vector3(400, 40, 400), new GLBoost.Vector4(0.2, 0.2, 0.2, 1));
    var material = glBoostContext.createClassicMaterial();
    material.shaderClass = GLBoost.LambertShader;
    var mesh = glBoostContext.createMesh(geometry, material);
    mesh.translate.y -= 50;
    mesh.dirty = true;
    scene.addChild( mesh );
}
おわりに
以上でドミノっぽい年賀状の完成です。
おつかれさまでした。