ディープラーニングで落書きを消す
先日畳み込みオートエンコーダでノイズ除去を行いましたが、そのときの課題は再現された画像が滲んでしまっていたことです。
今回はもう少し改良して、オートエンコーダやCNNで落書きを消してみようと思います。
ライブラリにはKerasを使います。
データセットはCifar10を使います。
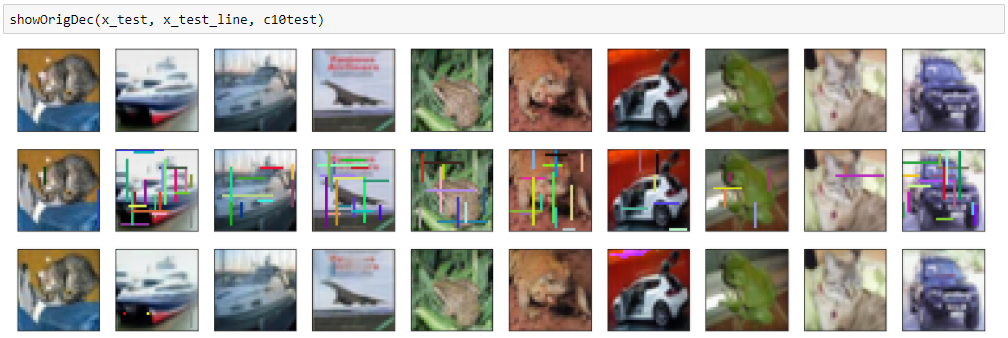
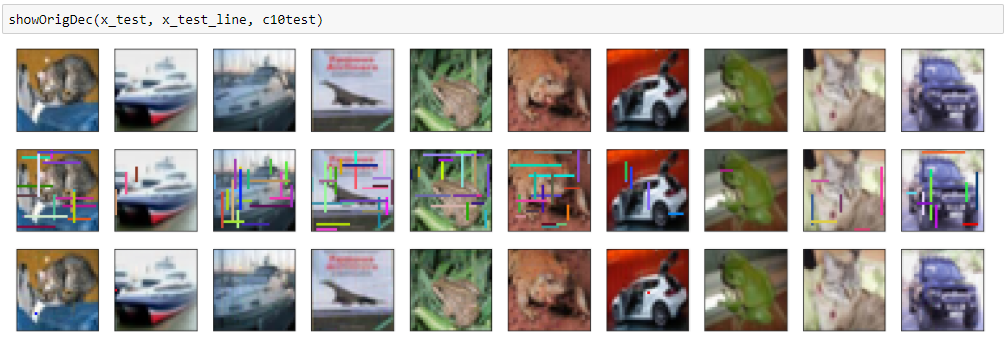
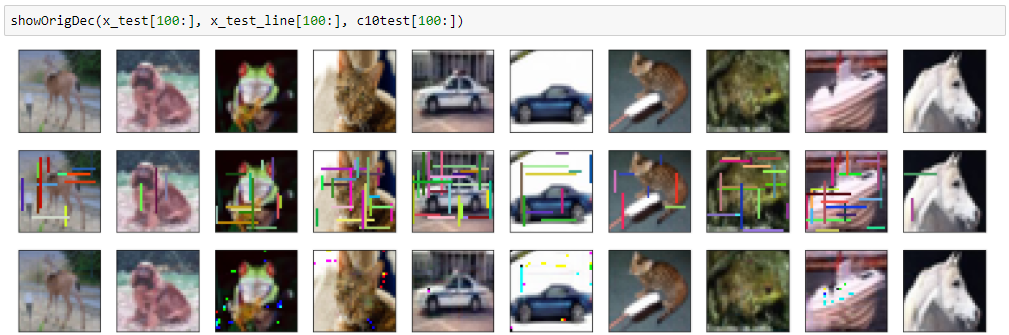
Cifar10にランダムに棒線で落書きします。
棒線の色は黒バージョンとランダム色バージョンを作りました。
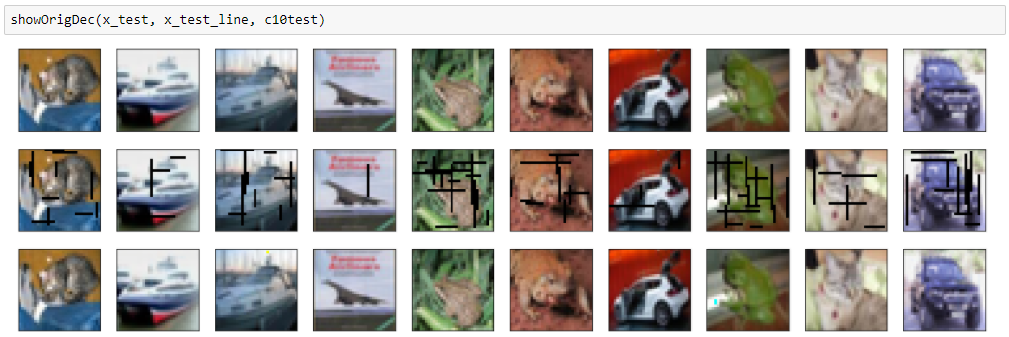
黒バージョン
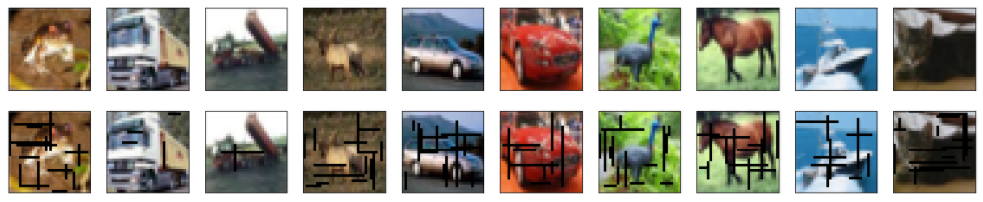
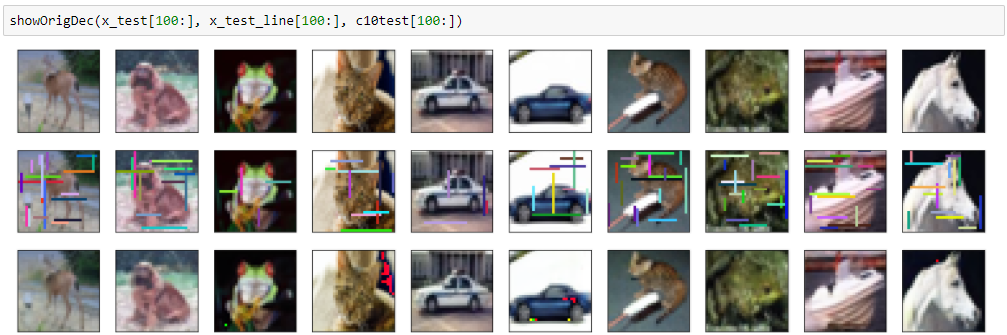
ランダム色バージョン
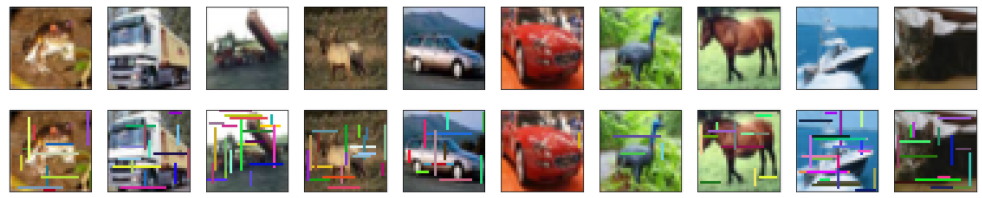
この棒線を消して元画像を再現するよう、ディープラーニングで学習します。
トレーニングデータ50,000点の落書き除去を学習し、テストデータ10,000点の落書き除去&元画像再現性を評価します。
再現性の評価関数はmean squared errorを使います。
落書きを消す手法として、オートエンコーダとCNNを試しました。
試した手法:
1. 畳み込みオートエンコーダ
2. 畳み込みオートエンコーダ改良版
3. DNCNN
4. Win5-RB
コードは以下にあります。
https://github.com/shibuiwilliam/DeepLearningDenoise
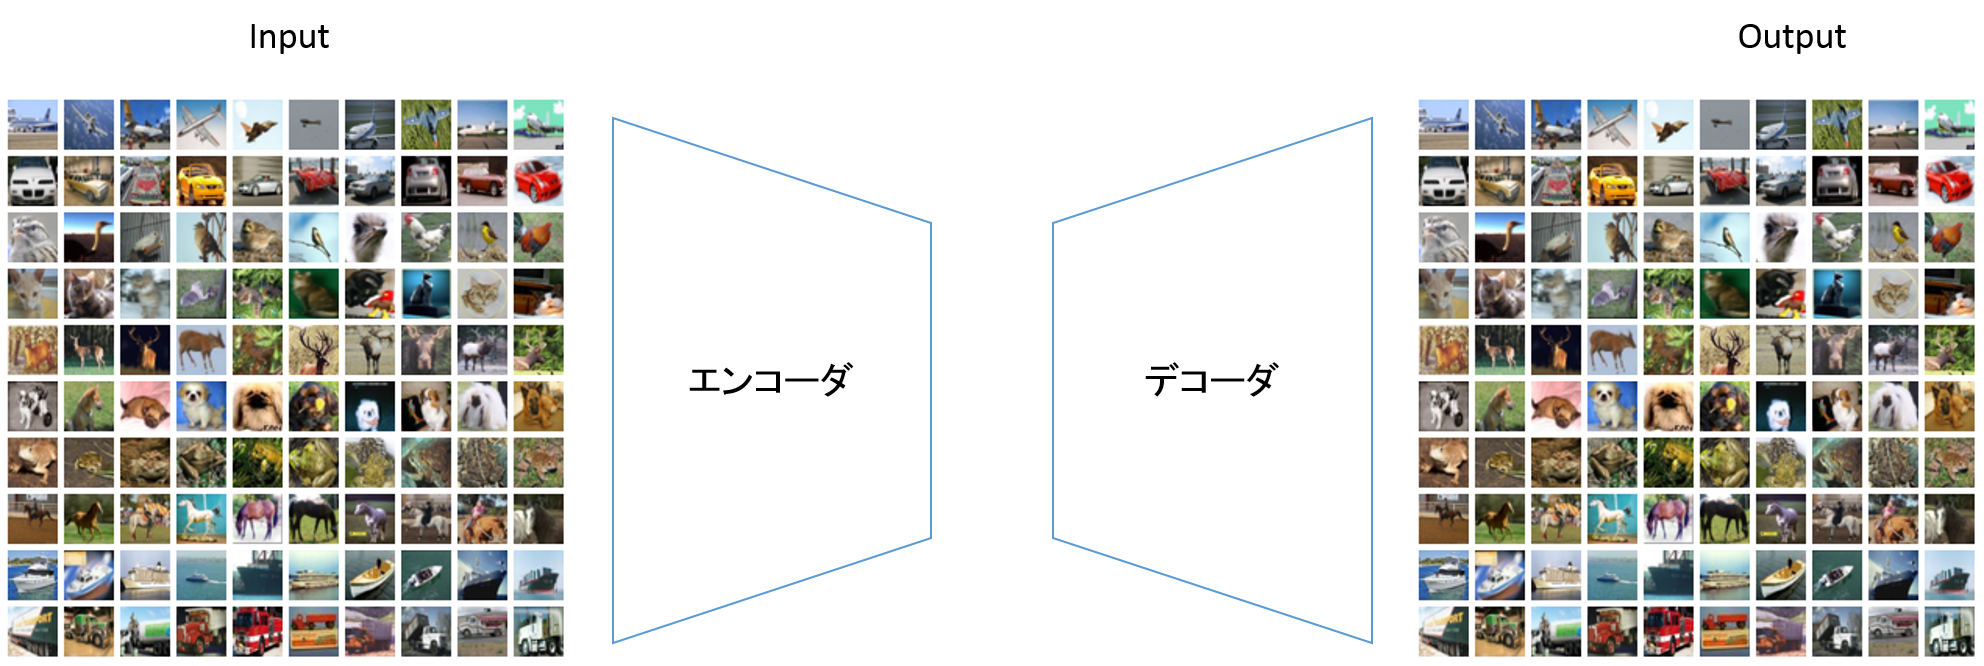
畳み込みオートエンコーダ
前回同様の畳み込みオートエンコーダです。
レイヤー定義
# encoder
input_img = Input(shape=(32, 32, 3))
x = Conv2D(32, (3, 3), padding='same')(input_img)
x = BatchNormalization()(x)
x = Activation('relu')(x)
x = MaxPooling2D((2, 2), padding='same')(x)
x = Conv2D(32, (3, 3), padding='same')(x)
x = BatchNormalization()(x)
x = Activation('relu')(x)
encoded = MaxPooling2D((2, 2), padding='same')(x)

# decoder
x = Conv2D(32, (3, 3), padding='same')(encoded)
x = BatchNormalization()(x)
x = Activation('relu')(x)
x = UpSampling2D((2, 2))(x)
x = Conv2D(32, (3, 3), padding='same')(x)
x = BatchNormalization()(x)
x = Activation('relu')(x)
x = UpSampling2D((2, 2))(x)
x = Conv2D(3, (3, 3), padding='same')(x)
x = BatchNormalization()(x)
decoded = Activation('sigmoid')(x)

# compile
model = Model(input_img, decoded)
model.compile(optimizer='adam', loss='mean_squared_error')

# options
es_cb = EarlyStopping(monitor='val_loss', patience=2, verbose=1, mode='auto')
chkpt = saveDir + 'AutoEncoder_Cifar10_deline_weights.{epoch:02d}-{loss:.2f}-{val_loss:.2f}.hdf5'
cp_cb = ModelCheckpoint(filepath = chkpt, monitor='val_loss', verbose=1, save_best_only=True, mode='auto')

# train
history = model.fit(x_train_line, x_train,
                    batch_size=batch_size,
                    epochs=epochs,
                    verbose=1,
                    validation_data=(x_test_line, x_test),
                    callbacks=[es_cb, cp_cb],
                    shuffle=True)
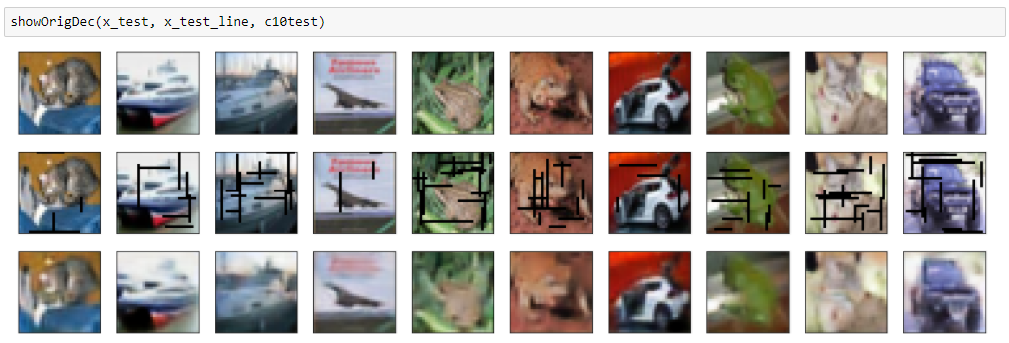
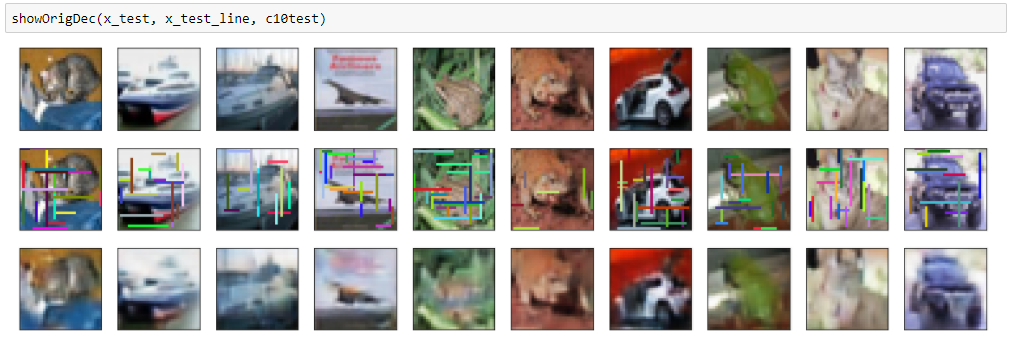
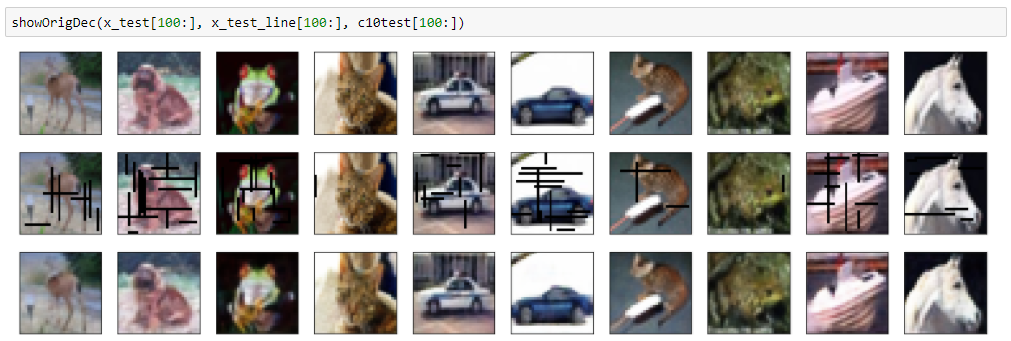
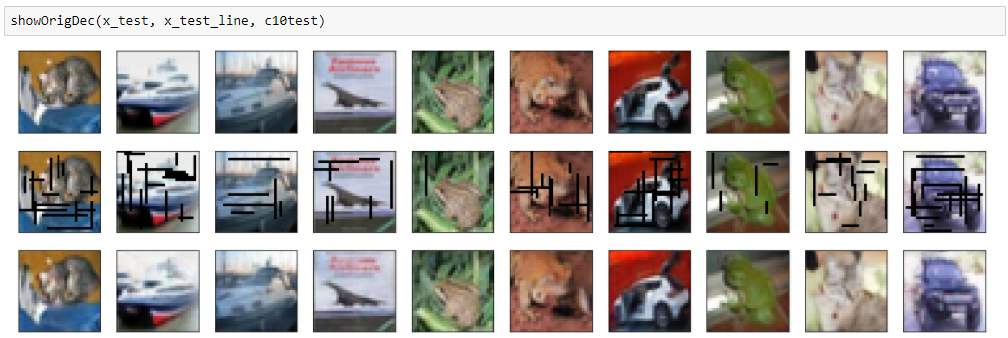
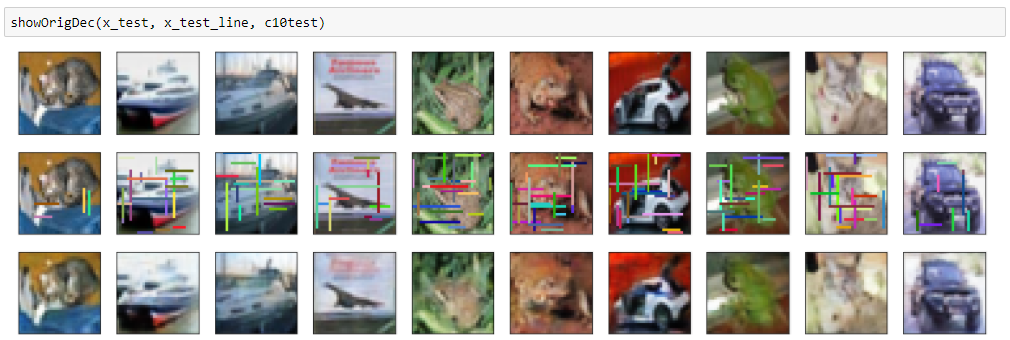
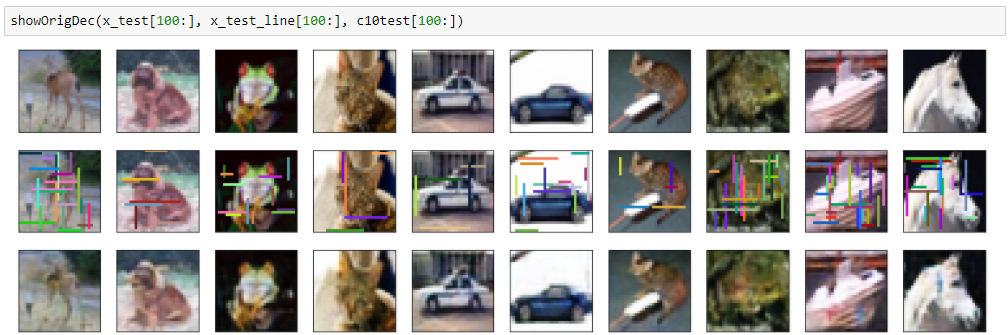
黒バージョンもランダム色バージョンも、やはり滲んでしまいます。
結果(黒バージョン)
mean squred error: 0.00251344182827
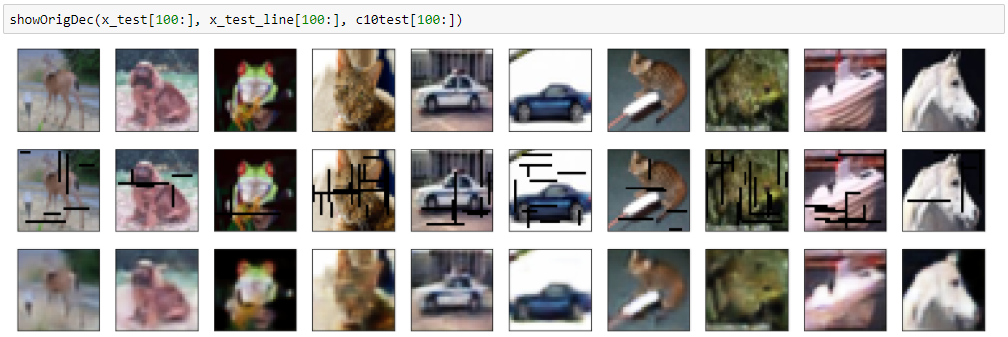
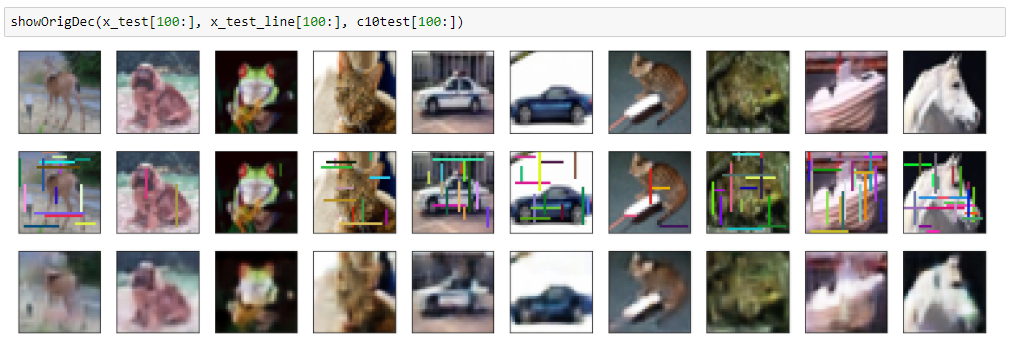
結果(ランダム色バージョン)
mean squred error: 0.00406358846352
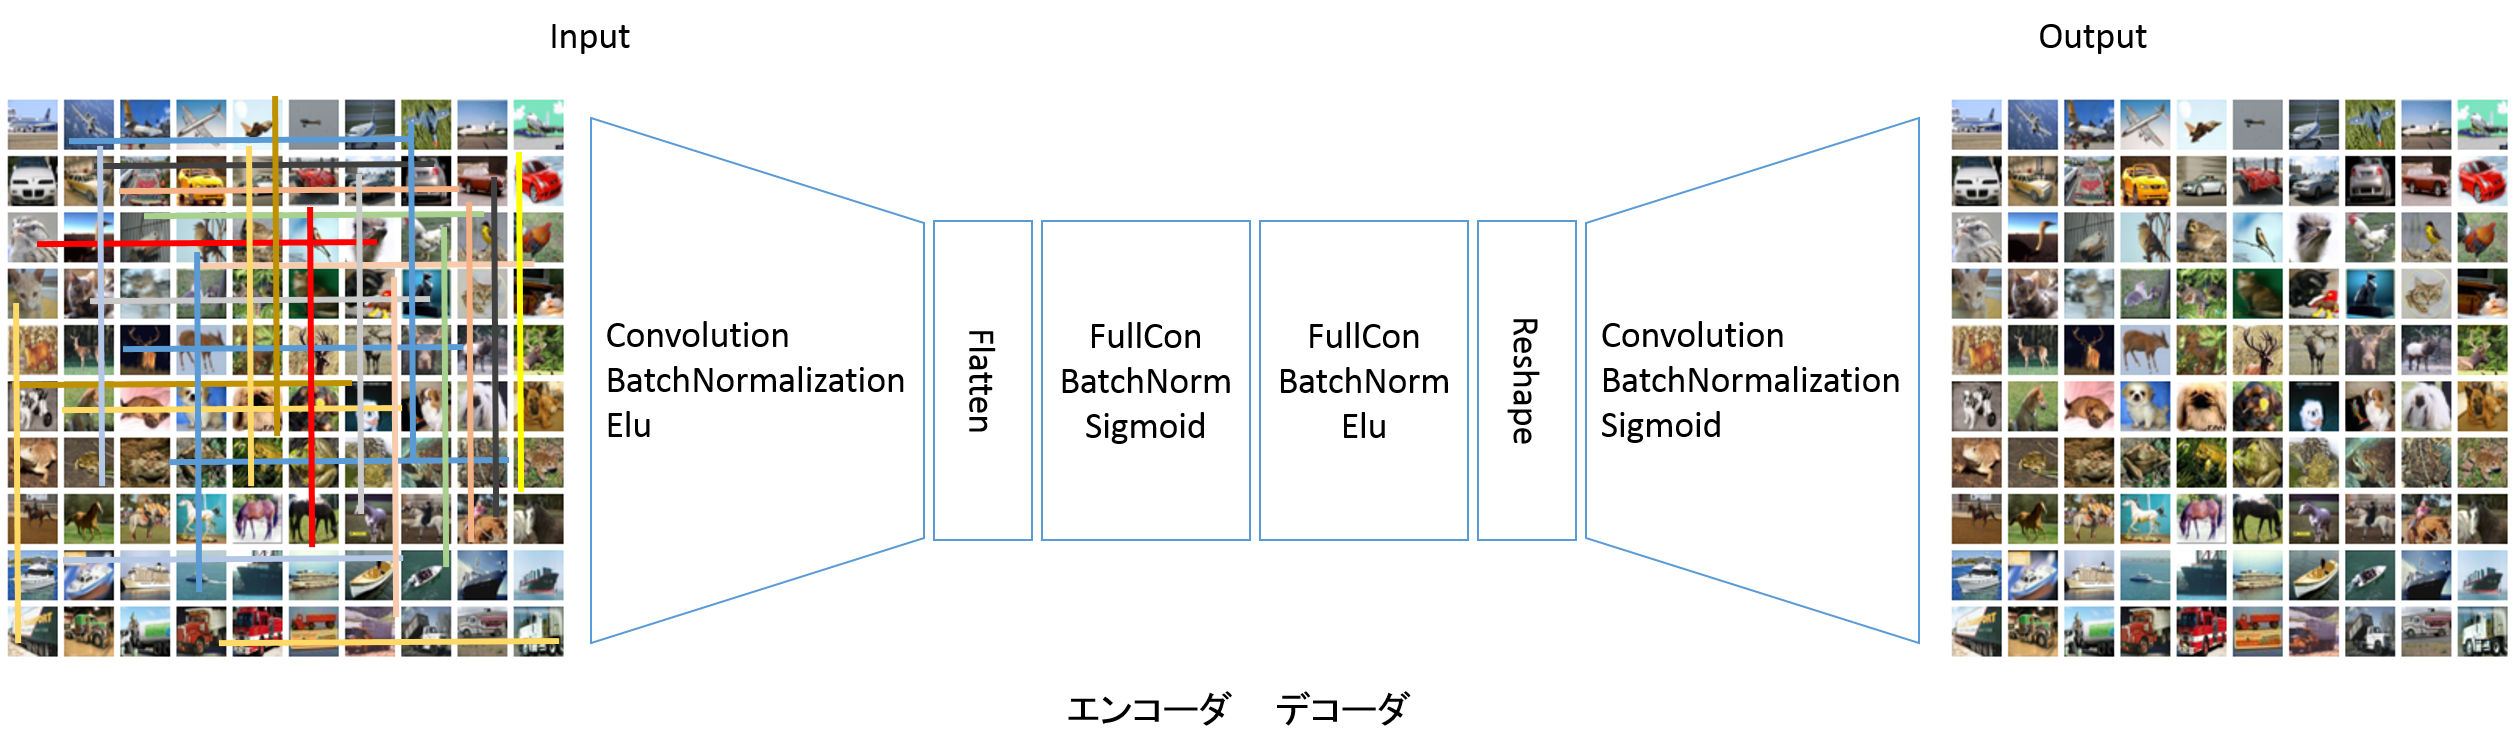
畳み込みオートエンコーダ改良版
畳み込みオートエンコーダを改良しました。こちらはエンコーダ・デコーダの間を全結合に変換して接続します。
レイヤー定義
# encoder
input_img = Input(shape=(32, 32, 3))
x = Conv2D(32, (3, 3), padding='same')(input_img)
x = BatchNormalization()(x)
x = Activation('elu')(x)
x = Conv2D(32, (3, 3), padding='same')(x)
x = BatchNormalization()(x)
x = Activation('elu')(x)
x = Conv2D(32, (3, 3), padding='same')(x)
x = BatchNormalization()(x)
x = Activation('elu')(x)
x = Flatten()(x)
x = Dense(3072)(x)
x = BatchNormalization()(x)
encoded = Activation('sigmoid')(x)

# decoder
x = Dense(3072)(encoded)
x = BatchNormalization()(x)
x = Activation('elu')(x)
x = Reshape((32,32,3))(x)
x = Conv2D(32, (3, 3), padding='same')(x)
x = BatchNormalization()(x)
x = Activation('elu')(x)
x = Conv2D(32, (3, 3), padding='same')(x)
x = BatchNormalization()(x)
x = Activation('elu')(x)
x = Conv2D(3, (3, 3), padding='same')(x)
x = BatchNormalization()(x)
decoded = Activation('sigmoid')(x)

# compile
model = Model(input_img, decoded)
model.compile(optimizer='adam', loss='mean_squared_error')

# options
es_cb = EarlyStopping(monitor='val_loss', patience=3, verbose=1, mode='auto')
chkpt = saveDir + 'AutoEncoder_Cifar10_delineBlack_CAE_weights.{epoch:02d}-{loss:.2f}-{val_loss:.2f}.hdf5'
cp_cb = ModelCheckpoint(filepath = chkpt, monitor='val_loss', verbose=1, save_best_only=True, mode='auto')

# train
history = model.fit(x_train_line, x_train,
                    batch_size=batch_size,
                    epochs=epochs,
                    verbose=1,
                    validation_data=(x_test_line, x_test),
                    callbacks=[es_cb, cp_cb],
                    shuffle=True)
こうするだけでも意外と再現性が向上するようです。
結果(黒バージョン)
mean squred error: 0.00139122980386
結果(ランダム色バージョン)
mean squred error: 0.00257390149683
多少滲んでしますが、前の畳み込みオートエンコーダよりはきれいに再現できています。
DNCNN
DNCNNはDenoising Convolutional Neural Network(ノイズ除去畳み込みニューラルネットワーク)という、その名のとおりのノイズ除去を目的としたCNNです。
https://arxiv.org/pdf/1608.03981v1.pdf
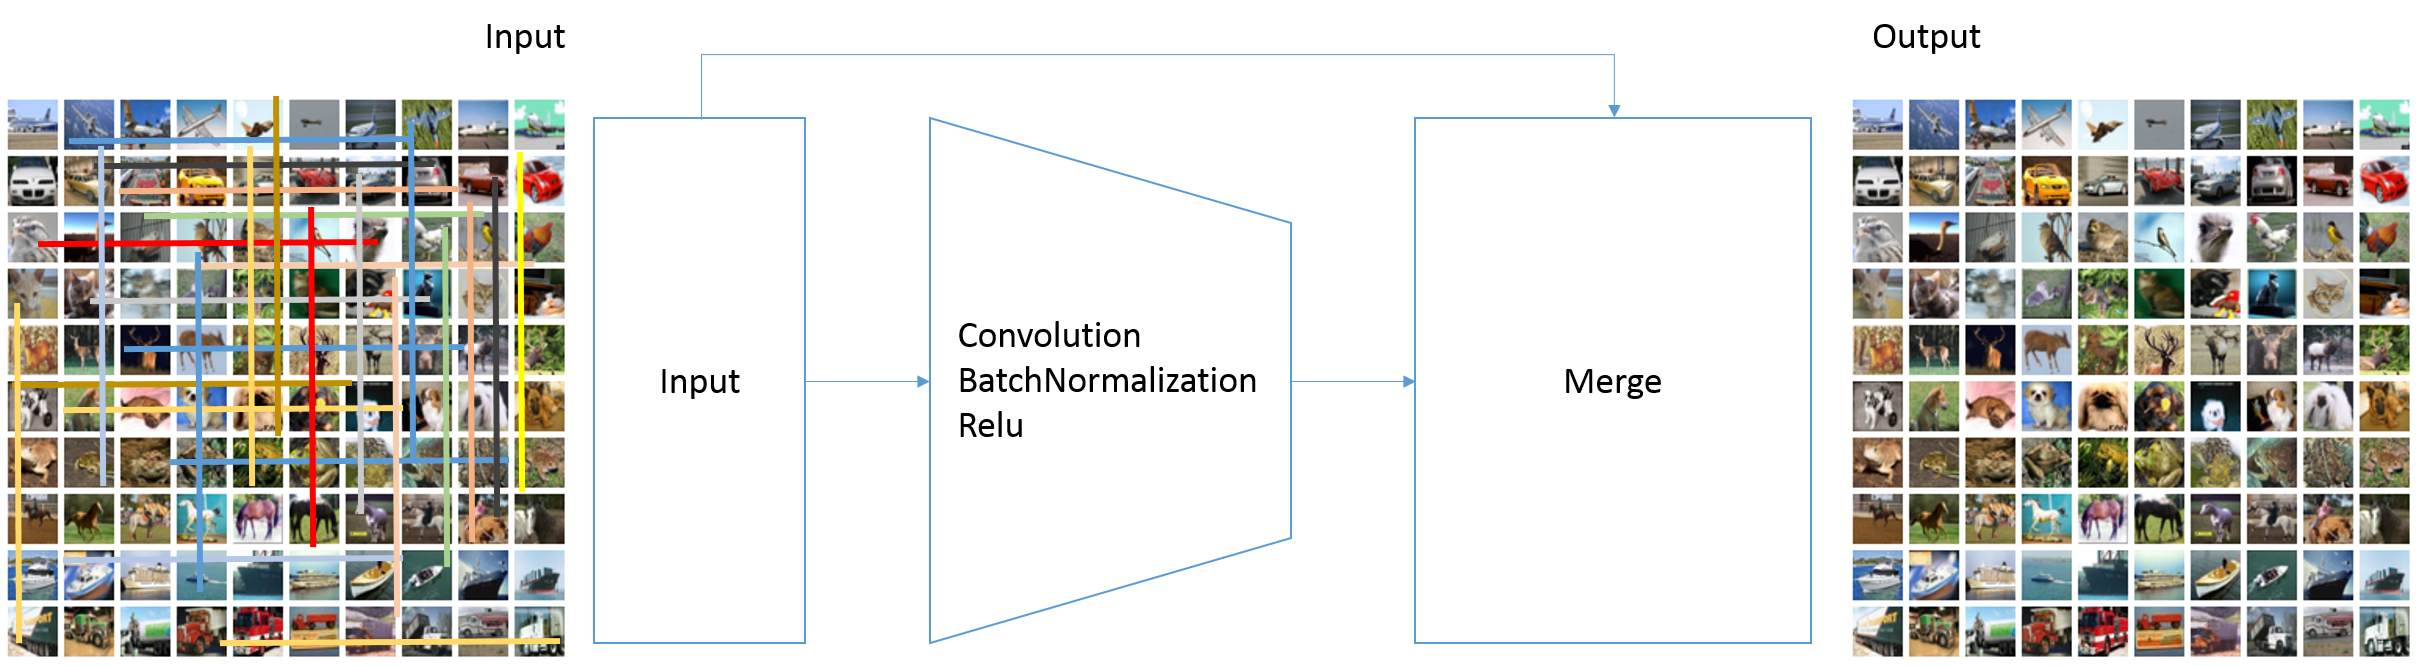
構造は以下のようなものです。
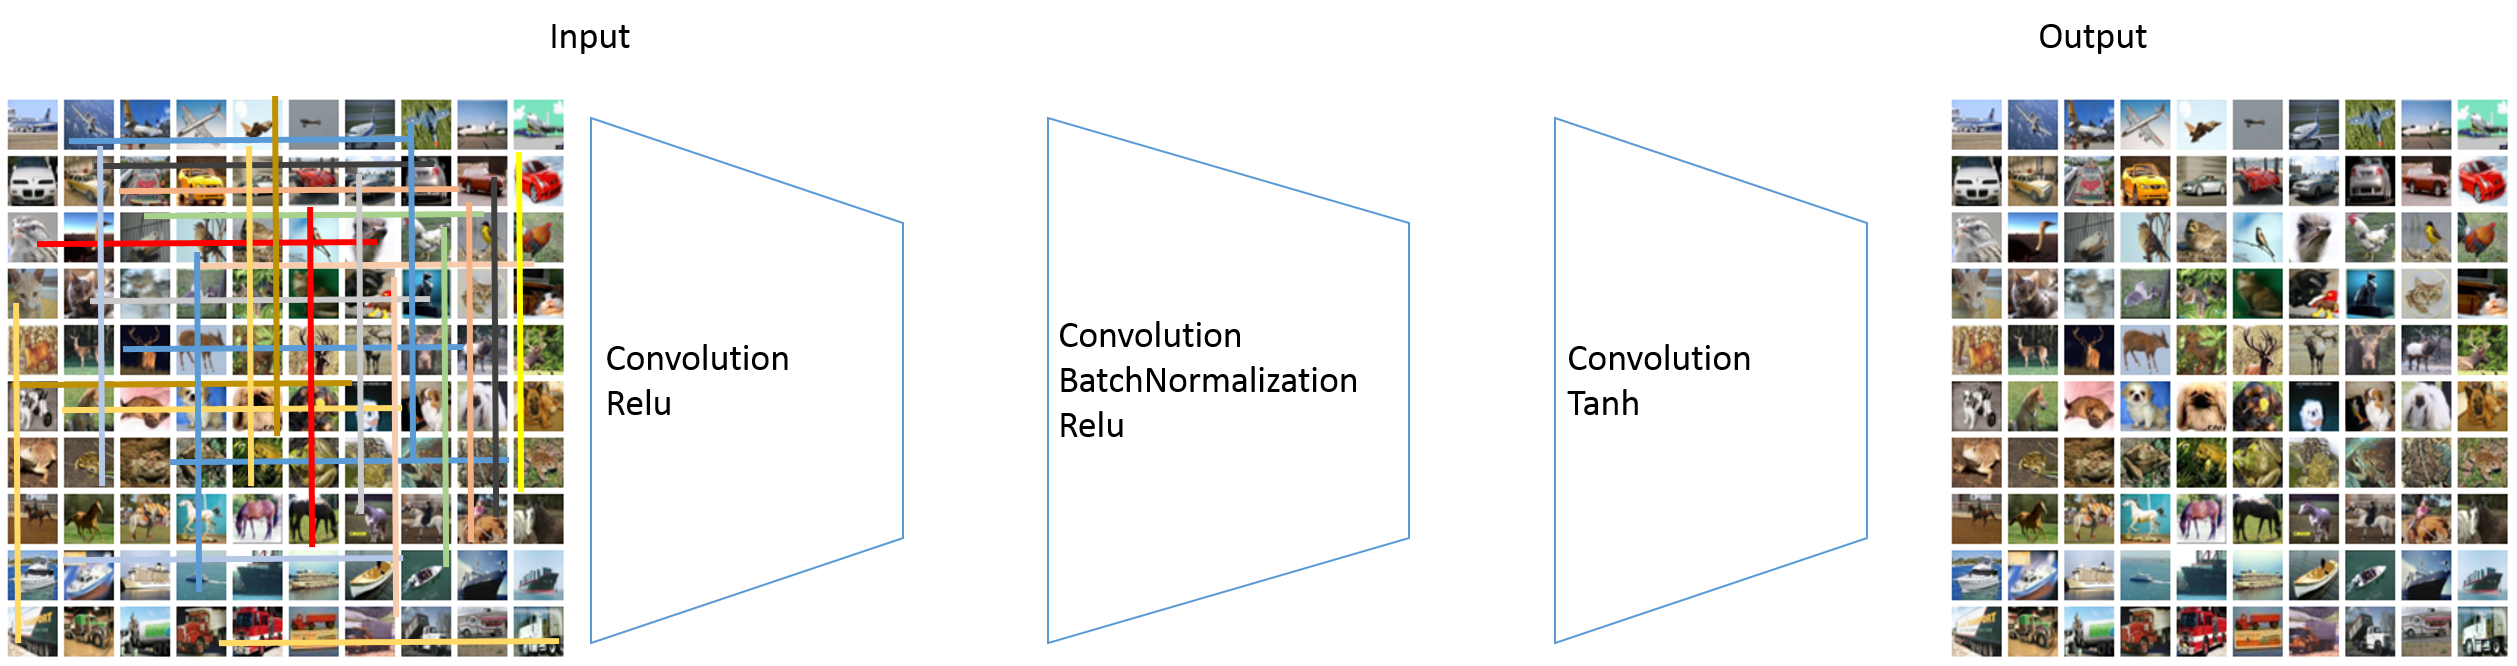
畳み込みとBatchNormalization、活性化関数Reluを重ねていき、最後の層だけ活性化関数Tanhを使います。
中間層が16層と厚い構成です。
レイヤー定義
# DNCNN
input_img = Input(shape=(32, 32, 3))
x = Conv2D(64, (3, 3), padding='same')(input_img)
x = Activation('relu')(x)

for i in range(15):
    x = Conv2D(64, (3, 3), padding='same')(x)
    x = BatchNormalization()(x)
    x = Activation('relu')(x)

x = Conv2D(3, (3, 3), padding='same')(x)
output_img = Activation('tanh')(x)

# compile
model = Model(input_img, output_img)
model.compile(optimizer='adam', loss='mean_squared_error')

# options
es_cb = EarlyStopping(monitor='val_loss', patience=2, verbose=1, mode='auto')
chkpt = saveDir + 'AutoEncoder_Cifar10_dncnn_weights.{epoch:02d}-{loss:.2f}-{val_loss:.2f}.hdf5'
cp_cb = ModelCheckpoint(filepath = chkpt, monitor='val_loss', verbose=1, save_best_only=True, mode='auto')

# train
history = model.fit(x_train_line, x_train,
                    batch_size=batch_size,
                    epochs=epochs,
                    verbose=1,
                    validation_data=(x_test_line, x_test),
                    callbacks=[es_cb, cp_cb],
                    shuffle=True)
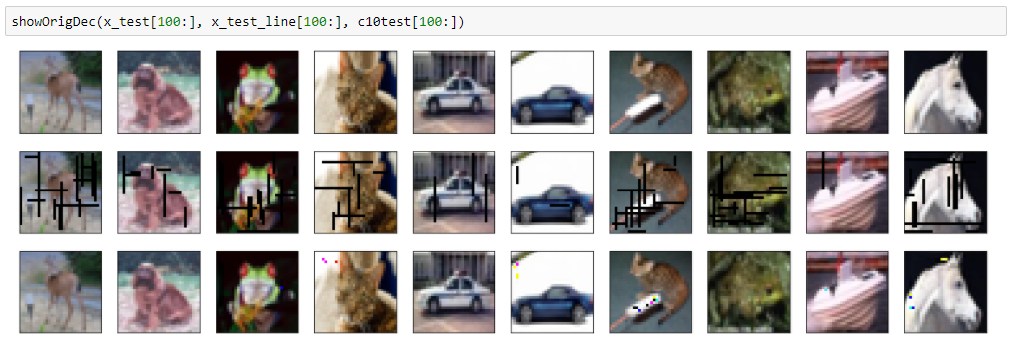
結果は以下のとおりで、大分きれいに落書きが消えて、画像も再現できています。
結果(黒バージョン)
mean squred error: 0.000638661881443
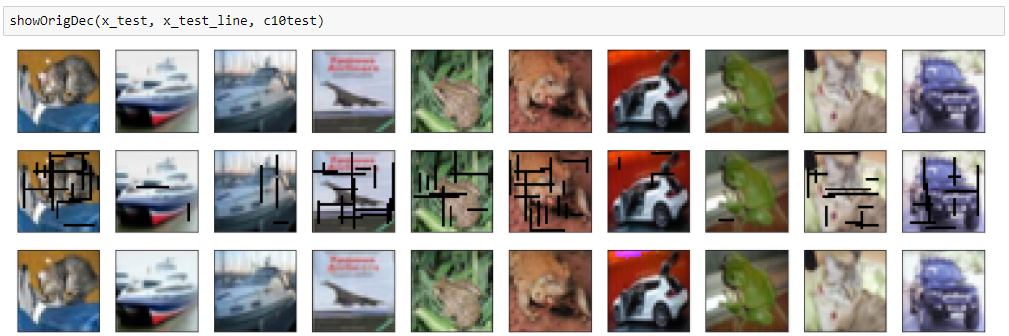
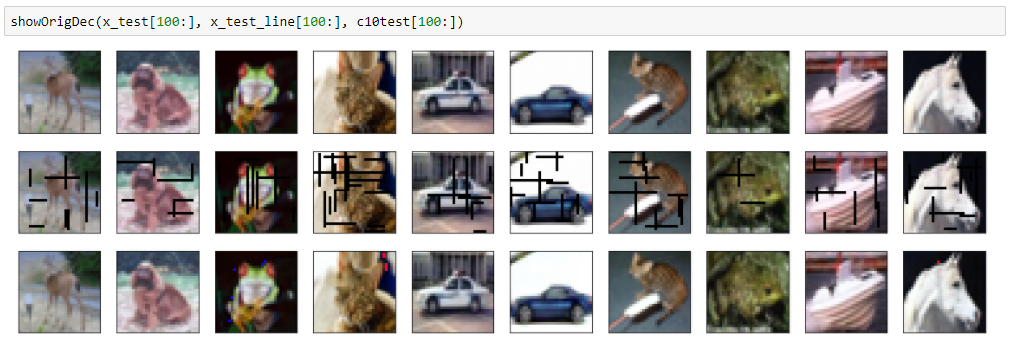
結果(ランダム色バージョン)
mean squared error: 0.000755158919282
ところどころ別のノイズが入ってしまっているのが難点です。
Win5-RB
Win5-RBはDNCNNをResnetにしたものです。
Win5-RBはWide Inference Network(Win)が5層構成で、Resnet(R)とBatchNormalization(B)を使っているという意味です。
https://arxiv.org/pdf/1707.05414.pdf
レイヤー定義
# Win5-RB
input_img = Input(shape=(32, 32, 3))
x = Conv2D(64, (7, 7), padding='same')(input_img)
x = BatchNormalization()(x)
x = Activation('relu')(x)

for i in range(3):
    x = Conv2D(64, (7, 7), padding='same')(x)
    x = BatchNormalization()(x)
    x = Activation('relu')(x)

x = Conv2D(3, (7, 7), padding='same')(x)
x = BatchNormalization()(x)
output_img = layers.add([x, input_img])

# compile
model = Model(input_img, output_img)
model.compile(optimizer='adam', loss='mean_squared_error')

# options
es_cb = EarlyStopping(monitor='val_loss', patience=2, verbose=1, mode='auto')
chkpt = saveDir + 'AutoEncoder_Cifar10_win5rb_weights.{epoch:02d}-{loss:.2f}-{val_loss:.2f}.hdf5'
cp_cb = ModelCheckpoint(filepath = chkpt, monitor='val_loss', verbose=1, save_best_only=True, mode='auto')

# train
history = model.fit(x_train_line, x_train,
                    batch_size=batch_size,
                    epochs=epochs,
                    verbose=1,
                    validation_data=(x_test_line, x_test),
                    callbacks=[es_cb, cp_cb],
                    shuffle=True)
評価関数的にはもっとも良い値を出しています。
結果(黒バージョン)
mean squred error: 0.000271678016009
結果(ランダム色バージョン)
mean squred error: 0.000558209863212
きれいに再現できていますが、DNCNN同様に違うノイズが入ってしまっています。
どうやらDNCNNもWin5RBも、真っ白い部分や真っ黒い部分にノイズが残ってしまうようです。
最後に
比較のため、それぞれの結果を並べて表示します。
評価関数
| 黒バージョン | ランダム色バージョン | |
|---|---|---|
| 畳み込みオートエンコーダ | 0.00251344182827 | 0.00406358846352 |
| 畳み込みオートエンコーダ改良版 | 0.00139122980386 | 0.00257390149683 |
| DNCNN | 0.000638661881443 | 0.000755158919282 |
| Win5-RB | 0.000271678016009 | 0.000558209863212 |
畳み込みオートエンコーダ
黒バージョン
ランダム色バージョン
畳み込みオートエンコーダ改良版
黒バージョン
ランダム色バージョン
DNCNN
黒バージョン
ランダム色バージョン
Win5-RB
黒バージョン
ランダム色バージョン