CentOSからKeras with CNTK backendを動かす
KerasがCNTKに対応しました。
https://docs.microsoft.com/en-us/cognitive-toolkit/Using-CNTK-with-Keras
インストールして動かしてみたので、手順を紹介します。
環境
CentOS7.3とPython3.5で、CPU onlyです。
マイクロソフトのサイトを見るとLinuxの環境構築方法はUbuntuだけしか書かれてませんが、Centos7.3でも無事に動きました。
(ボヤキ:ディープラーニング系はもはやUbuntu一強になってきましたね。)
CNTKのインストール
公式手順は以下にあります。
https://docs.microsoft.com/en-us/cognitive-toolkit/setup-linux-python?tabs=cntkpy21
ここではCentos7.3へのインストール方法を紹介します。
まずはAnaconda3をインストールします。
以下からバージョンを選んでインストールします。
https://www.continuum.io/downloads
コマンドラインでインストールする場合は以下でインストールできます。
wget https://repo.continuum.io/archive/Anaconda3-4.3.1-Linux-x86_64.sh
bash Anaconda3-4.3.1-Linux-x86_64.sh -b -p /opt/anaconda3
echo 'export PATH="/opt/anaconda3/bin:$PATH"' >> /etc/profile
source /etc/profile
CNTKにはOpenMPIが必要です。
CentOS7.3には以下でインストールし、環境変数も設定します。
yum -y install openmpi openmpi-devel
export PATH=/usr/lib64/openmpi/bin:$PATH
export LD_LIBRARY_PATH=/usr/lib64/openmpi/lib:$LD_LIBRARY_PATH
いよいよCNTKのインストールです。
pip installで環境にあわせたURLを指定します。
Linux、CPUonly、Python3.5だと以下になります。
pip install https://cntk.ai/PythonWheel/CPU-Only/cntk-2.1-cp35-cp35m-linux_x86_64.whl
指定するURLの一覧は以下にあります。
https://docs.microsoft.com/en-us/cognitive-toolkit/setup-linux-python?tabs=cntkpy21
インストールがうまくいけば以下でCNTKのバージョンを表示できます。
python -c "import cntk; print(cntk.__version__)"
サンプルプログラムとチュートリアルは以下で取得可能です。
python -m cntk.sample_installer
Kerasで使う
KerasでCNTKを使うにはバックエンドを変更する必要があります。
https://keras.io/ja/backend/
バックエンドは/User'sHOME/.keras/keras.jsonで変更しますが、この段階ではまだ.kerasディレクトリがありません。
一度PythonからKerasを呼び出して、作る必要があります。
python -c "import keras"
デフォルトではTensorFlowがバックエンドになっていると思います。
/User'sHOME/.keras/keras.jsonを編集します。
# 編集前
{
    "floatx": "float32",
    "image_data_format": "channels_last",
    "epsilon": 1e-07,
    "backend": "cntk"
}

# 編集後
{
    "floatx": "float32",
    "image_data_format": "channels_last",
    "epsilon": 1e-07,
    "backend": "cntk"
}
これでKerasをCNTKバックエンドで使うことができるようになります。
Jupyter Notebookでimport KerasをするとバックエンドがCNTKになっていることがわかります。
とりあえずMNIST
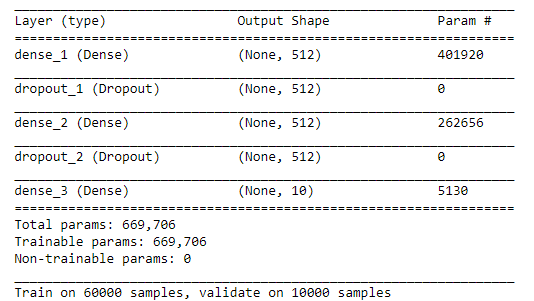
ひとまずMNISTのMLPサンプルを動かしてみました。
https://github.com/fchollet/keras/blob/master/examples/mnist_mlp.py
こういうネットワークになっています。
プログラムは既存のKerasのものがそのまま動きます。編集不要です。
概要と結果
- トレーニングデータ:28x28の画像60000枚
- テストデータ:28x28の画像10000枚
- バッチサイズ:128
- エポック:20
- CNTKバックエンドのトレーニング所要時間:314秒
- CNTKバックエンドのテスト成績:Loss 0.106430094829、Accuracy 0.9835
余談
ディープラーニングフレームワークが乱立していますが、DL4Jが比較をしてくれています。意外とよくまとまっています。
https://deeplearning4j.org/ja/compare-dl4j-torch7-pylearn


