64bitの完全クリーンなCentOS環境のEBS-Backed AMIを作成する手順です。
Amazon公式のAMIを使えばいいだけの話なのですが完全にゼロからクリーンインストールを行ったCentOS AMIを作成したいと思います。
AWSで仮想化方式 PV(paravirtual) と HVM(Hardware-assisted virtualization)があるのですが、今回はt2.microなどの新しいインスタンスタイプが使用できるHVM方式にて作成したいと思います。
おおまかな流れ
- 作業用インスタンスにVolumeをアタッチ
- そのVolumeにCentOSをインストール。
- CentOSインストール後、各種設定を行い、Volumeのsnapshotを取る。
- 取ったsnapshotからAMIを作成する
作業用インスタンスを作成
適当なHVMなAmazon Linux 64bitを立ち上げます。
このインスタンスはPV-HVMへの変更の作業用インスタンスとなります。
インスタンスが立ち上がったらAvailability zoneを控えておきます
新規ボリューム作成&アタッチ
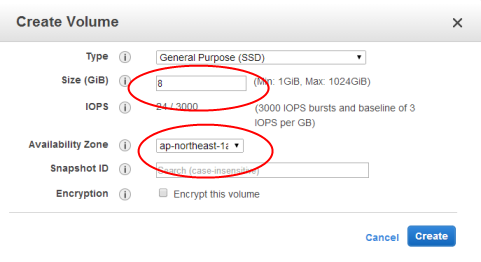
Volumes -> Create Volumeで新規ボリュームも作成します。
作成するVolumeのAvailability zoneは作業用インスタンスと同じとして下さい。
ここで作成したサイズはそのままAMIの基本容量となります。
後から拡張もそんなに難しくないので8GBくらいでOKだと思います。
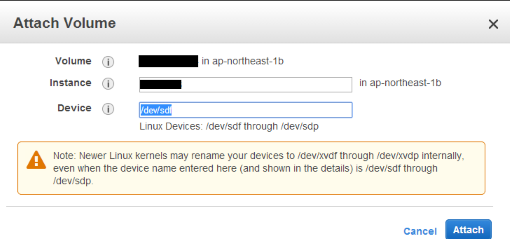
作成が完了したら、このVolumeを作業用インスタンスにアタッチします。
作成したVolumeを右クリックでAttachを選択。
インスタンスのテキストボックスにカーソルするとアタッチできるインスタンスが一覧されるので選択します。
(ここで、上記で作成したインスタンスがでない場合はAvailability zoneを確認)
Deviceは/dev/sdfでいいと思います
作業用インスタンスで各種作業を行う
作業用インスタンスにログインします。
以降の作業はrootユーザで行います。
EBSのパーティション作成。フォーマット。マウント
/dev/sdfとしてアタッチした場合は/dev/xvdf として認識されているはずです。
パーティション作成
parted /dev/xvdf --script 'mklabel msdos mkpart primary 1M -1s print quit'
partprobe /dev/xvdf
udevadm settle
フォーマット
mkfs.ext4 /dev/xvdf1
マウント
mount /dev/xvdf1 /mnt
dfでマウントできたか確認を行って下さい。
インストール用のファイルを作成
ここからはアタッチしたボリュームへのCentOSインストールの事前準備となります。
まずはデバイスファイルの作成。
cd /mnt
mkdir etc proc dev
fstabを作成。
vi etc/fstab
以下のように作成
LABEL=/ / ext4 defaults,noatime 1 1
none /dev/pts devpts gid=5,mode=620 0 0
none /dev/shm tmpfs defaults 0 0
none /proc proc defaults 0 0
none /sys sysfs defaults 0 0
mount -t proc none proc
インストール用の yum.conf を作成
今回はrikenさんのmirrorを使用したいと思います。
まずは鍵ファイルを入れておきます。
cd /mnt
wget -O ../RPM-GPG-KEY-CentOS-6 http://ftp.riken.jp/Linux/centos/RPM-GPG-KEY-CentOS-6
repos.confの作成
vi ../repos.conf
以下のように編集
[ami-base]
name=CentOS-6 - Base
mirrorlist=http://mirrorlist.centos.org/?release=6&arch=x86_64&repo=os
gpgcheck=1
gpgkey=file://${PWD}/../RPM-GPG-KEY-CentOS-6

# released updates
[ami-updates]
name=CentOS-6 - Updates
mirrorlist=http://mirrorlist.centos.org/?release=6&arch=x86_64&repo=updates
gpgcheck=1
gpgkey=file://${PWD}/../RPM-GPG-KEY-CentOS-6
CentOSのインストール
cd /mnt
setarch x86_64 yum -y -c ../repos.conf --installroot=$PWD --disablerepo=* --enablerepo=ami-base,ami-updates groupinstall Core
setarch x86_64 yum -y -c ../repos.conf --installroot=$PWD --disablerepo=* --enablerepo=ami-base,ami-updates install kernel
setarch x86_64 yum -y -c ../repos.conf --installroot=$PWD --disablerepo=* --enablerepo=ami-base,ami-updates install ruby rsync grub
rpm -Uvh --root=$PWD http://s3.amazonaws.com/ec2-downloads/ec2-ami-tools.noarch.rpm
wget -O usr/bin/ec2-metadata http://s3.amazonaws.com/ec2metadata/ec2-metadata
chmod +x usr/bin/ec2-metadata
grubの設定
cd /mnt
cp -a /dev/xvdf /dev/xvdf1 /mnt/dev/
cp /mnt/usr/*/grub/*/*stage* /mnt/boot/grub/
以下のようにgrubのmenu.lstを作成します
cd /mnt
cat > boot/grub/menu.lst <<EOS
default=0
timeout=0
hiddenmenu
title CentOS6.5
        root (hd0,0)
        kernel /boot/vmlinuz-$(rpm --root=$PWD -q --queryformat "%{version}-%{release}.%{arch}\n" kernel) ro root=LABEL=/ console=ttyS0 xen_pv_hvm=enable
        initrd /boot/initramfs-$(rpm --root=$PWD -q --queryformat "%{version}-%{release}.%{arch}\n" kernel).img
EOS
grub.confをmenu.lstのシンボリックリンクとする
chroot /mnt
ln -s /boot/grub/menu.lst /boot/grub/grub.conf
ln -s /boot/grub/grub.conf /etc/grub.conf
exit
grubのインストール
cat <<EOF | chroot /mnt grub --batch
device (hd0) /dev/xvdf
root (hd0,0)
setup (hd0)
EOF
ラベルを変更
e2label /dev/xvdf1 /
ちゃんと/というラベルになっているか確認
tune2fs -l /dev/xvdf1 |grep name
Filesystem volume name: /となっていればOKです。
テンポラリデバイスの削除
rm -f /mnt/dev/xvdf /mnt/dev/xvdf1
ネットワークの設定
ネットワーク設定ファイルを作成します。
初回のIP取得はDHCPを使って行われます。
vi /mnt/etc/sysconfig/network-scripts/ifcfg-eth0
以下のように編集。
DEVICE=eth0
BOOTPROTO=dhcp
ONBOOT=yes
TYPE=Ethernet
USERCTL=yes
PEERDNS=yes
IPV6INIT=no
vi /mnt/etc/sysconfig/network
以下のように編集
NETWORKING=yes
rc.local に ssh 公開鍵を取得する設定を追加
初回起動で公開鍵を設定できなければ、だれもログインできないインスタンスとなる為、必須作業です。
今回のスクリプトでは起動時にec2-ami-toolsの更新も行われるように作成されています。
vi /mnt/etc/rc.local
以下のように作成。
# !/bin/sh
#
# This script will be executed *after* all the other init scripts.
# You can put your own initialization stuff in here if you don't
# want to do the full Sys V style init stuff.

touch /var/lock/subsys/local

# Update the Amazon EC2 AMI creation tools
rpm -Uvh http://s3.amazonaws.com/ec2-downloads/ec2-ami-tools.noarch.rpm

# Update ec2-metadata
wget -O /usr/bin/ec2-metadata http://s3.amazonaws.com/ec2metadata/ec2-metadata
chmod 755 /usr/bin/ec2-metadata

if [ -f "/root/firstrun" ] ; then
dd if=/dev/urandom count=50|md5sum|passwd --stdin root
rm -f /root/firstrun
else
echo "* Firstrun *" && touch /root/firstrun
fi

if [ ! -d /root/.ssh ] ; then
mkdir -p /root/.ssh
chmod 0700 /root/.ssh
fi

ATTEMPTS=5
FAILED=0
# Fetch public key using HTTP
while [ ! -f /root/.ssh/authorized_keys ]; do
curl -f http://169.254.169.254/latest/meta-data/public-keys/0/openssh-key > /tmp/aws-key 2>/dev/null
if [ $? -eq 0 ]; then
cat /tmp/aws-key >> /root/.ssh/authorized_keys
chmod 0600 /root/.ssh/authorized_keys
rm -f /tmp/aws-key
echo "Successfully retrieved AWS public key from instance metadata"
else
FAILED=$(($FAILED + 1))
if [ $FAILED -ge $ATTEMPTS ]; then
echo "Failed to retrieve AWS public key after $FAILED attempts, quitting"
break
fi
echo "Could not retrieve AWS public key (attempt #$FAILED/$ATTEMPTS), retrying in 5 seconds..."
sleep 5
fi
done
その他各種設定
sshdの設定
cd /mnt
perl -p -i -e 's,^#PermitRootLogin yes,PermitRootLogin without-password,' etc/ssh/sshd_config
perl -p -i -e 's,^#UseDNS yes,UseDNS no,' etc/ssh/sshd_config
perl -p -i -e 's,^PasswordAuthentication yes,PasswordAuthentication no,' etc/ssh/sshd_config
SElinuxの設定
vi /mnt/etc/sysconfig/selinux
以下のように編集
SELINUX=enforcing
↓
SELINUX=disabled
IPv6を無効にする
if [ `grep disable_ipv6 /mnt/etc/sysctl.conf | wc -l` -ne 2 ]; then
    cat >> /mnt/etc/sysctl.conf << EOM
net.ipv6.conf.all.disable_ipv6 = 1
net.ipv6.conf.default.disable_ipv6 = 1
EOM
fi
hostsファイルの編集
vi /mnt/etc/hosts
IPv6関連の名前解決をコメント
127.0.0.1   localhost localhost.localdomain localhost4 localhost4.localdomain4
# ::1         localhost localhost.localdomain localhost6 localhost6.localdomain6
timezoneを日本に設定
rm -f /mnt/etc/localtime
cp -p /mnt/usr/share/zoneinfo/Japan /mnt/etc/localtime
EBSをアンマウント
cd /mnt
setarch x86_64 yum -y -c ../repos.conf --installroot=$PWD --disablerepo=* --enablerepo=ami-base,ami-updates clean all
cd ../
sync
umount /mnt/proc
umount /mnt
作成したVolumeをスナップショット作成 -> AMI化する
作成したVolumeのスナップショットを作成します。
Volumesから該当Volumeで右クリック -> Create Snapshotです。
名前等は適当でOKです。
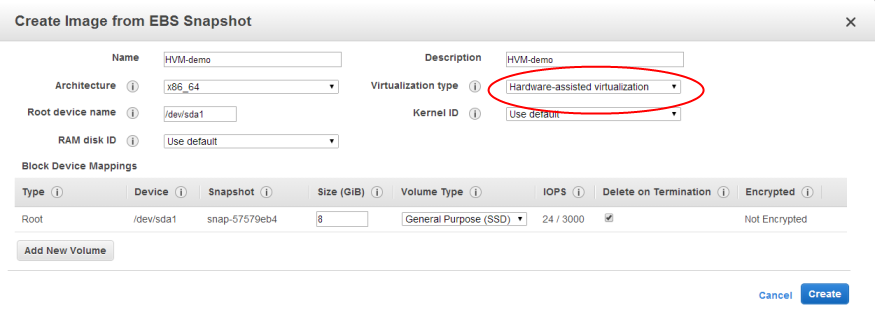
スナップショットができたら、今度は作成したSnapshotを右クリック -> Create Image
Virtualization type を Hardware-assisted virtualization にします。
これでAMIが作成されます。(完成)
確認
作成されたAMIからインスタンスを作成し正常起動できるか確認します。
この時、t2.micro等のHVMインスタンスが選択できるかを確認。
これでインスタンスが起動しない場合はやりなおし・・・。
今後のAMI作成
クリーンなCentOS-AMIの作成が完了したら自分ごのみにカスタマイズする事となるでしょう。
その後、AMIを作成したい場合の方法ですが、すごく簡単です。
カスタマイズ済のインスタンスを右クリックで[Create Image (EBS AMI)]というメニューを選ぶ事でAMI登録する事が可能です
追記
この手順で作成したインスタンスでyumを実行すると変なエラーが出ました・・・
rpmdb: /var/lib/rpm/Name: unexpected file type or format
error: cannot open Name index using db3 - Invalid argument (22)
rpmdb: /var/lib/rpm/Providename: unexpected file type or format
error: cannot open Providename index using db3 - Invalid argument (22)
Loaded plugins: fastestmirror
Error: clean requires an option: headers, packages, metadata, dbcache, plugins, expire-cache, rpmdb, a
以下のようにすればfixできました
rpm -vv --rebuilddb
この状態でAMIを作った方がいいかもしれないです。


