元ネタはこれ。もともとモノクロなんだけど、arcで描画している部分を青緑系の色で幾つか重ねて、加算合成したらもっとサイバー感出ないかなって試してみたのが始まり。
コードとしては、noFill指定、arcのstrokeWeightを20ぐらいで固定、strokeの色を設定した感じ。それで、strokeでアルファ値を指定するとレンダラがP2Dだと描画が激重になってしまうので、P3Dに変更して表示してみたら、表示は速いけどノイズみたいなものが乗ってしまうことがわかった。さらにProcessing2系と3系で描画方法が変わっている。どっちにしろ表示は微妙……。
おそらくarc自体こういう描画で使われることが想定されていなさそうなので、beginShape/endShape、bezierVertexとかで描く方法を探してみたところ、まさにそれをやっている記事が見つかった。これで作ってみたところ、P2Dでも軽く、P3Dでもきれいに表示できたのでメモっておく。
| Processing 2.2.1 | Processing 3.0a11 | 今回できたもの |
|---|---|---|
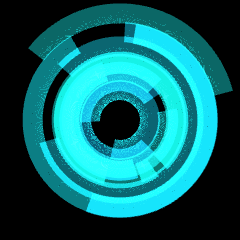 |
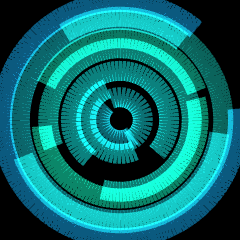 |
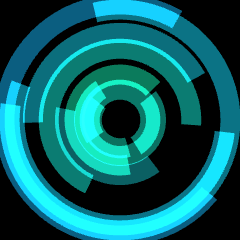 |
CyberCircle.pde
Arc[] arcs = new Arc[10];

void setup() {
  size(240, 240, P2D);
  blendMode(ADD);

  for (int i = 0; i < arcs.length; i++) {
    arcs[i] = new Arc();
  }
}

void draw() {
  background(0);
  translate(width/2, height/2);

  for (Arc arc : arcs) {
    arc.move();
    arc.drawArc();
  }
}

private class Arc {

  final color fillColor;
  final float radius, weight;
  final float speed;

  float start;
  float end;

  Arc() {
    fillColor = color(16, random(128, 192), random(128, 192), 180);
    speed = random(2) < 1 ? random(-0.05, -0.01) : random(0.01, 0.05);
    radius = random(20, 120);
    weight = 20;

    start = 0;
    end = random(HALF_PI, TAU);
  }

  void drawArc() {

    // もともとこのコードで描画してた
    // noFill();
    // ellipseMode(RADIUS);
    // stroke(fillColor);
    // strokeWeight(weight);
    // arc(0, 0, radius, radius, start, start + end);

    fill(fillColor);
    baumkuchen(0, 0, radius, weight, start, end);
  }

  void move() {
    start += speed;
  }
}

void baumkuchen(float x, float y, float radius, float weight, float start, float stop) {
  float INTERVAL_RAD = radians(30);

  pushStyle();
  pushMatrix();

  noStroke();
  translate(x, y);
  rotate(start);

  float remain = stop;
  while (remain > 0) {
    float current = min(INTERVAL_RAD, remain);
    piece(current, radius, weight);
    remain -= current;
    rotate(INTERVAL_RAD);
  }

  popMatrix();
  popStyle();
}

void piece(float angle, float radius, float weight) {

  float controlTheta1 = angle/3.0;
  float controlTheta2 = controlTheta1*2.0;

  // 孤の内周と外周を計算
  float inner = radius - weight / 2;
  float outer = inner + weight;

  // 1つ目のベジェ曲線の値
  float sx1 = cos(0)*inner;
  float sy1 = sin(0)*inner;

  float controlRadius1 = inner/cos(controlTheta1);
  float cx1 = cos(controlTheta1)*controlRadius1;
  float cy1 = sin(controlTheta1)*controlRadius1;
  float cx2 = cos(controlTheta2)*controlRadius1;
  float cy2 = sin(controlTheta2)*controlRadius1;

  float ax1 = cos(angle)*inner;
  float ay1 = sin(angle)*inner;

  // 2つめのベジェ曲線の値
  float sx2 = cos(angle)*outer;
  float sy2 = sin(angle)*outer;

  float controlRadius2 = outer/cos(controlTheta1);
  float cx3 = cos(controlTheta2)*controlRadius2;
  float cy3 = sin(controlTheta2)*controlRadius2;
  float cx4 = cos(controlTheta1)*controlRadius2;
  float cy4 = sin(controlTheta1)*controlRadius2;

  float ax2 = cos(0)*outer;
  float ay2 = sin(0)*outer;

  // 弧を描く
  beginShape();

  vertex(sx1, sy1);
  bezierVertex(cx1, cy1, cx2, cy2, ax1, ay1);

  vertex(sx2, sy2);
  bezierVertex(cx3, cy3, cx4, cy4, ax2, ay2);

  endShape(CLOSE);
}
baumkuchenメソッドで、「noFill(), ellipseMode(RADIUS)を指定し、かつwidthとheightに同じ値を指定したarcメソッド」を的な感じのものを再現できるようにした。元のコードから変更した点は下記の通り。
- angleはradiansでの指定にした
- 30°ずつ描画してrotateを繰り返すようにした(90°が限界って書いてあったけど、けっこう誤差が出る)
- weightは指定したradiusを中心に、内側と外側に向けて(strokeWeightっぽく)設定されるようにした