CardViewはカード型のUIを実現するAndroidのAPIの一つです。FrameLayoutを継承しています。
導入方法
1.build.gradleに以下を追加します。
build.gradle
dependencies {
        compile "com.android.support:cardview-v7:+"
}
2.xmlファイルを作成します。
メインの画面にはCardViewを動的に追加していきます。
メインの画面
activity_main.xml
<?xml version="1.0" encoding="utf-8"?>
<LinearLayout xmlns:android="http://schemas.android.com/apk/res/android"
    android:orientation="vertical" android:layout_width="match_parent"
    android:layout_height="match_parent">

    <ScrollView
        android:layout_width="match_parent"
        android:layout_height="match_parent"
        android:id="@+id/scrollView"
        android:fillViewport="false"
        android:layout_alignParentLeft="true"
        android:layout_alignParentStart="true">
        <LinearLayout
            android:orientation="vertical"
            android:layout_width="match_parent"
            android:layout_height="match_parent"
            android:layout_centerVertical="true"
            android:layout_centerHorizontal="true"
            android:id="@+id/cardLinear">
        </LinearLayout>
    </ScrollView>

</LinearLayout>
CardViewの部品
test_card.xml
<?xml version="1.0" encoding="utf-8"?>
<LinearLayout xmlns:android="http://schemas.android.com/apk/res/android"
    android:orientation="vertical" android:layout_width="match_parent"
    android:layout_height="match_parent"
    android:weightSum="1">

    <android.support.v7.widget.CardView
        xmlns:android="http://schemas.android.com/apk/res/android"
        xmlns:card_view="http://schemas.android.com/apk/res-auto"
        android:layout_width="match_parent"
        android:layout_height="78dp"
        card_view:cardCornerRadius="4dp"
        android:layout_marginLeft="10dp"
        android:layout_marginRight="10dp"
        android:layout_marginTop="5dp"
        android:id="@+id/cardView"
        >

        <!-- カードに載せる情報 -->

        <RelativeLayout
            android:layout_width="match_parent"
            android:layout_height="match_parent"
            android:layout_gravity="center_horizontal"
            android:id="@+id/cardRelative"
            >

            <TextView
                android:layout_width="wrap_content"
                android:layout_height="wrap_content"
                android:textAppearance="?android:attr/textAppearanceLarge"
                android:text="CardView"
                android:id="@+id/textBox"
                android:textSize="30dp"
                android:layout_centerVertical="true"
                android:layout_marginLeft="17dp"
                android:layout_marginStart="17dp" />

        </RelativeLayout>
    </android.support.v7.widget.CardView>
</LinearLayout>
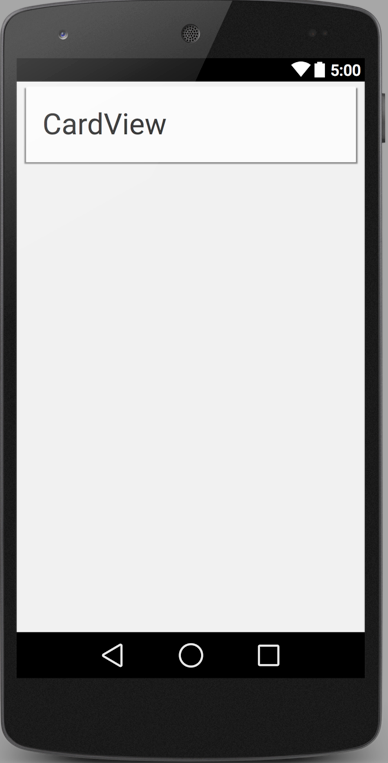
こんな感じのレイアウトができます。
3.プログラムから制御
MyActivity.java
protected void onCreate(Bundle savedInstanceState) {
super.onCreate(savedInstanceState);
setContentView(R.layout.activity_main);
LinearLayout cardLinear = (LinearLayout)this.findViewById(R.id.cardLinear);
cardLinear.removeAllViews();
for(int i = 0; i< 5; i++) {
LayoutInflater inflater = (LayoutInflater) getSystemService(LAYOUT_INFLATER_SERVICE);
LinearLayout linearLayout = (LinearLayout) inflater.inflate(R.layout.test_card, null);
CardView cardView = (CardView) linearLayout.findViewById(R.id.cardView);
TextView textBox = (TextView) linearLayout.findViewById(R.id.textBox);
textBox.setText("CardView" + i);
cardView.setTag(i);
cardView.setOnClickListener(new View.OnClickListener() {
@Override
public void onClick(View v) {
Toast.makeText(MainActivity.this, String.valueOf(v.getTag()) + "番目のCardViewがクリックされました", Toast.LENGTH_SHORT).show();
}
});
cardLinear.addView(linearLayout,i);
}
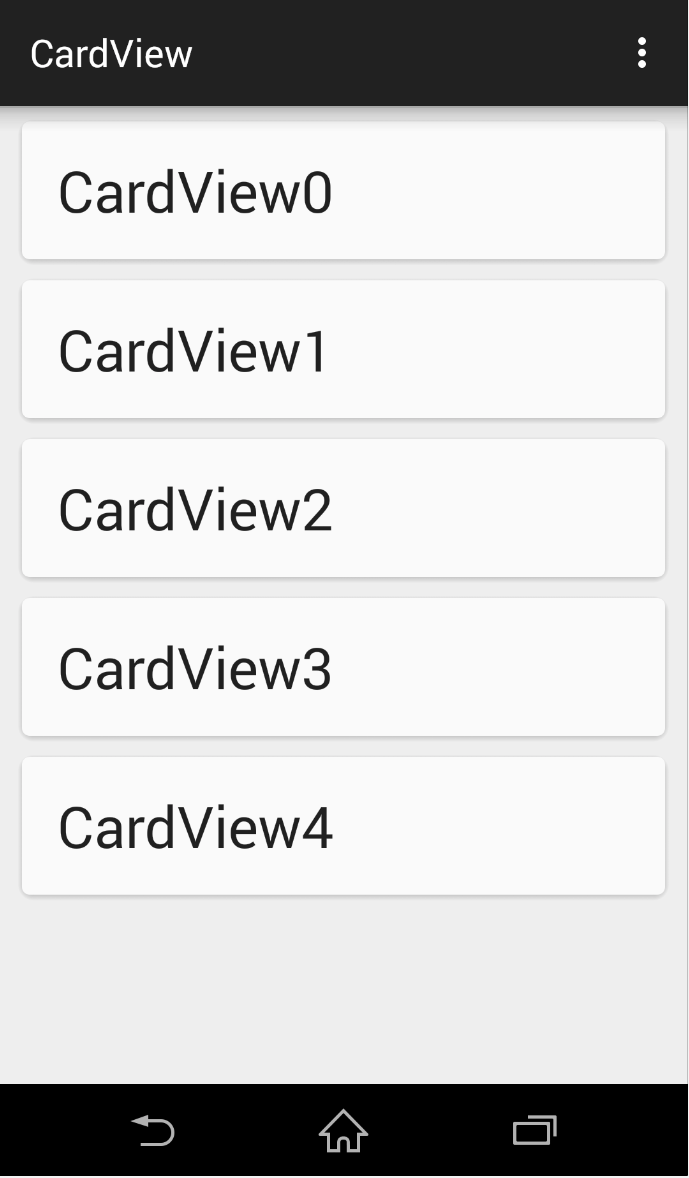
}
こんな感じになりました。
タッチした時の反応が欲しい場合
CardViewはOnClickListenerやOnLongClickListenerを実装して、タッチした時にイベントは発生しますが、ListViewのようにタッチされたよ!的な反応はしてくれません。なので、CardViewのxmlに以下の内容を追加します。
android:foreground="?android:attr/selectableItemBackground"