必要なところだけまとめました。試行錯誤編はこちらです。
2017-04-09 githubにupしてました。
https://github.com/boyaki-machine/TSL2561
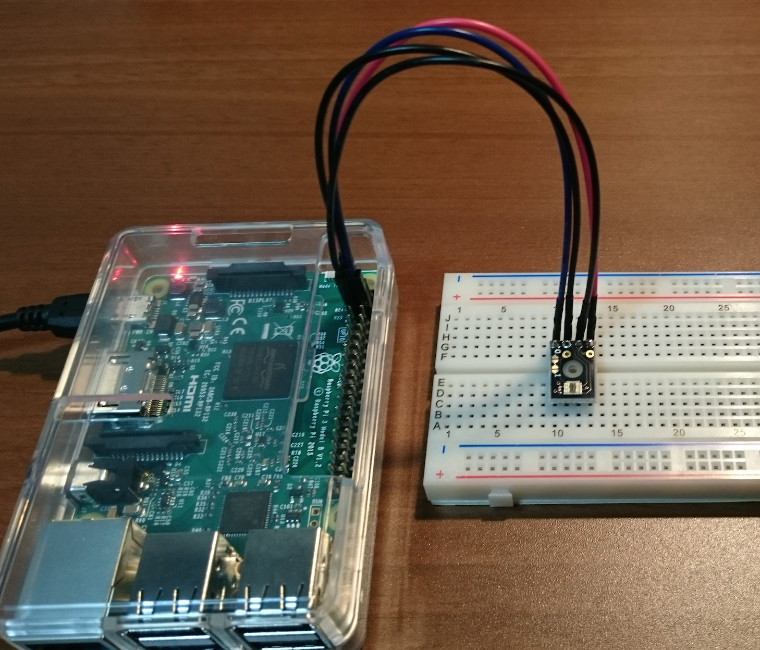
物理配線
届いたセンサに、ピンヘッダをハンダ付けします。その後、配線します。
センサ1pin(GND) -> Raspi 6番pin
センサ2pin(SDA) -> Raspi 3番pin
センサ3pin(SCL) -> Raspi 5番pin
センサ4pin(VDD) -> Raspi 1番pin
Raspberry piでI2Cを使えるようにする
OSのコンフィグメニューで設定。
$ sudo raspi-config
"9 Advenced Options” -> “A7 I2C” の順にメニューを選択。
「Would you like the ARM I2C interface to be enabled?」と聞いてくるのでyesを選択。
「Would you like the I2C kernel module to be loaded by default?」と聞いてくるのでyesを選択。
次に、/boot/config.txtを編集。
$ sudo vi /boot/config.txt
...以下の内容を追記
dtparam=i2c_arm=on
更に、/etc/modulesを編集。
$ sudo vi /etc/modules
...以下の内容を追記
snd-bcm2835
i2c-dev
設定終了後、Raspyを再起動。
再起動後にカーネルモジュールがロードされていることを確認。
$ lsmod
...
i2c_dev                 6709  0
snd_bcm2835            21342  0
...
ツール類をインストールする
$ sudo apt-get install i2c-tools python-smbus
アドレス確認
センサのアドレスを確認します。
$ sudo i2cdetect -y 1
     0  1  2  3  4  5  6  7  8  9  a  b  c  d  e  f
00:          -- -- -- -- -- -- -- -- -- -- -- -- --
10: -- -- -- -- -- -- -- -- -- -- -- -- -- -- -- --
20: -- -- -- -- -- -- -- -- -- -- -- -- -- -- -- --
30: -- -- -- -- -- -- -- -- -- 39 -- -- -- -- -- --
40: -- -- -- -- -- -- -- -- -- -- -- -- -- -- -- --
50: -- -- -- -- -- -- -- -- -- -- -- -- -- -- -- --
60: -- -- -- -- -- -- -- -- -- -- -- -- -- -- -- --
70: -- -- -- -- -- -- -- --
アドレス0x39で認識。
Pythonでデータを取得する
以下のクラスを使います。
# !/usr/bin/python -u
# -*- coding: utf-8 -*-

import smbus
import time

# Strawberry Linux社の「TSL2561 照度センサ・モジュール」から
# I2Cでデータを取得するクラス
# https://strawberry-linux.com/catalog/items?code=12561
# 2016-05-03 Boyaki Machine
class SL_TSL2561:
	def __init__(self, address, channel):
		self.address	= address
		self.channel	= channel
		self.bus		= smbus.SMBus(self.channel)
		self.gain 		= 0x00			# 0x00=normal, 0x10=×16
		self.integrationTime 	= 0x02	# 0x02=402ms, 0x01=101ms, 0x00=13.7ms
		self.scale 		= 1.0

		# センサ設定の初期化
		self.setLowGain()
		self.setIntegrationTime('default')

	def powerOn(self):
		self.bus.write_i2c_block_data(self.address, 0x80, [0x03])
		time.sleep(0.5)

	def powerOff(self):
		self.bus.write_i2c_block_data(self.address, 0x80, [0x00])

	# High Gainにセットする(16倍の感度?)
	def setHighGain(self):
		# High Gainにするとうまくrawデータが取れないことがある。
		# 要原因調査 ( 5047固定値になる )
		self.gain 	= 0x10
		data 		= self.integrationTime | self.gain
		self.bus.write_i2c_block_data(self.address, 0x81, [data])
		self.calcScale()

	# Low Gain(default) にセットする
	def setLowGain(self):
		self.gain 	= 0x00
		data 		= self.integrationTime | self.gain
		self.bus.write_i2c_block_data(self.address, 0x81, [data])
		self.calcScale()

	# 積分する時間の設定(1回のセンシングにかける時間?)
	# val = shor, middle, logn(default)
	def setIntegrationTime(self, val):
		if val=='short':
			self.integrationTime 	= 0x00	# 13.7ms scale=0.034
		elif val=='middle':
			self.integrationTime 	= 0x01 	# 101ms	 scale=0.252
		else:
			self.integrationTime 	= 0x02  # defaultVal 402ms  scale=1.0
		data = self.integrationTime | self.gain
		self.bus.write_i2c_block_data(self.address, 0x81, [data])
		self.calcScale()

	def getVisibleLightRawData(self):
		data 	= self.bus.read_i2c_block_data(self.address, 0xAC ,2)
		raw 	= data[1] << 8 | data[0]	# 16bitで下位バイトが先
		return raw

	def getInfraredRawData(self):
		data 	= self.bus.read_i2c_block_data(self.address, 0xAE ,2)
		raw 	= data[1] << 8 | data[0]	# 16bitで下位バイトが先
		return raw

	def getRawData(self):
		data 	= self.bus.read_i2c_block_data(self.address, 0xAC ,4)
		VL 		= data[1] << 8 | data[0]	# 可視光 16bitで下位バイトが先
		IR 		= data[3] << 8 | data[2]	# 赤外線 16bitで下位バイトが先
		return (VL,IR)

	def calcScale(self):
		_scale = 1.0
		# integrationTimeによるスケール
		if self.integrationTime == 0x01:	# middle
			_scale = _scale / 0.252
		elif self.integrationTime == 0x00:	# short
			_scale = _scale / 0.034

		# gainによるスケール
		if self.gain == 0x00 :				# gain 1
			_scale = _scale * 16.0

		self.scale = _scale

	def getLux(self):
		# センサ生データの取得
		raw  = self.getRawData()

		# 65535の時はエラー出力にする実装
		if raw[0] == 65535 or raw[1] == 65535:
			return "Range Over"

		# センサ設定により生データをスケールする
		VLRD = raw[0] * self.scale
		IRRD = raw[1] * self.scale

		# 0の除算にならないように
		if (float(VLRD) == 0):
			ratio = 9999
		else:
			ratio = (IRRD / float(VLRD))

		# Luxの算出
		if ((ratio >= 0) & (ratio <= 0.52)):
			lux = (0.0315 * VLRD) - (0.0593 * VLRD * (ratio**1.4))
		elif (ratio <= 0.65):
			lux = (0.0229 * VLRD) - (0.0291 * IRRD)
		elif (ratio <= 0.80):
			lux = (0.0157 * VLRD) - (0.018 * IRRD)
		elif (ratio <= 1.3):
			lux = (0.00338 * VLRD) - (0.0026 * IRRD)
		elif (ratio > 1.3):
			lux = 0

		return lux


if __name__ == "__main__":
	sensor 	= SL_TSL2561(0x39,1)
	sensor.powerOn()
	# sensor.setHighGain()
	sensor.setIntegrationTime('default')
	while True:
		print "Lux : " + str(sensor.getLux())
		time.sleep(1.0)
留意点
- High Gainにした時、ある程度の照度(5月日中の窓際くらい)があると異常な値に固定される問題があります。
