我々Sansan社では年々社員が増加し、それに伴いトイレのリソース問題が顕著になってきました。そこでトイレの空き状況がリアルタイムにわかると嬉しい!という声があがりトイレの空き状況を監視するシステムを作ってみました。
概要
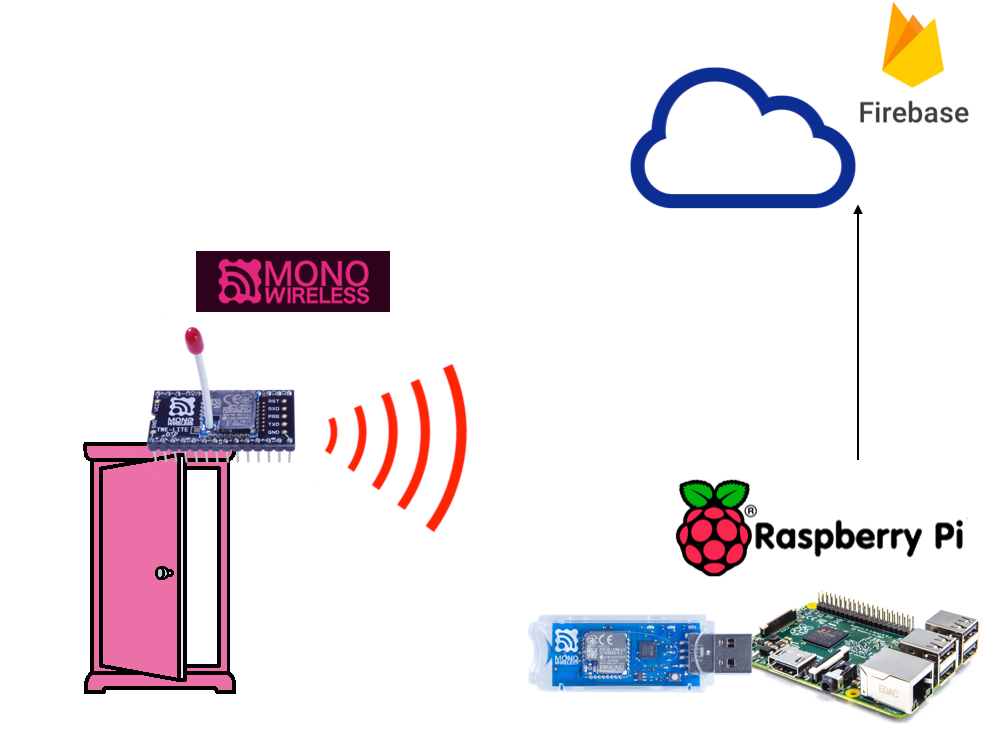
作るシステムは以下の図のような感じです。
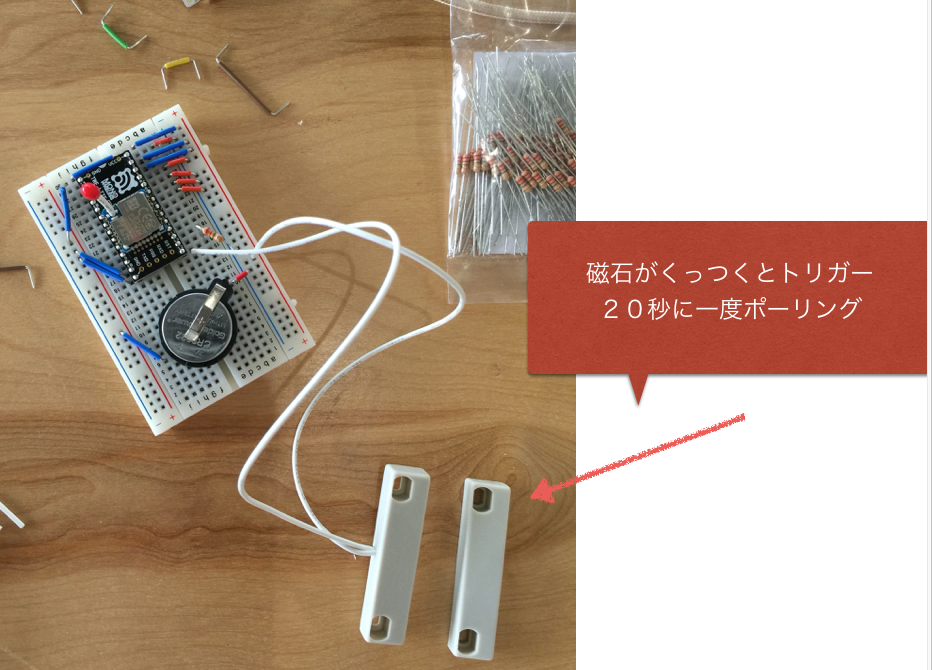
- ドア開閉センサー (リードスイッチ + TWE-Liteによるワイヤレス・システム)
- Raspberry Pi でセンサーの信号を受取サーバに送信
- Firebase databaseで状態を管理
- webクライアントでリアルタイムに情報を更新
ドア開閉センサー
こちらの記事を参考に作りました。
ボタン電池1個で数年持つ無線ドア開閉センサを作る - Qiita
部品や回路などは全くこの記事にある通りにしてあります。
TWE-Liteへのファームウェアの焼き込みに苦労したので、以下記録です。
TWE-Liteへのファームウェアの焼き込み
http://mono-wireless.com/jp/tech/misc/jenprog/index.html
からpyserialをダウンロードして展開し
sudo python setup.py install
を実行してpyserialをインストール
http://mono-wireless.com/jp/products/TWE-NET/TWESDK.html
から 2014/08月号 SDK ファイル をダンロードして展開
cd TWESDK/Tools/jenprog
chmod +x jenprog
chmod +x tweusb
http://www.ftdichip.com/Drivers/VCP.htm
から Mac OS X 10.9 and above 2015-04-15 2.3 をダウンロード
FTDI USB Serial Driver をインストール
TWI-LITE-RをUSBに差し込んで確認
 $ls /dev/tty.usbserial*
> /dev/tty.usbserial-MW7LR3T
jenprogの使い方
Usage: jenprog.py [options]

Options:
  -h, --help            show this help message and exit
  -a ADDR, --address=ADDR
                        start reading at address
  -l LEN, --len=LEN     number of bytes to read
  -m MAC, --mac=MAC     reset the mac addr (e.g. -m 01234567ABCDABCD)
  -k KEY, --key=KEY     reset the license key
  -v, --verify          also verify after writing
  -z, --compare         compare between flash content and specified file
  -s, --show            show mac address and license key
  -e, --erase           erasing the flash after reading mac and license key
  -b BAUD, --baud=BAUD  baud rate for serial connection.
  -t TARGET, --target=TARGET
                        target for connection
  -F, --force           skip firmware compatibility
  -C, --list-com-ports  skip firmware compatibility
  -D CDIR, --current_dir=CDIR
                        current directory
これでターゲットの情報を取得する
jenprog -t /dev/tty.usbserial-MW7LR3T -s
↑この操作はターゲットのプログラムボタンを押しながら、リセットしてプログラムモードにする必要がある。
  flash   : JN516x Internal Flash
  chip id : 0x10408686
  mac addr: 0x001bc501210e016b
こんな感じで情報がとれます。
次にファームウェアをインストール。
http://mono-wireless.com/jp/products/Software_download/index.html
ver 1.7.1 ソフトウェア(ソース含)
※ 実験的な実装。(最新版ではありません。v1.6.6 以降は反映されていません)
※ オプションビット2の追加(bit0:3⇒DI1-4, bit4:7⇒DO1-4 のプルアップ停止)
※ バイナリは Master/Build 以下に格納 (*_JN5164*.bin ⇒ TWE-Lite 用)
ちょっと怖いけどこれを焼き込む
焼きこむファイル
App_TweLite_1_7_1_unoff\App_TweLite\Master\Build\App_TweLite_Master_JN5164_1_7_1.bin
以下のコマンドで書き込み
jenprog -t /dev/tty.usbserial-MW7LR3T ./App_TweLite/Master/Build/App_TweLite_Master_JN5164_1_7_1.bin
むー、書き込みに失敗するなあ
$ jenprog -t /dev/tty.usbserial-MW7LR3T ./App_TweLite/Master/Build/App_TweLite_Master_JN5164_1_7_1.bin
*** jenprog ver 1.3 ***
 file info: 04 03 0008
writing...
  0%..10%..
ERROR(2): communication with the target
むー 30%までいって失敗。。。
writing...
  0%..10%..20%..30%..
ERROR(2): communication with the target
どうもこれと同じ問題みたい。
TWE-Lite-Rでtwe-liteのファームウェア書き込みしたらエラーが出た - Qiita
$ jenprog -t /dev/tty.usbserial-MW7LR3T App_TweLite_Master_JN5164_1_7_1.bin -b 38400
*** jenprog ver 1.3 ***
 file info: 04 03 0008
writing...
  0%..10%..20%..30%..40%..50%..60%..70%..80%..90%..done - 2.66 kb/s
done

OK: firmware is successfully programmed.
ケーブルを何本かためしてみて、ボーレート 38400で成功!
できあがり
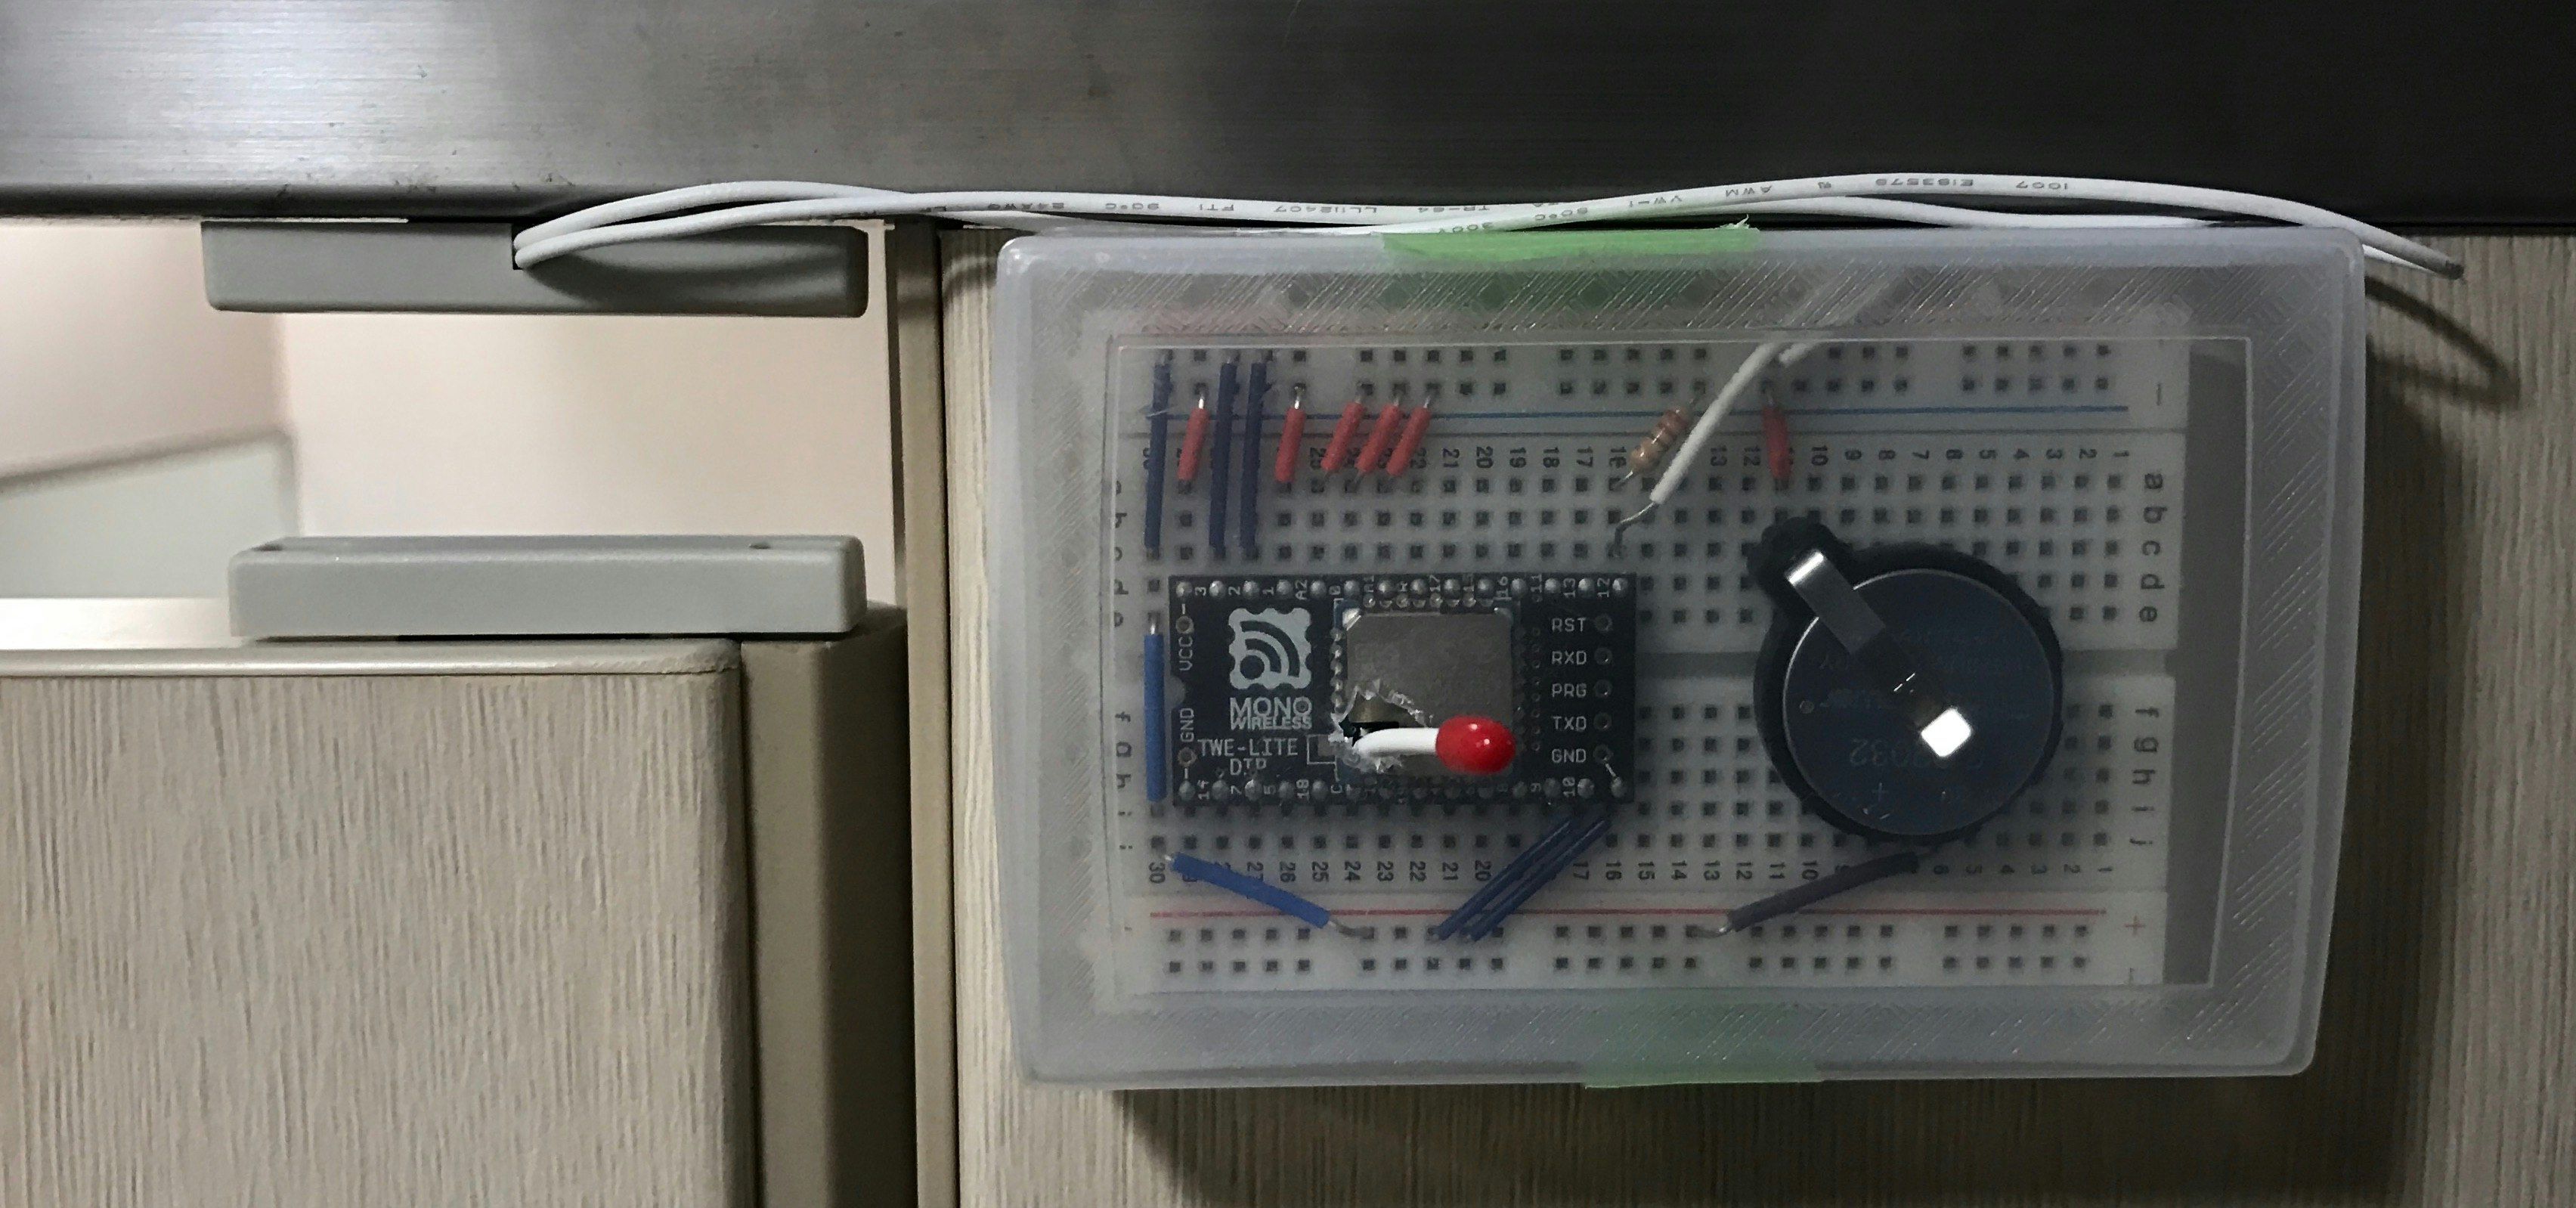
こんな感じです。
Sansanらしく名刺ケースに入れてみました。
Raspberry Pi
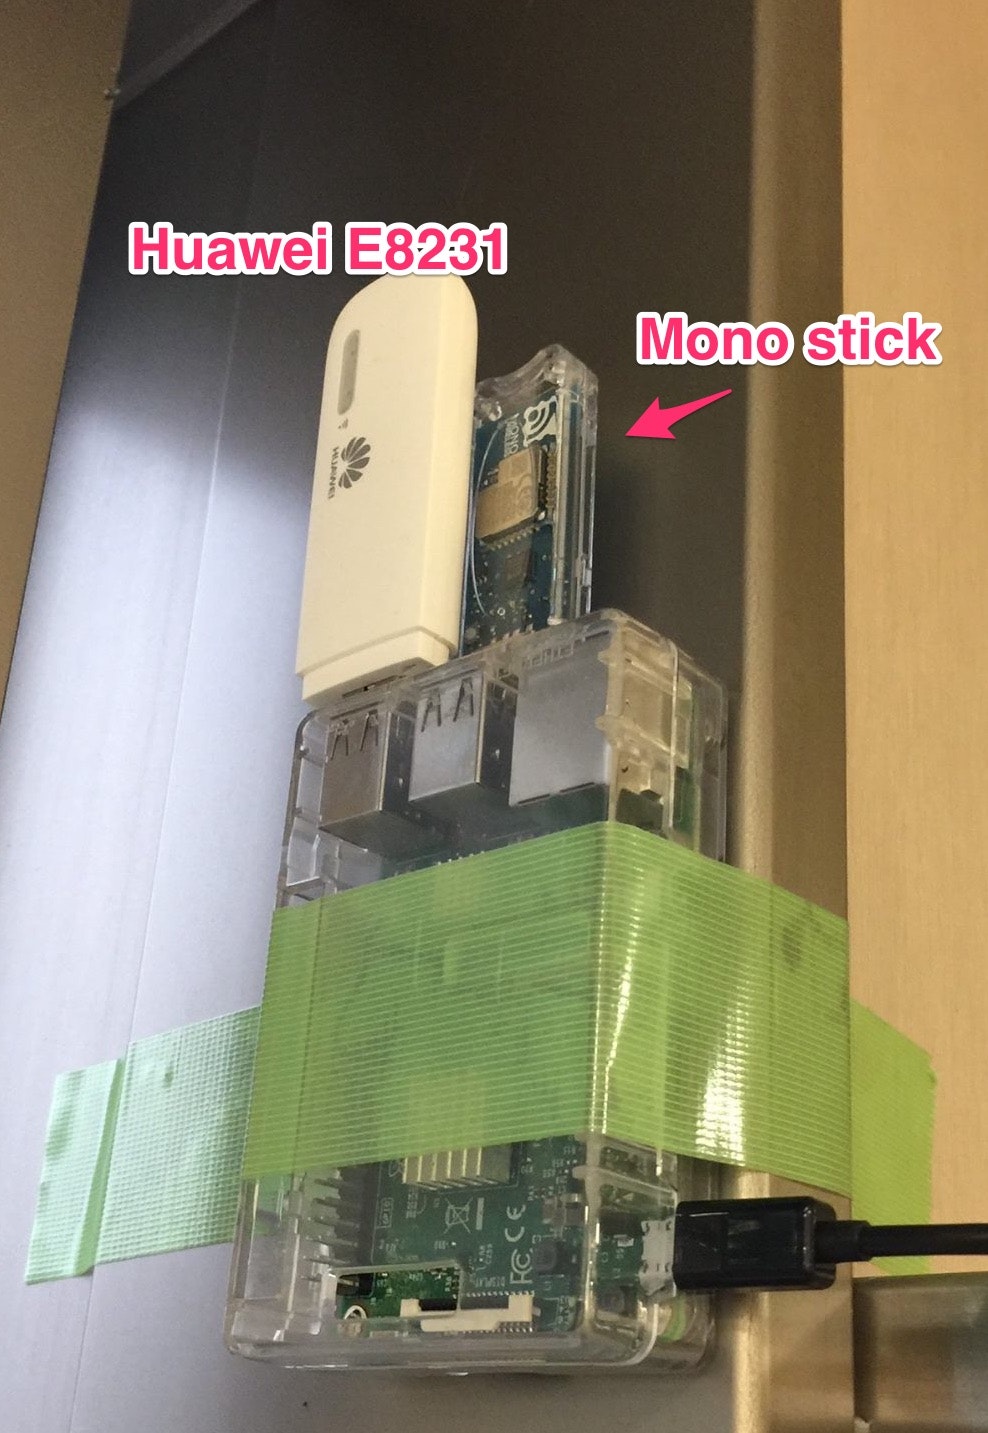
Rspberry PiにはMono stickを挿して、TWE-Liteからの信号を受取り、
HuaweiのモバイルルータE8231を挿して、FreetelのSIMで運用しています。
コードはpythonで記述しています。
pythonのコード
メイン関数
メインループでシリアルからデータを受け取り、必要に応じて各センサーデバイスに対応するハンドラで情報を処理しています。
import device_state

import serial_reader

import server_api


if __name__ == "__main__":
    print("start")
    reader = serial_reader.SerialReader()

    api = server_api.ServerApi()
    state_11f_gentlemen_a = device_state.DeviceState(1, "11f_gentlemen_a", api)
    state_11f_gentlemen_b = device_state.DeviceState(2, "11f_gentlemen_b", api)

    while True:
        try:
            state_11f_gentlemen_a.health_check()
            state_11f_gentlemen_b.health_check()
            line = reader.read()
            state_11f_gentlemen_a.handle_serial(line)
            state_11f_gentlemen_b.handle_serial(line)
        except KeyboardInterrupt:
            break
        except:
            continue

    reader.close()
Mono stickからの信号のうけとり
シリアルポートから読み出します。
import serial


class SerialReader:

    def __init__(self, port="/dev/ttyUSB0", borate=115200, timeout=0.5):
        self.ser = serial.Serial(port, borate, timeout=timeout)

    def read(self):
        return self.ser.readline().decode("utf-8")

    def close(self):
        self.ser.close()
デバイスの状態の管理
デバイスごとにシリアル通信で取得したデータを受取り、必要に応じてサーバに状態を送信します。
また、デバイスから60秒間何のデータも送られて来ない場合にhealth checkにデータを投げます。
from datetime import datetime, timedelta


class DeviceState:
    def __init__(self, device_id, device_name, server_api):
        self.server_api = server_api
        self.device_id = device_id
        self.device_name = device_name
        self.is_open = True
        self.last_call = datetime.now()
        self.health = "initial"

    def open(self):
        if self.is_open:
            return
        self.time_delta = (datetime.now() - self.start_time)
        self.is_open = True
        self.server_api.set_vacant(self.device_name)
        self.server_api.set_log(
            self.device_name, self.start_time, datetime.now())

    def close(self):
        if not self.is_open:
            return
        self.start_time = datetime.now()
        self.is_open = False
        self.server_api.set_occupied(self.device_name)

    def handle_serial(self, line):
        if not int(line[2]) == self.device_id:
            return False

        self.last_call = datetime.now()
        self.set_health("good")
        if int(line[34]) == 1:
            print("device:{0} call close".format(self.device_id))
            self.close()
        else:
            print("device:{0} call open".format(self.device_id))
            self.open()
        return True

    def set_health(self, health):
        print("device:{0} health:{1}".format(self.device_id, health))
        if not self.health == health or health == "good":
            self.health = health
            print("device:{0} send_health:{1}".format(self.device_id, health))
            self.server_api.send_health(self.device_name, health, datetime.now())

    def health_check(self):
        delta = datetime.now() - self.last_call
        if delta > timedelta(seconds=60):
            self.set_health("bad")
Firebaseサーバへのデータの送信
- 空き/使用中の状態の通知
- health check
- トイレの使用時間のログ
を送信しています。
import requests
import json
from datetime import timezone, timedelta, datetime


class ServerApi:

    def __init__(self):
        self.jst = timezone(timedelta(hours=+9), 'JST')

    def set_occupied(self, device_name):
        url = "https://xxxxxx.firebaseio.com/{0}/status.json".format(
            device_name)
        print(url)
        requests.put(url, "\"occupied\"")
        return

    def set_vacant(self, device_name):
        url = "https://xxxxxx.firebaseio.com/{0}/status.json".format(
            device_name)
        print(url)
        requests.put(url, "\"vacant\"")
        return

    def send_health(self, device_name, health, last_update):
        url = "https://xxxxxx.firebaseio.com/{0}/health.json".format(
            device_name)
        print(url)
        str = json.dumps(
            {"status": health,
             "last_update": last_update.replace(tzinfo=self.jst).isoformat()
             })
        requests.put(url, str)

    def set_log(self, device_name, start_time, end_time):
        start_time = start_time.replace(tzinfo=self.jst)
        end_time = end_time.replace(tzinfo=self.jst)
        path = start_time.strftime('%Y/%m/%d/%H')
        url = "https://xxxxxx.firebaseio.com/{0}/log/{1}.json".format(
            device_name, path)
        print(url)
        str = json.dumps(
            {"start_time": start_time.isoformat(),
             "end_time": end_time.isoformat()})
        print(str)
        requests.post(url, str)
Raspberry Piの起動時にスクリプトを実行する
/etc/local.rc
に以下の通り実行処理を追加
python3 /home/pi/main.py &
Raspberry Piへのファイルの転送方法
HuaweiのモバイルルータE8231は、Wifiルータでもあるので、このルータにmacからwifiで接続することでRaspberry Piとは同じネットワーク上に入れるので、そこでssh接続することが出来ます。
ラズパイにE8321が刺さっている状態で電源を入れる 以下にWifi接続
SSID: HUAWEI-E8231-ddo2
Key: XXXXXXXXXXX
(KeyはE8321本体に記載)
SSHで接続
$ ssh pi@192.168.8.100
password: raspberry
とても簡単!
以下のコマンドでファイルを転送
$ scp -C ./*py pi@192.168.8.100:/home/pi/sansan-wc
password: raspberry
sshログインし以下のコマンドを実行
sudo reboot
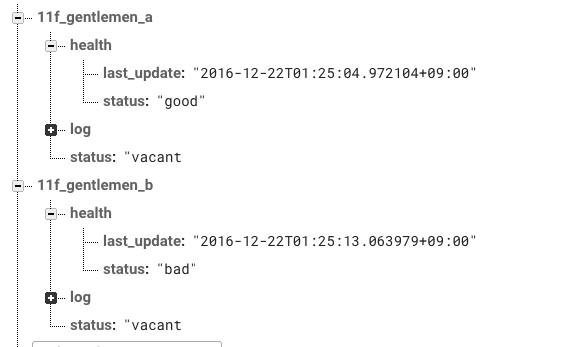
Firebase
Firebase databaseのデータ構造は以下の通りです。
Webクライアント
WebのクライアントはFirebaseのjavascriptクラアントを使い、リアルタイムで情報を取得するようにしています。
$(function() {
	listen('11f_gentlemen_a')
	listen('11f_gentlemen_b')

	function listen(device){
		firebase.database().ref(device + '/status').on('value', function(data) {
			updateStatus(device, data.val())
		});
		firebase.database().ref(device + '/health').on('value', function(data) {
			updateHealth(device, data)
		});
	}

	function updateStatus(device, value){
		var node = $('#' + device + '_status')
		switch(value){
			case "vacant": {
				node.text("空き")
				break;
			}
			case "occupied": {
				node.text("使用中")
				break;
			}
		}
	}
	function updateHealth(device, data){
		var healthNode = $('#' + device + '_health')
		switch(data.val().status){
			case "good":{
				healthNode.text("稼働中")
				break;
			}
			case "bad":{
				healthNode.text("停止中")
				break;
			}
		}
		var lastUpdateNode = $('#' + device + '_last_update')
		var date = new Date(data.val().last_update)
		lastUpdateNode.text(date)
	}
});
まとめ
製作期間はトータルで5日くらい。
みるからに怪しいので問い合わせが相次ぎました。
