この記事は「WACUL Advent Calendar 2016」の3日目です。
今年の10月からWACULでフロントエンドエンジニアをしている@bokuwebと申します。
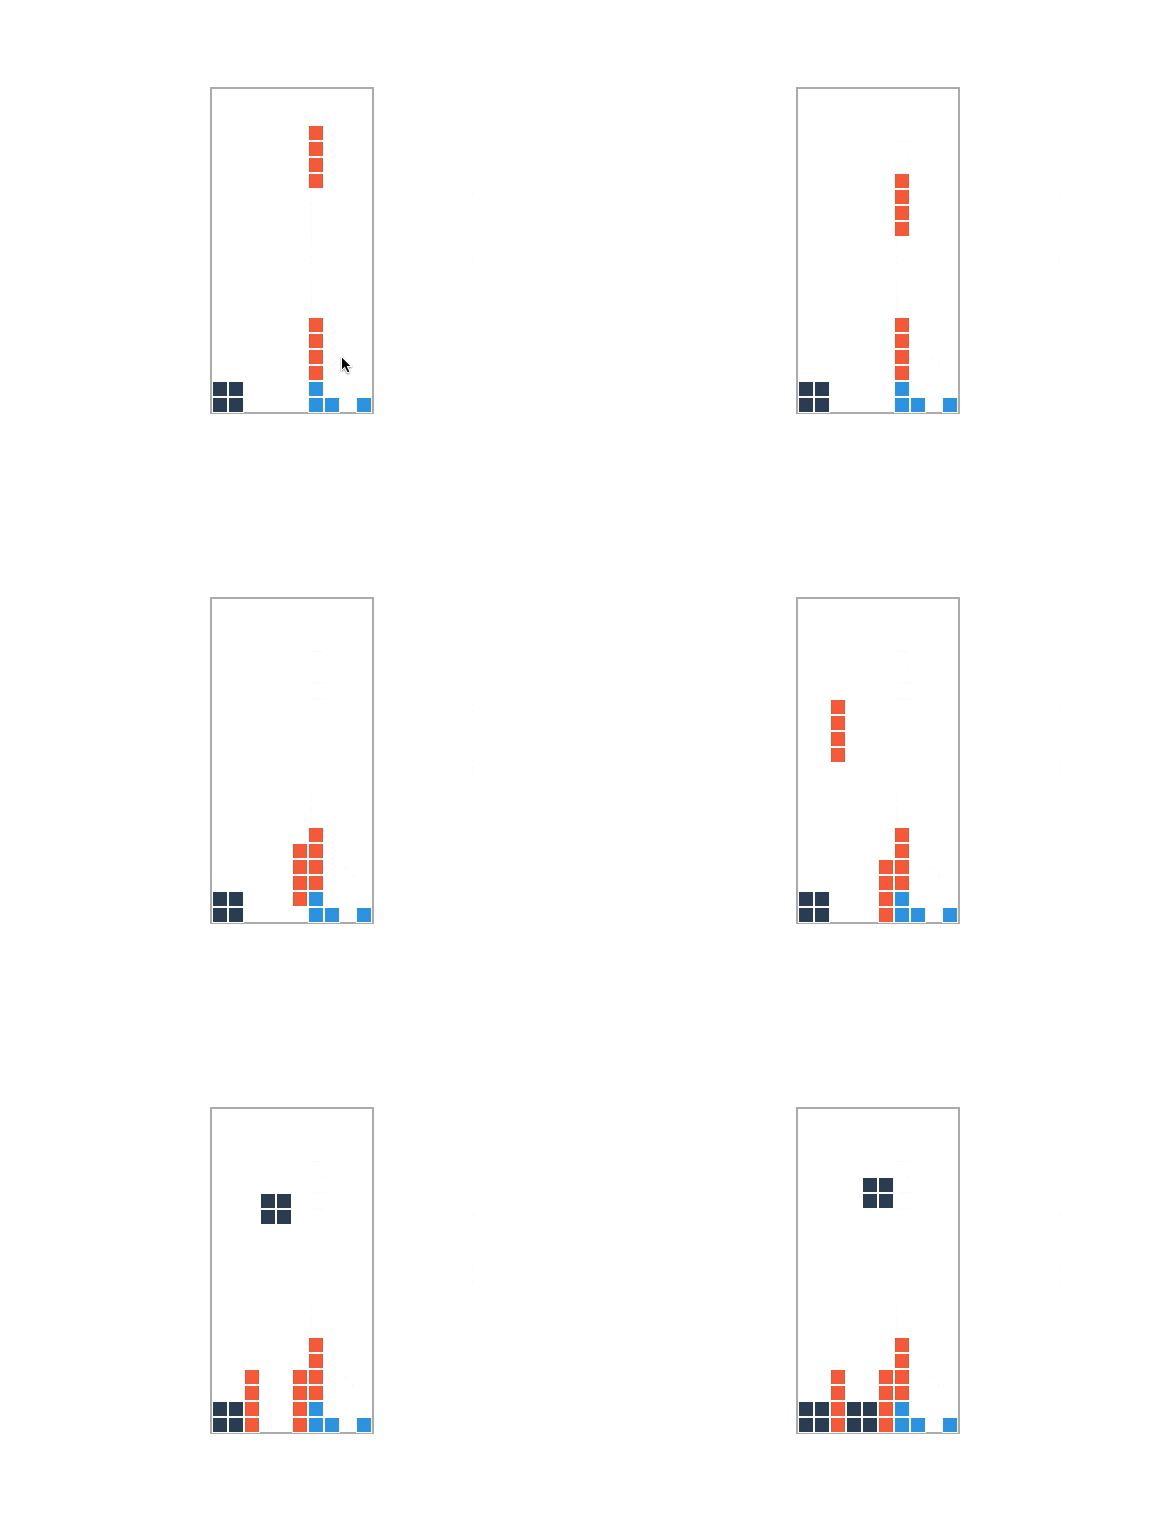
本記事ではRxJSの勉強にテトリスを実装した話しを書いてみます。
つくったもの
リポジトリ: https://github.com/bokuweb/rxjs-tetris
デモ: https://bokuweb.github.io/rxjs-tetris/
デモの遊び方
Enterキーでゲームが開始します。(音が鳴るのでご注意ください。)
→ : ブロックを右へ移動
← : ブロックを左へ移動
↓ : ブロックを下へ移動
SPACE : ブロックを回転
実装
概要
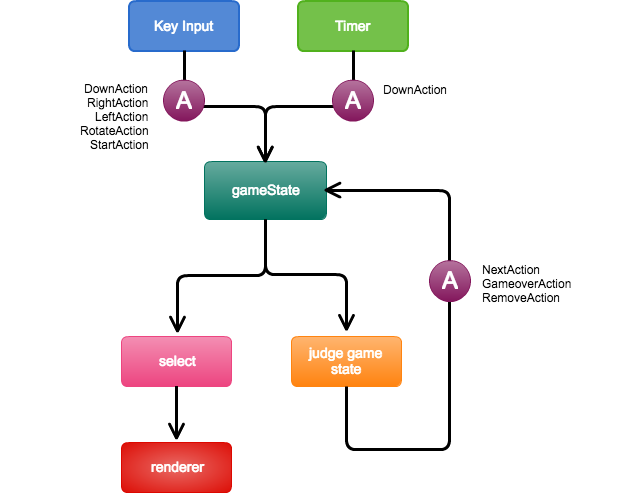
先に全体の流れを図示すると以下のような構成になりました。
後述しますが、Timer/KeyInput``StraemからActionが発行され、ゲームのステートを更新していきます。更新されたゲームのステートから描画を行うとともに、ゲームオーバー判定や、行削除の有無などの判定を行いActionを投げる形となっています。
Action
例えばゲームの開始やブロックの回転、ブロックの移動などのイベントをActionとして定義しています。ActionはActionSource$を介して次のように発行されます。
ActionSource$.next(new RemoveAction(removeRows))
この辺はTackling Stateという記事を参考にしています。
// src/actions.ts
import { Subject } from "rxjs/Subject";

export const actionSource$ = new Subject();

export type Action = NextAction |
  StartAction |
  DownAction |
  LeftAction |
  RightAction |
  RotateAction |
  GameoverAction |
  RemoveAction;

export class NextAction {
  constructor () {}
}

export class StartAction {
  constructor () {}
}

export class DownAction {
  constructor () {}
}

export class LeftAction {
  constructor () {}
}

export class RightAction {
  constructor () {}
}

export class RotateAction {
  constructor () {}
}

export class GameoverAction {
  constructor () {}
}

export class RemoveAction {
  constructor (public removeRows: number[]) {}
}
Key Input
キー入力はfromEventでkeydownイベントを変換mapで各ActionにマッピングしActionSource$に渡しています。これで各キー入力に応じてActionが発行されることになります。
// src/index.ts
const keyEvent$ = Observable
  .fromEvent(document, 'keydown')
  .map((k: KeyboardEvent) => {
    switch(k.code) {
      case 'ArrowRight': return new RightAction();
      case 'ArrowLeft': return new LeftAction();
      case 'ArrowDown': return new DownAction();
      case 'Enter': return new StartAction();
      case 'Space': return new RotateAction();
      default: return;
    };
  })
  .filter((action) => !!action)
  .subscribe(actionSource$);
Timer
タイマーはintervalにて作成しています。以下で500ms毎にDownActionが発行されることになります。
// src/index.ts
Observable
  .interval(500)
  .map(_ => new DownAction())
  .subscribe(actionSource$);
game State
ゲームのステートとして、ポーズ中かどうか、落下中のブロックのステート、フィールドのステートを保持しています。ここはReduxでいうところのReducerに相当しています。
すなわち、scanを使用して前述のActionを受け取る度に、前回の状態とActionを引数にもらい次回ステートを演算して返す処理を行います。
このように状態をストリーム内に保持するためにscanはよく使用するoperatorだと思います。(ちなみにreduceというoperatorもありますが、こちらはcompleteしないと値が流れないため、scanのほうが使用頻度が高い印象があります。)
このあたりは「Reactive Programing with RxJS」 *1 にもAvoiding External State、Using scanと書いてあります。パイプラインの外にステートを持ってしまうと、アプリケーションが複雑になった際にバグの温床となるということですね。
*1 この書籍はRxJS5には未対応なのでご注意ください。
// src/index.ts

interface AppState {
  isPaused: boolean;
  block: Block;
  field: Field;
}

const gameState$ = actionSource$
  .scan((state: AppState, action: Action) => {
    if (action instanceof StartAction) {
      return assign(state, { isPaused: false } );
    } else if (action instanceof DownAction) {
      if (state.isPaused) return state;
      if (!isLocked(state)) state.block.y += 1;
      return state;
    } else if (action instanceof LeftAction) {
      if (canMoveX(state, -1)) state.block.x -= 1;
      return assign({}, state);
    } else if (action instanceof RightAction) {
      if (canMoveX(state, 1)) state.block.x += 1;
      return state;
    } else if (action instanceof NextAction) {
      const block = getRandomBlock();
      const newField = createNewField(state.field, state.block);
      return assign(state, { block, field: newField });
    } else if (action instanceof RotateAction) {
      const rotatedBlock = assign({}, state.block, { shape: getRotatedShape(state.block.shape) });
      const block = isCollision(state.field, rotatedBlock) ? state.block : rotatedBlock;
      return assign(state, { block });
    } else if (action instanceof RemoveAction) {
      action.removeRows.forEach((rowIndex: number) => {
        state.field.splice(rowIndex, 1);
        state.field.unshift(range(config.ROW).map(() => 99))
      });
      return state;
    } else if (action instanceof GameoverAction) {
      return createInitState();
    } else {
      return state;
    }
  }, createInitState())
  .share()
上記の固まりをみてもわかりにくいですが、あるActionに着目してみると非常に単純な処理をおこなっているだけです。
例えば以下はDownActionを受け取ったらブロックを1マス下に移動したステートを作成し、次回ステートとして反映するということを行っています。
else if (action instanceof DownAction) {
  if (state.isPaused) return state;
  if (!isLocked(state)) state.block.y += 1;
  return state;
Render
gameState$から必要なステートをselectかつ、ブロックのステートと、フィールドのステートを合成して描画すべきフォールドを生成、renderに渡しています。
// src/index.ts
gameState$
  .map((state: AppState) => ({
    isPaused: state.isPaused,
    field: createNewField(state.field, state.block)
  }))
  .subscribe(render);
renderは蛇足ですが、snabbdom/snabbdomを使用しています。特に理由はないのですが、どうせなら使ったことのないものを触ってみようという意図です。
以下が記述になります。パッと見拒否反応を示す人もいるかもしれませんが、自分はmithril.jsで遊んでいたこともあり、割りと好みです。
描画はdiv要素を敷き詰めて、fieldとblockの状態を合成したものをマッピングしています。
ポーズの場合だけは、そのメッセージを表示するようにしています。
import { Renderer, h } from './renderer';
import { colors } from './shape';

const renderer = new Renderer();
renderer.mount(document.getElementById('container'), h('div'));

export const render = (state: any ) => {
  const vnode = h('div', [
    state.isPaused
      ? h('div', 'Press enter key to start')
      : h('div.field', state.field.map((row: number[]) => (
        h('div.raw', row.map(cell => (
          h(`div.cell${cell !== 99 ? '--active' : ''}`,
            { style: { backgroundColor: colors[cell] }})))
         )
      )))
  ]);
  renderer.update(vnode);
};
Judge game state
ここでは流れたきたステートを見て、各種判定を行い、必要に応じてActionを発行しています。
まずは、接地判定を行い、接地していたらNextActionを発行し次のブロックを用意させます。
テトリスって接地した後も1マス分横にスライドできたりするんですよね。最初はこの辺無視してたんですが、いざ遊んでみると結構重要な要素っぽく、bufferCountでFIFOつくって対応しました。(この辺もっといいOperatorありそうな気がしますが。。)
また、この接地判定は行が消せるかどうかの判定にも使用したいためshareでhot化しています。
const isLocked$ = gameState$
  .map((state: AppState) => isLocked(state))
  .bufferCount(2, 1)
  .map(lockedBuffer => (
    lockedBuffer.every(isLocked => isLocked)
  ))
  .share()

isLocked$
  .distinctUntilChanged()
  .filter(isLocked => !!isLocked)
  .map(_ => new NextAction())
  .do(() => beeper.next(100))
  .subscribe(actionSource$);
ここではゲームオーバー判定をおこなっています。次のブロックを用意した段階で衝突していたらゲームオーバーとしています。
gameState$
  .filter((state: AppState) => state.block.y === 0)
  .filter((state: AppState) => (
    isCollision(state.field, state.block) || isLocked(state)
  ))
  .map(_ => new GameoverAction())
  .delay(200)
  .subscribe(actionSource$);
ゲームのステートとisLocked$ストリームをcombineし、接地状態であれば、消せる行がないか走査するようにしています。横一列そろっている消すことが可能な行があった場合、音を鳴らし、RemoveActionを発行するようにしています。
delay(50)してるのは接地から削除までの隙間時間を設けるために入れました。これがないと本当に接地した瞬間に消えてしまいブロックを置いた感が無かったからです。
gameState$
  .combineLatest(isLocked$)
  .delay(50)
  .filter(([_, isLocked]) => isLocked)
  .map(([state, _]: [AppState, boolean]) => (
    getRemovableRows(state.field)
  ))
  .filter(removeRows => removeRows.length > 0)
  .do(() => beeper.next(400))
  .map(removeRows => new RemoveAction(removeRows))
  .subscribe(actionSource$);
Audio(おまけ)
これは完全に蛇足なんですが、音が全くならないとフィードバックがなくイマイチだったのでWebAudioで矩形波をつくって、適当な周波数を放り込んでいます。これにより、ブロックが消えたときにピロってなります。
src/sounder.ts
import { Subject } from 'rxjs';

const audio = new window.AudioContext;
export const beeper = new Subject();
beeper.sampleTime(100).subscribe((hz: number) => {
    const oscillator = audio.createOscillator();
    oscillator.connect(audio.destination);
    oscillator.type = 'square';
    oscillator.frequency.value = hz;
    oscillator.start();
    oscillator.stop(audio.currentTime + 0.1);
});
例えば以下で400Hzの音が鳴ることになります。
beeper.next(400);
まとめ
他にも細かいものがありますが、大まかには上記のストリーム等をつなげていくことでこのテトリスは構築されています。
テトリスがRxJSの学習の題材としてよかったかというと、疑問符がつきますが、それでも学ぶところも多く楽しい題材でした。ただ、やはりRxJSが一番生きる題材と言えばもう少し時間的な制御が必要なものだったかもしれません。
最後に勉強するに当って参考になって記事やページを挙げておきます。
参考記事
社内フロント勉強会のRx回では以下のLearn RxJSの★付きOperatorをみんなで眺めました。なかなかよかったですが、サンプルがひどいケースもあるので他の資料やマーブルダイアグラムも合わせて眺めるのが効果的でした。
その中でもRx逆引きとその中でリンクが貼られている、RxJavaのjavadocを見ると結構よかったです。

