I bought a fitbit device more than 2 years ago. Since then, using the wearable device and its app, almost everything in my ordinary life have been being logged such as workouts, steps, heart rate, sleeps, weights and calories. One of my habit is measuring and logging how many hours I spend for certain tasks 24/7. As I am such a crazy person, fitbit became one of my indispensable tools to gather data around my everyday life.
Now, I am using Google Spreadsheet for logging and analyzing data such as my hourly time usage. But on the other hand, all data gathered by fitbit is stored in my fitbit app and fitbit's server. As you know, it is very inconvenient if data is stored in multiple platforms separately. So it should be in the same place as long as possible. Also, one of my dissatisfactions about fitbit's app is that it is not so user friendly if you want to investigate your long-term data trend. And one more thing, last week I bought a new device fitbit charge 2, and thanks to its software update, now fitbit can log and analyze your sleep with more detail.
As a result, I decided to create a simple program which retrieve sleep log data from fitbit API and return it to Google Spreadsheet in order to incorporate sleep logs into my hourly task logs. In addition, in order to run the program once a day regularly (because fitbit gathers data every single day), AWS EC2 instance and Lambda/CloudWatch service are used.
1. Fitbit API Authorization and Request
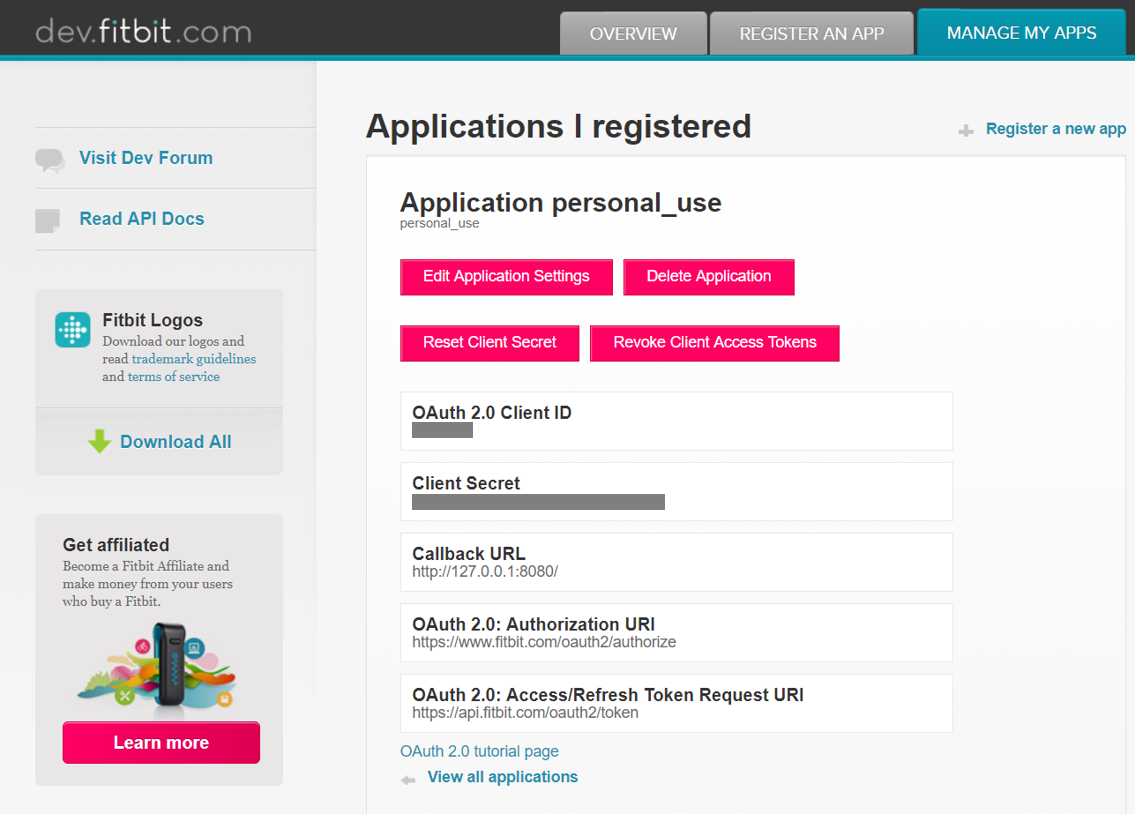
To use Fitbit API, first of all, you need to register your application: https://dev.fitbit.com/apps/new
If you don't have your application yet and there is no specific callback URL, just set http://127.0.0.1:8080 as Callback URL. (Note that personal_use is just the name of this application.)
For more detailed information about fitbit API authorization, refer this link: https://dev.fitbit.com/reference/web-api/oauth2/)
Then, you can access to the following url with parameters.
In my case, I set all scopes for permission and set expires_in, which defines the life time of the token, as 1 year.
Refer this link for more detailed information: https://dev.fitbit.com/reference/web-api/oauth2/#implicit-grant-flow
https://www.fitbit.com/oauth2/authorize?response_type=token&client_id=******&redirect_uri=http%3A%2F%2F127.0.0.1%3A8080%2F&scope=activity%20nutrition%20heartrate%20location%20nutrition%20profile%20settings%20sleep%20social%20weight&expires_in=31536000
Once you access to the above URL, it returns the following page. (You may need to login to your fibit account.)
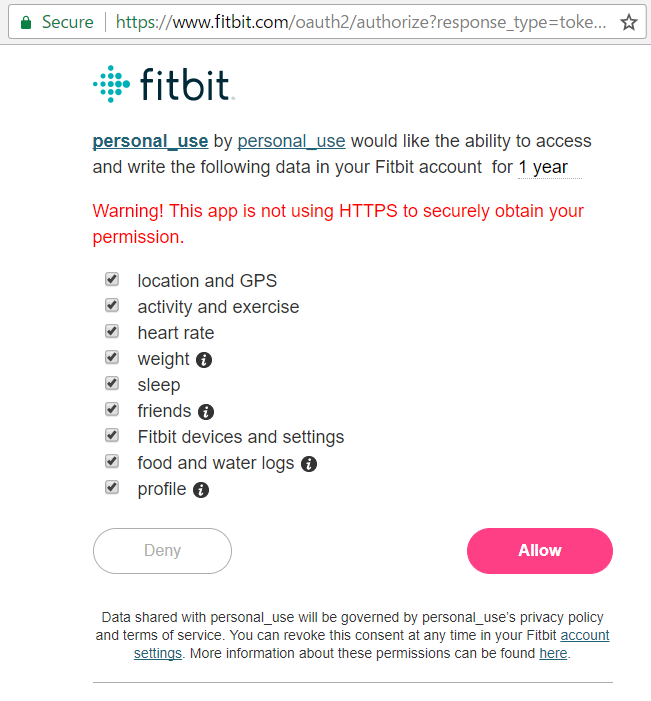
After clicking allow, an access token will be returned in URL bar on your browser. (This seems awkward but it is okay as I just needed an access token now.)

Finally, using the access token you can get your sleep log via fitbit API with the following a few lines.
For more detailed information about fitbit API sleep log, refer this link: https://dev.fitbit.com/reference/web-api/sleep/
# Get sleep logs
import requests

headers = {"Authorization" : "Bearer " + access_token}
http_request_get_test = "https://api.fitbit.com/1.2/user/-/sleep/date/2017-11-06.json"
r = requests.get(http_request_get_test, headers=headers)
2. Update Spreadsheet via Google Spreadsheet API
For logging fitbit data in google spreadsheet, no special operations are necessary. Just insert a new row and add daily sleep logs to the row. Before moving on to the operation, no matter what API you use, you need to authorize your API operation at first.
To get credential for Google Spreadsheet API, just follow the instruction: https://developers.google.com/sheets/api/quickstart/python
In the URL, get_credentials() function in quickstart.py is used for testing authorization. You can use this function in your code as well to get and store credential.
def get_credentials():
    home_dir = os.path.expanduser('~')
    credential_dir = os.path.join(home_dir, '.credentials')
    if not os.path.exists(credential_dir):
        os.makedirs(credential_dir)
    credential_path = os.path.join(credential_dir,
                                   'sheets.googleapis.com-python-quickstart.json')
    store = Storage(credential_path)
    credentials = store.get()
    if not credentials or credentials.invalid:
        flow = client.flow_from_clientsecrets(CLIENT_SECRET_FILE, SCOPES)
        flow.user_agent = APPLICATION_NAME
        if flags:
            credentials = tools.run_flow(flow, store, flags)
        else:  # Needed only for compatibility with Python 2.6
            credentials = tools.run(flow, store)
        print('Storing credentials to ' + credential_path)
    return credentials
In addition, you need to create a Sheet API service object to use Sheet API. So just like described in main() function, I defined service_create() function as below.
def service_create():
    # Creates a Sheets API service object
    credentials = get_credentials()
    http = credentials.authorize(httplib2.Http())
    discoveryUrl = ('https://sheets.googleapis.com/$discovery/rest?'
                    'version=v4')
    service = discovery.build('sheets', 'v4', http=http,
                              discoveryServiceUrl=discoveryUrl)
    return service
Now, you are authorized to operate Sheet API. To insert rows, the following function is used.
For more detail about row/column operation, refer this document: https://developers.google.com/sheets/api/samples/rowcolumn
def insert_row(service, spreadsheet_id, sheet_id, start_Index, end_Index):
    insert_row_requests = [
            {
                "insertDimension": {
                    "range": {
                        "sheetId": sheet_id,
                        "dimension": "ROWS",
                        "startIndex": start_Index,
                        "endIndex": end_Index
                    }
                }
            }
        ]

    body = {
        "requests": insert_row_requests
    }
    response = service.spreadsheets().batchUpdate(spreadsheetId=spreadsheet_id,
                                                  body=body).execute()
Note that you need to know sheet_ID (not spreadsheet_ID) to add rows/columns to a sheet. To get the property information, you can use the following function. It returns sheet properties as json. By properly parsing the json, you can get information you need.
def get_sheet_properties(service, spreadsheet_id):
    request = service.spreadsheets().get(spreadsheetId=spreadsheet_id)
    sheet_properties_response = request.execute()
    return sheet_properties_response
Finally, you are ready to write fitbit log data to your spreadsheet. Giving the values to be added to your sheet in list format to the following function, you will see the data on your spreadsheet.
For more detailed information, refer the document: https://developers.google.com/sheets/api/guides/values
def write_spreadsheet(service, spreadsheet_id, sleep_log_list, range_name):
    values = [
        sleep_log_list
    ]

    data = [
        {
            'range': range_name,
            'values': values
        }
    ]

    body = {
        'valueInputOption': "USER_ENTERED",
        'data': data
    }

    result = service.spreadsheets().values().batchUpdate(
        spreadsheetId=spreadsheet_id, body=body).execute()
At this point, python code which gathers data from fitbit API and update spreadsheet via Google API is ready. The last todo task is to schedule this python code execution on a regular basis such as once a day.
3. Run Python Code Regularly with AWS Lambda and CloudWatch
First, I launched and configured a new EC2 instance which execute the python code automatically every time when it boots up. Then, I learned about scheduled task operation with AWS Lambda and CloudWatch and created a scheduled event by which a EC2 instance start/stop automatically on a regular basis. The following is what I did.
First of all, launch a new instance. Then, install python 3 to the instance. Note that AWS image already has python 2.7 installed initially so that you need to install python 3 by yourself. Also, you need to be sure that, when you run python 3 code on the instance, you need call python3 to specify python version explicitly in this environment.
$ python3 --version
Python 3.6.2
Next, set cron schedule to execute a command when the instance boots up as described in the link: http://smallbusiness.chron.com/run-command-startup-linux-27796.html
This time I created a simple shell script which cd to move to the path where the .py is stored and python3 to execute the .py.
$ sudo crontab -e
@reboot /command/to/execute/when/rebooting
Now the instance is configured to execute the fitbit_logger.py when it boots up. Therefore, the last task is to scheduling start/stop the instance with AWS Lambda and CloudWatch.
To tell the truth, the method to schedule EC2 instance start/stop regularly is explained well in the following document: https://aws.amazon.com/jp/premiumsupport/knowledge-center/start-stop-lambda-cloudwatch/
Before creating a new lambda function, you need to create a new IAM role and edit its policy to allow it to start/stop EC2 instances.
{
  "Version": "2012-10-17",
  "Statement": [
    {
      "Effect": "Allow",
      "Action": [
        "logs:CreateLogGroup",
        "logs:CreateLogStream",
        "logs:PutLogEvents"
      ],
      "Resource": "arn:aws:logs:*:*:*"
    },
    {
      "Effect": "Allow",
      "Action": [
        "ec2:Start*",
        "ec2:Stop*"
      ],
      "Resource": "*"
    }
  ]
}
Create a function for stopping EC2 instance like below.
import boto3
# Enter the region your instances are in. Include only the region without specifying Availability Zone; e.g., 'us-east-1'
region = 'XX-XXXXX-X'
# Enter your instances here: ex. ['X-XXXXXXXX', 'X-XXXXXXXX']
instances = ['X-XXXXXXXX']

def handler(event, context):
    ec2 = boto3.client('ec2', region_name=region)
    ec2.stop_instances(InstanceIds=instances)
    print 'stopped your instances: ' + str(instances)
Create a function for starting EC2 instance like below.
import boto3
# Enter the region your instances are in. Include only the region without specifying Availability Zone; e.g.; 'us-east-1'
region = 'XX-XXXXX-X'
# Enter your instances here: ex. ['X-XXXXXXXX', 'X-XXXXXXXX']
instances = ['X-XXXXXXXX']

def lambda_handler(event, context):
    ec2 = boto3.client('ec2', region_name=region)
    ec2.start_instances(InstanceIds=instances)
    print 'started your instances: ' + str(instances)
After a lambda function is created, you can test the function. You can move on to the next step if the function works as you expect.
For starting/stopping instances on a regular basis, you need to create a rule on AWS CloudWatch. Go to CloudWatch console and create a new rule like below: https://console.aws.amazon.com/cloudwatch/
Here, for a test purpose, set cron 0/10 * * * ? * which means it is scheduled for every 10 minutes. Later it was changed to 0 13 * * ? * for the lambda function to start fitbit logger instance once a day at 1 PM (since fitbit logger is currently only for sleep log). For the function to stop fitbit logger instance, it was set as 10,30 13 * * ? *

That's all. Now fitbit sleep log data is gathered from fitbit API and inserted into my Google Spreadsheet once a day. Thanks to this simple tool, I can easily check my everyday sleep logs just by checking my management spreadsheet, in which some other logs are stored. After enough amount sleep logs are stored in the sheet, I will analyze its long term trend comparing other logs which I have been logging for years.
Memo
-
By default, Amazon Linux instances are set its time zone as UTC. So you may need to change its time zone by following the below link.
http://docs.aws.amazon.com/AWSEC2/latest/UserGuide/set-time.html -
Sometimes it is bothering to connect to your instance via ssh client. By creating teraterm shortcut with the following parameters in target link, just click the shortcut and you can access to the instance. Unfortunately, in this post's case, the logger instance boots/stops everyday, as a result, its dns name changes everyday so this method is not so helpful. I just don't have strong reasons to assign static public IP to this instance: http://docs.aws.amazon.com/AWSEC2/latest/UserGuide/elastic-ip-addresses-eip.html
C:\path\to\teraterm\ttermpro.exe" ec2-###-###-###-###.ap-northeast-1.compute.amazonaws.com:22 /ssh2 /auth=publickey /user=ec2-user(or could be other user name) /keyfile="C:\path\to\your\key\file.pem