機械学習のライブラリ(dlib)を使って物体検出してみます
http://dlib.net/ml.html#structural_object_detection_trainer を試します。
用意するもの
- raspberry-pi 2 or 3 とか
- 学習させたいものが写ってる画像20-30枚くらい
-
~/my_imagesに保存していると仮定 - 学習させたいもの以外の物も写っている方が良い
今回学習させたいもの:
apple tv の youtubeに出てくる何か なにをさせたいかはお察しください(´・ω・`)
dlibをインストール
まずは関連ライブラリ群をインストール:
$ sudo apt-get install -y cmake gfortran graphicsmagick libgraphicsmagick1-dev libatlas-dev libavcodec-dev libavformat-dev libboost-all-dev libgtk2.0-dev libjpeg-dev liblapack-dev libswscale-dev python-dev python-protobuf software-properties-common
pipを使う場合:
$ sudo pip install dlib
anacondaを使う場合:
$ conda install -c menpo dlib
自分でビルドする場合(バージョンは適当に):
$ git clone -b v19.0 --depth=1 https://github.com/davisking/dlib
$ cd dlib && python setup.py install --yes USE_AVX_INSTRUCTIONS
raspberry-pi2で1hくらいかかります
学習準備
画像に写っている物体をラベルするためにimglabを使います。
imglab(dlib/tools)をコンパイル(バージョンは適当に):
$ git clone -b v19.0 --depth=1 https://github.com/davisking/dlib
$ cd dlib/tools/imglab/ && mkdir build && cd build && cmake .. && cmake --build . --config Release
raspberry-pi2で0.5hくらいかかります
トレーニング用に、10-20枚程度の画像からターゲットとなる物体をラベリングします:
$ cd ~/my_images
$ ~/dlib/tools/imglab/build/imglab -c training.xml training_*.jpg
$ ~/dlib/tools/imglab/build/imglab training.xml
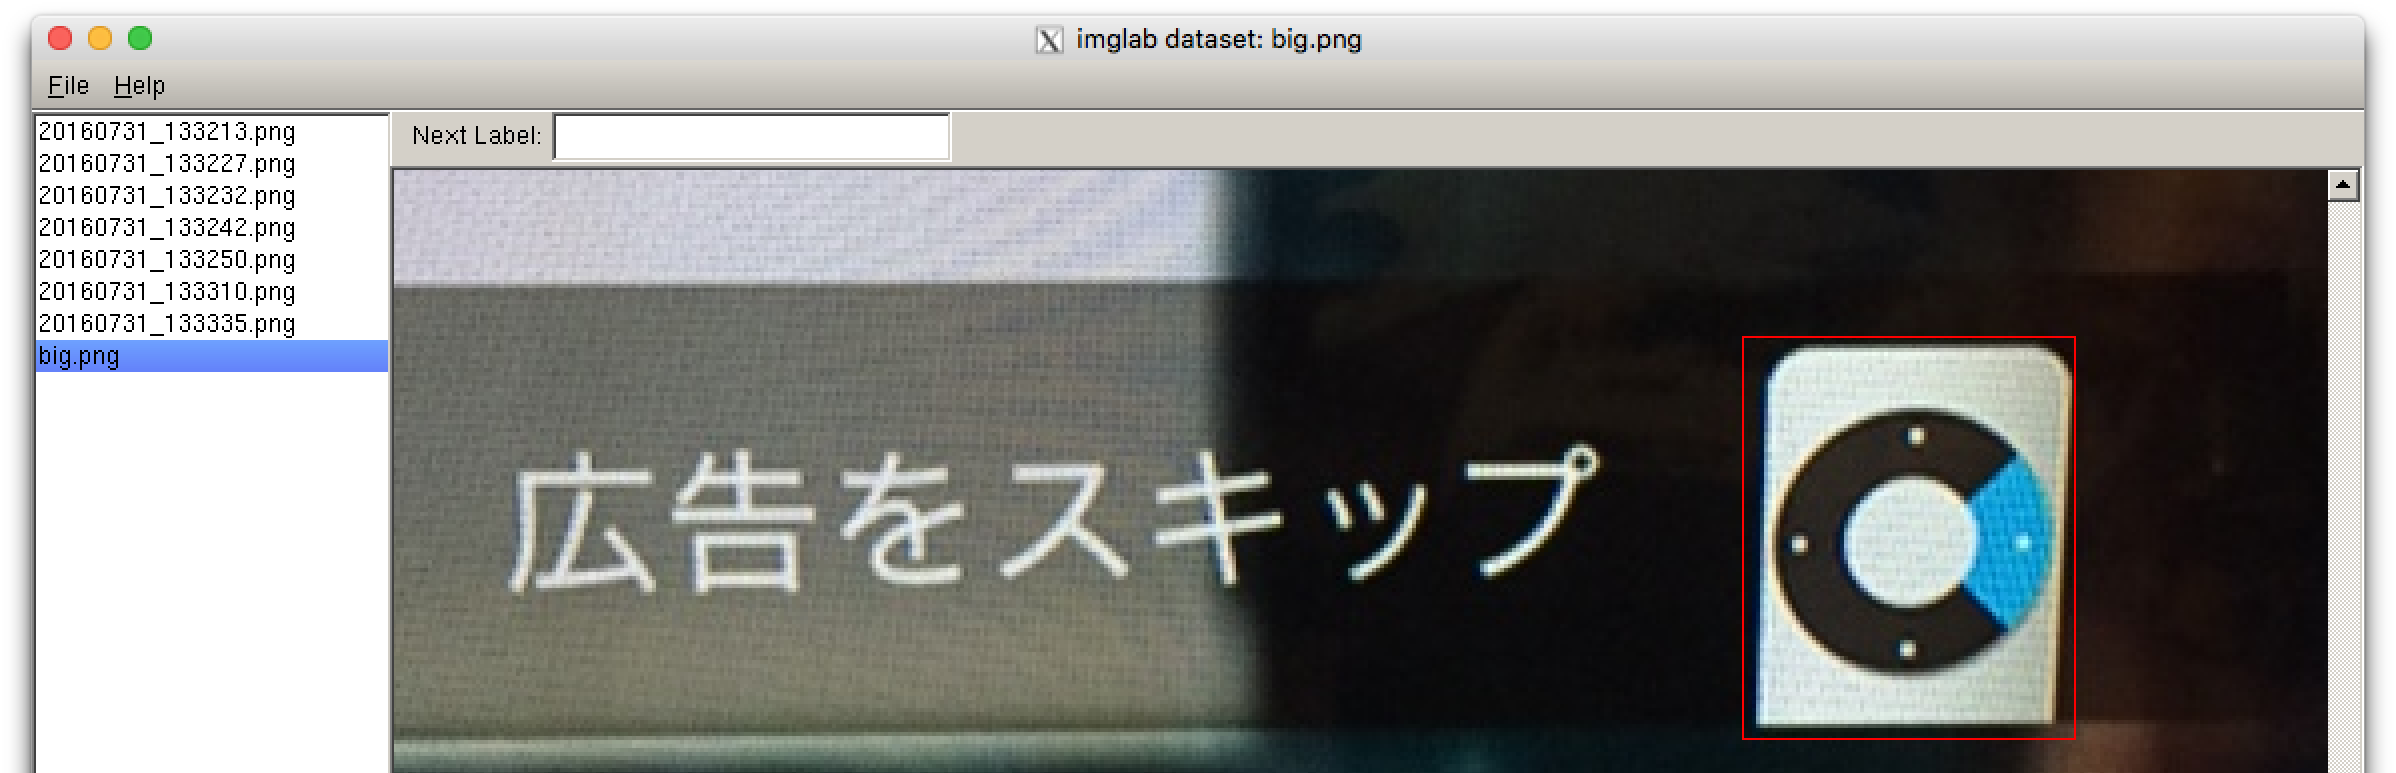
imglabのGUIで↓のようにターゲットとする画像をshiftを押しながらマウスで指定します:
同様に、テスト用にも何枚か(5枚くらい?)画像を選択してラベリングします:
$ cd ~/my_images
$ ~/dlib/tools/imglab/build/imglab -c testing.xml testing_*.jpg
$ ~/dlib/tools/imglab/build/imglab testing.xml
学習
http://dlib.net/train_object_detector.py.html を修正して利用します↓
~/trainning_object_detector.py:
import os
import sys
import dlib

img_dir = "."

options = dlib.simple_object_detector_training_options()
options.add_left_right_image_flips = False
options.C = 5
options.num_threads = 2
options.be_verbose = True

training_xml_path = os.path.join(img_dir, "training.xml")
testing_xml_path = os.path.join(img_dir, "testing.xml")

dlib.train_simple_object_detector(training_xml_path, "detector.svm", options)

print("")
print("Training accuracy: {}".format(
    dlib.test_simple_object_detector(training_xml_path, "detector.svm")))
print("Testing accuracy: {}".format(
    dlib.test_simple_object_detector(testing_xml_path, "detector.svm")))
これを実行すると:
$ cd ~/my_images
$ python ~/trainning_object_detector.py
:
(snip)
:
Training complete.
Trained with C: 5
Training with epsilon: 0.01
Trained using 2 threads.
Trained with sliding window 74 pixels wide by 86 pixels tall.
Upsampled images 2 times to allow detection of small boxes.
Saved detector to file detector.svm

Training accuracy: precision: 1, recall: 1, average precision: 1
Testing accuracy: precision: 1, recall: 1, average precision: 1
これでdevector.svmができあがります。画像枚数によりますが、raspberry-pi2で0.5hくらいかかります。
最後の行の average precisionが1になっていると良い学習ができたということになります。
実践
USBカメラをOpenCVをつかって学習した結果をみてみましょう
用意するもの
- USBカメラ(UVCに対応してると接続がラク)
事前準備
カメラを使うためにopencvを導入しましょう
$ sudo apt-get install python-opencv
やってみる
カメラで物体検出をするサンプル:
import dlib
import cv2

detector = dlib.simple_object_detector("detector.svm")

cap = cv2.VideoCapture(0)

while(True):
    # Capture frame-by-frame
    ret, frame = cap.read()
    frame = cv2.cvtColor(frame, cv2.COLOR_BGR2RGB)

    dets = detector(frame)

    for d in dets:
        cv2.rectangle(frame, (d.left(), d.top()), (d.right(), d.bottom()), (0, 0, 255), 2)

    # Display the resulting frame
    cv2.imshow("frame",frame)
    if cv2.waitKey(1) & 0xFF == ord('q'):
        break

# When everything done, release the capture
cap.release()
cv2.destroyAllWindows()
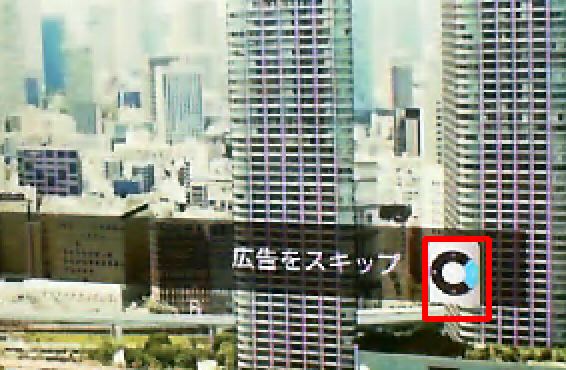
無事に検出できました:
誤検知した場合は?
誤検知した画像をtraining.xmlファイルに追加して、再度学習(training_object_detect.py)しましょう。
例:
  <image file='20160808_164302_016705.png'>
  </image>
参考
- HOG特徴とSVMによる物体検出 http://ishi.main.jp/ros/ros_obj_detection.html