AWS Configを使うと、EC2インスタンスと関連アイテムの初期状態と関連性のキャプチャーおよび、作成・削除・プロパティ変更の追跡をすることができます。http://aws.typepad.com/aws_japan/2014/11/track-aws-with-config.html (AWSブログ)
このAWSブログに紹介されているConfigパートナーはいずれも有料のサービスです。そのため、「ちょっと試す」というのは面倒な人も多いかと思います。
そこで今回はGraphvizのJavaScript実装であるViz.jsを使ってなんちゃって可視化をしてみることにします。https://github.com/mdaines/viz.js/
viz.jsは次のURLからviz.jsというファイルを取ってくればそれでOKです。 https://github.com/mdaines/viz.js/releases
ここからは、awscli(1.6.3にあげてから!)とjqの出番です。
aws configservice --region us-east-1 get-resource-config-history --resource-id インスタンスID --resource-type AWS::EC2::Instance
このコマンドで、任意のインスタンスIDの変更履歴のJSONを取得できます。このJSONは全関係リソースを含むのでやたらと長いものになりますが、ここは思い切って削りましょう
jq .configurationItems[履歴の数].relationships[].resourceId
おそらく、SecurityGroupやENIなどが現れます.ここからgraphvizの矢印を定義します。
digraph instance {
"i-ebf54xxx" -> "eipalloc-f85f3xxx";
"i-ebf54xxx" -> "eni-1f5f3xxx";
"i-ebf54xxx" -> "sg-662dfxxx";
"i-ebf54xxx" -> "subnet-685d3xxx";
"i-ebf54xxx" -> "vol-3ce6cxxx";
"i-ebf54xxx" -> "vpc-6f5d3xxx";
}
できてしまえば、これをviz.jsに読ませるだけです。
というわけで、これを一気にやってしまうshをつくりましょうか。
# !/bin/sh

rm -rf tmp/*

mkdir -p tmp
aws configservice --region us-east-1 get-resource-config-history --resource-id i-ebf54xxx --resource-type AWS::EC2::Instance > i-ebf54xxx.current.txt
FILE="i-ebf54xxx.current.txt"
I_ID="i-ebf54xxx"

STATE_ID=`jq .configurationItems[0].configurationStateId $FILE |sed 's/[^0-9]//g'`

echo $STATE_ID
STATE_ID2=`expr $STATE_ID - 1`
echo $STATE_ID2

for a in $(seq 0 $STATE_ID2)
do
    C_TIME=`jq .configurationItems[$a].resourceCreationTime $FILE |sed 's/[^0-9]//g'`
    echo $C_TIME
    jq .configurationItems[$a].relationships[].resourceId $FILE |sort > tmp/$a
done

ruby digmake2.rb $I_ID > tmp/index.html
cp viz.js tmp/
# !/usr/bin/env ruby
require 'erb'

i_id = ARGV[0]

tmpfiles = Dir.glob("tmp/*")
outtexts = Array.new

tmpfiles.each do |tmpfile|

  outtext = "digraph instance {\n"
  fo = File.open(tmpfile, "r")

  while fo.gets
    outtext += '"' + i_id + '" -> ' + $_.chomp + ";\n"
  end
  outtext += "}\n"
  outtexts.push(outtext)
end

@dots = outtexts

fhtml = open("dig-html2.rhtml")
puts ERB.new(File.open("dig-html2.rhtml").read).result(binding)
<html>
<head>
<meta charset="utf-8">
<title>Viz</title>
</head>
<body>
<% i = 0 %>
<% @dots.each do |dot| %>
<script type="text/vnd.graphviz" id="cluster_<%=i%>">
<%= dot %>
</script>
<% i += 1 %>
<%end%>
<script src="viz.js"></script>
<script>
function inspect(s) {
return "<pre>" + s.replace(/</g, "<").replace(/>/g, ">").replace(/\"/g, """) + "</pre>"
}
function src(id) {
return document.getElementById(id).innerHTML;
}
function example(id, format, engine) {
var result;
try {
result = Viz(src(id), format, engine);
if (format === "svg")
return result;
else
return inspect(result);
} catch(e) {
return inspect(e.toString());
}
}
<% i = 0 %>
<% @dots.each do |dot| %>
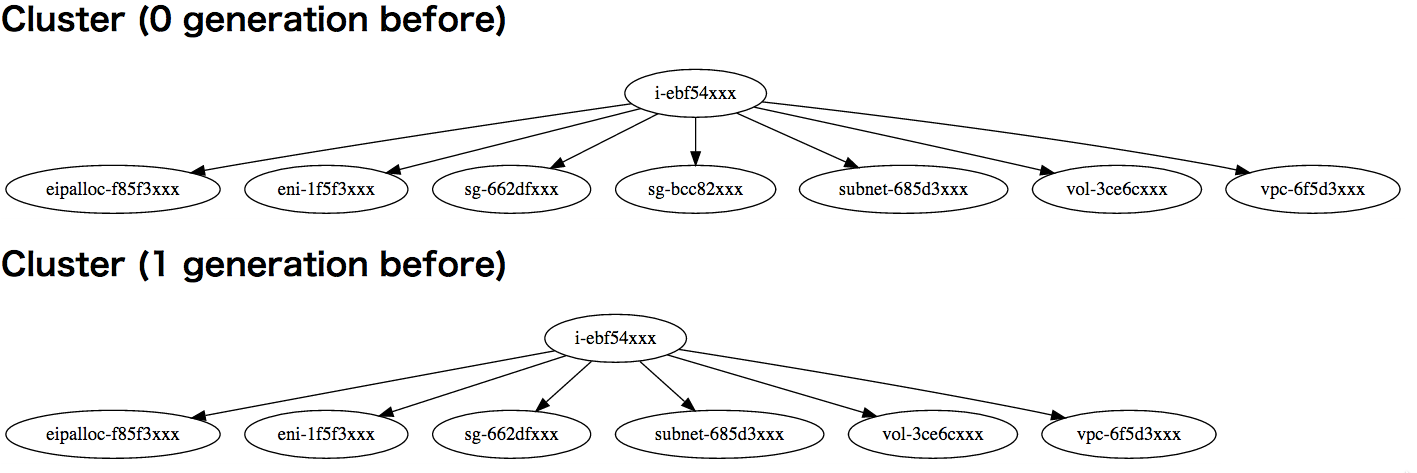
document.body.innerHTML += "<h1>Cluster (<%=i%> generation before)</h1>";
document.body.innerHTML += example("cluster_<%=i%>", "svg");
<% i += 1 %>
<%end%>
</script>
</body>
</html>
ここまで行ったら、tmp/index.htmlをブラウザで開くだけです。
あとは工夫しだいです!