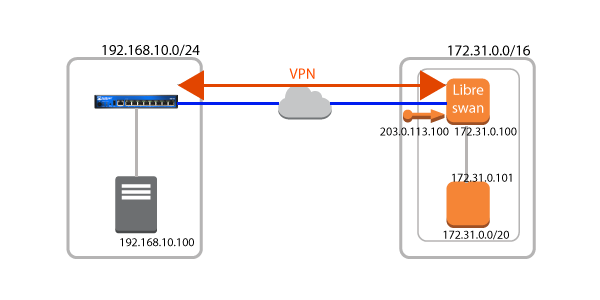
IPsecのアグレッシブモードを利用すれば動的なパブリックIPアドレスでも拠点間VPNを張ることができます。このような拠点とAWSのVPCとVPN接続をする場合、VGW(Virtual Private Gateway)はアグレッシブモードには対応していないため、ソフトウェアのVPNルータを利用する必要があります。
今回はソフトウェアのVPNルータとしてLibreswanを利用します。LibreswanはRed Hat Enterprise Linux 7で採用されているVPNソフトウェアで、設定自体はOpenswanとほとんど(というか今回の内容では全く)同じでした。
オンプレミス側はスモールオフィスや店舗のインターネット接続でよく利用されているJuniper SRXを利用したかったのですが、実機が無かったのでVMwareの仮想マシンとして動作できるFireFlyを利用しました。
ネットワーク構成
今回はデフォルトVPCのパブリックサブネットにLibreswanとテスト用のEC2インスタンスを配置します。
また、オンプレミス側はJuniperルータとテスト用のサーバがあり、Juniperルータはインターネット回線が直接接続されています。パブリックIPアドレスはプロバイダから動的に割当てられます。
VPN用のパラメータ
今回利用するVPNのパラメータは以下のとおりです。もちろん、LibreswanとJuniperルータで適宜ご自分の環境に合わせてください。
IKE (フェーズ1)
| パラメータ | 設定値 |
|---|---|
| 暗号化アルゴリズム | AES256 |
| ハッシュアルゴリズム | SHA-1 |
| 認証方式 | Preshared-key |
| DHグループ | グループ2 |
| ライフタイム | 28800秒 |
IPsec (フェーズ2)
| パラメータ | 設定値 |
|---|---|
| ESP認証トランスフォーム | ESP-sha-hmac |
| ESPトランスフォーム | ESP-AES256 |
| ライフタイム | 3600秒 |
EC2インスタンスの起動
EC2インスタンスをVPCのパブリックサブネットに作成します。Juniperru-ta
からVPN接続をインターネット経由で受け付けるため、EIPでパブリックIPを固定にします。また、本インスタンスではVPCとオンプレミス間のルーティングも行なうため、 他のEC2インスタンスからのパケットを受け付けてフォワーディングできるように Check Source/Dest.Check をDisableにします。
セキュリティグループについては、インターネット上のJuniperルータからIKE/IPsec/ESPを受け付けるように設定します。(赤枠)送信元のIPアドレスは今回は動的に変わるため特定できないという想定なのでAnywhere 0.0.0.0/0としております。
カーネルの設定
Libreswanはルータとして動作するように、パケットフォワーディングなどのカーネルパラメータを以下のように設定します。 (ip_forwardはデフォルトで0になっています。その他は新規追加が必要だと思います。)
net.ipv4.ip_forward = 1
net.ipv4.conf.all.send_redirects = 0
net.ipv4.conf.default.send_redirects = 0
net.ipv4.conf.eth0.send_redirects = 0
net.ipv4.conf.lo.send_redirects = 0
net.ipv4.conf.all.accept_redirects = 0
net.ipv4.conf.default.accept_redirects = 0
net.ipv4.conf.eth0.accept_redirects = 0
設定後、反映します。
# sysctl -p
Libreswanのインストール
Amazon LinuxのリポジトリにはLibreswanが含まれていないため、EPELリポジトリを有効にしています。
# yum -y install --enablerepo=epel libreswan
インストールが完了したら、Libreswanを起動してみます。また、自動起動も設定しておきます。
# service ipsec start
Starting pluto IKE daemon for IPsec: .                     [  OK  ]
# chkconfig ipsec on
Libreswanの設定
LibreswanにVPNの設定をします。
config setup
    interfaces="eth0"
    klipsdebug=none
    plutodebug=all
    plutostderrlog=/var/log/ipseclog
    nat_traversal=yes # EIP部分でNATしているのでNAT Traversalは有効にする

conn srx
    type=tunnel
    ikelifetime=28800s
    salifetime=3600s
    authby=secret
    auth=esp
    ike=aes256-sha1;modp1024
    phase2alg=aes-256-sha1;modp1024
    keyexchange=ike
    aggrmode=yes
    pfs=no
    forceencaps=yes
    auto=start
    left=%defaultroute
    leftid=203.0.113.100 # EIPのアドレス
    leftsourceip=203.0.113.100 # EIPのアドレス
    leftsubnet=172.31.0.0/16 # VPCのCIDR
    right=%any
    rightid=%any
    rightsubnet=192.168.10.0/24 # オンプレミスのCIDR
    dpdaction=restart_by_peer
    dpdtimeout=10
    dpddelay=10
認証のためのPreshared keyはipsec.secretファイルに記述します。今回のPreshared keyは"password"としています。
%any : PSK "password"
設定が完了したらlibreswanをリスタートします。
# service ipsec restart
Juniperルータの設定
show configuration | display setの出力を表示しています。
VPNに関連する設定だけ抜粋しています。自分の環境に合わせて設定してみてください。それではそれぞれの項目について見ていきます。
VPN用のトンネルインタフェースを作成し、VPCのCIDRのトラフィックをトンネルインタフェースに向けるようにstaticルートを設定します。
set interfaces st0 unit 0 family inet
set routing-options static route 172.31.0.0/16 next-hop st0.0
IKE(フェーズ1)の設定です。アグレッシブモードを設定し、リモートのVPNエンドポイントにLibreswanのインスタンスに割当てられたEIPを指定します。
set security ike traceoptions flag all
set security ike proposal ike-aes256-sha1 authentication-method pre-shared-keys
set security ike proposal ike-aes256-sha1 dh-group group2
set security ike proposal ike-aes256-sha1 authentication-algorithm sha1
set security ike proposal ike-aes256-sha1 encryption-algorithm aes-256-cbc
set security ike proposal ike-aes256-sha1 lifetime-seconds 28800
set security ike policy ike-policy mode aggressive
set security ike policy ike-policy proposals ike-aes256-sha1
set security ike policy ike-policy pre-shared-key plain-text "password"
set security ike gateway ike-gateway ike-policy ike-policy
set security ike gateway ike-gateway address 203.0.113.100
set security ike gateway ike-gateway dead-peer-detection interval 10
set security ike gateway ike-gateway dead-peer-detection threshold 3
set security ike gateway ike-gateway local-identity hostname "store1"
set security ike gateway ike-gateway remote-identity inet 203.0.113.100
set security ike gateway ike-gateway external-interface ge-0/0/0
IPsec(フェーズ2)の設定です。先ほど作成したトンネルインタフェースst0をバインドしています。
set security ipsec proposal ipsec-aes256-sha1 protocol esp
set security ipsec proposal ipsec-aes256-sha1 authentication-algorithm hmac-sha1-96
set security ipsec proposal ipsec-aes256-sha1 encryption-algorithm aes-256-cbc
set security ipsec proposal ipsec-aes256-sha1 lifetime-seconds 3600
set security ipsec policy ipsec-policy proposals ipsec-aes256-sha1
set security ipsec vpn ipsec-vpn bind-interface st0.0
set security ipsec vpn ipsec-vpn ike gateway ike-gateway
set security ipsec vpn ipsec-vpn ike proxy-identity local 192.168.10.0/24
set security ipsec vpn ipsec-vpn ike proxy-identity remote 172.31.0.0/20
set security ipsec vpn ipsec-vpn ike ipsec-policy ipsec-policy
set security ipsec vpn ipsec-vpn establish-tunnels immediately
Zoneの設定です。VPN接続先用のZoneを新たに作成し、trust Zoneとの通信を許可しています。
set security policies from-zone trust to-zone vpn policy default-permit match source-address local
set security policies from-zone trust to-zone vpn policy default-permit match destination-address remote
set security policies from-zone trust to-zone vpn policy default-permit match application any
set security policies from-zone trust to-zone vpn policy default-permit then permit
set security policies from-zone vpn to-zone trust policy default-permit match source-address remote
set security policies from-zone vpn to-zone trust policy default-permit match destination-address local
set security policies from-zone vpn to-zone trust policy default-permit match application any
set security policies from-zone vpn to-zone trust policy default-permit then permit
set security zones security-zone trust address-book address local 192.168.10.0/24
set security zones security-zone vpn address-book address remote 172.31.0.0/20
set security zones security-zone vpn interfaces st0.0
VPCの設定
VPC上のEC2インスタンスからオンプレミスへの通信がLibreswanのインスタンスを経由するようにルーティングを設定します。拠点側LANのネットワークを宛先とし、ターゲットをLibreswanのインスタンスとします。
$ aws ec2 create-route --route-table-id rtb-xxxxxx --destination-cidr-block 192.168.10.0/24 --gateway-id i-xxxxxx
動作確認
対向のテストサーバ間でpingを試してみてください。もしうまくいかない場合はLibreswanのログ(今回は/var/log/ipseclogを指定)や、Juniperルータ側のログを確認してください。
Juniperルータではこちらの設定を反映することで/var/log/kmdにデバッグログが出力されます。monitor start kmdとmonitor stop kmdでログを標準出力することもできます。
set security ike traceoptions flag ike
set security ike traceoptions flag all
さいごに
冗長化については別途検討する必要があります。マルチAZ構成にし、障害時にEIPとルーティングテーブルの切り替えを行なうことで実現できます。
免責事項:こちらは個人の意見で、所属する企業や団体は関係ありません。

