TableView
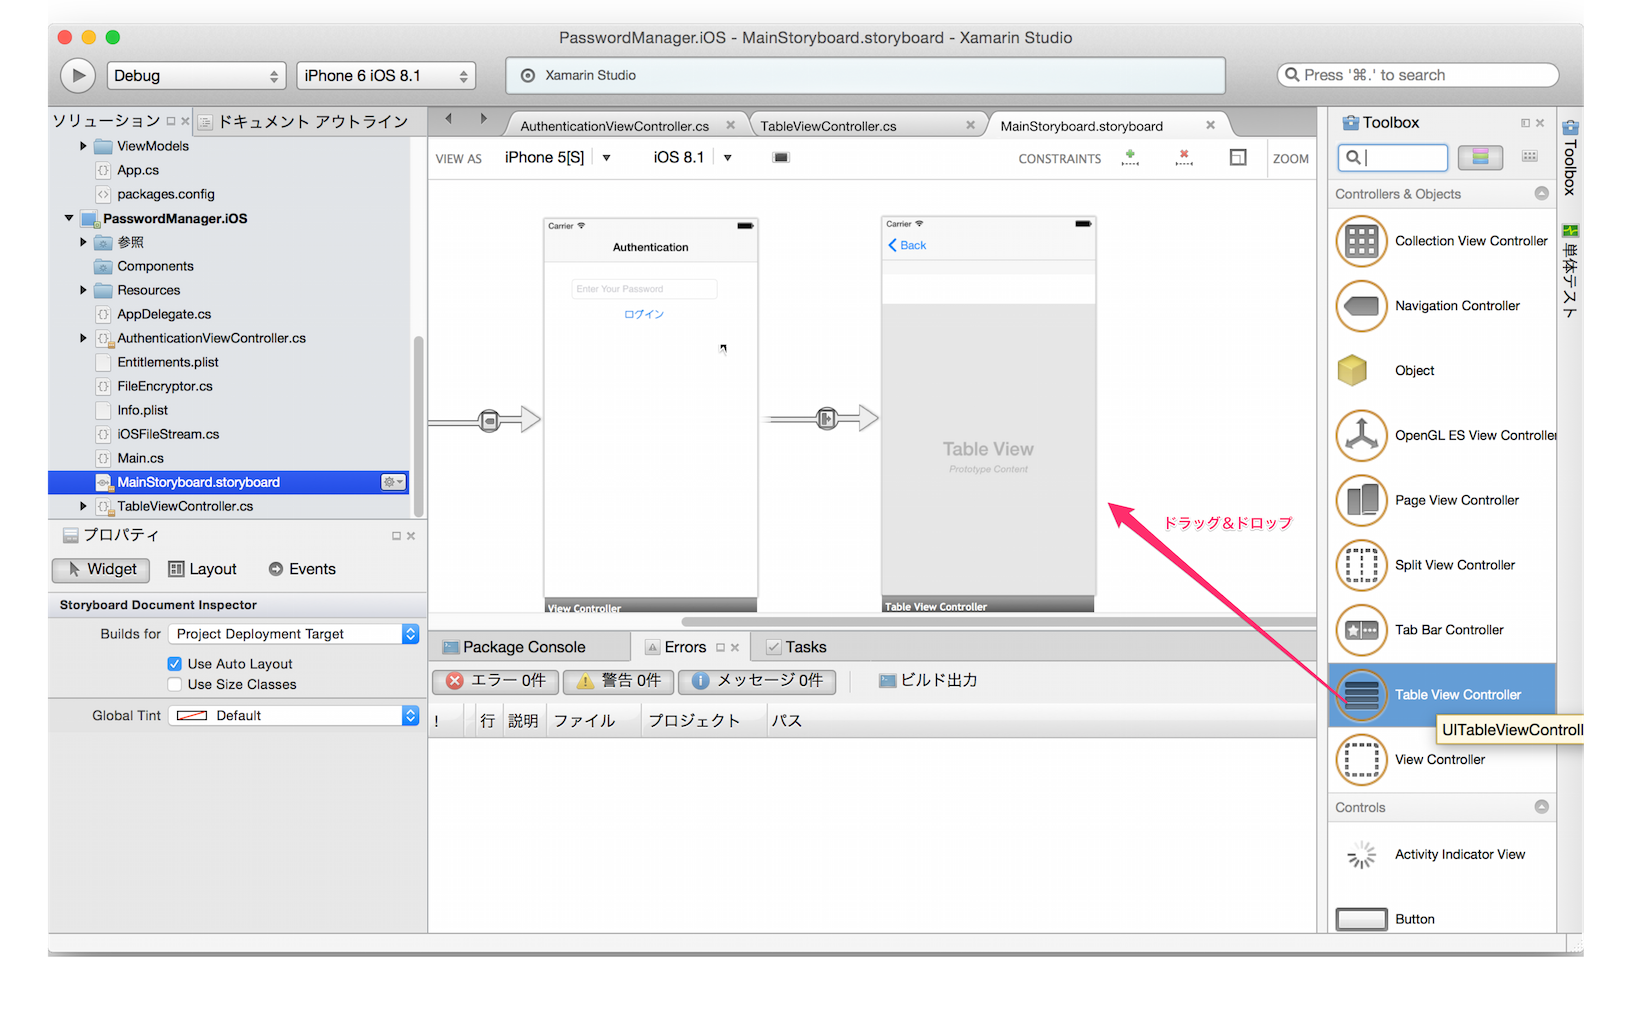
- Xamarin Studio上でStory Boardを開く
- Table View Controllerをドラッグ&ドロップして追加
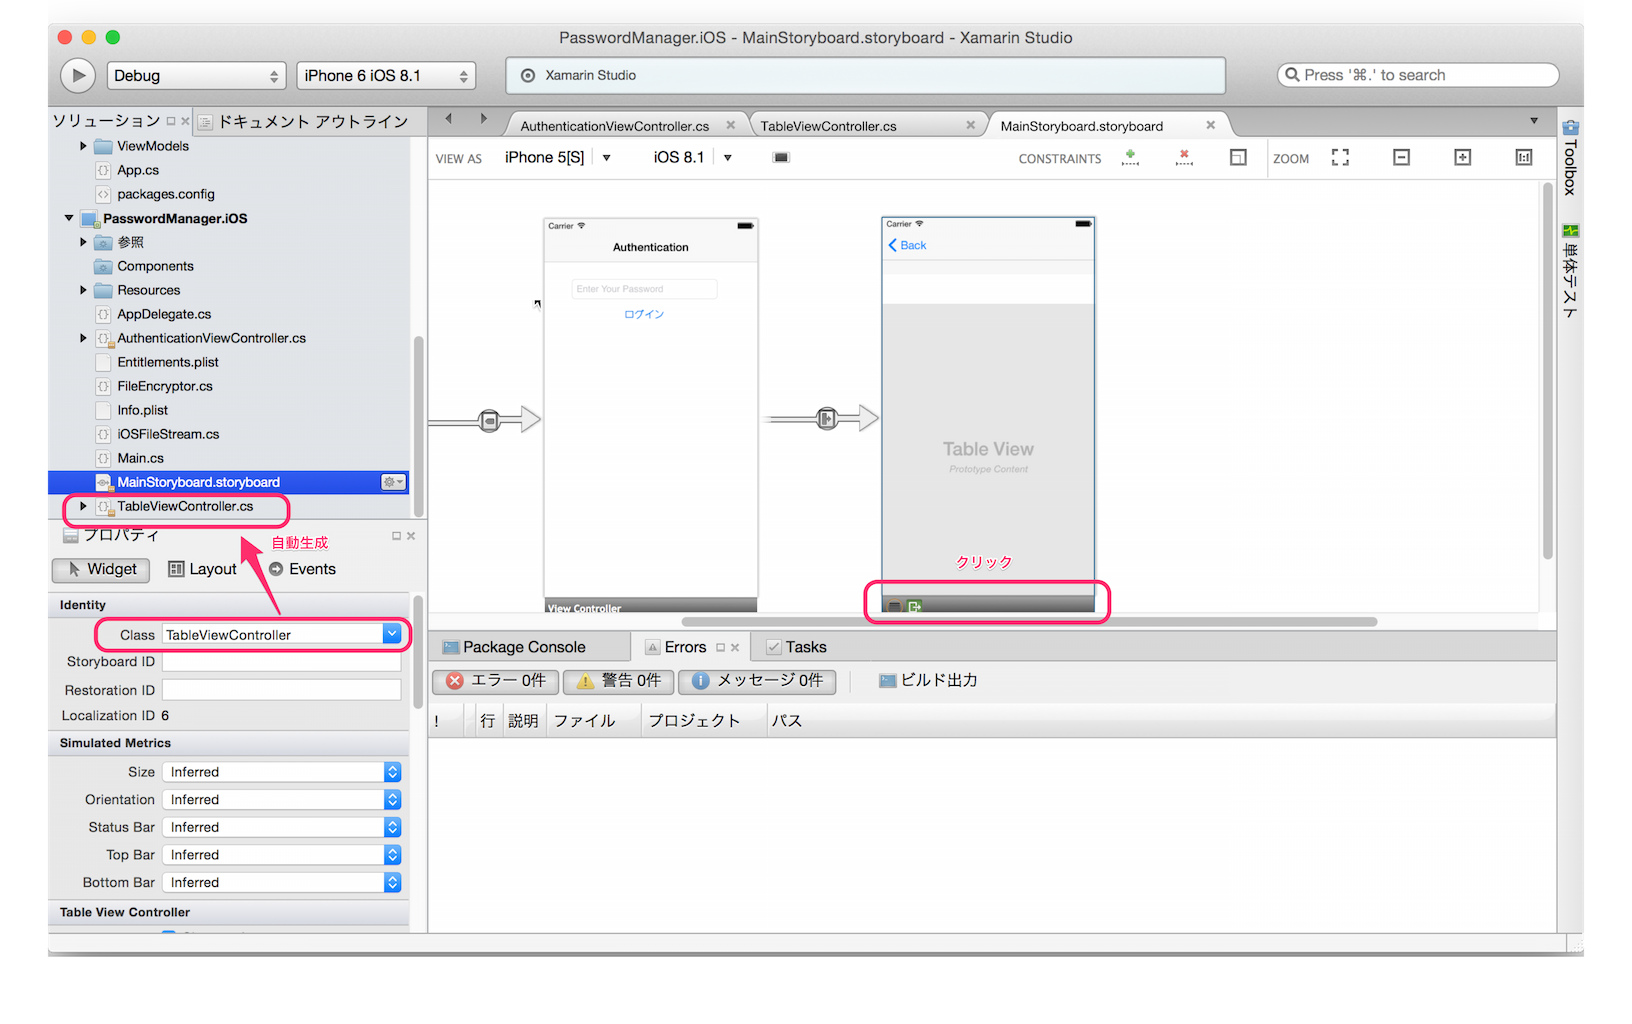
- 追加したTable View Controllerの下部(黒いバー)をクリック
- [Class]欄にクラス名を追加
- 作成したクラスファイルが自動生成される
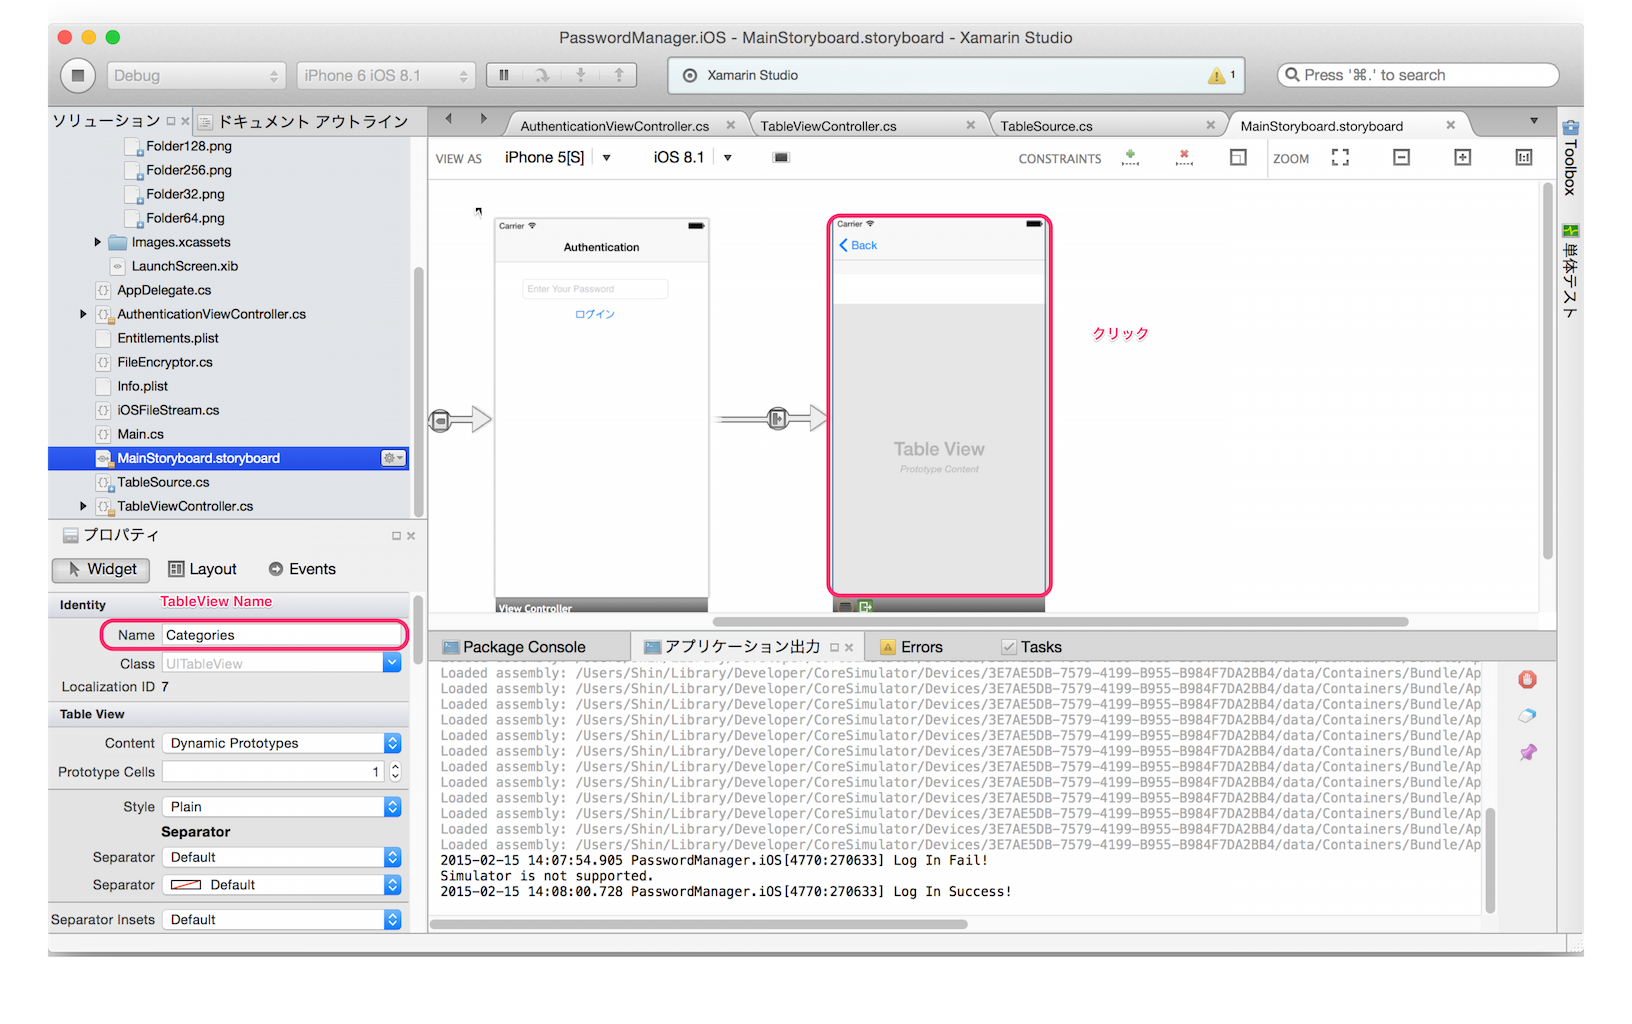
- Table View Controllerの本体部分をクリック
- NameにC#コードからアクセスするための名前を設定
TableView Source
TableViewにセットするためのDataSource用のクラスを新規作成する。
- 新規クラス用のC#ファイルを追加する
-
UITableViewSourceクラスを継承する -
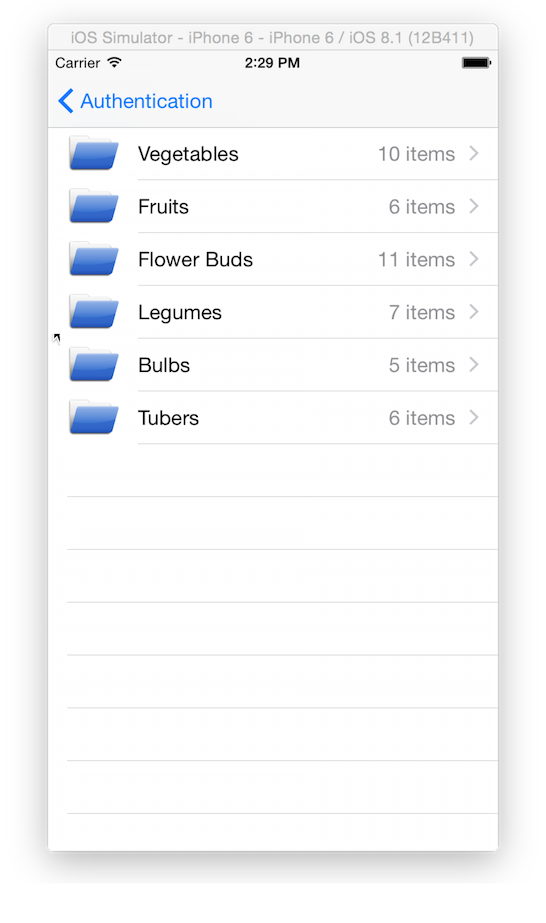
RowsInSectionメソッドをオーバーライドし、表示する項目数を返す -
GetCellメソッドをオーバーライドし、各セルの表示方法を設定する -
RowSelectedメソッドをオーバーライドし、項目が選択された際の動作を記述する
TableSource.cs
/// <summary>
/// Table Source Class
/// </summary>
public class TableSource : UITableViewSource
{
    /// <summary>
    /// Table Item
    /// </summary>
    private string[] TableItems;

    /// <summary>
    /// Cell Identifier
    /// </summary>
    private const string CellIdentifier = "TableCell";

    /// <summary>
    /// Constructor
    /// </summary>
    /// <param name="items">Items</param>
    public TableSource(string[] items)
    {
        /* Set Table Items */
        this.TableItems = items;
    }

    /// <summary>
    /// Get Row Count In Section
    /// </summary>
    /// <returns>In Section</returns>
    /// <param name="tableview">Table View</param>
    /// <param name="section">Section</param>
    public override nint RowsInSection(UITableView tableview, nint section)
    {
        return TableItems.Length;
    }

    /// <summary>
    /// Get Table View Cell
    /// </summary>
    /// <returns>Table View Cell</returns>
    /// <param name="tableView">Table View</param>
    /// <param name="indexPath">Index Path</param>
    public override UITableViewCell GetCell(UITableView tableView, Foundation.NSIndexPath indexPath)
    {
        /* Get Table View Cell(Default : Create new Talbe View Cell) */
        var cell = tableView.DequeueReusableCell(CellIdentifier) ?? new UITableViewCell(UITableViewCellStyle.Value1, CellIdentifier);
        /* Show Disclosure Indicator of Cell */
        cell.Accessory = UITableViewCellAccessory.DisclosureIndicator;
        /* Set Cell label */
        cell.TextLabel.Text = this.TableItems[indexPath.Row];
        /* Get Label Length */
        var len = this.TableItems[indexPath.Row].Length;
        /* Set Cell Detail Label */
        cell.DetailTextLabel.Text = string.Format("{0} items", len);
        /* Set Cell Image */
        cell.ImageView.Image = UIImage.FromFile("Icons/Folder256.png");

        return cell;
    }

    /// <summary>
    /// Row Selected Event Handler
    /// </summary>
    /// <param name="tableView">Table View</param>
    /// <param name="indexPath">Index Path</param>
    public override void RowSelected(UITableView tableView, NSIndexPath indexPath)
    {
        /* Create Alert View */
        var alert = new UIAlertView("Row Selected", this.TableItems[indexPath.Row], null, "OK", null);
        /* Show Alert View */
        alert.Show();

        /* Deselect Row */
        tableView.DeselectRow(indexPath, true);
    }
}
TableView Controller
TableViewにセットするData Sourceを初期化する。
1. ViewDidLoadメソッドをオーバーライドする。
2. TableSourceクラスのインスタンスを生成する
3. TableViewのSourceプロパティにTableSourceインスタンスをセットする
TableViewController.cs
/// <summary>
/// Table View Controller
/// </summary>
partial class TableViewController : UITableViewController
{
    /// <summary>
    /// Constructor
    /// </summary>
    /// <param name="handle">Handle</param>
    public TableViewController(IntPtr handle) : base(handle)
    {
        /* Nothing to do */
    }

    /// <summary>
    /// View Did Load Event Handler
    /// </summary>
    public override void ViewDidLoad()
    {
        /* Base Method */
        base.ViewDidLoad();

        /* Create Table View Items */
        var items = new string[] { "Vegetables", "Fruits", "Flower Buds", "Legumes", "Bulbs", "Tubers" };
        /* Create Table View Source */
        var source = new TableSource(items);
        /* Set Table View Source */
        this.Categories.Source = source;
    }
}


