Validations are used to ensure that only valid data is saved into your database.
For example, it may be important to your application to ensure that every user provides a valid email address, mailing address and other details.
Model-level validations are the best way to ensure that only valid data is saved into your database. They are database agnostic, cannot be bypassed by end users, and are convenient to test and maintain. Rails make them easy to use, provides built-in helpers for common needs, and allows you to create your own validation methods as well.
In this article, we'll cover the following points.
1.Model-level validations
2.Display Ruby on Rails form validation error messages
Here we start,
first, create a helper class in your /app/helpers/form_helper.rb
module FormHelper
    def errors_for(form, field)
        content_tag(:p, form.object.errors[field].try(:first), class: 'help-block')
    end

    def form_group_for(form, field, opts={}, &block)
        label = opts.fetch(:label) { true }
        has_errors = form.object.errors[field].present?

        content_tag :div, class: "form-group #{'has-error' if has_errors}" do
            concat form.label(field, class: 'control-label') if label
            concat capture(&block)
            concat errors_for(form, field)
        end
    end
end
Great, now go to your /app/views/ folder.
in my case the path is /app/views/accounts, where is my page exist.
<% def msg(status) return "#{status}" end %>
<div class="col-md-6 col-md-offset-3 panel panel-default">
  <div class="panel-body">
    <h2>Create an Acccount</h2>
    <%= form_for @account do |f| %>
      <%= form_group_for f, :username, label: false  do %>
        <div class="input-group">
          <span class="input-group-addon"><span class="fa fa-user fa-lg fa-fw"></span></span>
          <%= f.text_field :username, class: 'form-control', placeholder: 'UserName' %>
        </div>
      <% end %>
      <%= form_group_for f, :password, label: false  do %>
        <div class="input-group">
          <span class="input-group-addon"><span class="fa fa-key fa-lg fa-fw"></span></span>
          <%= f.password_field :password, class: 'form-control', placeholder: 'Password' %>
        </div>
      <% end %>
      <%= f.submit("Create Account", class:"btn btn-primary", data: {:confirm => msg('Do you want to create account?'), :disable_with => 'Creating'}) %>
    <% end %>
  </div>
</div>
in the above code, we are using "form_group_for" method,
<%= form_group_for o, :password, label: false  do %>
<% end %>
here, f is the form object.
:password is the your db col name.
label: false means, if you want to display header then set to true otherewise it will not display header.
example,
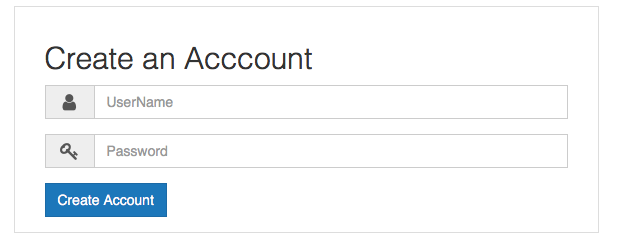
then after click on Create Account Button,
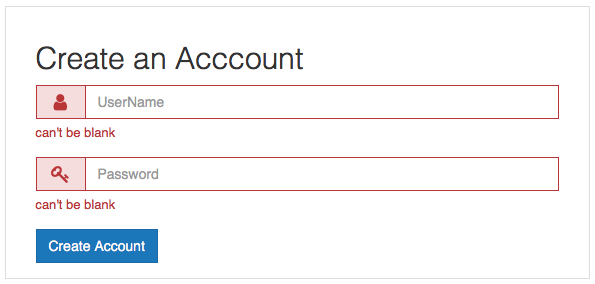
You can customized your error messages in your model.
for example,
validates_presence_of   :username, :message => 'Please Enter User  Name.'
    validates_presence_of   :password, :message => 'Please Enter Your Password.'
Enjoy Coding.![]()
![]()
Thanks & Best Regards,
Alok Rawat