はじめに
検証時に各サーバーのリソース状態を取得してリアルタイムで見たいなと思って、fluentd、influxDB、Grafanaという構成でいいかなと思い調べた。
リソース情報はdstatで取得した。
環境
- OS: CentOS7.1
- Ruby: 2.2.2p95
- dstat: 0.7.0
- fluentd: 0.12.15
- influxDB: 0.9.2
- Grafana: 2.1.3
Install
dstat、fluentdについては以下でインストール出来る。
$ sudo yum install dstat
$ gem install fluentd
influxDBについては、InfluxDB インストール - 簡単な使い方
Grafanaについては、Grafana インストール - InfluxDBとの連携
でインストール出来る・・・はず。
dstatについて
dstatは、systemの統計情報を取得するツールで、cpu/memory/disk/network/割り込み情報を取得できる。
実行すると以下のように出力される。
$ sudo dstat
You did not select any stats, using -cdngy by default.
----total-cpu-usage---- -dsk/total- -net/total- ---paging-- ---system--
usr sys idl wai hiq siq| read  writ| recv  send|  in   out | int   csw
  0   0 100   0   0   0| 996B 4819B|   0     0 |   0     0 |  41    84
  0   0 100   0   0   0|   0     0 | 132B  838B|   0     0 |  54   107
  2   0  98   0   0   0|   0  4096B| 822B 2940B|   0     0 |  78   125 ^C
$
データ投入前準備
Fluentd設定
今回利用するfluentdのプラグインは以下でインストールする。
$ fluent-gem install fluent-plugin-dstat fluent-plugin-influxdb fluent-plugin-typecast fluent-plugin-flatten-hash
それぞれのプラグインの役割は以下。
- fluent-plugin-dstat: dstat情報をJsonに変換してくれるプラグイン
- fluent-plugin-influxdb: JSONデータをinfluxDBに入れてくれるプラグイン
- fluent-plugin-typecast: データの型を変換してくれるプラグイン
- fluent-plugin-flatten-hash: 階層化されているJSONをフラットなJSONに変換してくれるプラグイン
fluent-plugin-dstat
inputプラグインを利用してfluent-plugin-dstatを標準出力してみる。
<source>
  type dstat
  tag before_trans
  option -cdgny
  delay 3
</source>

<match before_trans>
  type stdout
</match>
上記ファイルではdstatにオプションとして-cdgnyを指定してやり3秒毎に実行する設定となっている。
上記ファイルでfluentdを実行してやると以下のように出力される。
$ fluend -c fluentd_dstat.conf
....
2015-08-28 00:55:56 +0900 before_trans: {"hostname":"influxdb.cs1aidcfcloud.internal","dstat":{"total_cpu_usage":{"usr":"0.288","sys":"0.131","idl":"99.556","wai":"0.024","hiq":"0.000","siq":"0.002"},"dsk/total":{"read":"995.537","writ":"4817.681"},"paging":{"in":"0.0","out":"0.0"},"net/total":{"recv":"0.0","send":"0.0"},"system":{"int":"40.824","csw":"83.692"}}}
2015-08-28 00:55:59 +0900 before_trans: {"hostname":"influxdb.cs1aidcfcloud.internal","dstat":{"total_cpu_usage":{"usr":"0.664","sys":"0.0","idl":"99.336","wai":"0.0","hiq":"0.0","siq":"0.0"},"dsk/total":{"read":"0.0","writ":"1365.333"},"paging":{"in":"0.0","out":"0.0"},"net/total":{"recv":"274.0","send":"1008.667"},"system":{"int":"56.0","csw":"108.0"}}}
$
上記を見てやるとわかるように、JSONが階層化されていて、値が文字列となっていることがわかる。
InfluxDBにデータを投入するために利用するfluent-plugin-influxdbではフラットなJSONでしか投入出来ないので、fluent-plugin-flatten-hashでフラットなJSONに変更する。またInfluxDBで数値として扱いたいのでfluent-plugin-typecastで変換してやる。
fluent-plugin-typecast + fluent-plugin-flatten-hash
フラットなJSONで文字列を数値に変換してやるfluentdの設定ファイルは以下。
-
flatten_hashで階層構造のJSONの結合文字列を何するかを設定する。ここでは__を指定する。 -
次に
record_transformerでデータにkeyを追加している。
InfluxDBで解析する際に/があるとパースに失敗したので変換している。 -
typecastでstringをfloatに変換しています。 -
record_transformerでkeyに/があるものを削除している。typecast時にorginalのkeyがないとエラーになったのでこういう書き方にしている。(多分もっと良い書き方やプラグインがあるはず!)
<source>
  type dstat
  tag before_trans
  option -cdgny
  delay 3
</source>

<filter before*>
  type flatten_hash
  separator __
</filter>

<filter before*>
  type record_transformer
  <record>
    dstat__net_total__send ${dstat__net/total__send}
    dstat__dsk_total__read ${dstat__dsk/total__read}
    dstat__dsk_total__writ ${dstat__dsk/total__writ}
    dstat__net_total__recv ${dstat__net/total__recv}
    dstat__net_total__send ${dstat__net/total__send}
  </record>
</filter>

<match before_*>
  type typecast
  item_types dstat__total_cpu_usage__usr:float,dstat__total_cpu_usage__sys:float,dstat__total_cpu_usage__idl:float,dstat__total_cpu_usage__wai:float,dstat__total_cpu_usage__hiq:float,dstat__total_cpu_usage__siq:float,dstat__paging__in:float,dstat__paging__out:float,dstat__system__int:float,dstat__system__csw:float,dstat__net_total__send:float,dstat__dsk_total__read:float,dstat__dsk_total__writ:float,dstat__net_total__recv:float,dstat__net_total__send:float
  tag influx_dstat
</match>

<filter influx_dstat>
  type record_transformer
  remove_keys dstat__net/total__send,dstat__dsk/total__read,dstat__dsk/total__writ,dstat__net/total__recv,dstat__net/total__send
</filter>

<match influx_*>
  type stdout
</match>
出力は以下となる。
$ fluentd -c fluentd_flatter.conf
2015-08-28 01:05:26 +0900 influx_dstat: {"hostname":"influxdb.cs1aidcfcloud.internal","dstat__total_cpu_usage__usr":0.288,"dstat__total_cpu_usage__sys":0.131,"dstat__total_cpu_usage__idl":99.556,"dstat__total_cpu_usage__wai":0.024,"dstat__total_cpu_usage__hiq":0.0,"dstat__total_cpu_usage__siq":0.002,"dstat__paging__in":0.0,"dstat__paging__out":0.0,"dstat__system__int":40.836,"dstat__system__csw":83.713,"dstat__net_total__send":0.0,"dstat__dsk_total__read":994.721,"dstat__dsk_total__writ":4815.365,"dstat__net_total__recv":0.0}
2015-08-28 01:05:29 +0900 influx_dstat: {"hostname":"influxdb.cs1aidcfcloud.internal","dstat__total_cpu_usage__usr":0.0,"dstat__total_cpu_usage__sys":0.0,"dstat__total_cpu_usage__idl":100.0,"dstat__total_cpu_usage__wai":0.0,"dstat__total_cpu_usage__hiq":0.0,"dstat__total_cpu_usage__siq":0.0,"dstat__paging__in":0.0,"dstat__paging__out":0.0,"dstat__system__int":55.333,"dstat__system__csw":111.333,"dstat__net_total__send":215.333,"dstat__dsk_total__read":0.0,"dstat__dsk_total__writ":2730.667,"dstat__net_total__recv":88.0}
$
最後にinfluxDBに入れるプラグインの設定を組み込んだ設定は以下。
<source>
  type dstat
  tag before_trans
  option -cdgny
  delay 3
</source>

<filter before*>
  type flatten_hash
  separator __
</filter>

<filter before*>
  type record_transformer
  <record>
    dstat__net_total__send ${dstat__net/total__send}
    dstat__dsk_total__read ${dstat__dsk/total__read}
    dstat__dsk_total__writ ${dstat__dsk/total__writ}
    dstat__net_total__recv ${dstat__net/total__recv}
    dstat__net_total__send ${dstat__net/total__send}
  </record>
</filter>

<match before_*>
  type typecast
  item_types dstat__total_cpu_usage__usr:float,dstat__total_cpu_usage__sys:float,dstat__total_cpu_usage__idl:float,dstat__total_cpu_usage__wai:float,dstat__total_cpu_usage__hiq:float,dstat__total_cpu_usage__siq:float,dstat__paging__in:float,dstat__paging__out:float,dstat__system__int:float,dstat__system__csw:float,dstat__net_total__send:float,dstat__dsk_total__read:float,dstat__dsk_total__writ:float,dstat__net_total__recv:float,dstat__net_total__send:float
  tag influx_dstat
</match>

<filter influx_dstat>
  type record_transformer
  remove_keys dstat__net/total__send,dstat__dsk/total__read,dstat__dsk/total__writ,dstat__net/total__recv,dstat__net/total__send
</filter>

<match influx_*>
  type influxdb
  host localhost
  port 8086
  dbname demo
  tag_keys ["hostname"]
  time_precision s
</match>
InfluxDBの設定
InfluxDBではDBを用意するだけ。
$ influx
Connected to http://localhost:8086 version 0.9.2
InfluxDB shell 0.9.2
> CREATE DATABASE demo
> exit
$
データ投入
以下のコマンドでfluentdを起動すればInfluxDBにデータが入る。
$ fluentd -c fluentd.conf
Grafanaの設定
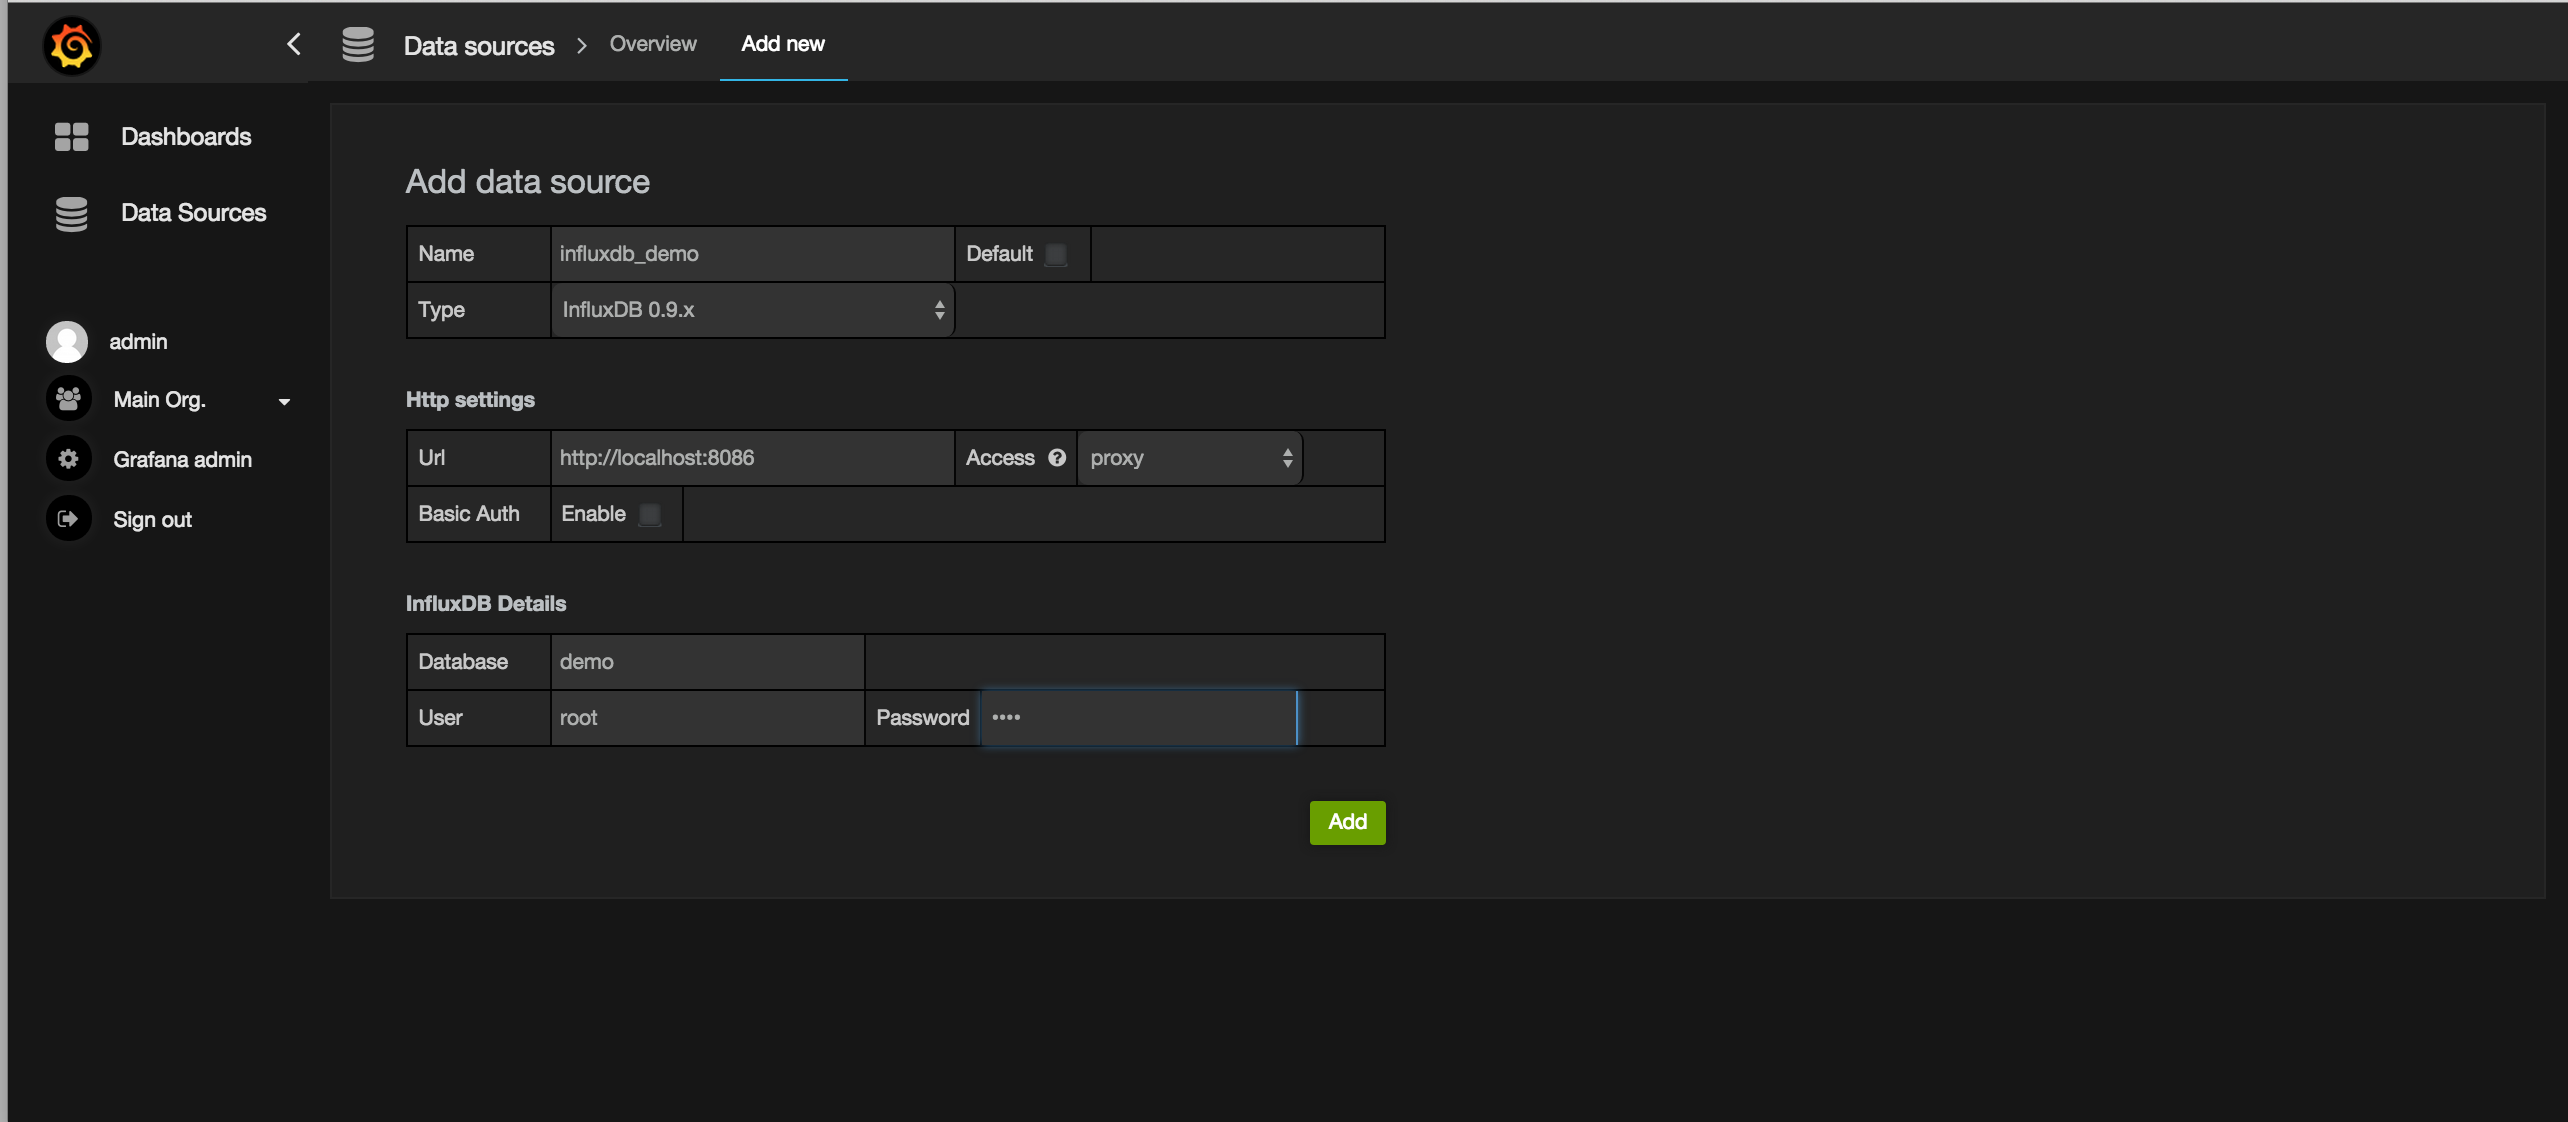
Grafana インストール - InfluxDBとの連携に記載されているようにDatasourceとDashboardを作成してやる。
Datasourcesの設定は以下の感じ。
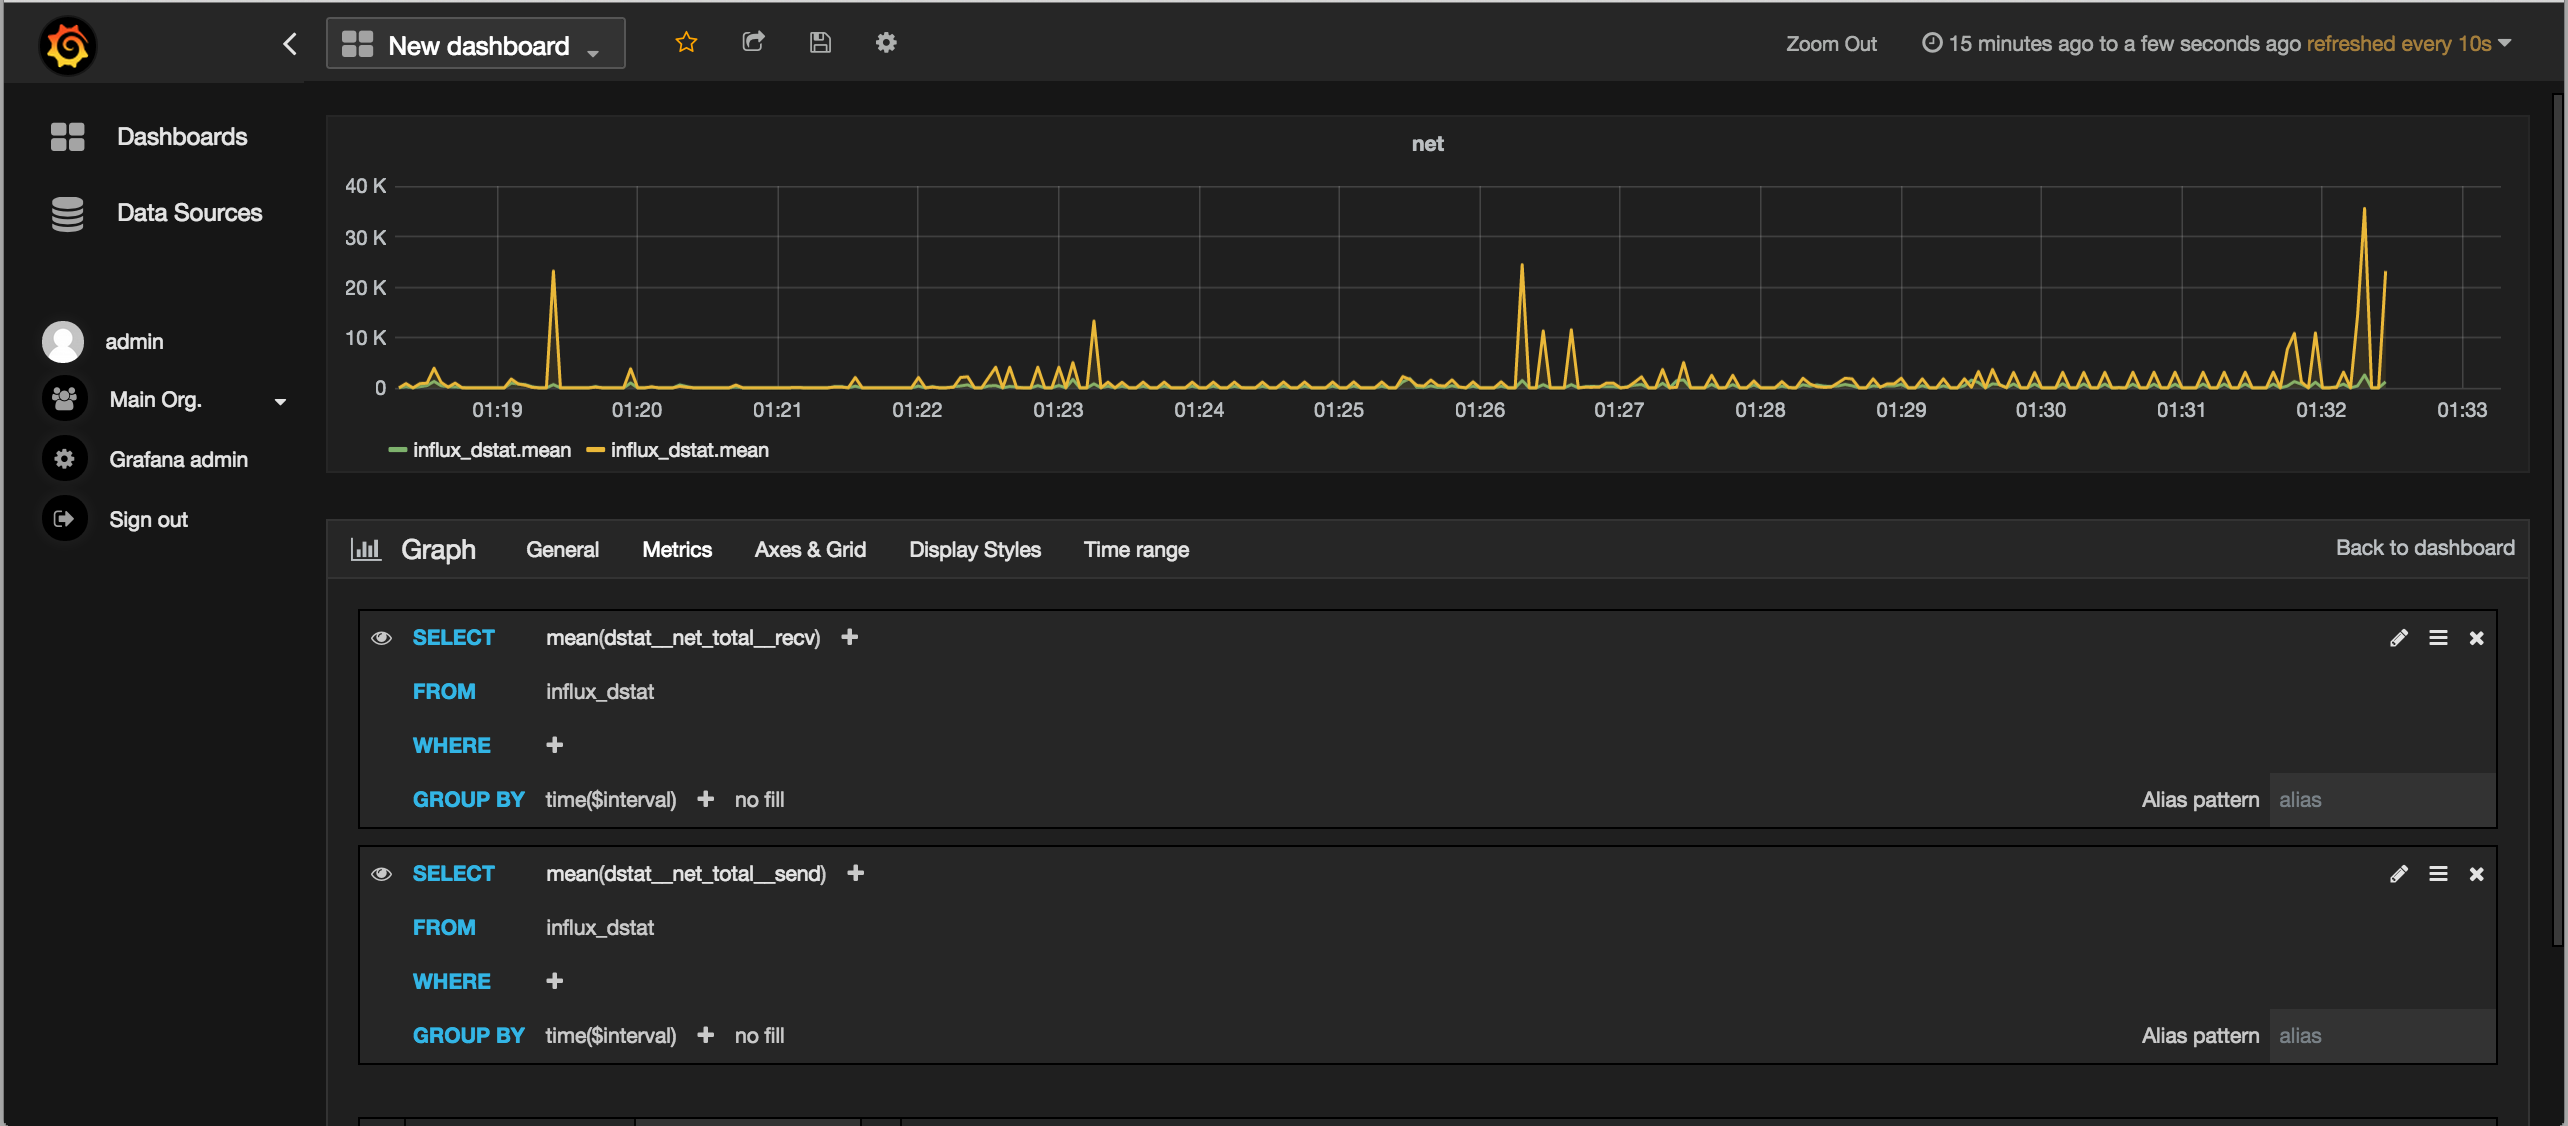
Metricsの書き方は以下。
ここではネットワークトラヒック量を表示。
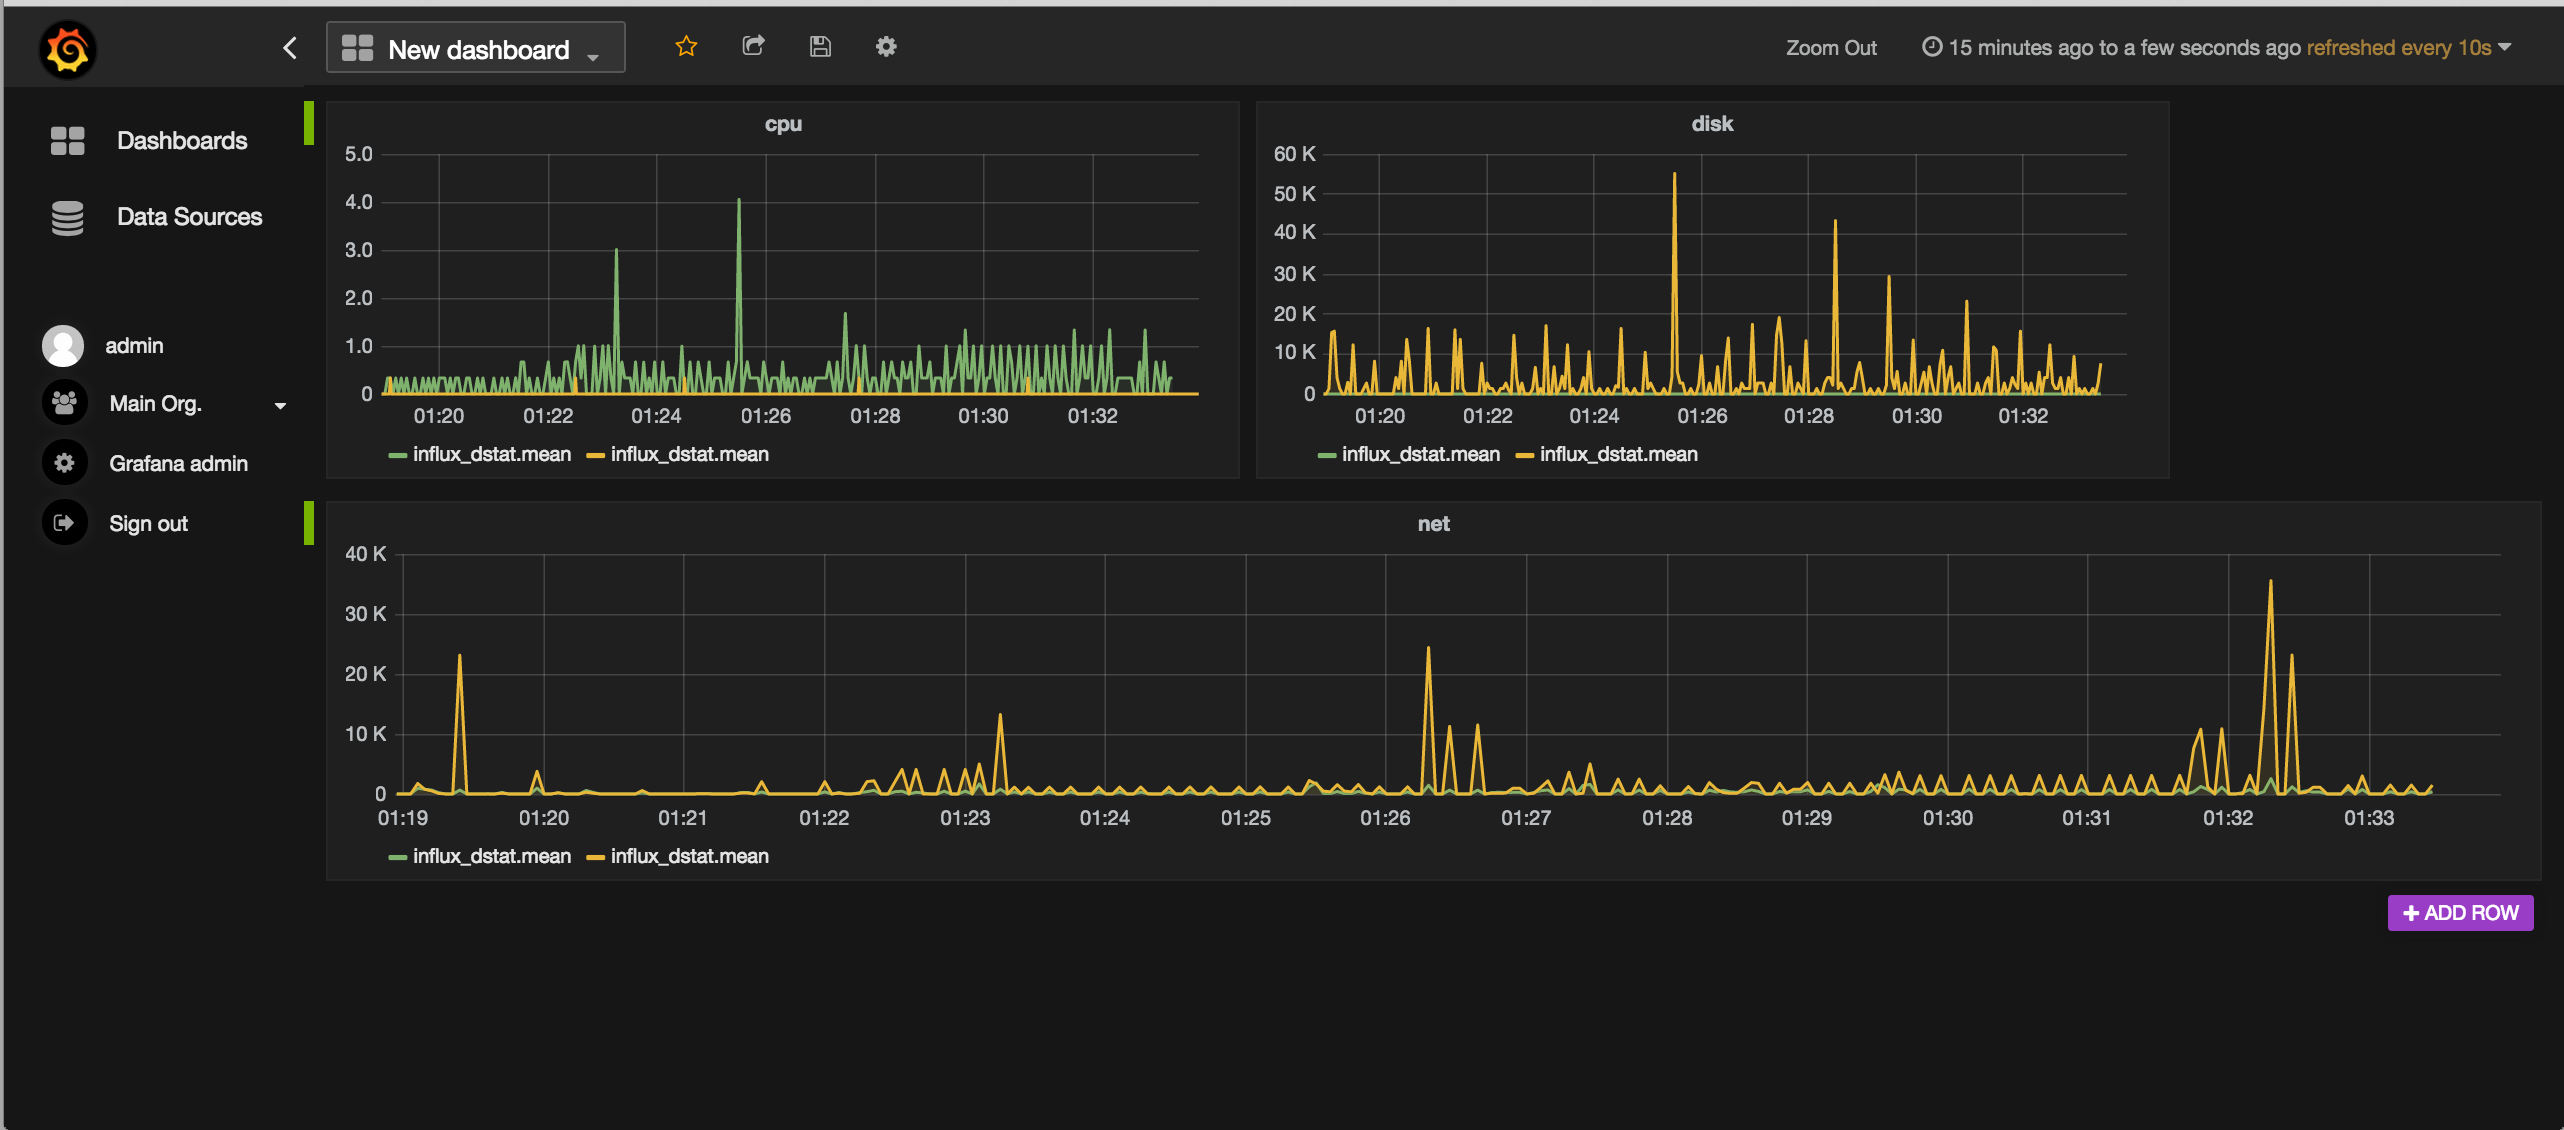
あとはいくつかのグラフをダッシュボードに追加すると以下のように表示される。
ある程度見れるようになってきましたね。
おわりに
あとはtagの値でグルーピングしてやって重ねてグラフを表示させられればモニタリングツールとしてある程度使えそうです。
おしまい。


