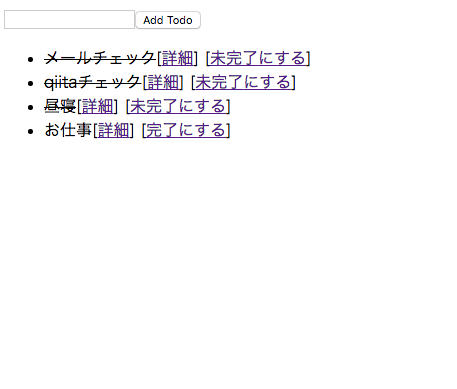
SPAをRails + React + Redux + Routerで実現して、解説してる記事があまりなかったのでまとめます。
ReduxのTodoアプリをベースにAPIリクエストするサンプルを作りました。
実現してること
- React + Redux + RouterでSPA
- APIリクエストでCRU(D)処理まで
対象
それぞれの技術の概念は理解してるが、実際にコードを書いたことがない方
実装方針
- 基本的にライブラリのサンプルの実装方針を踏襲(差分は後述)
- ServerSide Renderingも対応できるようにする
- Productionで使えて、ある程度の規模まで対応した構成
- javascriptはes2015で書く
- APIリクエストはthunkを使う
- BuildはWebpackで行う
github
Webpack
babelでビルドする。eslintはpreloadersでやるとconsole.logとか仕込めないので、commit hookとかciとかのが良さそう。
const DEBUG = process.env.NODE_ENV === 'development' || process.env.NODE_ENV === undefined;

module.exports = {
  cache: DEBUG,
  debug: DEBUG,
  devtool: DEBUG ? 'inline-source-map' : false,
  entry: {
  },
  output: {
    path: '../app/assets/javascripts/components',
    filename: '[name].js'
  },
  module: {
    loaders: [
      {
        test: /\.jsx?$/,
        exclude: /node_modules/,
        loader: 'babel?presets[]=react,presets[]=es2015,presets[]=stage-2'
      },
      { test: /\.json$/, loader: 'json' }
    ],
    preLoaders: [
      {
        test: /\.jsx?$/,
        exclude: /node_modules/,
        loader: "eslint-loader"
      }
    ]
  },
  eslint: {
    configFile: './.eslintrc.json'
  },
  resolve: {
    extensions: ['', '.js', '.jsx', 'json'],
  },
  externals: {
    'react': 'React',
    'react-dom': 'ReactDOM'
  }
}
view
react-railsというgemを使って、変数などをReactのアプリケーションに渡して、レンダリングを行ってもらう。
例としてtokenを渡す。
<%= react_component("Todo", { token: form_authenticity_token}, {}) %>
React
SPAのendpoint。 webpackでbuildするところでもある。
今回、変数はlocalstorageで保存して、apiリクエスト時に使う。initialStateとしてdispatchしても使える。
globalなwindowに渡さないとTodoクラスがreact-railsにはわからないので、windowに渡す。
ざっくり言うとProvider, storeが変数を管理するredux側のモジュール(action,reducer,container,componentで変数を伝搬してくれる)で、
history, Routerがreact-routerでSPAのルーティングを実現するモジュール群です。
Route pathでurlマッチさせて、componentで指定されてるものが呼ばれます。
const storeArgs = combineReducers({
  ...reducers,
  routing: routerReducer
})

const store = process.env.NODE_ENV === 'production' ? prodConfigureStore(storeArgs) : devConfigureStore(storeArgs)

const history = syncHistoryWithStore(browserHistory, store)

const propTypes = {
  token: React.PropTypes.string.isRequired,
}

export default class Todo extends React.Component {
  componentWillMount() {
    localStorage.setItem("token", this.props.token)
  }
  render() {
    return (
      <Provider store={store}>
        <Router history={history}>
          <Route path="todos" component={Index}/>
          <Route path="todos/:id" component={Show}/>
        </Router>
      </Provider>
    )
  }
}
Todo.propTypes = propTypes

window.Todo = Todo
urlが/todosなので、Indexのcomponentが呼ばれる
export default class Index extends React.Component {
  render() {
    return (
      <div>
        <CreateTodo />
        <TodoList />
      </div>
    )
  }
}
あとはそれぞれCreateTodo, TodoListが展開される。
todosの情報のapi通信はTodoListのcomponentWillMountの段階で呼ばれる。
Action
(未)完了にするボタンをクリック
onClickが呼ばれる。これは親コンポーネントのTodoList.jsから渡される。onClickの中ではupdateTodoのactionメソッドが呼ばれる。
export default class Todo extends React.Component {
  render() {
    const { id, isCompleted, text, onClick } = this.props
    return (
      <li>
        <p style={{display: "inline", textDecoration: isCompleted ? 'line-through' : 'none'}}>{text}</p>
        [<Link to={"todos/" + id }>詳細</Link>]
        [<a href="#" onClick={onClick}>{isCompleted ? "未完了" : "完了"}にする</a>]
      </li>
    )
  }
}
updateTodoはTodoListのcontainerでdispatchを注入して使えるようにしている。mapStateToPropsとmapDispatchToPropsはstateとdispatchをcontainerで使えるようにするもの。
const mapStateToProps = (state) => {
  return {
    todos: state.todos.todos
  }
}

const mapDispatchToProps = (dispatch) => {
  return {
    actions: bindActionCreators({
      updateTodo,
      fetchTodos
    }, dispatch)
  }
}

export default connect(
  mapStateToProps,
  mapDispatchToProps
)(TodoList)
api通信でUPDATE_TODO_**でそれぞれ後続のreducer処理できる。REQUESTはリクエストした瞬間、SUCCESSは成功時、FAILUREはエラー時に呼ばれる。CALL_APIをMOCK_APIにすれば、api通信せずに開発を進めることも可能。
export const updateTodo = (id, param) => {
  return {
    [CALL_API]: {
      types: [ types.UPDATE_TODO_REQUEST, types.UPDATE_TODO_SUCCESS, types.UPDATE_TODO_FAILURE ],
      endpoint: "todos/" + id + ".json",
      param: { id: id,  todo: param },
      method: "PUT"
    }
  }
}
ここで処理をかまして、fetchのリクエストからpromiseで処理を繋いで、reducerへ。
middleware/api.js
今回UPDATE_TODO_SUCCESSの時だけtodosの更新したオブジェクトを更新後のオブジェクトに変更。REQUEST時にloadingのフラグ、FAILURE時にエラーメッセージの表示など本番のプロダクトでは入れることができる。
const INITIAL_STATE = {
  todos: [],
  todo: undefined,
}

const todos = (state = INITIAL_STATE, action) => {
  switch (action.type) {
    case types.UPDATE_TODO_SUCCESS:
      return Object.assign({}, state, {
        todos: state.todos.map(t => {
          if (t.id == action.response.todo.id) {
            return action.response.todo
          } else {
            return t
          }
        })
      })
    default:
      return state
  }
}
state.todos.todosが変更されて、containerが受け取りcomponentに渡す。
componentが変更を受け取ったらreactが差分変更してくれる。
const mapStateToProps = (state) => {
  return {
    todos: state.todos.todos
  }
}
export default class TodoList extends React.Component {
  componentWillMount() {
    this.props.actions.fetchTodos()
  }
  render() {
    const { todos } = this.props
    const { updateTodo } = this.props.actions
    return (
      <ul>
        {todos.map(todo =>
          <Todo
            key={todo.id}
            {...todo}
            onClick={() => updateTodo(todo.id, { is_completed: !todo.isCompleted })}
          />
        )}
      </ul>
    )
  }
}
#ページ遷移
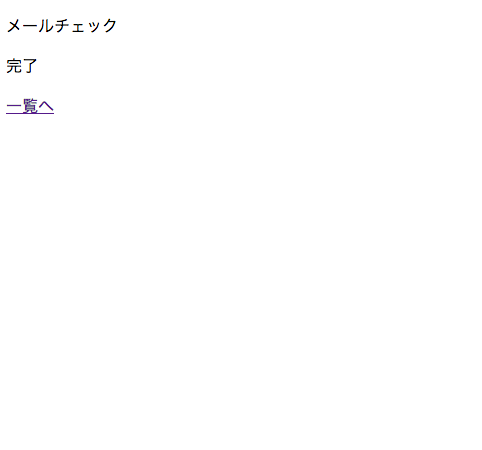
[詳細]をクリック
export default class Todo extends React.Component {
  render() {
    const { id, isCompleted, text, onClick } = this.props
    return (
      <li>
        <p style={{display: "inline", textDecoration: isCompleted ? 'line-through' : 'none'}}>{text}</p>
        [<Link to={"todos/" + id }>詳細</Link>]
        [<a href="#" onClick={onClick}>{isCompleted ? "未完了" : "完了"}にする</a>]
      </li>
    )
  }
}
RouteのパスにマッチしたShowのcomponentを呼び出す。
export default class Todo extends React.Component {
  componentWillMount() {
    localStorage.setItem("token", this.props.token)
  }
  render() {
    return (
      <Provider store={store}>
        <Router history={history}>
          <Route path="todos" component={Index}/>
          <Route path="todos/:id" component={Show}/>
        </Router>
      </Provider>
    )
  }
}
サンプルとの差分:
- actionのメソッドをrailsのapiよりに変える(updateTodo, createTodoなど)
- componentのクラスをconst **で定義してるのをexport default class ** extends React.Componentで統一
- containerでbindActionCreatorsしてdispatchをここで注入して、actionsに統一で入れる
- railsのapiで整形して渡しやすいので、thunkのschema廃止。
ポリシーが迷う所:
- container作るかcomponentだけか。actionがあるものやstateから値をとるものはcontainerを作ってる。
参考
https://github.com/reactjs/react-redux/blob/master/docs/api.md#connectmapstatetoprops-mapdispatchtoprops-mergeprops-options
http://redux.js.org/docs/basics/ExampleTodoList.html
https://github.com/reactjs/react-router/tree/master/docs

