概要
トータルSwift歴2,3週間くらいのド素人が、
SceneKitを使って3Dに挑戦してみた話です。
Swift愛好会、1周年記念合宿での成果です。
https://love-swift.connpass.com/event/43865/
はじめに(3Dそのものが初挑戦な人)
(僕が普段JSで3Dやってるので、Three.jsの記事の紹介で恐縮なんですが)
3Dをやるには、カメラとかシーンとかライトとか、なんか映画撮影に出てきそうな言葉がいっぱいでてきます。そこらへんの概念が分からない人は下記記事を流し読みするといいかもです。
「初心者でも絶対わかる、WebGLプログラミング<three.js最初の一歩>」 @yomotsu さん
https://html5experts.jp/yomotsu/5225/
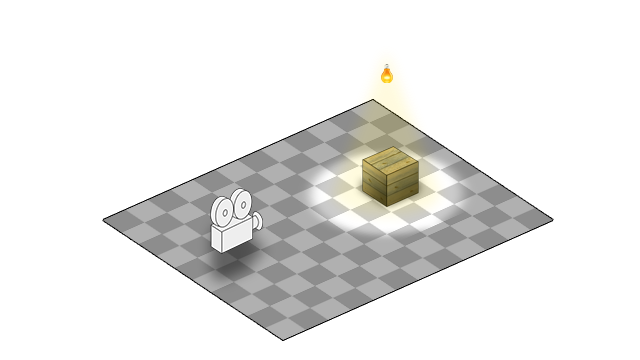
要は下図のように、
● シーンというものの上に、
● カメラを用意し(これが画面から見たときの視点になる)、
● ライトを追加してシーンを照らし、
● そこに3Dの物体(3Dオブジェクト)を追加していき、
● アニメーションでカメラや3D物体を動かしていく(座標を変えていく)
っといった流れが基本です。
下準備
ここの記事をもとに3Dサンプルアプリを立ち上げましょう。シーンとかカメラとかライトとか全部一通り準備してくれて楽です。
http://dev.classmethod.jp/references/ios-8scenekitintroduction1/
そして下記のように
let ambientLightNode = SCNNode() ...のとこで環境光を設定したあたりの次のとこに3Dオブジェクトを追加していきましょう。
//
//  GameViewController.swift
//  3D_wa_toshi
//
//  Created by Kinoshita Yusaku on 2016/12/03.
//  Copyright © 2016年 afroscript. All rights reserved.
//

import UIKit
import QuartzCore
import SceneKit

class GameViewController: UIViewController {

    override func viewDidLoad() {
        super.viewDidLoad()

        // create a new scene
        let scene = SCNScene()

        // create and add a camera to the scene
        let cameraNode = SCNNode()
        cameraNode.camera = SCNCamera()
        scene.rootNode.addChildNode(cameraNode)

        // place the camera
        cameraNode.position = SCNVector3(x: 0, y: 0, z: 0)

        // create and add a light to the scene
        let lightNode = SCNNode()
        lightNode.light = SCNLight()
        lightNode.light!.type = .omni
        lightNode.position = SCNVector3(x: 0, y: 100, z: 100)
        scene.rootNode.addChildNode(lightNode)

        // create and add an ambient light to the scene
        let ambientLightNode = SCNNode()
        ambientLightNode.light = SCNLight()
        ambientLightNode.light!.type = .ambient
        ambientLightNode.light!.color = UIColor.darkGray
        scene.rootNode.addChildNode(ambientLightNode)

        /*
         * ★ここにいろいろ追加していくよ!★
         * 下記2行は削除します〜
         * let ship = scene.rootNode.childNodeWithName("ship", recursively: true)!
         * ship.runAction(SCNAction.repeatActionForever(SCNAction.rotateByX(0, y: 2, z: 0, duration: 1)))
         */

        // retrieve the SCNView
        let scnView = self.view as! SCNView

        // set the scene to the view
        scnView.scene = scene

        // allows the user to manipulate the camera
        scnView.allowsCameraControl = true

        // show statistics such as fps and timing information
        scnView.showsStatistics = true

        // configure the view
        scnView.backgroundColor = UIColor.black

        // add a tap gesture recognizer
        let tapGesture = UITapGestureRecognizer(target: self, action: #selector(handleTap(_:)))
        scnView.addGestureRecognizer(tapGesture)
    }

    func handleTap(_ gestureRecognize: UIGestureRecognizer) {
        // retrieve the SCNView
        let scnView = self.view as! SCNView

        // check what nodes are tapped
        let p = gestureRecognize.location(in: scnView)
        let hitResults = scnView.hitTest(p, options: [:])
        // check that we clicked on at least one object
        if hitResults.count > 0 {
            // retrieved the first clicked object
            let result: AnyObject = hitResults[0]

            // get its material
            let material = result.node!.geometry!.firstMaterial!

            // highlight it
            SCNTransaction.begin()
            SCNTransaction.animationDuration = 0.5

            // on completion - unhighlight
            SCNTransaction.completionBlock = {
                SCNTransaction.begin()
                SCNTransaction.animationDuration = 0.5

                material.emission.contents = UIColor.black

                SCNTransaction.commit()
            }

            material.emission.contents = UIColor.red

            SCNTransaction.commit()
        }
    }

    override var shouldAutorotate: Bool {
        return true
    }

    override var prefersStatusBarHidden: Bool {
        return true
    }

    override var supportedInterfaceOrientations: UIInterfaceOrientationMask {
        if UIDevice.current.userInterfaceIdiom == .phone {
            return .allButUpsideDown
        } else {
            return .all
        }
    }

    override func didReceiveMemoryWarning() {
        super.didReceiveMemoryWarning()
        // Release any cached data, images, etc that aren't in use.
    }

}
3D物体を追加する
では進めていきます。
今回はトーラスを使ってみます。ドーナッツ型の3Dオブジェクトです。
ドキュメントは下記。
https://developer.apple.com/reference/scenekit/scntorus)
トーラスを1個表示するには下記な感じです。「★ここにいろいろ追加していくよ!★」のとこに下記を追加してください。
//シーン以外の3DのものつくるときはひとまずSCNNodeを用意する
let torusNode = SCNNode()
//trusNodeのジオメトリーにトーラスを設定。引数についてはドキュメントを
torusNode.geometry = SCNTorus(ringRadius: 3, pipeRadius: 1)
//シーンにtorusNodeを追加します
scene.rootNode.addChildNode(torusNode)
そして、追加した3Dオブジェクトは、デフォルトでは座標(0,0,0)に現れるので、
カメラの位置を見やすいとこに変更しておきます。
cameraNode.position = SCNVector3(x: 0, y: 0, z: 0)
を
cameraNode.position = SCNVector3(x: 0, y: 0, z: 20)
とかにしといてください。
※手前方向がz軸の+方向、右がx軸の+方向、上方向がy軸の+方向です。
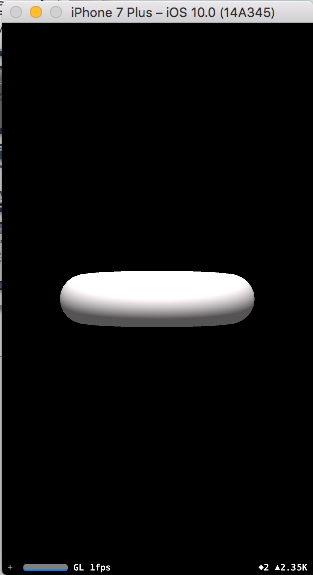
シミュレーターを立ち上げると下記のようにドーナッツを真横から見たものが表示されるかと思います。
※マウスで視点を動かせるので、視点を変えてドーナッツ型が表示されているのを確認してください。
3D物体の向きを変える&位置を変える
カメラの位置cameraNode.positionをSCNVector3(x: 0, y: 0, z: 0)に戻しといてください。
では、さきほどのドーナッツの向きを変えて表示してみましょう。
x軸方向に90度回転させて、ドーナッツの穴が見えるようにして、
z軸のマイナス方向(視点からみて前方向)の位置に表示してみましょう。
それには、torusNode.transformをイジっていきます。
これは、(多分)(現段階の僕の薄っっっい理解でいうと)、3Dオブジェクトを構成する各頂点がどこにいるかを記録していく、的な4次元行列です。(ちょっといい表現が見つかりませんw)
さっき追加したコードに、下記にように3行追加します。
let torusNode = SCNNode()
torusNode.geometry = SCNTorus(ringRadius: 3, pipeRadius: 1)
//ここの以下3行を追加
var t = torusNode.transform
t = SCNMatrix4Rotate(t, Float.pi * 0.5, 1, 0, 0)
t = SCNMatrix4Translate(t, 0, 0, -20)
torusNode.transform = t
scene.rootNode.addChildNode(torusNode)
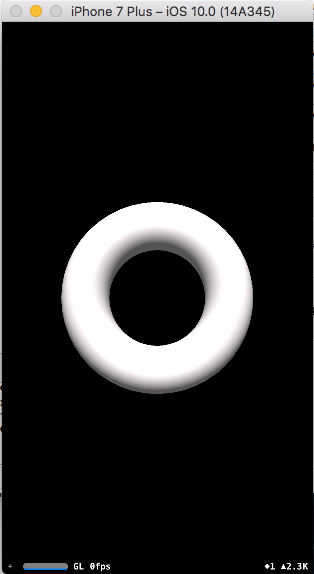
シミュレーターを立ち上げると、下記のようになるかと思います。
追加したコードを解説します。
var t = torusNode.transform
まず、変数tにtorusNode.transformを取り出して、
t = SCNMatrix4Rotate(t, Float.pi * 0.5, 1, 0, 0)
でx軸方向に90°(弧度法gではπ/2)回転させます。
[SCNMatrix4Rotateのドキュメント]はこちら。(https://developer.apple.com/reference/scenekit/1409659-scnmatrix4rotate)
1個目の引数→回転させる4次元行列を指定
2個目の引数→回転させる角度を指定
3〜5個目の引数→x,y,z軸、それぞれどの軸に適用させるかを1or0で指定
次に平行移動です。
t = SCNMatrix4Translate(t, 0, 0, -20)
これは単純。
1個目の引数→回転させる4次元行列を指定
2〜4個目の引数→x,y,z軸、それぞれの軸方向にどれだけ平行移動させるかを指定
そして最後に、回転させて、平行移動させたあとの位置情報を記録している4次元行列tを元のtorusNode.transformに戻してあげます
torusNode.transform = t
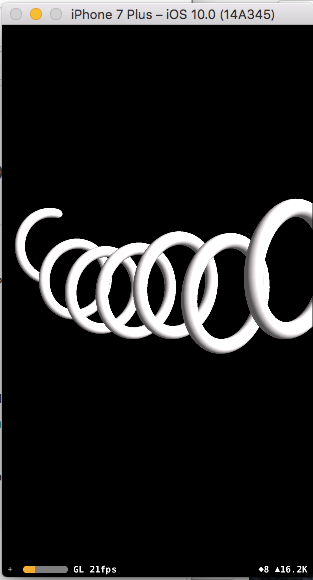
トラスをいっぱいつくって、上下の位置を少しずらす
あとは今やったものの応用です。
z軸方向にドーナッツを増殖させ、y軸方向にランダムでずらしてみます。
下記のようになります。
for i in 1...10 {
  let torusNode = SCNNode()
  torusNode.geometry = SCNTorus(ringRadius: 7, pipeRadius: 1)
  let random = Float(arc4random() % 10 )
  let randomScale = Float(1 + (arc4random() % 10) / 10)
  var t = torusNode.transform
  t = SCNMatrix4Scale(t, randomScale, 1, randomScale)
  t = SCNMatrix4Rotate(t, Float.pi * 0.5, 1, 0, 0)
  t = SCNMatrix4Translate(t, 0, random, -20 - 10 * Float(i))
  torusNode.transform = t
  scene.rootNode.addChildNode(torusNode)
}
シレっと追加した下記は、大きさを変える(拡大/縮小)やつです。
SCNMatrix4Scale(t, randomScale, 1, randomScale)
1個目の引数→回転させる4次元行列を指定
2〜4個目の引数→x,y,z軸、それぞれの軸方向にどれだけ拡大/縮小させるかを指定
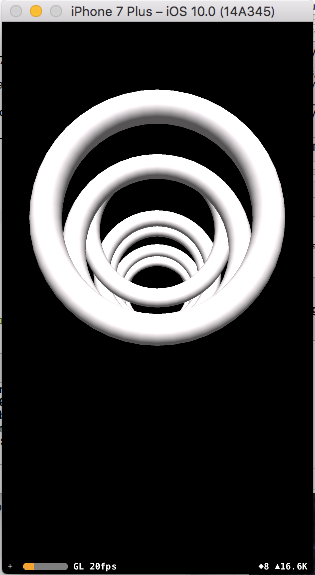
出来上がりは下記のようになります。
続きを書きました。(2017/01/28)
