1.はじめに
前回の記事では簡単なアプリを作ってiBeaconに触れてみました。(レンジング)
今回は、CoreLocationフレームワークの領域の観測について簡単に触れてみたいと思います。
- 本稿範囲:CoreLocationフレームワークの領域観測に触れてみる
- 対象読者:Xcodeの基本を理解している
- 開発環境:OS X Mavericks v10.9.4
- IDE:Xcode Ver 5.1.1
- 検証端末:iPhone 5S (iOS:7.1.2)
- Beacon機器:MyBeacon Pro (MB004)
2.領域観測
CoreLocationフレームワークでは、特定の領域へのユーザー(デバイス)の進入、及び、退出を検知するために「地理的領域の観測」と「Beacon領域の観測」という二つの方法を用意しています。
1. 地理的領域の観測
地理的領域とは特定の緯度、経度、そして、半径によって定義された領域です。
1.領域の定義と観測の開始
iOS7.0以降ではCLCircularRegionクラスを使用して地理的領域の定義を行ないます。
以下のメソッドでCLCircularRegionオブジェクトを生成します。
- (id)initWithCenter:(CLLocationCoordinate2D)center // 緯度、経度
      radius:(CLLocationDistance)radius             // 半径(メートル単位)
      identifier:(NSString *)identifier;            // 識別子
そして、地理的領域への観測を開始します。
観測を開始するには、CLLocationManagerクラスのstartMonitoringForRegion:メソッドを使用します。
- (void)startMonitoringForRegion:(CLRegion *)region // 観測する領域
観測の開始に成功すると、以下のメソッドが呼び出されます。
(CLLocationManagerDelegateプロトコルのメソッドです、デリゲートをお忘れなく。)
- (void)locationManager:(CLLocationManager *)manager    // イベントを報告したCLLocationManagerオブジェクト
        didStartMonitoringForRegion:(CLRegion *)region  // 観測を開始した領域
逆に観測の開始に失敗すると、以下のメソッドが呼び出されます。
- (void)locationManager:(CLLocationManager *)manager   // イベントを報告したCLLocationManagerオブジェクト
        monitoringDidFailForRegion:(CLRegion *)region  // エラーになった領域
        withError:(NSError *)error                     // 何故、観測がエラーになったかを示すエラー情報
尚、CLRegionクラスのnotifyOnEntry、notifyOnExitプロパティに明示的に値をセットすることで領域への進入、退出の通知をカスタマイズする事ができます。
(どちらも、デフォルトではYESがセットされていますが、notifyOnExit = NO;と、することで退出の通知は行なわない、といった具合に。)
領域の定義と観測の開始について、サンプルのソースを以下に示します。
    // _circleOverlayは、MKCircleオブジェクト。(MapKitの円形オーバーレイ)
    // 地理的領域の定義と観測の開始
    _circleRegion = [[CLCircularRegion alloc] initWithCenter:_circleOverlay.coordinate radius:_circleOverlay.radius identifier:@"foobar"];
    [_locationManager startMonitoringForRegion:_circleRegion];
2.境界線の横断を検知
領域の観測を開始すると、領域の境界線を横断する際に領域への進入、退出の通知を受ける事ができます。
CLLocationManagerDelegateプロトコルのdelegateを設定し、以下のメソッドを実装して下さい。
- (void)locationManager:(CLLocationManager *)manager  // イベントを報告したCLLocationManagerオブジェクト
        didEnterRegion:(CLRegion *)region             // 進入した領域

- (void)locationManager:(CLLocationManager *)manager  // イベントを報告したCLLocationManagerオブジェクト
        didExitRegion:(CLRegion *)region              // 退出した領域
領域の境界線を横断すると、これらのメソッドが呼び出されます。
が、境界線を越えた瞬間に即座に呼び出される、というものではありません。
境界線からある程度の距離を離れたうえで、その状態を数十秒間以上保ってからようやく呼び出される感じです。
iOSシミュレーターでテストしましたが、境界線を越えて移動してもなかなか通知されませんでした。
(実機では通知されましたが。)
尚、観測を開始した時点で既に領域の中にいる場合、上述のメソッドは呼び出されません。
領域の内部にいるかどうかの判定をする場合には、CLLocationManagerクラスの以下のメソッドを使用します。
- (void)requestStateForRegion:(CLRegion *)region // 状態について知りたい領域
すると、非同期で以下のメソッドが呼び出されます。
(実機で動作確認したところ、少し移動すると通知される事が多いような?)
- (void)locationManager:(CLLocationManager *)manager  // イベントを報告したCLLocationManagerオブジェクト
        didDetermineState:(CLRegionState)state        // 特定領域に対する状態
        forRegion:(CLRegion *)region                  // 領域
第二引数のstateは、その領域の内側なのか、外側なのかを教えてくれます。
以下の3種類の状態を持ちます。
| state | 説明 |
|---|---|
| CLRegionStateUnknown | 領域の外側にいるのか、内側にいるのか判らない。 |
| CLRegionStateInside | 領域の内側にいる。 |
| CLRegionStateOutside | 領域の外側にいる。 |
2. Beacon領域の観測
Beacon領域とは特定のID(proximityUUIDは必須、major、minorは任意)を持つBeacon機器によって定義された領域です。
地理的領域とは異なり、特定の緯度、経度とは結びつきません。
例えば、Beacon機器を電車やバス等に載せる事でBeacon領域も一緒に移動していきます。
1.領域の定義と観測の開始
Beacon領域は、CLBeaconRegionクラスを使用して領域を定義します。
(地理的領域のCLCircularRegionクラスとは、CLRegionクラスを親とする兄弟関係にある。)
領域を定義するには、CLBeaconRegionクラスの以下のメソッドを呼び出します。
- (id)initWithProximityUUID:(NSUUID *)proximityUUID  // ターゲットのビーコンが持つ識別子
      identifier:(NSString *)identifier              // 領域オブジェクトとヒモづく識別子(任意)
観測の開始は、地理的領域と同様にCLLocationManagerクラスの- (void)startMonitoringForRegion:(CLRegion *)regionメソッドを使用します。
Beacon領域の定義と観測の開始について、サンプルソースを以下に示します。
    NSUUID *_uuid = [[NSUUID alloc]initWithUUIDString:UUID];
    _beaconRegion = [[CLBeaconRegion alloc] initWithProximityUUID:_uuid identifier:[_uuid UUIDString]];
    [_locationManager startMonitoringForRegion:_beaconRegion];
2.境界線の横断を検知
こちらも地理的領域の横断と同様、領域の境界線上を横断すると以下のメソッドが呼び出されます。
- (void)locationManager:(CLLocationManager *)manager  // イベントを報告したCLLocationManagerオブジェクト
        didEnterRegion:(CLRegion *)region             // 進入した領域

- (void)locationManager:(CLLocationManager *)manager  // イベントを報告したCLLocationManagerオブジェクト
        didExitRegion:(CLRegion *)region              // 退出した領域
そして、既に領域の内側にいる場合には、locationManager:didEnterRegion:が呼び出されることはありません。
地理的領域と同様に- (void)requestStateForRegion:(CLRegion *)regionを使用する事で非同期でその領域の内部にいるか否かを知る事ができます。
3. サンプルアプリ概要
今回は、地理的領域観測とBeacon領域観測の二つを使ったサンプルアプリを作成します。
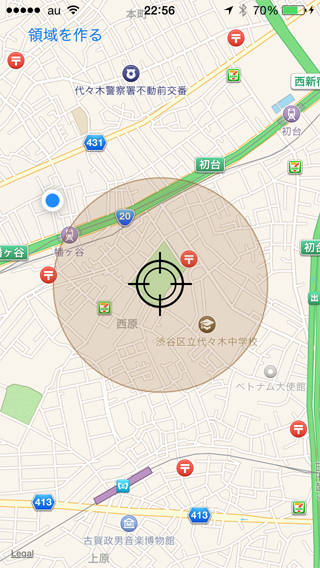
ボタンを押下するとMapViewの中心位置に地理的領域を作成し、観測を行います。
また、Beacon領域についても作成し、観測を行います。
定義した領域への進入と退出を検知すると通知を発行します。
4. いざ、作ってみよう
今回もSingle View Applicationで、新規にプロジェクトを作成します。
Product Nameは「TestGeoFence」としましたが、お好きな名前をつけていただいて結構です。
そして、Device OrientationをPortraitに。

続いて、Capabilitiesで、MapsをONに。
Background ModesもONにし、Location Updatesにチェックを入れます。

Main.storyboardを編集します。
MapView、Button、Image Viewを追加します。

自身の場所をMapViewに表示するので、Shows User Locationにチェックを付けます。
あと、delegateの設定もお忘れなく。

Image Viewは、常に画面の中央にあって、ボタン押下時に領域がどの辺りに作られるかのガイドの役割を果たします。
このようなイメージファイルを使用しました。

Buttonは、押下するとMapViewの中央に地理的領域を作成します。
では、ソースファイルを見て行きます。
本アプリで唯一のUIViewControllerです。
#import <UIKit/UIKit.h>
#import <MapKit/MapKit.h>

@interface ViewController : UIViewController <MKMapViewDelegate,CLLocationManagerDelegate>
- (IBAction)pushedCreateButton:(id)sender;
@end
MKMapViewDelegateとCLLocationManagerDelegateの二つのプロトコルを採用しています。
では、次に実装部を見て行きます。
とりあえず全体を提示します。
#import "ViewController.h"

// 地理的領域半径(メートル単位)
#define REGION_RADIUS 400.0
// ユーザーデフォルトに保存する座標情報キー
#define COORDINATE @"coordinate"
// ディクショナリに保存する緯度キー
#define LATITUDE   @"latitude"
// ディクショナリに保存する経度キー
#define LONGITUDE  @"longitude"
// 地理的領域ID
#define REGION_ID  @"region"
// Beacon領域ID
#define UUID       @"00000000-0C4F-1001-B000-001C4D0184A3"

@interface ViewController ()
@property (weak, nonatomic) IBOutlet MKMapView *mapView;
@end

@implementation ViewController
{
    // 位置情報マネージャ
    CLLocationManager *_locationManager;
    // 地理的領域の中心緯度経度
    CLLocationCoordinate2D _regionCoordinate;
    // 円形オーバーレイ
    MKCircle *_circleOverlay;
    // 地理的領域(円形)
    CLCircularRegion *_circleRegion;
    // ビーコン領域
    CLBeaconRegion *_beaconRegion;
}

#pragma mark - ViewController Lifecycle
- (void)viewDidLoad
{
    [super viewDidLoad];
    // 位置情報マネージャを初期化
    _locationManager = [[CLLocationManager alloc]init];
    _locationManager.delegate = self;
    _locationManager.desiredAccuracy = kCLLocationAccuracyBest;
    _locationManager.distanceFilter = kCLDistanceFilterNone;
    [_locationManager startUpdatingLocation];
}

- (void)didReceiveMemoryWarning
{
    [super didReceiveMemoryWarning];
}

- (void)viewDidAppear:(BOOL)animated {
    [super viewDidAppear:animated];
    // 領域情報をロード、ロードする情報があれば各種設定
    if([self loadCoordinate]) {
        // ジオフェンス(地理的領域とオーバーレイ)を定義
        [self addGeoFence];
    }
    // ビーコン領域を定義
    [self addBeaconRegion];
    // 監視中の領域をログに出力
    [self monitoredRegions];
    // MapViewの表示領域を現在位置に設定
    MKCoordinateRegion region = MKCoordinateRegionMakeWithDistance(_locationManager.location.coordinate, 1200.0, 1200.0);
    [_mapView setRegion:region animated:YES];
}

#pragma mark - region / overlay
- (void)addBeaconRegion {
    // Beacon領域の定義と観測の開始
    NSUUID *_uuid = [[NSUUID alloc]initWithUUIDString:UUID];
    _beaconRegion = [[CLBeaconRegion alloc] initWithProximityUUID:_uuid identifier:[_uuid UUIDString]];
    [_locationManager requestStateForRegion:_beaconRegion];
    [_locationManager startMonitoringForRegion:_beaconRegion];
}

- (void)addGeoFence {
    // 既存のオーバーレイを削除
    [_mapView removeOverlay:_circleOverlay];
    // 円形オーバーレイオブジェクトを生成
    _circleOverlay = [MKCircle circleWithCenterCoordinate:_regionCoordinate radius:REGION_RADIUS];
    // MapViewへ追加
    [_mapView addOverlay:_circleOverlay];
    // 地理的領域の定義と監視の開始
    _circleRegion = [[CLCircularRegion alloc] initWithCenter:_circleOverlay.coordinate radius:_circleOverlay.radius identifier:REGION_ID];
    _circleRegion.notifyOnEntry = YES;
    _circleRegion.notifyOnExit = YES;
    [_locationManager requestStateForRegion:_circleRegion];
    [_locationManager startMonitoringForRegion:_circleRegion];
}

- (void)monitoredRegions {
    NSSet* regions = [_locationManager monitoredRegions];
    NSLog(@"regions:[%@]", regions);
}

#pragma mark - MKMapViewDelegate
- (MKOverlayRenderer *)mapView:(MKMapView *)mapView rendererForOverlay:(id<MKOverlay>)overlay {
    MKCircleRenderer *renderer = [[MKCircleRenderer alloc] initWithCircle:(MKCircle *)overlay];
    renderer.strokeColor = [[UIColor brownColor] colorWithAlphaComponent:0.7];
    renderer.lineWidth = 1;
    renderer.fillColor = [[UIColor brownColor] colorWithAlphaComponent:0.2];
    return (MKOverlayRenderer*)renderer;
}

#pragma mark - CLLocationManagerDelegate
- (void)locationManager:(CLLocationManager *)manager didFailWithError:(NSError *)error {
    NSLog(@"%@", error);
}

- (void)locationManager:(CLLocationManager *)manager didStartMonitoringForRegion:(CLRegion *)region {
    NSLog(@"Monitoring region ID:[%@]", region.identifier);
}

- (void)locationManager:(CLLocationManager *)manager monitoringDidFailForRegion:(CLRegion *)region withError:(NSError *)error {
    NSLog(@"%@", error);
}

- (void)locationManager:(CLLocationManager *)manager didDetermineState:(CLRegionState)state forRegion:(CLRegion *)region {
    if(state == CLRegionStateInside) {
        NSLog(@"既に内側に。領域ID:[%@]", region.identifier);
        UILocalNotification *notification = [[UILocalNotification alloc] init];
        notification.alertBody = [NSString stringWithFormat: @"[%@]にいます。", region.identifier];
        notification.soundName = UILocalNotificationDefaultSoundName;
        [[UIApplication sharedApplication] presentLocalNotificationNow:notification];
    }
}

- (void)locationManager:(CLLocationManager *)manager didEnterRegion:(CLRegion *)region {
    NSLog(@"didEnterRegion.id[%@]",region.identifier);
    UILocalNotification *notification = [[UILocalNotification alloc] init];
    notification.alertBody = [NSString stringWithFormat: @"[%@] へ進入。", region.identifier ];
    notification.soundName = UILocalNotificationDefaultSoundName;
    [[UIApplication sharedApplication] presentLocalNotificationNow:notification];
}

- (void)locationManager:(CLLocationManager *)manager didExitRegion:(CLRegion *)region {
    NSLog(@"didExitRegion.id[%@]",region.identifier);
    UILocalNotification *notification = [[UILocalNotification alloc] init];
    notification.alertBody = [NSString stringWithFormat: @"[%@] から退出。", region.identifier ];
    notification.soundName = UILocalNotificationDefaultSoundName;
    [[UIApplication sharedApplication] presentLocalNotificationNow:notification];
}

#pragma mark - coordinate save/load
- (void)saveCoordinate {
    // 緯度経度をDictionaryへ
    NSDictionary *dic = @{LATITUDE: @(_regionCoordinate.latitude), LONGITUDE: @(_regionCoordinate.longitude)};
    // UserDefaultへ保管
    NSUserDefaults *userDefault = [NSUserDefaults standardUserDefaults];
    [userDefault setObject:dic forKey:COORDINATE];
}

- (BOOL)loadCoordinate {
    // UserDefaultから緯度経度を取得
    NSUserDefaults *userDefault = [NSUserDefaults standardUserDefaults];
    NSDictionary *dic = [userDefault objectForKey:COORDINATE];
    // UserDefaultに緯度経度が存在する場合、メンバ変数へセット
    if (dic) {
        _regionCoordinate = CLLocationCoordinate2DMake([dic[LATITUDE] doubleValue], [dic[LONGITUDE] doubleValue]);
        return YES;
    }
    return NO;
}

#pragma mark - Actions
- (IBAction)pushedCreateButton:(id)sender {
    // MapViewの中心緯度経度を取得し領域の中心位置とする
    _regionCoordinate = _mapView.region.center;
    // 中心の座標を保管
    [self saveCoordinate];
    // ジオフェンス(地理的領域とオーバーレイ)を定義
    [self addGeoFence];
    // 監視中の領域をログに出力
    [self monitoredRegions];
}
@end
それでは、振り返って行きましょう。
#pragma mark - ViewController Lifecycle
- (void)viewDidLoad
{
    [super viewDidLoad];
    // 位置情報マネージャを初期化
    _locationManager = [[CLLocationManager alloc]init];
    _locationManager.delegate = self;
    _locationManager.desiredAccuracy = kCLLocationAccuracyBest;
    _locationManager.distanceFilter = kCLDistanceFilterNone;
    [_locationManager startUpdatingLocation];
}
viewDidLoadメソッドでCLLocationManagerオブジェクトを作り、delegateの設定をします。
ここでは、位置情報の精度を最もハイレベルなkCLLocationAccuracyBestとしています。
この辺りの精度については、アプリケーションの要件によって最適なものを選択するにようして下さい。
distanceFilterについては、kCLDistanceFilterNoneとしていますが、アプリケーションの要件次第では、もう少し大きめの値を設定しても良いでしょう。
(例えば、位置情報の最後アップデート時から500m移動したら位置情報のアップデートを行なう、とする場合にはlocationManager.distanceFilter = 500;のように。)
最後にstartUpdatingLocationメソッドで位置情報のアップデートを開始します。
- (void)viewDidAppear:(BOOL)animated {
    [super viewDidAppear:animated];
    // 領域情報をロード、ロードする情報があれば各種設定
    if([self loadCoordinate]) {
        // ジオフェンス(地理的領域とオーバーレイ)を定義
        [self addGeoFence];
    }
    // ビーコン領域を定義
    [self addBeaconRegion];
    // 監視中の領域をログに出力
    [self monitoredRegions];
    // MapViewの表示領域を現在位置に設定
    MKCoordinateRegion region = MKCoordinateRegionMakeWithDistance(_locationManager.location.coordinate, 1200.0, 1200.0);
    [_mapView setRegion:region animated:YES];
}
viewDidAppear:メソッドでは、領域情報のロードを試み、ロードに成功したら地理的領域の設定を行います。
そして、無条件にビーコン領域の定義を行なった後、MapViewの表示位置を現在位置にします。
#pragma mark - region / overlay
- (void)addBeaconRegion {
    // Beacon領域の定義と観測の開始
    NSUUID *_uuid = [[NSUUID alloc]initWithUUIDString:UUID];
    _beaconRegion = [[CLBeaconRegion alloc] initWithProximityUUID:_uuid identifier:[_uuid UUIDString]];
    [_locationManager requestStateForRegion:_beaconRegion];
    [_locationManager startMonitoringForRegion:_beaconRegion];
}
proximityUUIDを使用してBeacon領域の定義を行ないます。
そして、Beacon領域の観測を開始します。
requestStateForRegionメソッドは、非同期でその領域の内部にいるか否かを教えてくれます。
startMonitoringForRegionメソッドは領域の境界線の横断を検知したら通知してくれます。
- (void)addGeoFence {
    // 既存のオーバーレイを削除
    [_mapView removeOverlay:_circleOverlay];
    // 円形オーバーレイオブジェクトを生成
    _circleOverlay = [MKCircle circleWithCenterCoordinate:_regionCoordinate radius:REGION_RADIUS];
    // MapViewへ追加
    [_mapView addOverlay:_circleOverlay];
    // 地理的領域の定義と監視の開始
    _circleRegion = [[CLCircularRegion alloc] initWithCenter:_circleOverlay.coordinate radius:_circleOverlay.radius identifier:REGION_ID];
    _circleRegion.notifyOnEntry = YES;
    _circleRegion.notifyOnExit = YES;
    [_locationManager requestStateForRegion:_circleRegion];
    [_locationManager startMonitoringForRegion:_circleRegion];
}
MapKitフレームワークの円状オーバーレイを作成してMapViewに追加します。
そして、円状オーバーレイの位置、半径にあわせて地理的領域の定義を行ないます。
notifyOnEntry、notifyOnExitの両方にYESをセットし、領域への進入、退出、両方とも通知するようにしています。(デフォルトで両方ともYESですが。)
そして、Beacon領域と同様に観測を開始します。
- (void)monitoredRegions {
    NSSet* regions = [_locationManager monitoredRegions];
    NSLog(@"regions:[%@]", regions);
}
CLLocationManagerオブジェクトに問い合わせて観測中の全ての領域を取得しログに出力しています。
#pragma mark - MKMapViewDelegate
- (MKOverlayRenderer *)mapView:(MKMapView *)mapView rendererForOverlay:(id<MKOverlay>)overlay {
    MKCircleRenderer *renderer = [[MKCircleRenderer alloc] initWithCircle:(MKCircle *)overlay];
    renderer.strokeColor = [[UIColor brownColor] colorWithAlphaComponent:0.7];
    renderer.lineWidth = 1;
    renderer.fillColor = [[UIColor brownColor] colorWithAlphaComponent:0.2];
    return (MKOverlayRenderer*)renderer;
}
オーバーレイを描画する際に呼び出されるメソッドです。
線の色をBrown、線の太さを1、塗りつぶしをBrownとしています。
#pragma mark - CLLocationManagerDelegate
- (void)locationManager:(CLLocationManager *)manager didFailWithError:(NSError *)error {
    NSLog(@"%@", error);
}
位置情報の取得に失敗した際に呼び出されます。
エラーオブジェクトをログ出力します。
- (void)locationManager:(CLLocationManager *)manager didStartMonitoringForRegion:(CLRegion *)region {
    NSLog(@"Monitoring region ID:[%@]", region.identifier);
}
領域の観測を開始した際に呼び出されます。
領域の識別子をログに出力します。
- (void)locationManager:(CLLocationManager *)manager monitoringDidFailForRegion:(CLRegion *)region withError:(NSError *)error {
    NSLog(@"%@", error);
}
領域の観測に失敗した際に呼び出されます。
エラーオブジェクトをログに出力します。
- (void)locationManager:(CLLocationManager *)manager didDetermineState:(CLRegionState)state forRegion:(CLRegion *)region {
    if(state == CLRegionStateInside) {
        NSLog(@"既に内側に。領域ID:[%@]", region.identifier);
        UILocalNotification *notification = [[UILocalNotification alloc] init];
        notification.alertBody = [NSString stringWithFormat: @"[%@]にいます。", region.identifier];
        notification.soundName = UILocalNotificationDefaultSoundName;
        [[UIApplication sharedApplication] presentLocalNotificationNow:notification];
    }
}
CLLocationManagerクラスのrequestStateForRegion:メソッドを呼び出すと非同期で呼び出されます。
内側にいる場合は領域の識別子をログに出力し、ローカル通知をします。
- (void)locationManager:(CLLocationManager *)manager didEnterRegion:(CLRegion *)region {
    NSLog(@"didEnterRegion.id[%@]",region.identifier);
    UILocalNotification *notification = [[UILocalNotification alloc] init];
    notification.alertBody = [NSString stringWithFormat: @"[%@] へ進入。", region.identifier ];
    notification.soundName = UILocalNotificationDefaultSoundName;
    [[UIApplication sharedApplication] presentLocalNotificationNow:notification];
}
CLLocationManagerクラスのstartMonitoringForRegion:メソッドを呼び出すと、境界線を横断して領域へ進入した際に呼び出されます。
(進入したら即座に呼び出されるわけではない。)
領域の識別子をログに出力し、ローカル通知を行ないます。
- (void)locationManager:(CLLocationManager *)manager didExitRegion:(CLRegion *)region {
    NSLog(@"didExitRegion.id[%@]",region.identifier);
    UILocalNotification *notification = [[UILocalNotification alloc] init];
    notification.alertBody = [NSString stringWithFormat: @"[%@] から退出。", region.identifier ];
    notification.soundName = UILocalNotificationDefaultSoundName;
    [[UIApplication sharedApplication] presentLocalNotificationNow:notification];
}
CLLocationManagerクラスのstartMonitoringForRegion:メソッドを呼び出すと、境界線を横断して領域から退出した際に呼び出されます。
(退出したら即座に呼び出されるわけではない。)
領域の識別子をログに出力し、ローカル通知を行ないます。
#pragma mark - coordinate save/load
- (void)saveCoordinate {
    // 緯度経度をDictionaryへ
    NSDictionary *dic = @{LATITUDE: @(_regionCoordinate.latitude), LONGITUDE: @(_regionCoordinate.longitude)};
    // UserDefaultへ保管
    NSUserDefaults *userDefault = [NSUserDefaults standardUserDefaults];
    [userDefault setObject:dic forKey:COORDINATE];
}
地理的領域の緯度経度をUserDefaultへ保管します。
- (BOOL)loadCoordinate {
    // UserDefaultから緯度経度を取得
    NSUserDefaults *userDefault = [NSUserDefaults standardUserDefaults];
    NSDictionary *dic = [userDefault objectForKey:COORDINATE];
    // UserDefaultに緯度経度が存在する場合、メンバ変数へセット
    if (dic) {
        _regionCoordinate = CLLocationCoordinate2DMake([dic[LATITUDE] doubleValue], [dic[LONGITUDE] doubleValue]);
        return YES;
    }
    return NO;
}
地理的領域の緯度経度をUserDefaultから読み出します。
#pragma mark - Actions
- (IBAction)pushedCreateButton:(id)sender {
    // MapViewの中心緯度経度を取得し領域の中心位置とする
    _regionCoordinate = _mapView.region.center;
    // 中心の座標を保管
    [self saveCoordinate];
    // ジオフェンス(地理的領域とオーバーレイ)を定義
    [self addGeoFence];
    // 監視中の領域をログに出力
    [self monitoredRegions];
}
ボタン押下時の処理です。
MapViewの中心位置を取得してUserDefaultに保管し地理的領域の中心地とします。
5. 最後に
CoreLocationによる二つの領域観測について書いてきました。
位置に縛られる地理的領域と、より柔軟な領域の定義が可能なBeacon領域の定義と観測について何となくの感触を掴んでいただければ幸いでございます。