概要
BehaviorDesignerのようなEditor拡張のAIシステムを作ってみました。
githubのリンク先は下記になります。Unityちゃんやら、Standard AssetsのCharactersやらが入っているのでちょっと容量が大きいかも。
(追記)
Unityで実行する場合は、BehaviourTreesフォルダの上の階層のフォルダ名をAssetsに変更して、直下にあるmain.unityを再生して下さい。
自分の過去記事で、Behaviour TreeのUniRxによる実装と、Unityでノードベースなウィンドウを簡単に作る為の「Simple node editor」の紹介がありますが、今回の記事ではこの2つを組み合わせて実装するところまで書きます。
実現するBehaviourTree
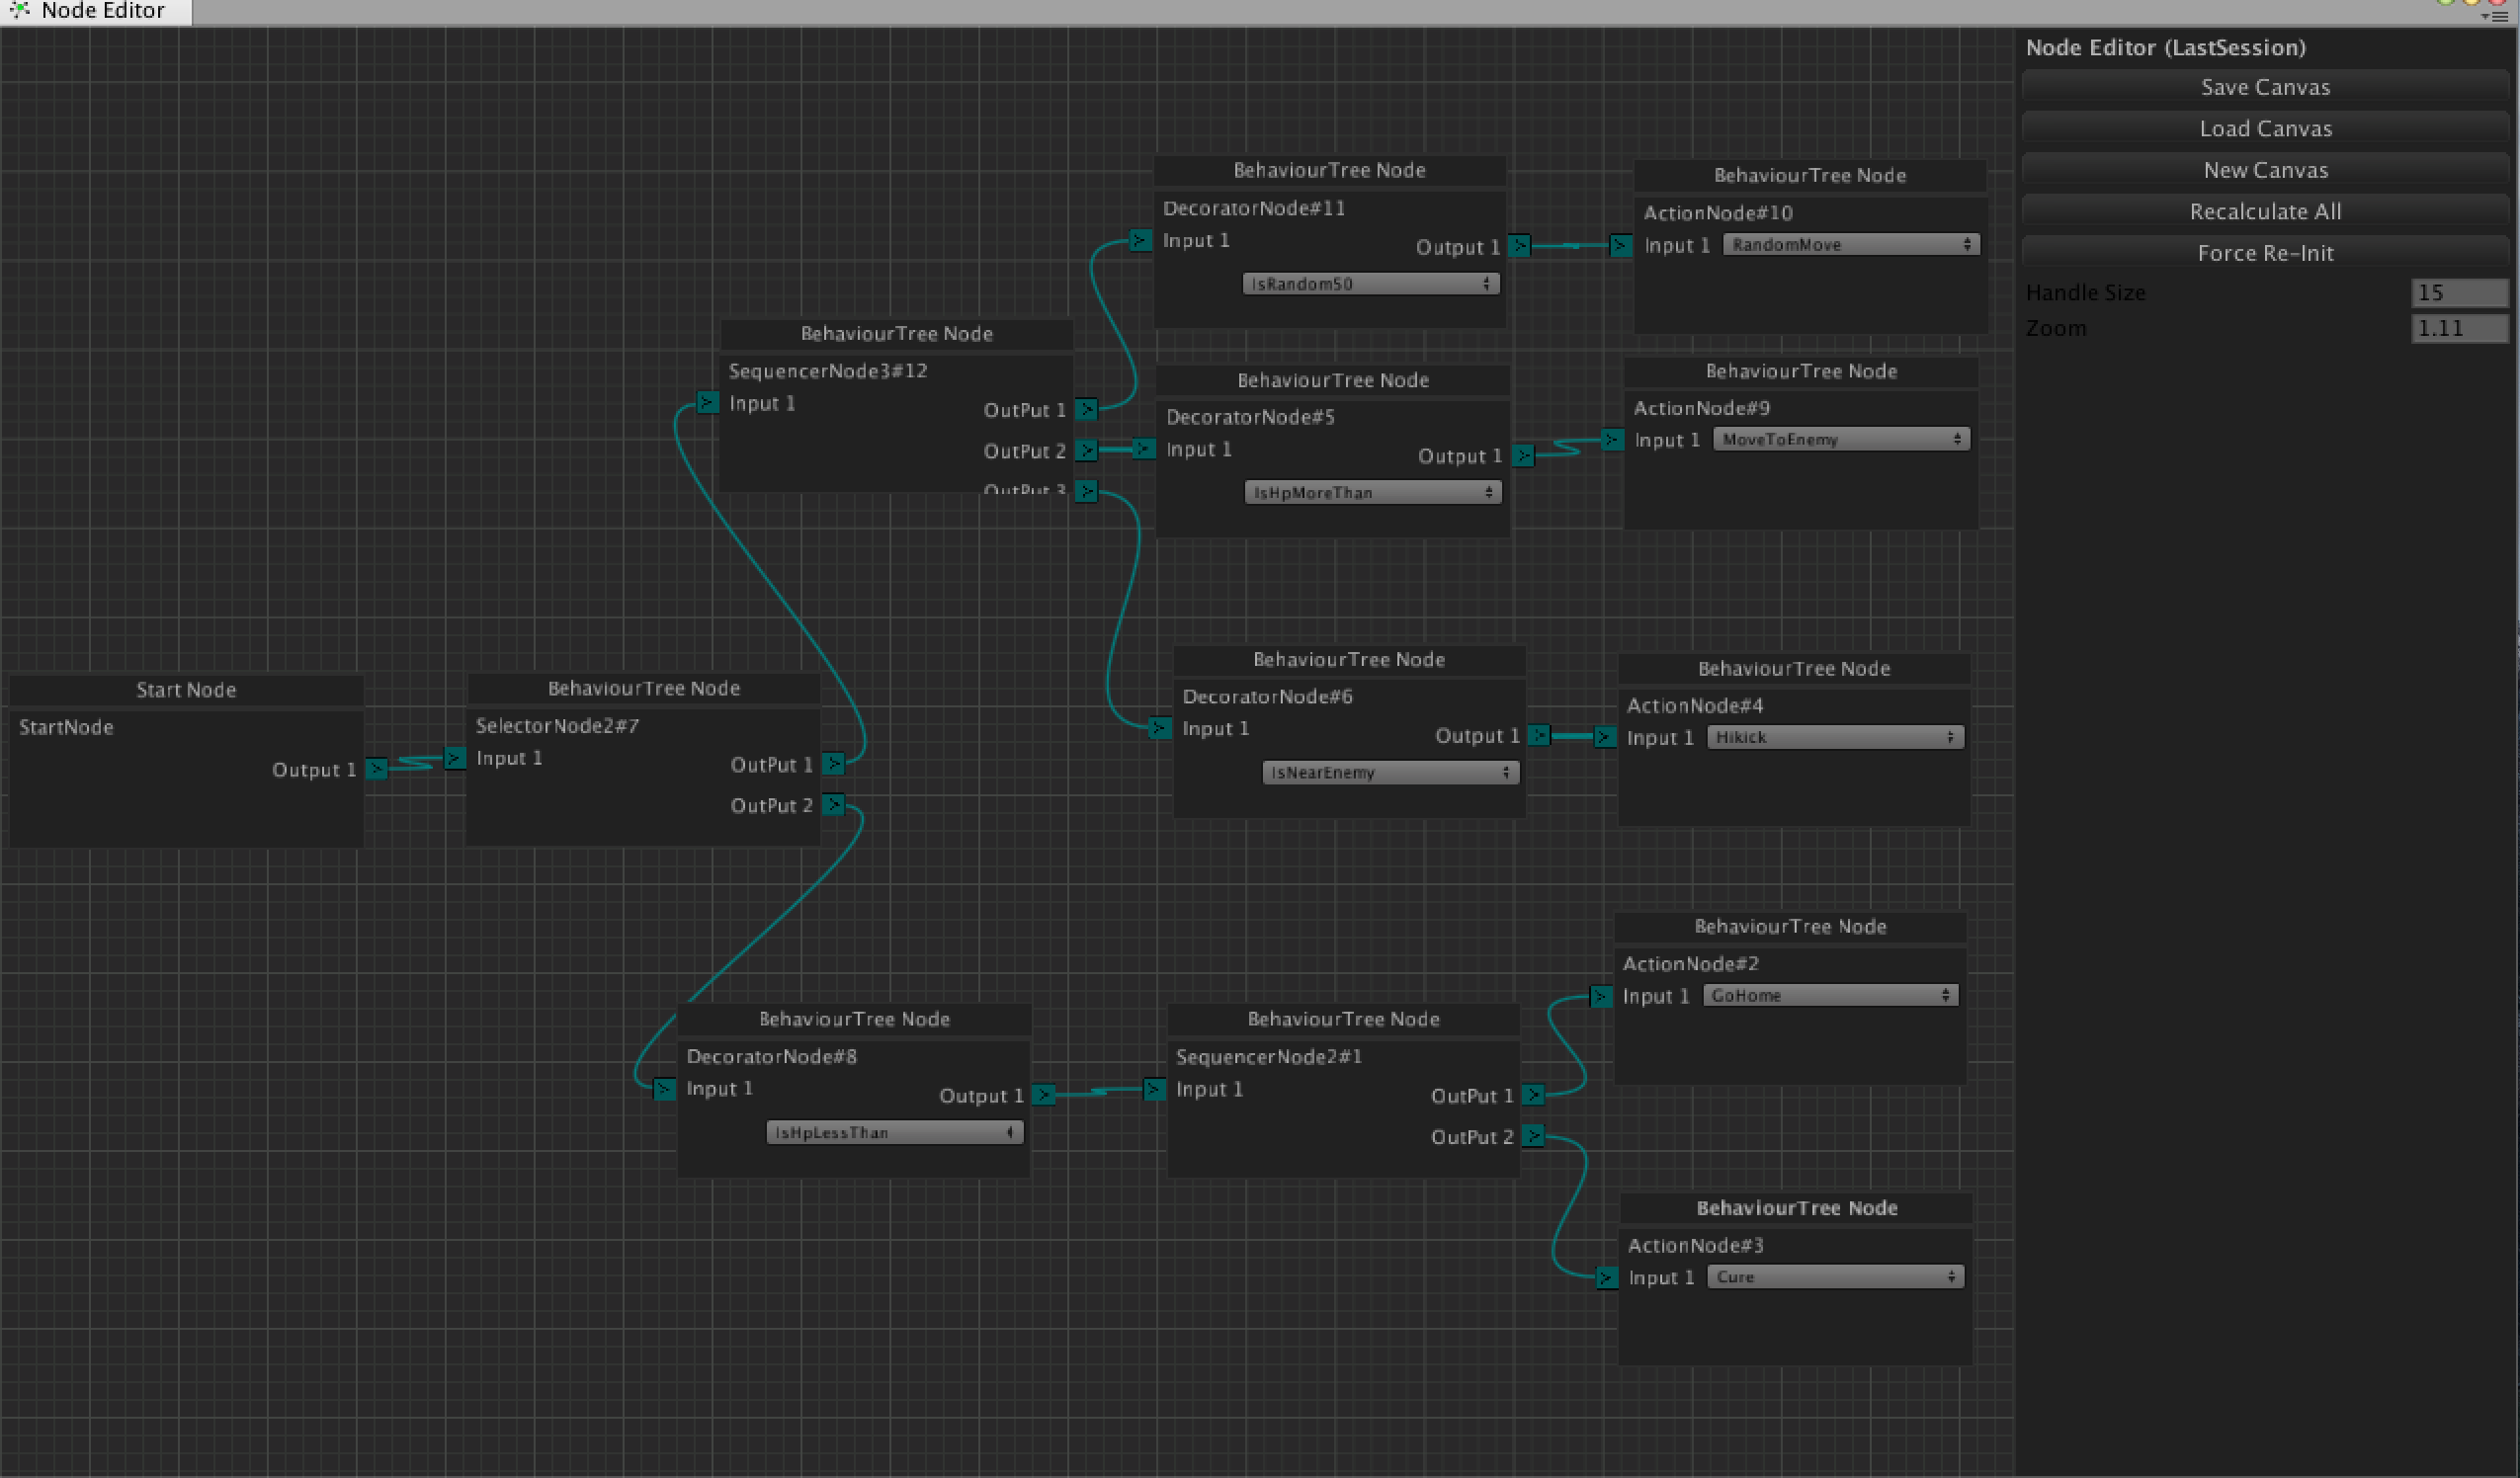
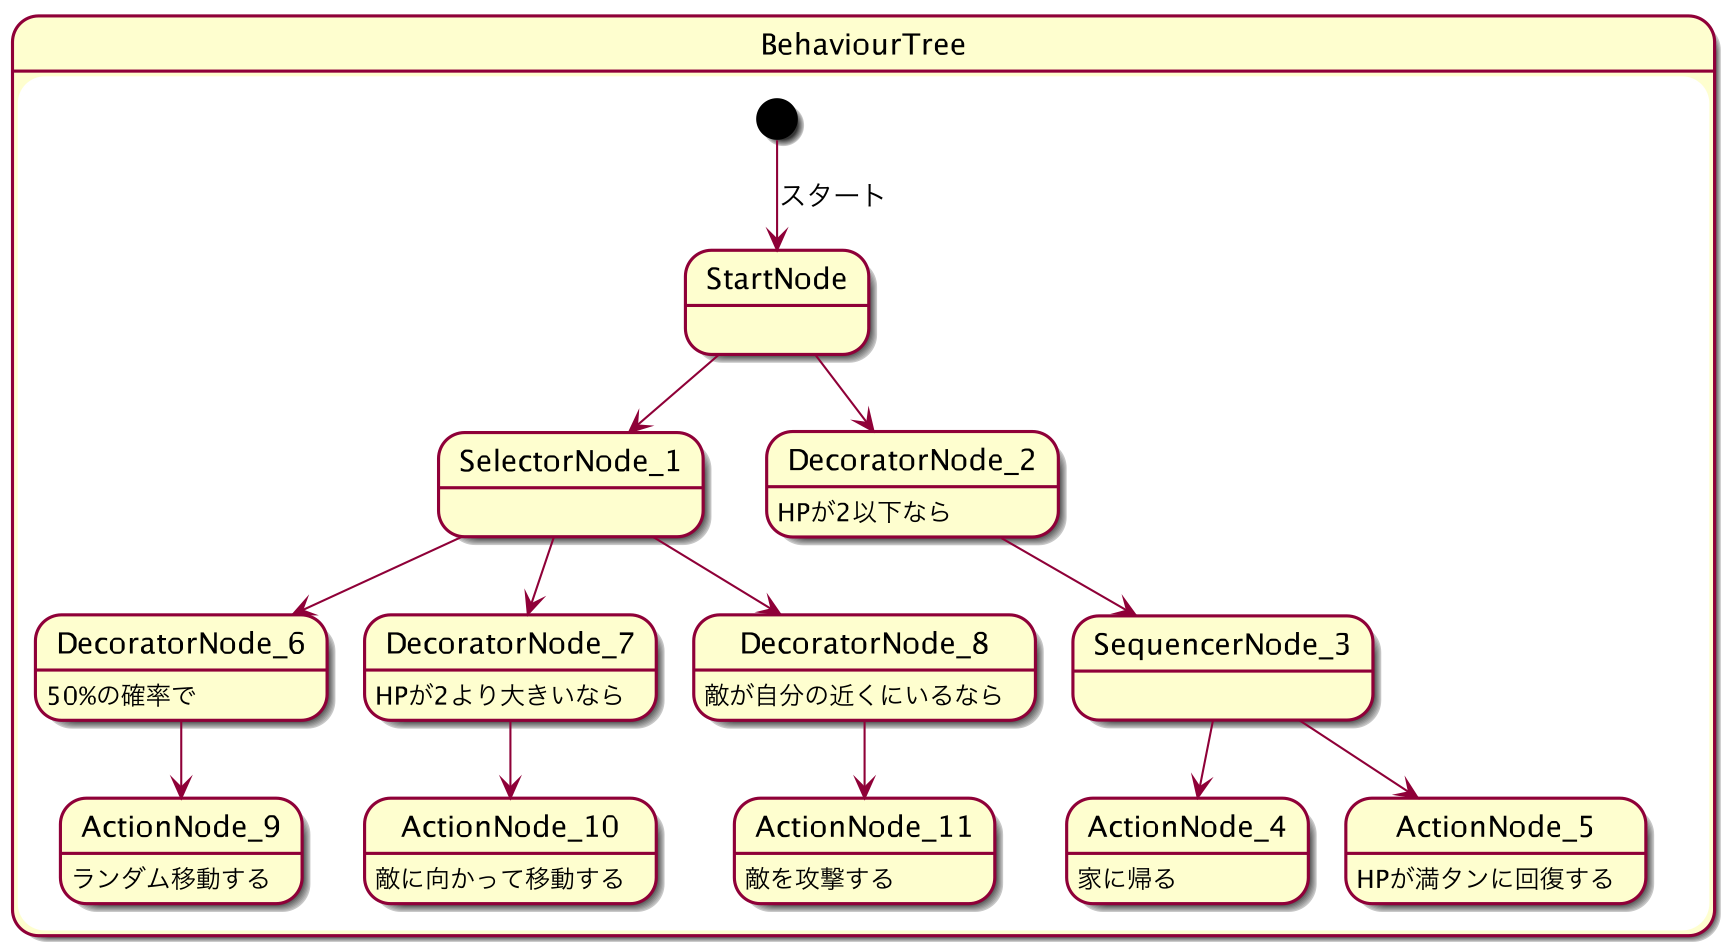
下の図のようなBehaviourTreeAIを作ります。2人のプレイヤーがいるとして以下の4つのアクションを繰り替えし行うイメージです。
- HPが2より大きければ敵に向かって進む
- 敵との距離が近ければ攻撃する
- HPが2以下になったら定位置に戻る。
- 回復する
Behaviour Tree実行部分の作成
Behaviour TreeのUniRxによる実装を見てください。
「Simple node editor」でBehaviourTree Editorを作る。
BehaviourTreeノードクラスを作る
Simple Node Editorはノードエディタを作る為のフレームワークです。NodeクラスをオーバーライドしてBehaviourTreeノードクラスを実装します。このフレームワークだけだと足りない機能があって、BehaviourTreeノードに必要なActionノードにメソッドを設定して、Behaviour Tree実行時にそのメソッドを実行させる事が出来ないので、これを追加します。
やり方としては、下記コードのようにリフレクションを使って、指定したクラスのpublicメソッド名を取得してNodeEditorに表示して選択できるようにし、実行するときには指定のGameObjectにアタッチされているクラスのメソッドのdelegateを作って、それを渡して実行すれば良いです。
/// <summary>
/// 指定したクラスの全てのメソッドを取得。
/// </summary>
/// <returns>The methods.</returns>
/// <typeparam name="T">The 1st type parameter.</typeparam>
public static string[] GetMethods<T>(){
//Tを継承したクラスを全て取得
		var clacces = Assembly.GetAssembly(typeof(T)).GetTypes().Where(t => t.IsSubclassOf(typeof(T)));
		return clacces
			.SelectMany(c=>c.GetMethods(BindingFlags.Public | BindingFlags.Instance | BindingFlags.DeclaredOnly))
			.Select(p=>p.Name).ToArray();
	}
	/// <summary>
	/// 指定のGameObjectの指定のメソッドのDelegateを取得
	/// </summary>
	/// <returns>The action.</returns>
	/// <param name="go">Go.</param>
	/// <param name="type">Type.</param>
	/// <param name="methodName">Method name.</param>
	/// <typeparam name="T">The 1st type parameter.</typeparam>
	public static Action<T> GetAction<T>(GameObject go, Type type, string methodName){
		var clacces = Assembly.GetAssembly(type).GetTypes().Where(t => t.IsSubclassOf(type));
		var query = clacces
			.SelectMany(c=>c.GetMethods(BindingFlags.Public | BindingFlags.Instance | BindingFlags.DeclaredOnly));

		Component comp = null;
		foreach(var c in clacces){
			///Publicメソッドを取得(継承されたメンバは含まない)
			foreach (var m in c.GetMethods(BindingFlags.Public | BindingFlags.Instance | BindingFlags.DeclaredOnly))
			{
				if(m.Name == methodName){
					comp =  go.GetComponent(c.Name);
				}
			}
		}
		var mquery = query.Where(p=>p.Name == methodName);
		var minfo = mquery.FirstOrDefault();
		var result =  (Action<T>)Delegate.CreateDelegate(typeof(Action<T>),comp,minfo);
		return result;
	}
Nodeクラスをどう拡張してごにょごにょしてるかは、本記事のTOPのリンク先のソースコードを参考にしてみてください。
Assets/Node_Editor/Nodes/BehaviourTree/uActionNode.cs
そんなこんなで出来たBehaviourTreeのNodeEditorで構築したAIは下記のような感じになります〜。

Editorで作成したAIを実行するクラスを作成する。
TOPのプロジェクトの中のAssets/Scripts/BTreeManager.csがそのクラスです。
中身をざっくり説明すると以下のような流れでAIを実行しています。
- NodeEditorで作成したScriptableObjectをロード
- 再帰的にNodeTreeを構築。
- ActionNodeとDicoratorNodeにDelegateを登録
- NodeTreeを繰り替えし実行
using UnityEngine;
using System.Collections;
using System.Collections.Generic;
using NodeEditorFramework;
using NodeEditorFramework.Utilities;
using System.Linq;
using BehaviourTrees;
using System;
using UniRx;

/// <summary>
/// NodeEditorで作成したScriptableObjectからBehaviourTreeを構築し、実行する
/// </summary>
public class BTreeManager : MonoBehaviour {

	[SerializeField, FilePath]
	string filePath;

	BehaviourTreeInstance node;

	RuntimeNodeEditor runtimeNodeEditor;

	Action m_task;

	uBehaviourTreeNode m_topNode;
	BehaviourTreeBase	m_bTreeBase;


	void Awake(){
		runtimeNodeEditor = GetComponent<RuntimeNodeEditor>();
		if(runtimeNodeEditor!=null){
			runtimeNodeEditor.canvasPath = filePath.Replace (Application.dataPath, "Assets");
		}
	}

	// Use this for initialization
	void Start () {
		m_task = ChangeColorTask;
		var path = filePath.Replace (Application.dataPath, "Assets");
		// Load the NodeCanvas
		var canvas = NodeEditorSaveManager.LoadNodeCanvas (path);
		var startNode = FindStartNode(canvas);
		if(startNode==null || startNode.Outputs[0].connections==null){
			return;
		}
		m_topNode= startNode.Outputs[0].connections[0].body as uBehaviourTreeNode;
		CreateNodes(m_topNode);
	}


	void Update(){
		if(m_task!=null){
			m_task();
		}
	}


	/// <summary>
	/// Creates the nodes.
	/// </summary>
	/// <param name="topNode">Top node.</param>
	void CreateNodes(uBehaviourTreeNode topNode){
		m_bTreeBase = CreateBehaviourTreeBase(topNode);
		node = new BehaviourTreeInstance(m_bTreeBase);
		node.finishRP.Where(p=>p!=BehaviourTreeInstance.NodeState.READY).Subscribe(p=>ResetCoroutineStart());
		node.finishRP.Value = BehaviourTreeInstance.NodeState.READY;
		node.Excute();
	}


	/// <summary>
	/// Changes the color task.
	/// </summary>
	void ChangeColorTask(){
		if(runtimeNodeEditor!=null && runtimeNodeEditor.canvas!=null){
			foreach(var one in runtimeNodeEditor.canvas.nodes){
				var bnode = one as uBehaviourTreeNode;
				if(bnode!=null){
					//Debug.Log("Excute Node = "+node.nowExcuteUuid);
					if(bnode.Uuid == node.nowExcuteUuid){
						bnode.setColorFlag = true;
					}
					else {
						bnode.setColorFlag = false;
					}
				}
			}
		}
	}

	/// <summary>
	/// 開始ノードを検索する。
	/// </summary>
	/// <returns>The start node.</returns>
	/// <param name="canvas">Canvas.</param>
	Node FindStartNode(NodeCanvas canvas){
		return canvas.nodes.Where(p=>p.GetType() == typeof(uStartNode)).FirstOrDefault();
	}

	/// <summary>
	/// BehaviourTreeを構築する。
	/// </summary>
	/// <returns>The behaviour tree base.</returns>
	/// <param name="node">Node.</param>
	BehaviourTreeBase CreateBehaviourTreeBase(uBehaviourTreeNode bnode){
		var type = Type.GetType("BehaviourTrees."+ bnode.nodeType.ToString());
		var ins =  Activator.CreateInstance(type) as BehaviourTreeBase;

		switch (bnode.nodeType) {
		case uBehaviourTreeNode.NodeType.ActionNode:
			{
				var nodeIns = ins as ActionNode;
				nodeIns.Initialize(BTreeUtil.GetAction<ReactiveProperty<bool>>(gameObject, typeof(BTreeActionBase),bnode.MethodName),bnode.Uuid);
			}
			break;
		case uBehaviourTreeNode.NodeType.DecoratorNode:
			{
				var nodeIns = ins as DecoratorNode;
				var actionNode = bnode.Outputs[0].connections[0].body as uBehaviourTreeNode;
				var bbase = CreateBehaviourTreeBase(actionNode);
				var func = BTreeUtil.GetFunc<BehaviourTreeInstance,ExecutionResult>(gameObject, typeof(BTreeDecoratorFuncBase),bnode.MethodName);
				nodeIns.Initialize(func, bbase,bnode.Uuid);
			}
			break;

		case uBehaviourTreeNode.NodeType.SelectorNode:
			{
				var nodeIns = ins as SelectorNode;
				var list = new List<BehaviourTreeBase>();
				foreach(var one in bnode.Outputs){
					if(one.connections.Count==0) continue;
					var childnode = CreateBehaviourTreeBase(one.connections[0].body  as uBehaviourTreeNode);
					list.Add(childnode);
				}
				nodeIns.Initialize(list.ToArray(),bnode.Uuid);
				list.Clear();
			}
			break;
		case uBehaviourTreeNode.NodeType.SequencerNode:
			{
				var nodeIns = ins as SequencerNode;
				var list = new List<BehaviourTreeBase>();
				foreach(var one in bnode.Outputs){
					if(one.connections.Count==0) continue;
					var childnode = CreateBehaviourTreeBase(one.connections[0].body as uBehaviourTreeNode);
					list.Add(childnode);
				}
				nodeIns.Initialize(list.ToArray(),bnode.Uuid);
				list.Clear();
			}
			break;
		}

		return ins;
	}


	/// <summary>
	/// Resets the coroutine start.
	/// </summary>
	void ResetCoroutineStart(){
		StartCoroutine(ResetCoroutine());
	}


	IEnumerator ResetCoroutine(){
		yield return null;
		node.Delete();
		CreateNodes(m_topNode);
	}
}
実行の様子
Unityちゃんが二人いて、双方とも上記のBTreeManagerがアタッチされており、双方同じAIで動いています。
画面内のBehaviourTreeは青いPlayer1のUnityちゃんのAIと対応しています。
白くハイライトしているノードが、今実行されているノードです。
まとめ
「Simple node editor」を使って比較的簡単に自前のAIシステムが構築できました。
今回の例ではBehaviourTreeでしたが、StateMachineもやろうと思えば出来そうです。

