世の中はAzureを使って、とかWebsocketを使って、とか色々な方法でPepperを複数台動かす方法が世にあふれてますが、
「とりあえず動けば何でもいいよ。」という人たちに贈るtipsです。
環境:choregraphe2.4.3.28
ALProxyについての復習
http://doc.aldebaran.com/2-4/dev/python/making_nao_speak.html
こちらのリンクを見ると
from naoqi import ALProxy
tts = ALProxy("ALTextToSpeech", "<IP of your robot>", 9559)
tts.say("Hello, world!")
このような形でロボットのIPとportnumber(9559)をALProxyの引数に入れてあげると、自分の接続しているPepperからほかのPepperのサービスを使うことができます。
要は、ほかのPepperをしゃべらせたり、動かしたりすることができる。という事ですね。
具体的にいうと、Sayボックスをダブルクリックして中にあるSay Textボックスの
    def __init__(self):
        GeneratedClass.__init__(self, False)
        self.tts = ALProxy('ALTextToSpeech')
        self.ttsStop = ALProxy('ALTextToSpeech', True) #Create another proxy as wait is blocking if audioout is remote
を
    def __init__(self):
        GeneratedClass.__init__(self, False)
        self.tts = ALProxy('ALTextToSpeech',"192.168.100.xxx",9559)
        self.ttsStop = ALProxy('ALTextToSpeech', True) #Create another proxy as wait is blocking if audioout is remote
というように変えてあげればいいだけです。
"192.168.100.xxx"の部分は、自分が接続している機体以外で動かしたいPepperのIPを指定してください。
session、serviceは無視しよう。
技術がない人向け(自分含む)なので、難しいことは飛ばします。
後で時間があるときにでも調べましょう。
何かというと、Show Imageボックスなどの中身がちょっと前から変わってるんですね。
どういう効果があるのかはいまだによく知らないのですが、
tabletService = self.session().service("ALTabletService")
なんていう書き方に変わってます。
なんだか難しそうですね。
ただ、とりあえず
tabletService = ALProxy("ALTabletService")
としてしまっても動くんですね。これ。
もっと言うと、
tabletService = ALProxy("ALTabletService","192.168.100.xxx",9559)
としてしまっても動きます。
とりあえずほかの人が開発してるPepperのタブレットをガンガン動かしてみましょう。
たぶん、すごく怒られます。
他のロボットのALMemoryをのぞいてみたい
とはいっても、先ほどまでのALProxyにIPを足す方法では難しいようです。
Raise Eventは可能なのですが、Subscribe to EventやGet Dataができないようです。
このあたりは、非同期処理に対応してないんじゃないかな、とか思いますが、正直、プログラミングの知識がないんでよくわからないですね。
なので、とりあえず小細工で何とかします。
要は
・Pepper AからPepper BのALMemoryが覗ければよい。
・Subscribe to EventやGet DataはできないがRaise Eventは可能。
ということなので、
Pepper Bが自分のALMemoryの内容をPepper AのALMemoryに書き込んであげれば、よさそうですね。
そうすれば、Pepper Aは自身のALMemoryをsubscribeするだけでPepper BのALMemoryを覗くことができそうです。
まずは、例として、Pepper AにPepper Bの首関節のモーターの温度を言ってもらいましょう。
Pepper A
①Raise Eventボックス:レンチマークを押してeventのところにtestと記入。pythonスクリプトを編集。ALProxy の引数にPepper BのIPを記入
②Subscribe to Eventボックス:レンチマークを押してeventのところにother/testと記入
③Say Textボックス:Subscribe to EventボックスのonEvent端子(グレーの出力端子)に入力を接続

Pepper B
④Subscribe to Eventボックス:レンチマークを押してeventのところにtestと記入。
⑤Get Dataボックス:レンチマークを押してeventのところに「Device/SubDeviceList/HeadYaw/Temperature/Sensor/Value」と記入
⑥Raise Eventボックス:レンチマークを押してeventのところにother/testと記入。pythonスクリプトを編集。ALProxy の引数にPepper AのIPを記入
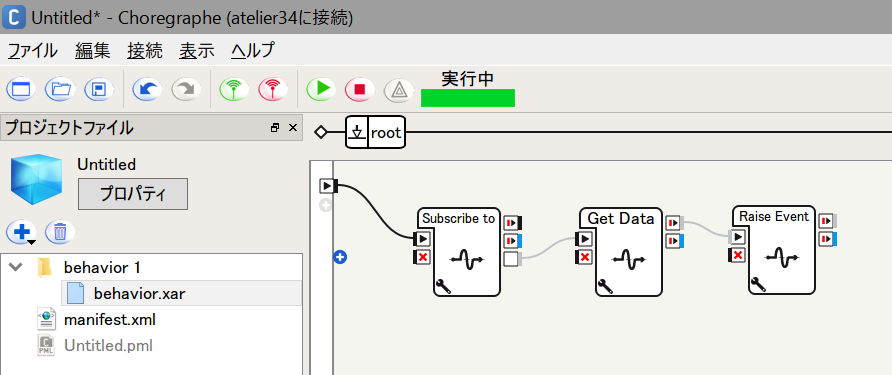
Pepper Bに接続したChoregrapheで実行した後にPepper Aに接続したChoregrapheで実行してみましょう。
これで「340」とか言ったら成功です。
pepperは小数点を飛ばして発音するので3桁の数字を言ってますが、Pepper Aのダイアログビューなどを見て確認すれば、納得できる数字のはずです。
流れとしては
①で作ったPepper AのRaise EventボックスがPepper BのALMemory の「test」にevent をRaiseします。
④のPepper BのSubscribe to Event ボックスがPepper AからのRaise Eventを検知します。
⑤のGetData ボックスがPepper Bの頭の関節の温度データを取得します。
⑥のRaise EventボックスがPepper AのALMemory「other/test」にeventをRaiseします。
②のPepper AのSubscribe to EventボックスがPepper BからのRaise Eventを検知します。
③Pepper AのALMemory「other/test」の内容を発話します。
というものになります。
他のロボットで発生したeventを検知してみたい。
たとえば、Pepperを防犯に使ってみる。みたいなデモをするときによいかもしれません。
Pepper Aで実行することは変わりませんが
Pepper Bでは
④Basic Awarenessボックスを配置。
⑤ALMemoryからのイベントを追加。「ALBasicAwareness/HumanTracked」
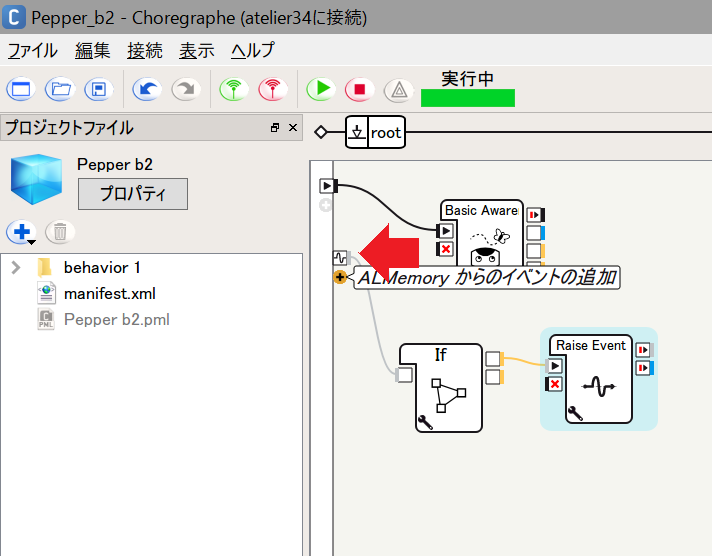
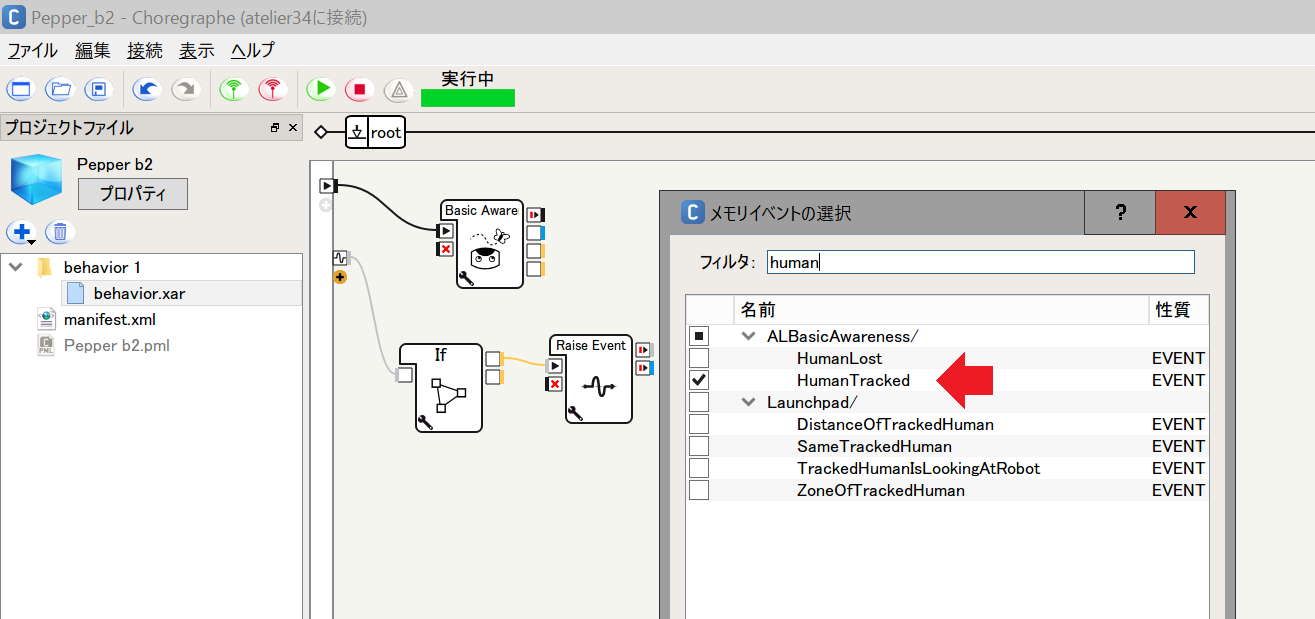
⑥ifボックスの出力端子を右クリックで編集。数値へ。レンチマークを押して「value to compare」を-1に。
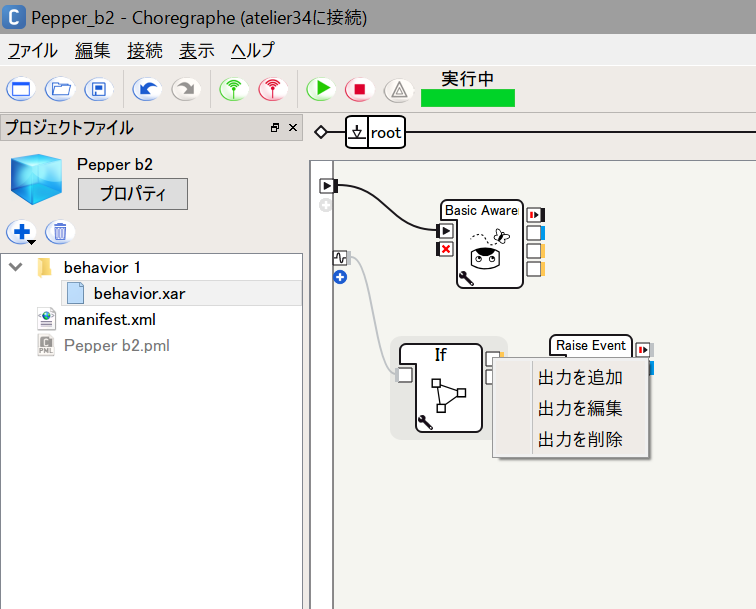
pythonスクリプトも変更。入力された数値を出力するように改造する。
class MyClass(GeneratedClass):
    def __init__(self):
        GeneratedClass.__init__(self, False)

    def onLoad(self):
        #~ puts code for box initialization here
        pass

    def onUnload(self):
        #~ puts code for box cleanup here
        pass

    def onInput_onData(self, p):
        param = self.getParameter("Value to compare")
        try:
            p = float(p)
            param = float(param)
        except:
            p = str(p)
            param = str(param)
        operator = self.getParameter("Condition operator")
        if( operator == "<" ):
            self.outputTrueOrFalse( p < param ,p)
        elif( operator == "< or =" ):
            self.outputTrueOrFalse( p <= param ,p)
        elif( operator == "=" ):
            self.outputTrueOrFalse( p == param ,p)
        elif( operator == "> or =" ):
            self.outputTrueOrFalse( p >= param ,p)
        elif( operator == ">" ):
            self.outputTrueOrFalse( p > param ,p)
        elif( operator == "≠" ):
            self.outputTrueOrFalse( p != param ,p)
        else:
            raise Exception( "Operator not known: " + str(operator) )

    def outputTrueOrFalse(self, condition,p):
        if( condition ):
            self.output_then(p)
        else:
            self.output_else(p)
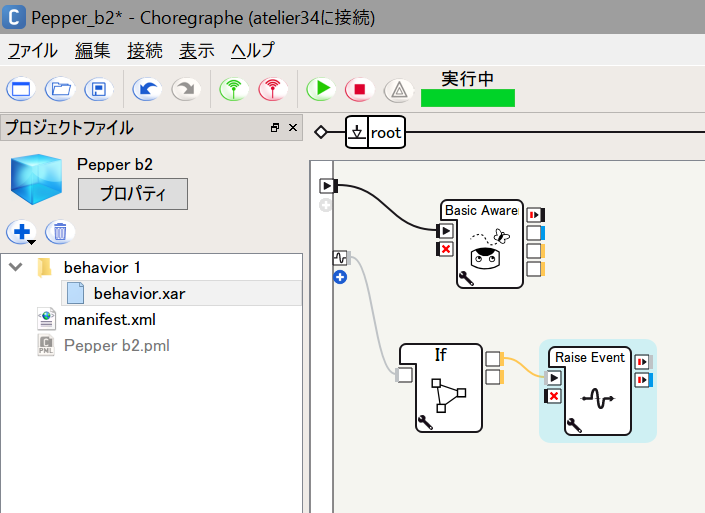
ちなみに、ifボックスの追加や、改造は、BasicAwarenessがHumanLostした時などに、「-1」を連発してうるさいから、というだけで、
発生するイベントによっては不要です。
ちなみに、この複数台、というのは「実機複数台」だけでなく「バーチャルロボット+実機」でもできる。というのがポイント。
モーションとALMemory周りを人工夫してPEpper開発の最大の障害「複数人がChoregrapheでつなげない」が何とかできないかなー。と
思う今日この頃。