実施内容の概要
Web ブラウザからサーバにSSH 接続できるGate One を、Docker を使って構築してみます。
今回は実践することに重きを置き、Docker, Web サーバ(Apache), Gate One の基本的な機能のこと等については特に説明はしませんのでご了承ください。
主にGate One の起動と接続、Web サーバから内部のDocker へプロキシ(SSL プロキシあり/なし)及びプロキシ時の認証(SSH 接続時の認証も含めると2 段階認証)を設ける設定について実際に構築した時の手順を備忘録として記しておきます。
- Git Hub liftoff/GateOne
要件
今回Gate One をインストールする環境としては次の通りです。
- 構成概要
| OS | Fedora 23 |
|---|---|
| Docker | docker-1.9.1-6.git6ec29ef.fc23.x86_64 |
| Docker ホストのIP アドレス | 192.168.1.112 |
gateone docker コンテナを起動する
Gate One には既にliftoff/gateone イメージが用意されているので、を使ってGate One の簡単な使用感を確認しておきます。
# docker run -t --name=gateone --add-host localhost:192.168.1.112 -p 8000:8000 liftoff/gateone
以上でgateone コンテナの起動は完了です。
動作確認するために指定したホストに対してhttps 接続をしてみましょう。
https://192.168.112:8000/
# iptables は適宜解放しておいてください
デフォルトでGate One は自己署名された証明書を使用するので検証エラーが出るはずですが、それを無視して接続してください。
ブラウザからSSH 接続できることが確認できるはずです。
以降では、Apache を使用してweb proxy 経由でこのDocker コンテナ上のGate One を使用する環境を構築してみることにします。
内部proxy でgateone コンテナに接続する
docker コンテナの設定(SSL Proxy を使用しないで接続できるように設定)
Apache のプロキシから接続できるようにDocker コンテナの設定を変更し、再ビルドしていきます。
Gate One の設定ファイルを編集し、デフォルトでON となっているSSL/TLS 接続をOFF (disable_ssl をtrue)にします。
また、Gate One の接続先をデフォルとでdockerhost としておきます。
デフォルとの接続先を変更するには、command の値に記載されているコマンドの引数に--default_hosts='dockerhost' と記載しておくようにします。
このdockerhost のIP アドレスは後ほどコンテナ上のhosts として定義し、デフォルトでDocker コンテナではなく、Docker ホストに接続できるようにします。
{
    "*": {
        "gateone": {
            "disable_ssl": true,
            "url_prefix": "/gateone",
            "origins": ["*"]
        },
        "terminal": { // These settings apply to the "terminal" application
            "commands": {"SSH": {"command": "/usr/local/lib/python2.7/dist-packages/gateone-1.2.0-py2.7.egg/gateone/applications/terminal/plugins/ssh/scripts/ssh_connect.py --default_host='dockerhost' -S '%SESSION_DIR%/%SESSION%/%SHORT_SOCKET%' --sshfp -a '-oUserKnownHostsFile=\\\"%USERDIR%/%USER%/.ssh/known_hosts\\\"'", "description": "Connect to hosts via SSH."}}
        }
    }
}
Dockerfile は以下のようにし、99docker.conf ファイルをDocker コンテナ上のGate One 設定ファイルディレクトリにコピーするようにします。
FROM liftoff/gateone
MAINTAINER Tsutomu Nakamura

ARG DOCKER_CONF=${DOCKER_CONF:-99docker.conf}
COPY ${DOCKER_CONF} /etc/gateone/conf.d/99docker.conf
Docker イメージをビルドします。
# docker build -t="proxy_gateone" .
Docker コンテナを起動します。
# docker run -t --name=proxy_gateone --add-host dockerhost:192.168.1.112 -p 8000:8000 proxy_gateone
Gate One 設定ファイルの設定値の上書きについて
Gate One の設定ファイルは、Gate One がインストールされたホストの/etc/gateone/conf.d ディレクトリの中に存在します。
ファイル名の形式は*.conf という形式のファイル名となっており、中身は例として次のようになっています。
// This is Gate One's main settings file.
{
    // "gateone" server-wide settings fall under "*"
    "*": {
        "gateone": { // These settings apply to all of Gate One
            "address": "",
            "ca_certs": null,
            "cache_dir": "/tmp/gateone_cache",
            "certificate": "/etc/gateone/ssl/certificate.pem",
            "cookie_secret": "***************************************",
            "debug": false,
            "disable_ssl": false,
            "embedded": false,
            "enable_unix_socket": false,
            "gid": "0",
            "https_redirect": false,
            "js_init": "",
            "keyfile": "/etc/gateone/ssl/keyfile.pem",
            "locale": "en_US",
            "log_file_max_size": 100000000,
            "log_file_num_backups": 10,
            "log_file_prefix": "/gateone/logs/gateone.log",
            "log_rotate_interval": 1,
            "log_rotate_mode": "size",
            "log_rotate_when": "midnight",
            "log_to_stderr": null,
            "logging": "info",
            "multiprocessing_workers": null,
            "origins": ["localhost:8000", "127.0.0.1:8000", "************:8000", "172.17.20.218:8000"],
            "pid_file": "/tmp/gateone.pid",
            "port": 8000,
            "session_dir": "/tmp/gateone",
            "session_timeout": "5d",
            "syslog_facility": "daemon",
            "uid": "0",
            "unix_socket_mode": "0600",
            "unix_socket_path": "/tmp/gateone.sock",
            "url_prefix": "/",
            "user_dir": "/gateone/users",
            "user_logs_max_age": "30d"
        }
    }
}
// This is Gate One's Terminal application settings file.
{
    // "*" means "apply to all users" or "default"
    "*": {
        "terminal": { // These settings apply to the "terminal" application
            "commands": {"SSH": {"command": "/usr/local/lib/python2.7/dist-packages/gateone-1.2.0-py2.7.egg/gateone/applications/terminal/plugins/ssh/scripts/ssh_connect.py -S '%SESSION_DIR%/%SESSION%/%SHORT_SOCKET%' --sshfp -a '-oUserKnownHostsFile=\\\"%USERDIR%/%USER%/.ssh/known_hosts\\\"'", "description": "Connect to hosts via SSH."}},
            "default_command": "SSH",
            "dtach": true,
            "enabled_filetypes": "all",
            "environment_vars": {"TERM": "xterm-256color"},
            "session_logging": true,
            "syslog_session_logging": false
        }
    }
}
今回99docker.conf というファイルを作成しましたが、上記の10server.conf ファイル内の設定値をオーバーライドするするには、ファイル名の先頭に付いている数字より大きい数値(今回は"99"としました)のファイルを用意して後から読み込まれるようにし、同じ値を再度定義してあげることでその値を上書きすることができます。
例えば先ほどの99docker.conf ファイルの例では10server.conf のdisable_ssl, url_prefix, origins と50terminal.conf のcommand の値を上書きしています。
内部プロキシの設定
既にhttpd サーバを使っていて入り口を1 箇所に集約したい場合、http サーバの内部プロキシを使用してGate One コンテナへのリクエストとレスポンスを中継させるができます。
通信をプロキシするWeb サーバの要件として、Web Socket のプロキシに対応している必要があります。
Apache の場合、proxy_wstunnel_module モジュールがそれを実現するためのモジュールになるので、それがロードされていることを確認します。
# grep proxy_wstunnel_module /etc/httpd/ -r
/etc/httpd/conf.modules.d/00-proxy.conf:LoadModule proxy_wstunnel_module modules/mod_proxy_wstunnel.so
上記のようにLoadModule でproxy_wstunnel_module が定義されていればOK です。
次に、httpd.conf にプロキシの設定を追加しますが、Docker コンテナ上のGate One にhttp, Web Socket の通信をプロキシするように設定を追加します。
今回は、/etc/httpd/conf.d/00_gateone_proxy.conf ファイルを新規に作成して次のようなproxy 設定を書き込みます。
<VirtualHost *:443>
    ServerName foo.example.com
    ServerAdmin webmaster@foo.example.com
    ServerSignature Off

    SSLEngine On
    SSLProxyEngine On
    SSLProtocol all -SSLv3
    SSLProxyProtocol all -SSLv3
    SSLHonorCipherOrder on
    SSLCipherSuite "ALL !aNULL !eNULL !LOW !3DES !MD5 !EXP !PSK !SRP !DSS !RC4"

    SSLCertificateFile /etc/letsencrypt/live/foo.example.com/fullchain.pem
    SSLCertificateKeyFile /etc/letsencrypt/live/foo.example.com/privkey.pem

    ## Proxy authentication
    # <Proxy *://bar.example.com:8000/*>
    #     AuthType Digest
    #     AuthName "Some Digest Auth"
    #     AuthDigestProvider file
    #     AuthUserFile /etc/httpd/.htdigest
    #     Require valid-user
    # </Proxy>

    ProxyPass /gateone/ws ws://127.0.0.1:8000/gateone/ws
    ProxyPassReverse /gateone/ws ws://127.0.0.1:8000/gateone/ws
    ProxyPass /gateone http://127.0.0.1:8000/gateone
    ProxyPassReverse /gateone http://127.0.0.1:8000/gateone
</VirtualHost>
設定を追加したらhttpd をreload します。
# systemctl reload httpd
reload したらweb ブラウザを開き、アクセスしてみましょう。
# https://foo.example.com/gateone
Gate One のトップページが表示され、SSH 接続できれば成功です。
内部proxy でgateone コンテナにSSL/TLS で接続する
先ほどのサンプルでは内部プロキシに、暗号化されていないWeb Socket, http で行っていましたが、その内部プロキシをSSL/TLS を使った方法で実施してみます。
内部プロキシの先のGate One に使用する証明書は、今回はLet's Encrypt で取得済みのものとします。
なお、今回は証明書の取得や準備については説明を割愛します。
SSL/TLS で内部プロキシを行うに当たり、環境としては以下のとおりです。
- 内部プロキシ先のSSL/TLS 設定
| 内部プロキシ先のFQDN | bar.example.com | 今回はApache と同じホスト上にGate One のDocker コンテナがあるものとします |
|---|---|---|
| 証明書ファイル | /etc/letsencrypt/live/bar.example.com/fullchain.pem | 中間証明書とサーバ証明書。letsencrypt で取得することを想定。Docker ホストOS 上に既にあるものを再利用 |
| 秘密鍵ファイル | /etc/letsencrypt/live/bar.example.com/privkey.pem | letsencrypt で取得することを想定。ホストOS 上に既にあるものを再利用 |
docker コンテナの設定(SSL/TLS でListen するように設定)
Dockerfile については、先ほどの内部プロキシ設定時のDockerfile を流用します。
Gate One の設定ファイルを新規に作成(99dockerssl.conf)し、以下のようにdisable_ssl をfalse に変更し、certificate とkeyfile を新たに定義します。
{
    "*": {
        "gateone": {
            "disable_ssl": false,
            "certificate": "/etc/letsencrypt/live/bar.example.com/fullchain.pem",
            "keyfile": "/etc/letsencrypt/live/bar.example.com/privkey.pem",
            "url_prefix": "/gateone",
            "origins": ["*"]
        },
        "terminal": { // These settings apply to the "terminal" application
            "commands": {"SSH": {"command": "/usr/local/lib/python2.7/dist-packages/gateone-1.2.0-py2.7.egg/gateone/applications/terminal/plugins/ssh/scripts/ssh_connect.py --default_host='dockerhost' -S '%SESSION_DIR%/%SESSION%/%SHORT_SOCKET%' --sshfp -a '-oUserKnownHostsFile=\\\"%USERDIR%/%USER%/.ssh/known_hosts\\\"'", "description": "Connect to hosts via SSH."}}
        }
    }
}
--build-arg を指定してイメージをビルドします。
# docker build --build-arg DOCKER_CONF="99dockerssl.conf" -t="sslproxy_gateone" .
コンテナを起動します。
# docker run -t --name=gateone --add-host dockerhost:192.168.1.112 -v /etc/letsencrypt:/etc/letsencrypt -p 8000:8000 sslproxy_gateone
proxy の設定(SSL/TLS でproxy するように設定)
Apache のproxy でssl を有効とするには、SSLProxyEngine の値をOn とする必要があります。
定義例としては以下の通りです。
<VirtualHost *:443>
    ServerName foo.example.com
    ServerAdmin webmaster@foo.example.com
    ServerSignature Off

    SSLEngine On
    SSLProxyEngine On
    SSLProtocol all -SSLv3
    SSLProxyProtocol all -SSLv3
    SSLHonorCipherOrder on
    SSLCipherSuite "ALL !aNULL !eNULL !LOW !3DES !MD5 !EXP !PSK !SRP !DSS !RC4"

    SSLCertificateFile /etc/letsencrypt/live/foo.example.com/fullchain.pem
    SSLCertificateKeyFile /etc/letsencrypt/live/foo.example.com/privkey.pem

    ## Proxy authentication
    # <Proxy *://bar.example.com:8000/*>
    #     AuthType Digest
    #     AuthName "Some Digest Auth"
    #     AuthDigestProvider file
    #     AuthUserFile /etc/httpd/.htdigest
    #     Require valid-user
    # </Proxy>

    ProxyPass /gateone/ws wss://bar.example.com:8000/gateone/ws
    ProxyPassReverse /gateone/ws wss://bar.example.com:8000/gateone/ws
    ProxyPass /gateone https://bar.example.com:8000/gateone
    ProxyPassReverse /gateone https://bar.example.com:8000/gateone
</VirtualHost>
設定を記載したら、httpd をreload します。
# systemctl reload httpd
Web ブラウザを開き、先ほどと同様にGate One のページが見えることを確認してください。
# https://foo.example.com/gateone
補足: SSH ログイン時認証に公開鍵ペアを使用する
サーバが公開鍵認証を要求するように設定されている場合、Gate One のSSH クライアント側で公開鍵ペアを作成し、公開鍵を予めサーバ側に設置しておくようにしてください。
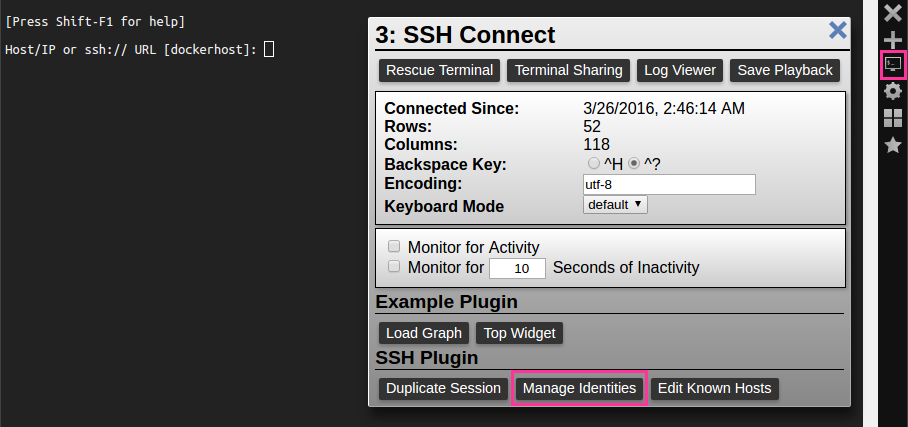
公開鍵を作成するには、SSH 接続画面から、右側のモニタアイコンをクリックし、Manage Identities をクリックします。

SSH Identity Manager ウィンドウが出てきたら、New Identity をクリックします。

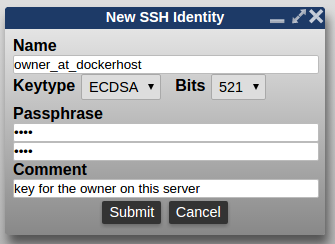
嘉木常法入力ウィンドウが出てくるので、画面の指示に従って入力していきます。

鍵が作成されるとSSH Identity Manager ウィンドウに戻り、右側に公開鍵情報が表示されるので、それを接続先のサーバに設置しておいてください(以降手順割愛)。
設置したら、Gate One から接続してみて、鍵認証が通ることを確認してください。
Gate One 側の機能で実装できる認証について
今回実装したProxy 認証とSSH のログイン認証以外にGate One 側で認証機能を設けることができるようになっています。
今回設定手順については割愛しますが、kerberos, google, pam, none(認証なし) が指定できるようになっています。
- Authentication Classes
origin を修正しなかった場合のエラーについて (作業備忘録)
origin の指定が明示的にあると次のようなエラーが出て、Gate One に接続できない事象が発生します。
そのため、Gate One のorigin の設定は* として設定しました。
{
    "*": {
        "gateone": {
            ......
            "origins": ["*"]
        },
        "terminal": { // These settings apply to the "terminal" application
            "commands": {"SSH": {"command": "......", "description": "Connect to hosts via SSH."}}
        }
    }
}
[E 160320 06:05:16 server:1565] Origin check failed for: https://bar.example.com
[W 160320 06:05:16 web:1946] 403 GET /gateone/ws (172.17.0.1) 8.59ms
[I 160320 06:05:18 server:1317] Settings have been modified.  Reloading from /etc/gateone/conf.d
参考
-
Install GateOne – an HTML5 ssh client
-
EC2インスタンスでhttp proxyサーバーを利用する
-
How To SSH into Your VPS from the Browser with GateOne
-
Backporting Apache support for websockets reverse proxy (aka getting GateOne to work behind Apache)
-
iptables failed - No chain/target/match by that name #16816
-
tunneling secure websocket connections with apache
-
Request - Allow change of default host #94


