自宅LAN 内への接続をトンネリング、暗号化する
OpenVPN を使って自宅LAN 内への接続を暗号化、トンネリングするためのVPN Server とクライアントを構築していきます。
VPN を構築することで、自宅外部に位置するVPN クライアントから自宅ネットワーク内のサーバやマシンに対して、あたかもクライアントが自宅LAN 内に位置しているかのように、プライベートIP アドレスでアクセスできるようになります。
また、VPN クライアントからVPN サーバまでのデータは暗号化がされ、安全に自宅内のノードに対してアクセスできるようになります。
構成概要
今回構築する環境の構成は以下のようにインターネット外部の端末(VPN Client)を公衆Wifi などのネットワークを経由して自宅内のVPN Server に接続し、暗号化したトンネルを確立して内部のサーバに安全にアクセスできるような環境の構築を目指します。
VPN 接続を確立することで、外部の端末は自宅ネットワーク内のサーバ、例えば192.168.1.151に対してあたかもローカルネットワークにあるように、192.168.1.151 のIP アドレスをそのまま指定することでアクセスができるようになります。
外部ネットワーク            |                                        自宅ネットワーク
Internet                    |                                        192.168.1.0/24
                            |
+------------------+    VPN 接続    +--------------------------+     +------------------+
| VPN Client       |================+ Router                   +==+==| VPN Server       |
| 1.1.1.1          |        |       | 2.2.2.2      192.168.1.1 |  |  | 192.168.1.71     |
+------------------+        |       +--------------------------+  |  +------------------+
                            |       (NAT/NAPT)                    |
                            |                                     |  +------------------+
                            |                                     +--| CA Server        |
                            |                                     |  | 192.168.1.72     |
                            |                                     |  +------------------+
                            |                                     |
                            |                                     |  +------------------+
                            |                                     +--| Your Server1     |
                            |                                     |  | 192.168.1.151    |
                            |                                     |  +------------------+
                            |                                     |
                            |                                     ......

VPN Client  : 外出先で使用するLinux laptop などの端末。もちろんiPhone やAndroid などのスマートフォンから接続することも可能。
VPN Server  : 外出先端末とVPN トンネルを確立するためのサーバ
CA Server   : VPN Client とVPN Server 証明書へ署名を行うための認証局
Your Server1: 自宅内のサーバ。OpenVPN でトンネリングすると、プライベートアドレス指定でアクセスできるようになる。

* 今回説明する方法では自宅内のルータにNAT が実装されていることが前提で、外部からの1194/UDP へのアクセスをVPN サーバの1194 ポートに転送する設定が事前に完了しているものとします
* 必要に応じて、自宅のグローバルIP が固定出ない場合は、あらかじめDDNS サービスのようなものを利用し、固定のFQDN で自宅へアクセスできるようにしてください
今回はCA, VPN Server, VPN Client の構築について、実際の手順を実施して説明していきます。
使用するディストリビューションはすべてFedora 25 です。
CA
VPN Client とVPN Server はお互いを認証するために、それぞれクライアント証明書とサーバ証明書を利用します。
それら証明書へ署名を行うためのCA を構築します。
今回CA はVPN Server とは別のマシン上に作成しますが、これはVPN Server 上でも構いません。
まずはCA サーバにeasy-rsa をインストールします。
- Install easy rsa ca~# dnf install easy-rsa ca~# cp -r /usr/share/easy-rsa/3.0.1 ~/easy-rsa ca~# cd easy-rsa ca~# ./easyrsa init-pki ca~# ./easyrsa build-ca
openvpn server
open vpn server でサーバ証明書要求を作成します。
ここで作成されたサーバ証明書要求を、先程構築したCA に署名してもらうことでサーバ証明書になります。
server~# dnf install openvpn easy-rsa
server~# cp -r /usr/share/easy-rsa/3.0.1 ~/easy-rsa
server~# cd easy-rsa
server~# ./easyrsa init-pki
server~# ./easyrsa gen-req server.vpn.example.com nopass
server~# ls -l ./pki/reqs/server.vpn.example.com.req
openvpn client
open vpn client でクライアント証明書要求を作成します。クライアント証明書要求を、先程構築したCA に署名してもらうことでクライアント証明書になります。
client~# dnf install openvpn easy-rsa
client~# cp -r /usr/share/easy-rsa/3.0.1 ~/easy-rsa
client~# cd easy-rsa
client~# ./easyrsa init-pki
client~# ./easyrsa gen-req client.vpn.example.com
client~# ls -l ./pki/reqs/client.vpn.example.com.req
CA
サーバ署名書要求とクライアント証明書要求に署名を行うために、まずはeasyrsa でサーバ証明書要求、クライアント証明書要求をインポートします。
各サーバ、クライアントで作成された証明書要求は~/received/server.vpn.example.com.req と~/received/client.vpn.example.com.req にあらかじめ転送されているものとします。
easyrsa で証明書要求をインポートするには./easyrsa import-req コマンドを実行することで可能で、その結果pki ディレクトリの/reqs ディレクトリにreq ファイルが格納され、次に署名を行うコマンドを実行するときにshourt name を指定することで署名を行うことができるようになります。
ca~# mkdir -p ~/received
// Transfer openvpn-server's req and openvpn-client's req into ~/easy-rsa/received
ca~# ls -l ~/received/server.vpn.example.com.req
ca~# ls -l ~/received/client.vpn.example.com.req
ca~# cd ~/easy-rsa
ca~# ./easyrsa import-req ~/received/server.vpn.example.com.req server.vpn.example.com
ca~# ./easyrsa import-req ~/received/client.vpn.example.com.req client.vpn.example.com
次に、各サーバ証明書とクライアント証明書に署名を行っていきます。
ca~# ./easyrsa show-req server.vpn.example.com

Showing req details for 'server.vpn.example.com'.
This file is stored at:
/root/easy-rsa/pki/reqs/server.vpn.example.com.req

Certificate Request:
    Data:
        Version: 0 (0x0)
        Subject:
            commonName                = server.vpn.example.com
        Attributes:
            a0:00

ca~# ./easyrsa sign server server.vpn.example.com

You are about to sign the following certificate.
Please check over the details shown below for accuracy. Note that this request
has not been cryptographically verified. Please be sure it came from a trusted
source or that you have verified the request checksum with the sender.

Request subject, to be signed as a server certificate for 3650 days:

subject=
    commonName                = server.vpn.example.com

Type the word 'yes' to continue, or any other input to abort.
  Confirm request details: yes                                  # <- "yes" を入力する
Using configuration from /root/easy-rsa/openssl-1.0.cnf
Enter pass phrase for /root/easy-rsa/pki/private/ca.key:        # <- CA 秘密鍵のパスワードを入力する
Check that the request matches the signature
Signature ok
The Subject's Distinguished Name is as follows
commonName            :ASN.1 12:'server.vpn.example.com'
Certificate is to be certified until May 12 05:20:47 2027 GMT (3650 days)

Write out database with 1 new entries
Data Base Updated

Certificate created at: /root/easy-rsa/pki/issued/server.vpn.example.com.crt
ca~# ./easyrsa show-req client.vpn.example.com

Showing req details for 'client.vpn.example.com'.
This file is stored at:
/root/easy-rsa/pki/reqs/client.vpn.example.com.req

Certificate Request:
    Data:
        Version: 0 (0x0)
        Subject:
            commonName                = client.vpn.example.com
        Attributes:
            a0:00

ca~# ./easyrsa sign client client.vpn.example.com

You are about to sign the following certificate.
Please check over the details shown below for accuracy. Note that this request
has not been cryptographically verified. Please be sure it came from a trusted
source or that you have verified the request checksum with the sender.

Request subject, to be signed as a client certificate for 3650 days:

subject=
    commonName                = client.vpn.example.com


Type the word 'yes' to continue, or any other input to abort.
  Confirm request details: yes
Using configuration from /root/easy-rsa/openssl-1.0.cnf
Enter pass phrase for /root/easy-rsa/pki/private/ca.key:
Check that the request matches the signature
Signature ok
The Subject's Distinguished Name is as follows
commonName            :ASN.1 12:'client.vpn.example.com'
Certificate is to be certified until May 12 05:41:12 2027 GMT (3650 days)

Write out database with 1 new entries
Data Base Updated

Certificate created at: /root/easy-rsa/pki/issued/client.vpn.example.com.crt
署名が完了したらサーバ証明書/root/easy-rsa/pki/issued/server.vpn.example.com.crt をopenvpn サーバへ、クライアント証明書/root/easy-rsa/pki/issued/client.vpn.example.com.crt をopenvpn クライアントへ転送してください。
CRL (証明書執行リスト)の作成
OpenVPN クライアントの秘密鍵が漏洩したとき等に、そのOpenVPN クライアントの証明書を無効化できるようにCRL を作成します。
CRL を作成するには実際にクライアント証明書を作成してからそれを廃止しないと作成できないようなので、ダミー用の証明書を作成します。
ca~# ./easyrsa build-client-full dmy
Generating a 2048 bit RSA private key
...........................+++
.................................................+++
writing new private key to '/root/easy-rsa/pki/private/dmy.key.e2yJ1pj1MW'
Enter PEM pass phrase:
Verifying - Enter PEM pass phrase:
-----
Using configuration from /root/easy-rsa/openssl-1.0.cnf
Enter pass phrase for /root/easy-rsa/pki/private/ca.key:
Check that the request matches the signature
Signature ok
The Subject's Distinguished Name is as follows
commonName            :ASN.1 12:'dmy'
Certificate is to be certified until May 26 00:42:57 2027 GMT (3650 days)

Write out database with 1 new entries

ca~# ./easyrsa revoke dmy

Please confirm you wish to revoke the certificate with the following subject:

subject=
    commonName                = dmy


Type the word 'yes' to continue, or any other input to abort.
  Continue with revocation: yes
Using configuration from /root/easy-rsa/openssl-1.0.cnf
Enter pass phrase for /root/easy-rsa/pki/private/ca.key:    # <- ca 秘密鍵のパスワード
Revoking Certificate 03.
Data Base Updated

IMPORTANT!!!

Revocation was successful. You must run gen-crl and upload a CRL to your
infrastructure in order to prevent the revoked cert from being accepted.
証明書を失効したらCRL ファイルを作成します。
ca~# cd ~/easy-rsa
ca~# ./easyrsa gen-crl
Using configuration from /root/easy-rsa/openssl-1.0.cnf
Enter pass phrase for /root/easy-rsa/pki/private/ca.key:    # <- CA 秘密鍵のパスワード入力

An updated CRL has been created.
CRL file: /root/easy-rsa/pki/crl.pem

ca~# ls pki/crl.pem
pki/crl.pem
CRL ファイルを作成したら各VPN サーバとクライアントにCRL ファイルを転送してください。
OpenVPN サーバの構築
Open VPN サーバを構築していきます。
/root/received ディレクトリを作成し、そこにCA で署名を行ったサーバ証明書server.vpn.example.com、CA 証明書ca.crt、CRL ファイルcrl.pem を予め転送しておいてください。
DH パラメータの生成
まずは強度の高いDH パラメータを事前に作成しておきます。
server~# cd ~/easy-rsa
server~# ./easyrsa gen-dh
...
DH parameters of size 2048 created at /root/easy-rsa/pki/dh.pem
TLS 認証鍵の生成
次にVPN サーバとVPN クライアント間で行われるTLS 認証で使用される鍵を作成します。
server~# openvpn --genkey --secret /etc/openvpn/pki/private/ta.key
OpenVPN サーバで使用する証明書や鍵ファイルを所定の場所へコピーします。
server~# mkdir -p /etc/openvpn/pki/{private,certs}
server~# cp -ai ~/received/server.vpn.example.com.key /etc/openvpn/pki/private/
server~# cp -ai ~/received/server.vpn.example.com.crt /etc/openvpn/pki/certs/
server~# cp -ai ~/received/ca.cert /etc/openvpn/pki/certs/
server~# cp -ai ~/received/crl.pem /etc/openvpn/pki
server~# cp -ai /root/easy-rsa/pki/dh.pem /etc/openvpn/pki/private/

server~# chown openvpn:openvpn /etc/openvpn/pki/private/*
server~# chown openvpn:openvpn /etc/openvpn/pki/certs/*
server~# chown openvpn:openvpn /etc/openvpn/pki/crl.pem
server.conf ファイルの作成
server~# cp -ai /usr/share/doc/openvpn/sample/sample-config-files/server.conf /etc/openvpn/server.conf
server~# vim /etc/openvpn/server.conf
設定ファイルを開いたら、CA 証明書やサーバ証明書、サーバ証明書の秘密鍵、DH parameter ファイルのパス等を適宜修正してください。
今回の設定ファイルで設定した値の例としては以下のようになります。
......
ca pki/certs/ca.crt
cert pki/certs/server.vpn.example.com.crt
key pki/private/server.vpn.example.com.key
dh pki/private/dh.pem
crl-verify pki/crl.pem
log-append  /var/log/openvpn.log
tls-auth pki/private/ta.key 0
push "route 192.168.1.0 255.255.255.0"
......
# TODO: proto tcp を試してみたい
上記のpush "route 192.168.1.0 255.255.255.0" の記述を行うことで192.168.1.0/24 宛のパケットはすべてVPN のトンネリングを経由して運ばれるようになります。
SELinux のコンテキストの復元
SELinux を利用している場合、restorecon でSELinux コンテキストの設定を行います。
server~# restorecon -Rv /etc/openvpn
openvpn サービスを登録し、起動します。
server~# ln -s /lib/systemd/system/openvpn\@.service /etc/systemd/system/multi-user.target.wants/openvpn\@server.service
server~# systemctl -f enable openvpn@server.service
server~# systemctl start openvpn@server.service
起動に成功するとtun デバイスが作成されます。
server~# ip a
......
3: tun0: <POINTOPOINT,MULTICAST,NOARP,UP,LOWER_UP> mtu 1500 qdisc fq_codel state UNKNOWN group default qlen 100
    link/none
    inet 10.8.0.1 peer 10.8.0.2/32 scope global tun0
       valid_lft forever preferred_lft forever
    inet6 fe80::cca3:6110:dd47:9ff0/64 scope link flags 800
       valid_lft forever preferred_lft forever
......
iptables(firewall-cmd) の設定
OpenVPN サーバで、OpenVPN クライアントからのパケットをnat し、転送できるようにiptables を設定します。
server~# firewall-cmd --add-service=openvpn --permanent
server~# firewall-cmd --direct --permanent --passthrough ipv4 -t nat -A POSTROUTING -s 10.8.0.0/24 -o ens33 -j MASQUERADE
server~# iptables -D FORWARD -j REJECT --reject-with icmp-host-prohibited
ipv4 forward の有効化
ipv4 のforward のforward 設定が有効化されていない場合は、それを有効化する必要があります。
まずは現状がipv4 forward を許可しているかどうか調べてみましょう。
server~# sysctl -a &> /dev/null | grep "net.ipv4.ip_forward ="
net.ipv4.ip_forward = 0
値が0(無効) となってる場合、forward を有効化します。
server~# sysctl -w net.ipv4.ip_forward = 1
また、OS 再起動後もforward の設定が有効となるように/etc/sysctl.d ディレクトリ配下に以下のようなファイルを作成しておきます。
net.ipv4.ip_forward = 1
openvpn client の設定
Open VPN クライアントを構築していきます。
/root/received ディレクトリを作成し、そこにクライアント証明書client.vpn.example.com、CA 証明書をca.crt、CRLcrl.pemを予め転送した状態で作業を行います。
また、TLS 認証で使われるta.key をvpn サーバから転送しておいてください。
client~# cd ~/easy-rsa
client~# mkdir -p /etc/openvpn/pki/{private,certs}
client~# cp -ai /root/received/client.vpn.example.com.crt /etc/openvpn/pki/certs/
client~# cp -ai /root/received/ca.crt /etc/openvpn/pki/certs/
client~# cp -ai /root/received/client.vpn.example.com.key /etc/openvpn/pki/private/
client~# cp -ai /root/received/crl.pem /etc/openvpn/pki
client~# cp -ai /root/received/ta.key /etc/openvpn/pki/private/

client~# chown openvpn:openvpn /etc/openvpn/pki/certs/*
client~# chown openvpn:openvpn /etc/openvpn/pki/private/*
client~# chown openvpn:openvpn /etc/openvpn/pki/crl.pem
client~# chmod 600 /etc/openvpn/pki/private/*
client~# restorecon -Rv /etc/openvpn
クライアント設定ファイルをサンプルからコピーし、必要に応じて設定ファイルを編集していきます。
主に接続サーバやポート番号、圧縮の形式などを選択していきます。
client~# cp -ai /usr/share/doc/openvpn/sample/sample-config-files/client.conf /etc/openvpn/client.conf
client~# vim /etc/openvpn/client.conf
/etc/openvpn/client.conf ファイルを編集します。
以下は変更した箇所のみを記載しています。
......
remote server.vpn.example.com 1194
ca pki/certs/ca.crt
cert pki/certs/client.vpn.example.com.crt
key pki/private/client.vpn.example.com.key
tls-auth pki/private/ta.key 1
crl-verify pki/crl.pem
......
OpenVPN サービスを登録し、起動を行います。
client~# ln -s /lib/systemd/system/openvpn\@.service /etc/systemd/system/multi-user.target.wants/openvpn\@client.service
client~# systemctl enable openvpn@client.service
client~# systemctl start openvpn@client.service
クライアント秘密鍵のパスワードがかかっていると以下のようなメッセージが表示されるので、systemd-tty-ask-password-agent コマンドを実行し、クライアント秘密鍵のパスワードを入力します。
Broadcast message from root@vpnclient01 (Sun 2017-05-14 22:04:17 JST):

Password entry required for 'Enter Private Key Password:' (PID 1886).
Please enter password with the systemd-tty-ask-password-agent tool!

systemd-tty-ask-password-agent               # <- "systemd-tty-ask-password-agent" を入力する
Enter Private Key Password: ********         # <- クライアント秘密鍵のパスワードを入力する
VPN Client がVPN Server との接続と認証に成功すると、VPN Client にtun0 インターフェースが作成されます。
また、VPN サーバ側のLAN (今回の場合は192.168.1.0/24) へのルーティングがtun0 インタフェースを経由するように設定されます。
client~# ip a
......
8: tun0: <POINTOPOINT,MULTICAST,NOARP,UP,LOWER_UP> mtu 1500 qdisc fq_codel state UNKNOWN group default qlen 100
    link/none
    inet 10.8.0.6 peer 10.8.0.5/32 scope global tun0
       valid_lft forever preferred_lft forever
    inet6 fe80::9253:b26d:650e:60d6/64 scope link flags 800
       valid_lft forever preferred_lft forever
......

client~# ip route
......
10.8.0.1 via 10.8.0.5 dev tun0
10.8.0.5 dev tun0 proto kernel scope link src 10.8.0.6
192.168.1.0/24 via 10.8.0.5 dev tun0
......
パスワードの入力が面倒なとき
VPN Client のOpenVPN を起動するときに秘密鍵のパスワード入力が面倒な時は、VPN Client 秘密鍵の暗号化を解除してください。
解除するには、次のようにopenssl コマンドで解除することができます。
client~# mv /etc/openvpn/pki/private/client.vpn.example.com.key /etc/openvpn/pki/private/client.vpn.example.com.key.enc
client~# openssl rsa -in /etc/openvpn/pki/private/client.vpn.example.com.key.enc -out /etc/openvpn/pki/private/client.vpn.example.com.key
client~# systemctl restart openvpn@client.service
-> パスワードの入力が不要
接続試験
VPN トンネルが確立されたら、OpenVPN サーバ側のLAN 内のサーバ(今回用意した環境では192.168.1.151) に対してping やcurl (Web サーバがあれば)してレスポンスが来ることを確認してみましょう。
接続確認をする際、VPN Client 側のtun0 インタフェースに対してtcpdump などでパケットをキャプチャし、tun0 インタフェース経由でアクセスができていることを確認すると良いかもしれません。
client~# tcpdump -i tun0
-> tun0 経由でパケットが送られていること
client~# ping 192.168.1.151
client~# curl -i http://192.168.1.151
-> レスポンスが返ってくること
おまけ: OpenVPN クライアントのインターネット向け接続もトンネリングする(カフェや駅などの無料Wifi スポットをより安全に利用するために)
ここまでの設定で、自宅内のLAN にローカルIP アドレス(192.168.1.0/24) 指定で通信を暗号化しながらアクセスできるようにOpenVPN を設定しました。
次にOpenVPN を使用して自宅サーバまでパケットを送信し、その自宅サーバをProxy としてインターネットへのアクセス実現する方法を説明します。
このようなことをする目的の経緯として、例えば外出先のカフェや駅で利用できる無料Wifi スポットをiPhone 等で接続して利用することがあるかと思いますが、それを利用して暗号化されないインターネットへのhttp 通信を行った場合、Wifi AP 機器は暗号化されていないデータを普通に見ることがで きてしまいます。
また、仮にhttps のような暗号化されている通信であったとしてもデータ部分は暗号化されていますが宛先情報については暗号化されていないので、誰がどのサイトを閲覧しているのかといった情報がカフェのWifi AP に読み取られてしまう可能性があります。
また、DNS リクエスト情報についても同様です。
そういったときにOpenVPN を使用して自宅経由でデータ通信をすることにより、(VPN サーバのアドレスはWifi AP に見えることにはなりますが)各http, https, DNS といったプロトコルのデータ、宛先情報等も暗号化することができるようになり、クライアントがどのサイトにアクセスしようとしている のかといった情報まで暗号化し、安全に無料Wifi を利用できるようになります。
                      +--------------------+
                      | Web Server         |
                      |                    |
                      +--------------------+
                              ^
                              |     +---------------------------------+
                              |     | 自宅LAN                         |
                              |     |                                 |
                              |     |     +--------------------+      |
+--------------------+        ------|---- | VPN Server         |      |
| VPN Client         |              |     |                    |      |
|                    |------------->|---->|                    |      |
+--------------------+              |     +--------------------+      |
                                    |                                 |
                                    +---------------------------------+
server.conf ファイルの作成
/etc/openvpn/server.conf ファイルをテンプレートからコピーして編集します。
server~# cp -ai /usr/share/doc/openvpn/sample/sample-config-files/server.conf /etc/openvpn/server.conf
テンプレートから設定を記述していきます。
下記は変更した箇所のみピックアップしています。
......
ca pki/certs/ca.crt
cert pki/certs/server.vpn.example.com.crt
key pki/private/server.vpn.example.com.key
dh pki/private/dh.pem
crl-verify pki/crl.pem
tls-auth pki/private/ta.key 0
log-append  /var/log/openvpn.log
push "redirect-gateway def1 bypass-dhcp"
push "dhcp-option DNS 208.67.222.222"
push "dhcp-option DNS 208.67.220.220"
......
上記のpush "redirect-gateway def1 bypass-dhcp" がインターネット宛のパケットをすべてOpenVPN のトンネリングを経由して行うための指示になります。
また、名前解決を行うためのDNS サーバをpush "dhcp-option DNS 208.67.222.222", push "dhcp-option DNS 208.67.220.220" で指定します。
208.67.222.222 と208.67.220.220 のDNS サーバはOpenVPN が提供しているDNS サーバになるので、それ以外のDNS サーバを使いたい場合はこのIP アドレスを変更してください。
以上で設定は完了です。
クライアント側は特別な設定等をする必要はなく、今までどおりOpenVPN クライアントとして接続すれば、データだけでなく宛先情報についても暗号化することができるようになり、安全に無料Wifi スポットを利用することができるようになります。
おまけ: iPhone をOpenVPN サーバへ接続する
iPhone でOpenVPN サーバへ接続するには、App Store からOpenVPN クライアントをインストールして、そのアプリを利用して接続する方法が簡単です。
OpenVPN で接続するために、OpenVPN クライアントにインポートするための.ovpn ファイルを作成し、それをiPhone に転送してインポートします。
まずはその.ovpn ファイルを作成します。
client
proto udp
remote server.vpn.example.com
port 1194
dev tun
nobind

key-direction 1

<ca>
-----BEGIN CERTIFICATE-----
MIIDSjCCAjKgAwIBAgIJANp8wPflnVcjMA0GCSqGSIb3DQEBCwUAMB0xGzAZBgNV
......
L5BQH/mLln07qVYtnRm3Tp8I5txQiK9gXubj1S5M
-----END CERTIFICATE-----
</ca>

<cert>
-----BEGIN CERTIFICATE-----
MIIDWjCCAkKgAwIBAgIBAjANBgkqhkiG9w0BAQsFADAdMRswGQYDVQQDDBJjYS5u
......
FEW72nqix52AJN0LlXZi+yx4zLFdukiyKBxYuquYZ10Dh9xa0B2Fe93R75ADww==
-----END CERTIFICATE-----
</cert>

<key>
-----BEGIN RSA PRIVATE KEY-----
MIIEowIBAAKCAQEApIWjgwCK1/cwtNwGCByXA4xyRBxacD1fk3qgC/u2u1eO5JZ3
......
ttamwm7lbrne/IxBGUdQsLSDLAyUpAh0pjebmVBNycYIxm57JosA
-----END RSA PRIVATE KEY-----
</key>

<tls-auth>
-----BEGIN OpenVPN Static key V1-----
cad3fc02b4c2a7879b83248d33b4be35
......
00436498f30ac44677784da57f849691
-----END OpenVPN Static key V1-----
</tls-auth>
tls-auth にはta.key の内容を挿入してください。
.ovpn ファイルの転送
.ovpn ファイルを転送します。
ファイルに秘密鍵情報も含まれているので、安全な方法で転送するようにしてください。
今回は比較的情報の多い、iTunes をつかった方法でファイルを転送することにします。
iPhone とMac を接続したら、ITunes を開き、ウィンドウ上部のiPhone マークをクリックしてください。
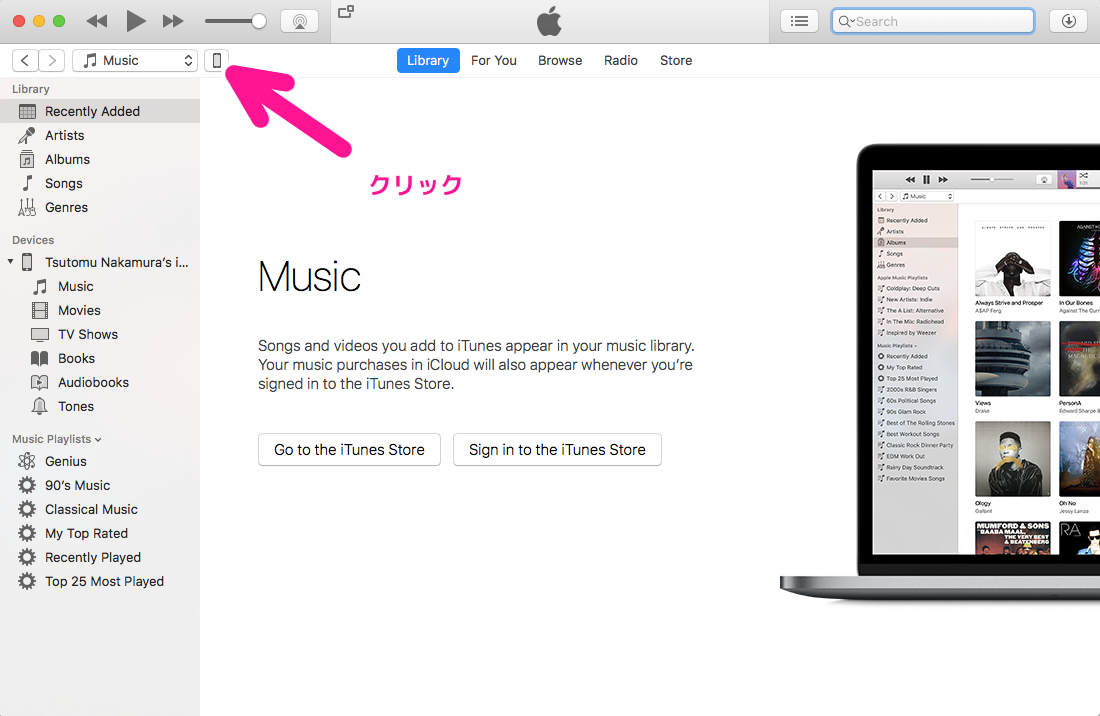
クリック後、左メニューからApps を選択し、右ペインを下へスクロースします。
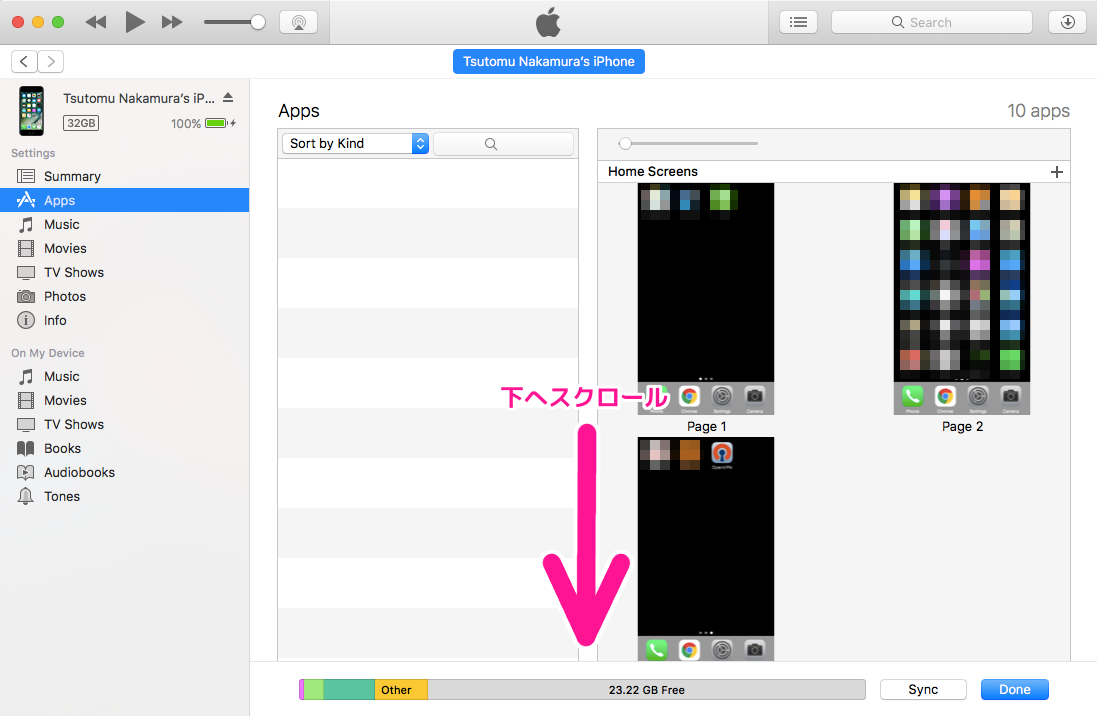
下へスクロールするとファイル共有(File Sharing)が現れるので、.ovpn ファイルをドラッグ&ドロップでファイルを転送してください。
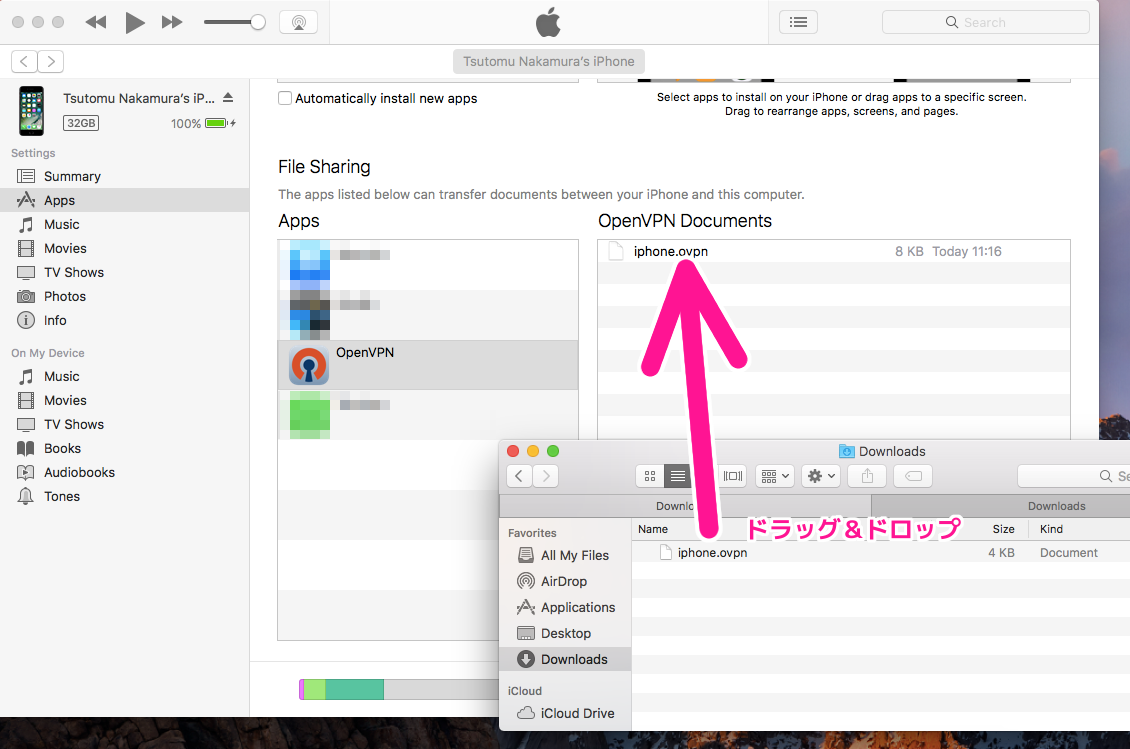
ファイルを転送したら、iPhone でOpenVPN アプリを起動してください。
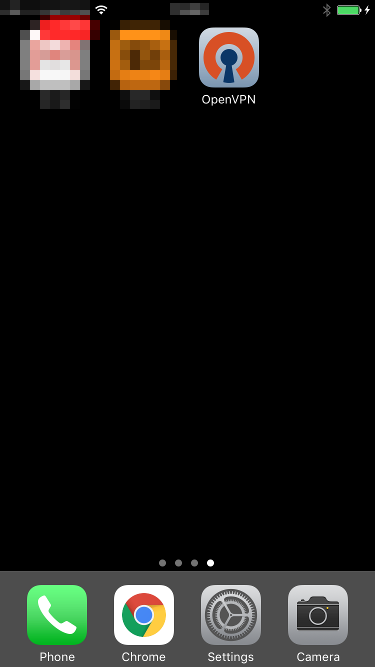
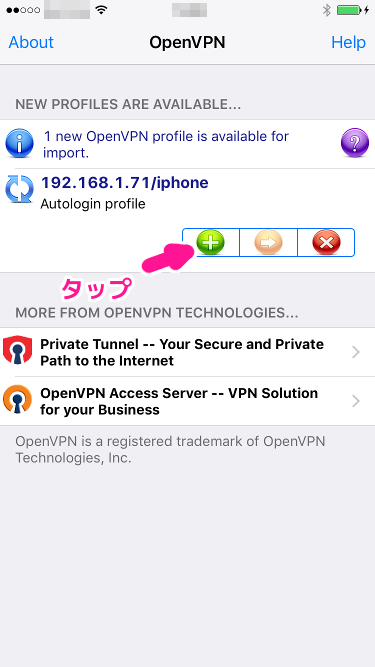
OpenVPN クライアントアプリを起動すると、下記のような設定のインポート画面が表示されるので、+ ボタンを押下して設定をインポートしてください。
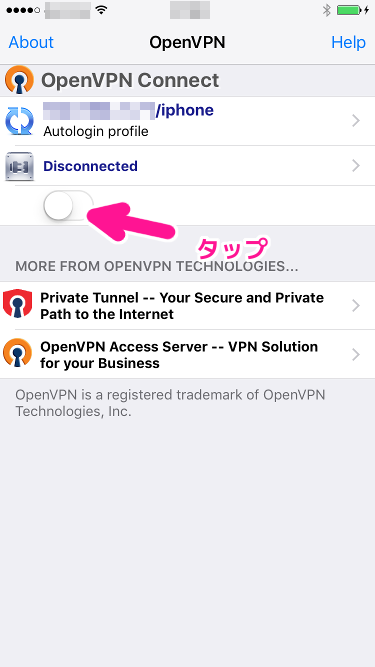
設定をインポートすると、接続画面に遷移するのでSwitch をタップして接続を開始してください。
エラーなく接続が完了すれば成功です。
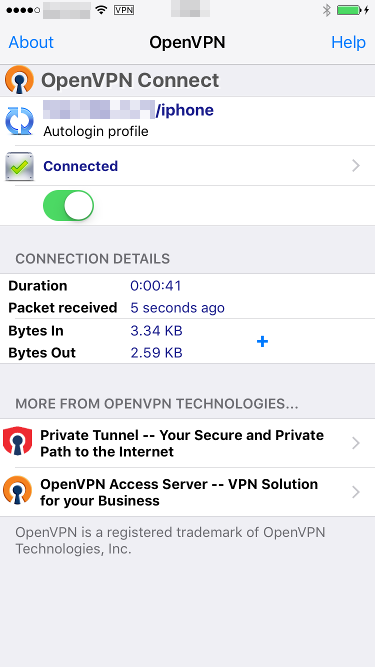

接続のテスト
iPhone の接続が完了したら192.168.1.0/24 ネットワーク内の適当なノードに対してping コマンドなりcurl コマンドを実行し、tun0 インタフェース経由で転送されているかどうかをtcpdump コマンドなどで確認してください。
参考
-
Openvpn - Fedora wiki
-
Easy-RSA v3 OpenVPN Howto
-
VPNサーバー構築(OpenVPN)
-
systemd-tty-ask-password-agentの使い方
-
Generate an OpenVPN profile for client user to import
-
iPhoneやiPad (iOS) でOpenVPNを使ってみよう!