やったこと
プレースホルダー付きのUITextViewをSwiftで実装してみた。
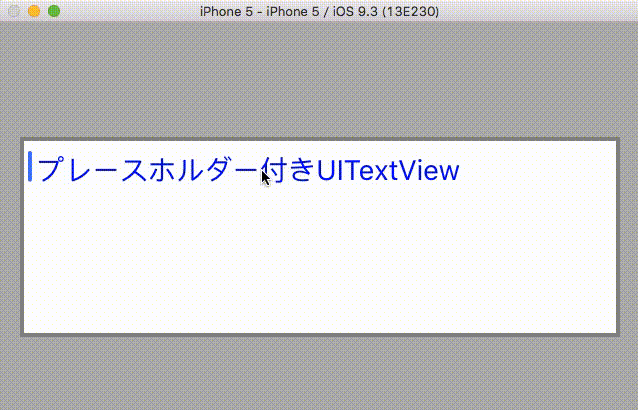
キャプチャー
ソースコード
PlaceHolderTextView.swift
import UIKit

class PlaceHolderTextView: UITextView {

    // プレースホルダー用のラベル
    var m_labelForPlaceHolder:UILabel?

    // プレースホルダーの文言
    var m_strPlaceHolder:String?

    // プレースホルダーのテキストの色
    var m_colorForPlaceHolder:UIColor?

    func initialize() {
        NSNotificationCenter.defaultCenter().addObserver(self, selector: #selector(self.TextChanged(_:)), name: UITextViewTextDidChangeNotification, object: nil)

        m_labelForPlaceHolder = UILabel(frame: CGRect(x: 8, y: 8, width: self.bounds.size.width - 16, height: 0))
        m_labelForPlaceHolder?.numberOfLines = 0
        m_labelForPlaceHolder?.font = UIFont.systemFontOfSize(14.0)
        m_labelForPlaceHolder?.lineBreakMode = NSLineBreakMode.ByCharWrapping

        // デフォルト設定
        self.placeHolder = "プレースホルダー"
        self.PlaceHolderColor = UIColor(red: 0.8, green: 0.8, blue: 0.8, alpha: 1)

        // 枠線をつける
        self.layer.borderWidth = 2
        self.layer.borderColor = UIColor.grayColor().CGColor

        self.addSubview(m_labelForPlaceHolder!)
    }

    init(frame:CGRect) {
        super.init(frame: frame, textContainer: nil)
        initialize()
    }

    required init?(coder aDecoder: NSCoder) {
        super.init(coder: aDecoder)
        initialize()
    }

    deinit {
        NSNotificationCenter.defaultCenter().removeObserver(self)
    }

    var PlaceHolderColor:UIColor? {
        get {
            return m_colorForPlaceHolder
        }
        set {
            m_colorForPlaceHolder = newValue
            if nil == m_colorForPlaceHolder {
                m_colorForPlaceHolder = UIColor(red: 0.8, green: 0.8, blue: 0.8, alpha: 1)
            }
            m_labelForPlaceHolder?.textColor = m_colorForPlaceHolder
        }
    }
    var placeHolder:String? {
        get {
            return m_strPlaceHolder
        }
        set {
            m_strPlaceHolder = newValue
            if nil == m_strPlaceHolder {
                m_strPlaceHolder = ""
            }
            // frameをリセットする
            m_labelForPlaceHolder?.frame = CGRect(x: 8, y: 8, width: self.bounds.size.width - 16, height: 0)

            m_labelForPlaceHolder?.text = m_strPlaceHolder
            m_labelForPlaceHolder?.sizeToFit()
        }
    }

    // テキストが変更された際に呼ばれる
    func TextChanged(niti:NSNotification) {
        if 0 == self.text.characters.count {
            m_labelForPlaceHolder?.hidden = false
        }
        else {
            m_labelForPlaceHolder?.hidden = true
        }
    }
}
使用例
 override func viewDidLoad() {
        super.viewDidLoad()

        let placeHolder:PlaceHolderTextView = PlaceHolderTextView.init(frame: CGRect(x: 10, y: 200, width: 300, height: 100))
        placeHolder.placeHolder = "プレースホルダー付きUITextView"
        placeHolder.PlaceHolderColor = UIColor.blueColor()

        self.view.addSubview(placeHolder)
    }
デメリット
テキストが入力されていない時のキャレットとプレースホルダーの距離がUITextFieldと比べると少し離れてしまうこと。