よくあるIoTの事例にHEMS(Home Energy Management System)があると思います。このユースケースでAWS IoTが使えると思います。ぷらっとホーム様に貸していただいたOpenblocks BX1を使います。
BX1の基本的な情報は、せーのさんのこちらの記事がわかりやすいです。
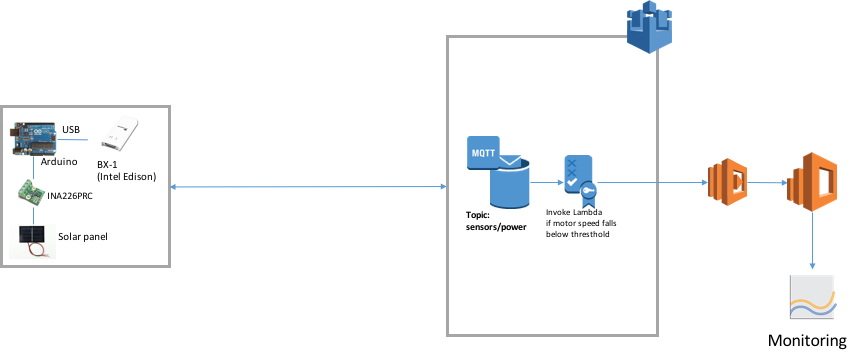
システム概要
2015年10月時点で、AWS IoTから直接Amazon Elasticsearch service(以下、Amazon ES)に展開できないので、Lambdaを経由します。さらに実用を意識した場合は、IoTのLambdaの間にAmazon Kinesisを挟むことにバルクで処理できるようになるので効率的ですが、今回はわかりやすくするための直接Lambdaを利用します。
なるべくCLIを使って説明しますのでCLIの最新化を行ってください。
AWS CLIのバージョンアップ
(まだ、AWS CLIをインストールしていない方はこちら)
% pip install awscli --upgrade
iotの機能がアップグレードされたか確認
% pip iot help
Amazon Elasticsearch Serviceのセットアップ
Kibanaで可視化するためにAmazon Elasticsearch Serviceを構築します。
% aws es create-elasticsearch-domain --domain-name solar
{
    "DomainStatus": {
        "ElasticsearchClusterConfig": {
            "DedicatedMasterEnabled": false,
            "InstanceCount": 1,
            "ZoneAwarenessEnabled": false,
            "InstanceType": "m3.medium.elasticsearch"
        },
        "DomainId": "736384702727/solar",
        "Created": true,
        "Deleted": false,
        "EBSOptions": {
            "EBSEnabled": false
        },
        "Processing": true,
        "DomainName": "solar",
        "SnapshotOptions": {
            "AutomatedSnapshotStartHour": 0
        },
        "AccessPolicies": "",
        "AdvancedOptions": {
            "rest.action.multi.allow_explicit_index": "true"
        },
        "ARN": "arn:aws:es:ap-northeast-1:******:domain/solar"
    }
}
現時点(2015年10月)では、Amazon ESには、リソース、IPアドレス、IAMからのアクセスをサポートしております。今回は時間の関係上すべてのアクセスを許可しました。(オススメはできません)
% aws es update-elasticsearch-domain-config --endpoint https://es.ap-northeast-1.amazonaws.com --domain-name solar --access-policies "{\"Version\": \"2012-10-17\",\"Statement\": [{\"Sid\": \"\",\"Effect\": \"Allow\",\"Principal\": {\"AWS\": \"*\"},\"Action\": \"es:*\",\"Resource\": \"arn:aws:es:ap-northeast-1:****:domain/solar/*\"}]}"
{
    "DomainConfig": {
        "ElasticsearchClusterConfig": {
            "Status": {
                "PendingDeletion": false,
                "State": "Active",
                "CreationDate": 1444622526.569,
                "UpdateVersion": 6,
                "UpdateDate": 1444623077.967
            },
            "Options": {
                "DedicatedMasterEnabled": false,
                "InstanceCount": 1,
                "ZoneAwarenessEnabled": false,
                "InstanceType": "m3.medium.elasticsearch"
            }
        },
        "AdvancedOptions": {
            "Status": {
                "PendingDeletion": false,
                "State": "Active",
                "CreationDate": 1444625089.173,
                "UpdateVersion": 9,
                "UpdateDate": 1444625089.173
            },
            "Options": {
                "rest.action.multi.allow_explicit_index": "true"
            }
        },
        "EBSOptions": {
            "Status": {
                "PendingDeletion": false,
                "State": "Active",
                "CreationDate": 1444622526.569,
                "UpdateVersion": 6,
                "UpdateDate": 1444623077.967
            },
            "Options": {
                "EBSEnabled": false
            }
        },
        "AccessPolicies": {
            "Status": {
                "PendingDeletion": false,
                "State": "Processing",
                "CreationDate": 1444625089.019,
                "UpdateVersion": 9,
                "UpdateDate": 1444625089.019
            },
            "Options": "{\"Version\": \"2012-10-17\",\"Statement\": [{\"Sid\": \"\",\"Effect\": \"Allow\",\"Principal\": {\"AWS\": \"*\"},\"Action\": \"es:*\",\"Resource\": \"arn:aws:es:ap-northeast-1:****:domain/solar/*\"}]}"
        },
        "SnapshotOptions": {
            "Status": {
                "PendingDeletion": false,
                "State": "Active",
                "CreationDate": 1444622526.569,
                "UpdateVersion": 6,
                "UpdateDate": 1444623077.967
            },
            "Options": {
                "AutomatedSnapshotStartHour": 0
            }
        }
    }
}
エンドポイントなどを取得するために以下のコマンドを実行します。
% aws es describe-elasticsearch-domain --domain-name solar
{
    "DomainStatus": {
        "ElasticsearchClusterConfig": {
            "DedicatedMasterEnabled": false,
            "InstanceCount": 1,
            "ZoneAwarenessEnabled": false,
            "InstanceType": "m3.medium.elasticsearch"
        },
        "Endpoint": "search-solar-****.ap-northeast-1.es.amazonaws.com",
        "Created": true,
        "Deleted": false,
        "DomainName": "solar",
        "EBSOptions": {
            "EBSEnabled": false
        },
        "SnapshotOptions": {
            "AutomatedSnapshotStartHour": 0
        },
        "DomainId": "****/solar",
        "AccessPolicies": "",
        "Processing": false,
        "AdvancedOptions": {
            "rest.action.multi.allow_explicit_index": "true"
        },
        "ARN": "arn:aws:es:ap-northeast-1:****:domain/solar"
    }
}
AWS Lambdaのセットアップ
AWS IoTから来たデータをそのままElasticsearch Serviceに流します。
データがJSON形式で"timestamp", "deviceId", "bus_mV", "current_mA"が入力される予定なので、それを意識してNode.jsで書きます。npmでElasticsearchのモジュールをインストールしてください。
LamdaからElasticsearchへの入力はこちらが参考になります。
bulkでなくてもよかったのですが、今後、Kinesis経由にすることを考慮し、bulkでpushにするようにしました。
var aws = require('aws-sdk');
var elasticsearch = require('elasticsearch');
var moment = require('moment-timezone');

var es = new elasticsearch.Client({
    host: 'search-solar-****.ap-northeast-1.es.amazonaws.com'
});

exports.handler = function(event, context) {
    console.log('Received event:');
	timeObj = moment(event.timestamp);
	var timestamp = timeObj.tz("Asia/Tokyo").format("YYYY-MM-DD HH:mm:ss")
	var deviceId = event.deviceId;
	var bus_mV = event.bus_mV;
	var current_mA = event.current_mA;
    var searchRecords = [];
    var header = {
        "index":{
            "_index": 'solarlog' + '-' + timeObj.tz("Asia/Tokyo").format("YYYY-MM-DD"),
            "_type": 'log',
            "_id": deviceId + '-' + timeObj.tz("Asia/Tokyo").format("YYYYMMDDHHmmss")
        }
    };

    var searchRecord = {
        "@timestamp" : timestamp,
		"deviceId":deviceId,
		"bus_mV" : bus_mV,
		"current_mA" : current_mA
    };
    searchRecords.push(header);
    searchRecords.push(searchRecord);

    console.log(searchRecords);
    es.bulk({
        "body": searchRecords
    }, function(err, resp){
            if(err){
                console.log(err);
                context.done("error",err);
            }else{
				console.log("Success");
                console.log(JSON.stringify(resp));
                context.done(null,'success');
            };
    });
};
% aws lambda create-function --function-name solar-elasticsearch --zip-file fileb://index.zip --role "arn:aws:iam::****:role/lambda_elasticsearch" --handler index.handler --runtime nodejs
{
    "CodeSha256": "****/****",
    "FunctionName": "solar-elasticsearch",
    "CodeSize": 1160223,
    "MemorySize": 128,
    "FunctionArn": "arn:aws:lambda:ap-northeast-1:****:function:solar-elasticsearch",
    "Version": "$LATEST",
    "Role": "arn:aws:iam::****:role/lambda_elasticsearch",
    "Timeout": 3,
    "LastModified": "2015-10-12T05:05:10.201+0000",
    "Handler": "index.handler",
    "Runtime": "nodejs",
    "Description": ""
}
モノの作成
% aws iot create-thing --thing-name solar
{
    "thingArn": "arn:aws:iot:ap-northeast-1:****:thing/solar",
    "thingName": "solar"
}
モノの証明書を作成
2つのクライアント証明書の作成方法があります。
create-keys-and-certificateで、鍵と証明書を作成できます。
% aws iot create-keys-and-certificate --set-as-active
{
    "certificateArn": "****",
    "certificatePem": "****",
    "keyPair": {
        "PublicKey": "****",
        "PrivateKey": "****"
    },
    "certificateId": "****"
}
証明書、公開鍵、秘密鍵をJSONから抽出して、pemファイルにします。
その際に、'\n'は削除する必要があります。
ポリシの作成と証明書との紐付け
AWS IoTにアクセス可能なポリシを作成します。
以下の内容のファイルを作成し、create-policyコマンドで作成します。
今回のポリシは、すべてのリソースに対してすべてのiotのアクションができるポリシになります。
% cat iot.policy
{
    "Version": "2012-10-17",
    "Statement": [{
        "Effect": "Allow",
        "Action":["iot:*"],
        "Resource": ["*"]
    }]
}

% aws iot create-policy --policy-name "PubSubToAnyTopic" --policy-document file://iot.policy
{
    "policyName": "PubSubToAnyTopic",
    "policyArn": "arn:aws:iot:ap-northeast-1:****:policy/PubSubToAnyTopic",
    "policyDocument": "{\n    \"Version\": \"2012-10-17\", \n    \"Statement\": [{\n        \"Effect\": \"Allow\",\n        \"Action\":[\"iot:*\"],\n        \"Resource\": [\"*\"]\n    }]\n}\n",
    "policyVersionId": "1"
}
証明書とポリシを紐付けます。
% aws iot attach-principal-policy --principal "arn:aws:iot:ap-northeast-1:****:cert/****" --policy-name "PubSubToAnyTopic"
モノと証明書との紐付け
モノと証明書を紐付けます。
% aws iot attach-thing-principal --thing-name "solar" --principal "arn:aws:iot:ap-northeast-1:****:cert/****"
MQTTのテスト
Mosquittoを使ってMQTTのPub/Subのテストをしてみましょう。
Mosquittoは、MQTTブローカーのOSSで、コマンドとしてmosquitto_pubやmosquitto_subがあり、MQTTのPub/SubをCLIで試すことができます。
MQTTのTLSでroot証明書が必要になりますので、ダウンロードしておきます。
接続先のアカウント毎のエンドポイントを取得します。
% aws iot describe-endpoint
{
    "endpointAddress": "****.iot.ap-northeast-1.amazonaws.com"
}
コンソールを2つ開いて、一つは、Subscriberとして起動させます。
% mosquitto_sub --cafile root.pem --cert cert.pem --key private.pem -h ****.iot.ap-northeast-1.amazonaws.com -p 8883 -q 1 -d -t topic/test -i clientid1
もう一方を、Publisherとして起動させます。
% mosquitto_pub --cafile root.pem --cert cert.pem --key private.pem -h ****.iot.ap-northeast-1.amazonaws.com -p 8883 -q 1 -d -t 'topic/test' -m "hello"
Subscriber側で以下のような結果がでたら通信成功です。
% mosquitto_sub --cafile root.pem --cert cert.pem --key private.pem -h ****.iot.ap-northeast-1.amazonaws.com -p 8883 -q 1 -d -t topic/test -i clientid1

Client clientid1 sending CONNECT
Client clientid1 received CONNACK
Client clientid1 sending SUBSCRIBE (Mid: 1, Topic: topic/test, QoS: 1)
Client clientid1 received SUBACK
Subscribed (mid: 1): 1
Client clientid1 sending PINGREQ
Client clientid1 received PINGRESP
Client clientid1 sending PINGREQ
Client clientid1 received PINGRESP
Client clientid1 received PUBLISH (d0, q1, r0, m1, 'topic/test', ... (5 bytes))
Client clientid1 sending PUBACK (Mid: 1)
hello
ルール設定の準備
今回は、すべてのデータをLambdaに渡して、Amazon Elastic Serviceに流そうと思います。
ルールを作り前にAWS IoTからLambdaをInvokeするので、IAM Roleとパーミッションを設定する必要があります。
{
"Version": "2012-10-17",
"Statement": [{
      "Sid": "",
      "Effect": "Allow",
      "Principal": {
            "Service": "iot.amazonaws.com"
       },
      "Action": "sts:AssumeRole"
  }]
}
% aws iam create-role --role-name iot-actions-role --assume-role-policy-document file://trust.policy

{
    "Role": {
        "AssumeRolePolicyDocument": {
            "Version": "2012-10-17",
            "Statement": [
                {
                    "Action": "sts:AssumeRole",
                    "Principal": {
                        "Service": "iot.amazonaws.com"
                    },
                    "Effect": "Allow",
                    "Sid": ""
                }
            ]
        },
        "RoleId": "****",
        "CreateDate": "2015-10-12T03:46:38.960Z",
        "RoleName": "iot-actions-role",
        "Path": "/",
        "Arn": "arn:aws:iam::****:role/iot-actions-role"
    }
}
{
    "Version": "2012-10-17",
    "Statement": [{
        "Effect": "Allow",
        "Action": ["lambda:InvokeFunction"],
        "Resource": ["*"]
    }]
}
% aws iam create-policy --policy-name iot-actions-policy --policy-document file://LambdaPermission

{
    "Policy": {
        "PolicyName": "iot-actions-policy",
        "CreateDate": "2015-10-12T03:50:18.687Z",
        "AttachmentCount": 0,
        "IsAttachable": true,
        "PolicyId": "****",
        "DefaultVersionId": "v1",
        "Path": "/",
        "Arn": "arn:aws:iam::****:policy/iot-actions-policy",
        "UpdateDate": "2015-10-12T03:50:18.687Z"
    }
}
% aws iam attach-role-policy --role-name iot-actions-role --policy-arn "arn:aws:iam::****:policy/iot-actions-policy"
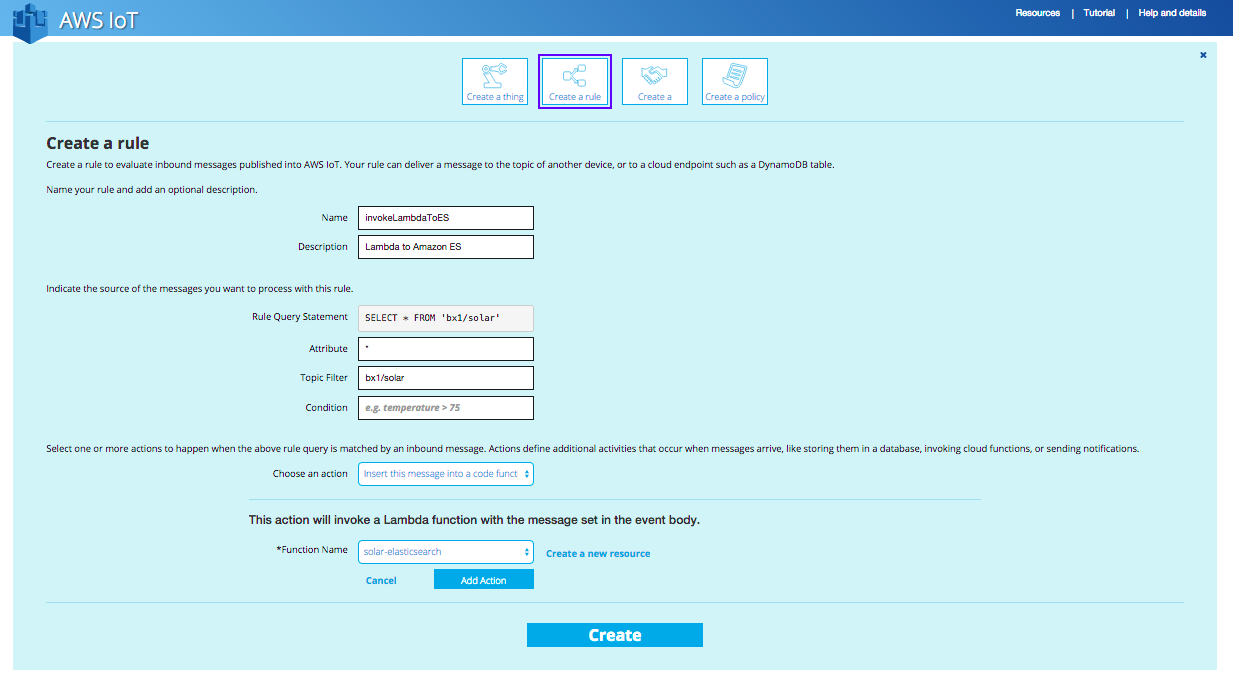
これで準備が整いました。ルールは画面で設定してみましょう。
MQTTのトピックをbx1/solarとして、来たメッセージをすべてをInvokeするようにしてます。
デバイスからMQTTで発電量をパブリッシュ
ようやく、最後の工程です。
BX1からAWS IoTに対して発電量をパブリッシュします。
Arduinoにセンサーがつながっており、ArduinoとBX1はUSB接続しております。
太陽電池モジュールからの発電量は、INA226を使用しており、こちらで購入できます。
Arduinoのコードは以下のとおり。(このコードは、ぷらっとホーム松下さんから提供いただけました!ありがとうございます!)
/* ref: http://n.mtng.org/ele/arduino/tutorial014.html */
# include <Wire.h>

const byte INA226_ADDR = B1000000;

const byte INA226_CONFIG = 0x00;
const byte INA226_SHUNTV = 0x01;
const byte INA226_BUSV   = 0x02;
const byte INA226_POWER  = 0x03;
const byte INA226_CURRENT = 0x04;
const byte INA226_CALIB  = 0x05;
const byte INA226_MASK   = 0x06;
const byte INA226_ALERTL = 0x07;
const byte INA226_DIE_ID = 0xff;

void INA226_write(byte reg, unsigned short val)
{
  Wire.beginTransmission(INA226_ADDR);
  Wire.write(reg);
  Wire.write(val >> 8);
  Wire.write(val & 0xff);
  Wire.endTransmission();
}

short INA226_read(byte reg)
{
  short ret = 0;
  // request the registor
  Wire.beginTransmission(INA226_ADDR);
  Wire.write(reg);
  Wire.endTransmission();

  // read
  Wire.requestFrom((int)INA226_ADDR, 2);

  while(Wire.available()) {
    ret = (ret << 8) | Wire.read();
  }

  return ret;
}

void setup() {
  Serial.begin(115200);
  while (!Serial) {}

  Wire.begin();
  INA226_write(INA226_CONFIG, 0x45ff); // average: 16 times, conversion time: 8.244ms/8.244ms
  INA226_write(INA226_CALIB,  2560); // current conversion
}

void loop() {
  int bv, c;
  float bv_;

  bv_ = bv = INA226_read(INA226_BUSV);
  bv_ *= 1.25;
  c = INA226_read(INA226_CURRENT);

  /* JSONfy */
  Serial.print("{\"bus_mV\":");
  Serial.print(bv_);
  Serial.print(",\"current_mA\":");
  Serial.print(c);
  Serial.println("}");

  delay(850);
}
BX1側では、USBからのデータを受信し、MQTTでパブリッシュするといった感じです。
AWS IoTでは、CのSDKやJSのSDKが提供されているのですが、MQTTなので、Pahoなど使えば、Pythonでも書くことができます。今回はPythonで書いてみました。
但し、重要なのは、AWS IoTは、TLS v1.2に対応しております。Python2.7系は、Version2.7.9以降にTLS v1.2を対応していることからBX1にデフォルトではいっているPythonのバージョンをあげる必要があります。
ソースからビルドしてバージョンアップしてください。(今回は、2.7.10をいれました)
# Import Libraries
import time
import json
import serial
from functools import wraps
import ssl
import sys, traceback

# Python MQTT Connection
import paho.mqtt.client as mqtt
import ssl

# USB ( Arduino )
ser = serial.Serial('/dev/ttyACM7', 115200)

# Define some constants.
HOST = '****.iot.ap-northeast-1.amazonaws.com'
PORT = 8883
CLIENTID = 'BX1'
TOPIC_PUBLISH = 'bx1/solar'
PAYLOAD = {}
data = {}
QOS = 0

CA_CERTS = 'root.pem'
CERTFILE = 'cert.pem'
KEYFILE = 'private.pem'

# Result codes and their explanations for connection failure debugging.
RESULT_CODES = {
    0: 'Connection successful',
    1: 'Incorrect protocol version',
    2: 'Invalid client identifier',
    3: 'Server unavailable',
    4: 'Bad username or password',
    5: 'Not authorized'
}

def sslwrap(func):
   @wraps(func)
   def bar(*args, **kw):
       kw['ssl_version'] = ssl.PROTOCOL_TLSv1_2
       return func(*args, **kw)
   return bar

ssl.wrap_socket = sslwrap(ssl.wrap_socket)


# Helper method MQTT
def on_connect(client, userdata, rc):
    if rc == 0:
        print("Connection successful! (Result code 0)")
    else:
        print("Connection unsuccessful! (Result code " + str(rc) + ": " + RESULT_CODES[rc] + ")")
        client.disconnect()

# The following are functions bound to callbacks.
def on_disconnect(client, userdata, rc):
    print("Connection has been lost.")
    # This will automatically reconnect if connection is lost.
    print("Attempting to reconnect in 5s.")
    time.sleep(5)
    client.connect(HOST, PORT)

def on_publish(client, userdata, mid):
    print("Message " + str(mid) + " has been published.")

def on_subscribe(client, userdata, mid, granted_qos):
    print("Subscription confirmed.")

def on_unsubscribe(client, userdata, mid):
    print("Unsubscribe confirmed.")

def on_message(client, userdata, message):
    try:
        print("Received message on topic " + str(message.topic) + " (QOS " + str(message.qos) + "): " + str(message.payload))
    except:
        print("ERROR: Command was not recognized")

def publishToTopic(value):

    PAYLOAD = json.dumps(value)
    client.publish(TOPIC_PUBLISH, PAYLOAD, QOS)
    print("Publishing to " + TOPIC_PUBLISH + " (QOS " + str(QOS) + "): " + PAYLOAD)


# def subscribeToTopic():
    #print("Subscribing to " + TOPIC_SUBSCRIBE)
    #client.subscribe(TOPIC_SUBSCRIBE, QOS)


client = mqtt.Client(client_id=CLIENTID, clean_session=True, protocol=mqtt.MQTTv311)
client.tls_set(CA_CERTS, CERTFILE, KEYFILE)

# Bind callbacks to the relevant functions.
client.on_connect = on_connect
client.on_disconnect = on_disconnect
client.on_publish = on_publish
client.on_subscribe = on_subscribe
client.on_unsubscribe = on_unsubscribe
client.on_message = on_message

# Establish the connection.
print("attempting connection to broker")
client.connect(HOST, PORT, 60)

# Maintain a connection with the server.
client.loop_start()
print("now connected and looping the connection")

# Subscribe to the topic and send messages
# subscribeToTopic()
# print("Subscribed to topic")


while True:
    try:
        recv =ser.readline()
        try:
            data = json.loads(recv)
            currentTimestamp = int(round(time.time() * 1000))
            data['timestamp'] = currentTimestamp
            data['deviceId'] = CLIENTID
            publishToTopic(data)
        except:
            pass
        time.sleep(5)
    except Exception as e:
        info = sys.exc_info()
        tbinfo = traceback.format_tb( info[2] )
        print 'Python Error.'.ljust( 80, '=' )
        for tbi in tbinfo:
            print tbi
        print '  %s' % str( info[1] )
        print '\n'.rjust( 80, '=' )
        sys.exit()
実行します。
% python solar.py

Publishing to bx1/solar (QOS 0): {"timestamp": 1444656873759, "bus_mV": 2.5, "current_mA": 1, "deviceId": "BX1"}
Message 1965 has been published.
{"bus_mV":2.50,"current_mA":1}

Publishing to bx1/solar (QOS 0): {"timestamp": 1444656874767, "bus_mV": 2.5, "current_mA": 1, "deviceId": "BX1"}
Message 1966 has been published.
無事、Publishされているようですね。
ちゃんと、AWS IoTにとどているか確認しましょう。
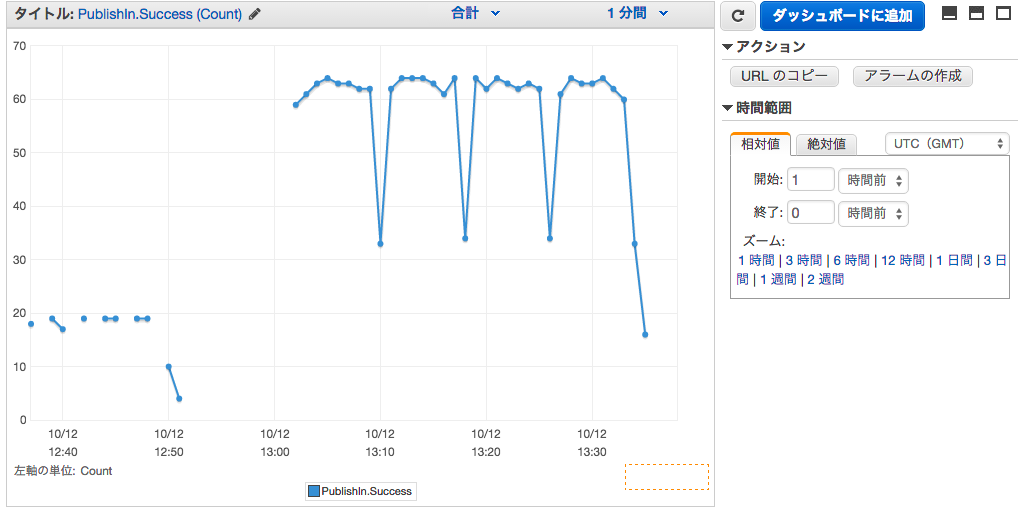
CloudWatchのメトリックスがいくつかあり、MQTTのPublisIn.successをみるとAWS IoTがPublishを受け取った数がわかります。
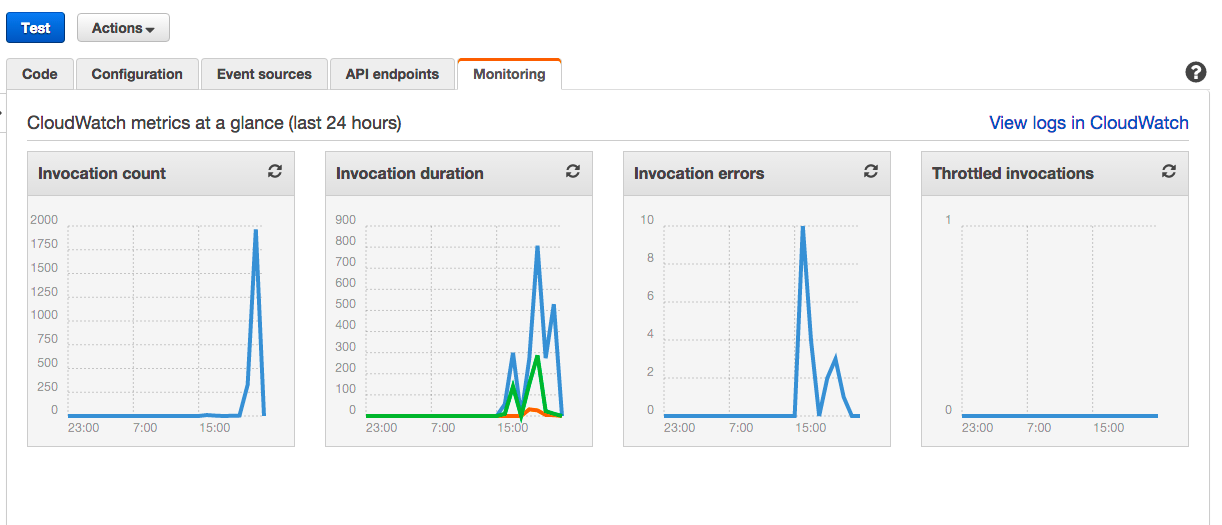
ルールが実行されているか確認するためにLambdaをみてみましょう。
Lambdaのコンソール内にあるMonitoringタブでInvocationされている数を確認します。
Invokeされているようですね。
あとは、kibanaにアクセスして可視化してみましょう。
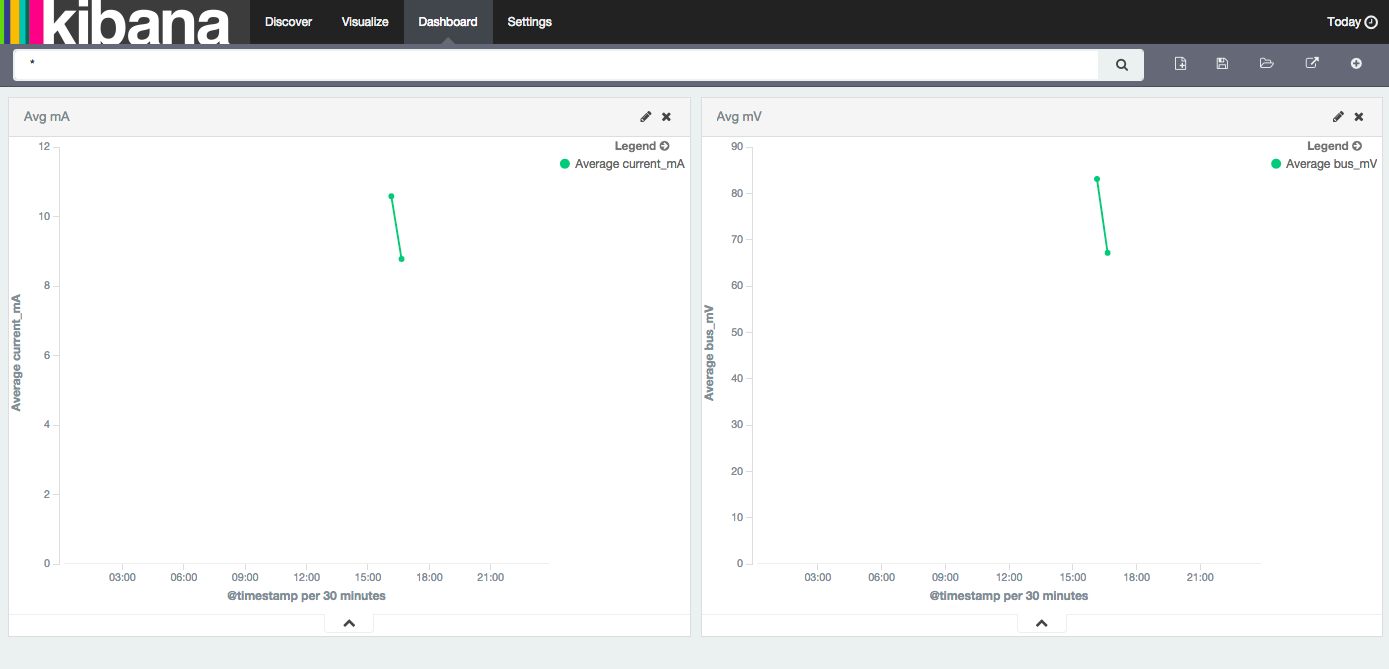
kibanaの使い方は、ここでは割愛します。とってもシンプルですが、電圧と電流の平均を出してみました。
最後に
AWS IoTとAmazon Elasticsearch Serviceをつかうとセンサーデータの可視化が簡単にできますね。
免責
こちらは個人の意見で、所属する企業や団体は関係ありません。
