メカトラックス株式会社様からラズパイIoTスタータキット「anyPi(エニーパイ)」提供していただいたので、アルプスIoT Smart Moduleを接続してみました。アルプスIoT Smart Moduleの加速度センサと地磁気センサからのピッチ、ロール、ヘディングを計算し、テキスト表示ディスプレイにその結果を表示します。ピッチ、ロール、ヘディングが一定範囲に入れば、PiConsole I/Fの電子ブザーを鳴らします。ピッチ、ロールに対しては、一定範囲に入れば2個のLEDで情報を表示します。
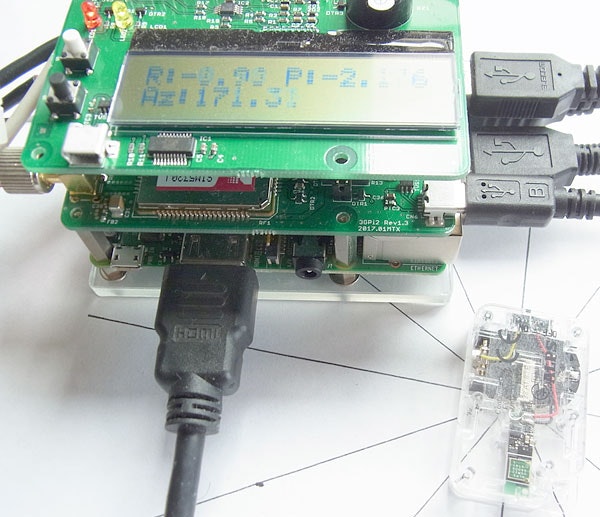
anyPiは、下から順番にRaspberry Pi 3、3GPI、PiConsole I/Fと積み重ねられており、今回は、PiConsole I/Fのテキスト表示ディスプレイにピッチ、ロール、ヘディングを表示し、あらかじめ決められた範囲に入れば電子ブザーを鳴らし、ピッチが入ればLED(黄)を点灯、ロールが入ればLED(赤)を点灯します。アルプスIoT Smart Moduleは、Raspberry Pi 3とBluetooth Low Energy(BLE)プロトコルで接続して、加速度センサと地磁気センサのモーションデータを取得します。アルプスIoT Smart Moduleは、ヘディングを確認しやすいように、円周を30°で分割した目盛用紙上に置きます。
プログラムの作成
プログラムはPython言語を使用し、全体を制御する「actionmain.py」、アルプスIoT Smart Moduleを制御してセンサー情報を取得する「alpsaction.py」、anyPiのPiConsole I/Fのテキスト表示ディスプレイにデータを表示する「lcd.py」で構成します。また、計算したピッチ、ロール、ヘディングがあらかじめ決められた範囲に入ったかを調べるために使用する閾値の定義を「constant.conf」に設定します。なお、「lcd.py」は、「anyPiのPiConsole I/Fの入出力」のLCD用サンプルプログラムと同じプログラムを使用します。
Pythonインタフェース「bluepy」のインストール
Python言語でBLEを取り扱うためには、次のコマンドでPythonインタフェース「bluepy」をインストールする必要があります。
$ sudo apt-get install python-pip libglib2.0-dev
$ sudo pip install bluepy
$ sudo apt-get install git build-essential libglib2.0-dev
$ git clone https://github.com/IanHarvey/bluepy.git
$ cd bluepy
$ sudo python setup.py build
$ sudo python setup.py install
全体の制御モジュール「actionmain.py」
「actionmain.py」が最初に起動し、次の処理を行います。
- BLE通信は、「Peripheral」クラスを継承した「AlpsSensor」を使用します
- buzzer関数により、計算したピッチ、ロール、ヘディングの範囲チェックとLED(赤/黄)の点灯/消灯を行っています。
- displayAngle関数により、PiConsole I/Fのテキスト表示ディスプレイにピッチ、ロール、ヘディングを表示します。displayAngle関数は、NtfyDelegateクラスのhandleNotificationメソッドから、コールバック関数として呼び出されます。
- プログラム起動時に、閾値定義ファイル「constant.conf」から範囲チェックの閾値データを取得します。
# -*- coding: utf-8 -*-
import sys
import signal
sys.path.append('/home/pi/bluepy/bluepy')
from btle import Peripheral
import btle
import ConfigParser

from lcd import St7032iLCD
from alpsaction import AlpsSensor
import pigpio

lcd = St7032iLCD()
Buzzer = 25        #ブザー
LED_red = 20    #赤
LED_yellow = 21 #黄
pi = pigpio.pi()
pi.set_mode(Buzzer, pigpio.OUTPUT)
pi.set_mode(LED_red, pigpio.OUTPUT)
pi.set_mode(LED_yellow, pigpio.OUTPUT)

global thresholdAngl
exitflg = False

def exithandler(signal, frame):
    print('exithandler !!')
    exitflg = True

def buzzer(Roll,Pitch,Heading):
    print ('Roll:{0:.3f} thresholdAngl:{1:.3f}'.format(abs(Roll ),thresholdAngl))
    if Heading > 180 :
        Headingdata = Heading - 360
    else :
        Headingdata = Heading
    if thresholdAngl > abs(Roll) and thresholdAngl > abs(Pitch) and thresholdAngl > abs(Headingdata):
        pi.write(Buzzer, 1)
    else :
        pi.write(Buzzer, 0)
    if thresholdAngl > abs(Roll):
        pi.write(LED_red,1)
    else :
        pi.write(LED_red,0)
    if thresholdAngl > abs(Pitch):
        pi.write(LED_yellow,1)
    else :
        pi.write(LED_yellow,0)


def displayAngle(Roll,Pitch,Heading):
    print ('Roll:{0:.3f} Pitch:{1:.3f} Heading:{2:.3f}'.format(Roll,Pitch,Heading ))
    lcd.set_cursor(0, 0)
    lcd.put_line ('R:{0:.2f} P:{1:.2f}'.format(Roll, Pitch))
    lcd.set_cursor(0, 1)
    lcd.put_line ('Az:{0:.2f} '.format(Heading))
    buzzer(Roll,Pitch,Heading)


def main():
    global thresholdAngl

    signal.signal(signal.SIGINT, exithandler)

# 設定ファイル読み込み
    conf = ConfigParser.SafeConfigParser()
    conf.read('constant.conf')
# 範囲チェックデータの保存
    thresholdAngl = int(conf.get('THRESHOLD', 'thresholdAngl'))

    alps = AlpsSensor(displayAngle)
    alps.setSensor()

# Main loop --------
    try:
        while True:
            if exitflg :
                break
            if alps.waitForNotifications(1.0):
            # handleNotification() was called
                continue

            print ("Waiting...")
            # Perhaps do something else here
    except Exception, e:
        print e, 'error occurred'
    sys.exit(0)


if __name__ == "__main__":
    main()
アルプスIoT Smart Moduleセンサー情報取得「alpsaction.py」
アルプスIoT Smart Moduleの加速度センサと地磁気センサからモーションデータを取得するために、アルプスIoT Smart Moduleのコマンドガイド「Sensor Network Module評価キットApplication Note Command Guide」の「2.2 コマンドによる設定例」を参考にして、次のような設定にしました。
| 設定 | 機能 |
|---|---|
| 計測モード | Fastモード |
| 計測間隔 | 100ms |
| Acceleration | 〇 |
| Geo-Magnetic | 〇 |
| Pressure | - |
| Humidity | - |
| Temperature | - |
| UV | - |
| Ambient Light | - |
BLE通信は「writeCharacteristic」メソッドを使用し、アルプスIoT Smart Moduleのコマンドガイド「Sensor Network Module評価キットApplication Note Command Guide」に従って、AlpsSensorクラスのsetSensorメソッドで設定します。Notificationメッセージは、setDelegateメソッドにより設定された NtfyDelegateクラスのhandleNotificationメソッドにより受信します。handleNotificationメソッドでは、モーションデータを含むEvent Codeがデータパケット1「0xF2」のみを処理します。
データパケット内の地磁気データ, 加速度データは符号つき2byte整数で、地磁気データ[uT]は「Magnetic×0.15」、加速度データ[G]は「Acceleration / 4096 (±2G Rangeの場合)」で求めます。
使用する計算式について
アルプスIoT Smart Moduleの加速度センサから加速度データ(Ax,Ay,Az)と、地磁気センサから地磁気データ(Mx,My,Mz)が入力されます。なお、本来は取得したデータに対して校正したり、正規化の必要がありますが、取得したモーションデータをそのまま使用します。計算式を次に示します。なお、実際の計算は、NtfyDelegateクラスのcomputeAngleメソッドで行います。
最初にピッチとロールを次の計算で求めます。
Pitch = ρ = arcsin(Ax)
Roll = γ = arcsin(Ay/cosρ )
次にヘディングを次の計算式で求めます。
Mx1 = Mxcosρ + Mzsinρ
My1 = Mxsinγsinρ + Mycosγ - Mzsinγcosρ
Heading = ψ = arctan(My1/Mx1)        Mx1>0 で My1>=0
            = 180° + arctan(My1/Mx1) Mx1<0
            = 360° + arctan(My1/Mx1) Mx1>0 で My1<=0
            = 90°                    Mx1=0 で My1<0
            = 270°                   Mx1=0 で My1>0
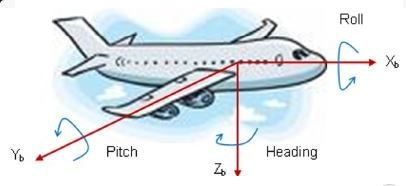
次の図のように、ヘディングはXb軸と水平面上の磁北間の角度、ピッチはXb軸と水平面間の角度、ロールはYb軸と水平面間の角度で、それぞれ定義されます。
アルプスIoT Smart Moduleのセンサ感度軸は次のようになっています。
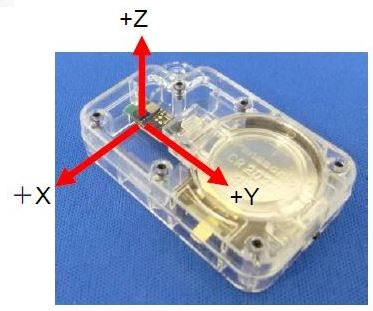
詳細については、アルプスIoT Smart Moduleのモーションセンサからピッチ、ロール、ヘディングの取得に示します。
# -*- coding: utf-8 -*-
import sys
sys.path.append('/home/pi/bluepy/bluepy')
from btle import Peripheral
import struct
import btle
import binascii
import math

class NtfyDelegate(btle.DefaultDelegate):
    def __init__(self, param, callback):
        btle.DefaultDelegate.__init__(self)
        # ... initialise here
        self.callbackFunc = callback

    def dataConv(self, msb, lsb):
        #    cal = 'f214fefff100320175000000ceef90010501007b'
        if (int(msb,16) & 0x80) == 0x80:
            data = -(65536-(int(msb+lsb,16)))
        else:
            data = int(msb+lsb,16)
        #print ('data:{0}'.format(data))
        return data

    def computeHeading(self, My, Mx):
        if Mx > 0 and My >= 0 :
            Heading = math.atan(My/Mx)
        elif Mx < 0 :
            Heading = math.pi + math.atan(My/Mx)
        elif Mx > 0 and My <= 0 :
            Heading = 2*math.pi + math.atan(My/Mx)
        elif Mx == 0 and My < 0 :
            Heading = math.pi/2
        else :
            Heading = math.pi+math.pi/2
        return Heading

    def computeAngle( self, GeoMagnetic_X,GeoMagnetic_Y,GeoMagnetic_Z,Acceleration_X,Acceleration_Y,Acceleration_Z):
        Pitch = math.asin(-Acceleration_X)
        Roll = math.asin(Acceleration_Y/math.cos(Pitch))

        Mx = GeoMagnetic_X*math.cos(Pitch)+GeoMagnetic_Z*math.sin(Pitch)
        #print ('cos:{0:.3f} sin:{1:.3f}'.format(GeoMagnetic_X*math.cos(Pitch),math.sin(Pitch) ))

        My=GeoMagnetic_X*math.sin(Roll)*math.sin(Pitch)+GeoMagnetic_Y*math.cos(Roll)-GeoMagnetic_Z*math.sin(Roll)*math.cos(Pitch)
        Heading = self.computeHeading(My,Mx)

        return math.degrees(Roll),math.degrees(Pitch),math.degrees(Heading)

    def handleNotification(self, cHandle, data):
        # ... perhaps check cHandle
        # ... process 'data'
        cal = binascii.b2a_hex(data)
        #print u'handleNotification : {0}-{1}:'.format(cHandle, cal)

        if int((cal[0:2]), 16) == 0xf2:
            #print 'cal:{0}'.format(type(cal))
            GeoMagnetic_X = self.dataConv(cal[6:8],cal[4:6]) * 0.15
            GeoMagnetic_Y = self.dataConv(cal[10:12],cal[8:10]) * 0.15
            GeoMagnetic_Z = self.dataConv(cal[14:16],cal[12:14]) * 0.15
            Acceleration_X = self.dataConv(cal[18:20],cal[16:18]) / 4096.0
            Acceleration_Y = self.dataConv(cal[22:24], cal[20:22]) / 4096.0
            Acceleration_Z = self.dataConv(cal[26:28],cal[24:26]) / 4096.0
            #print ('Geo-Magnetic X:{0:.3f} Y:{1:.3f} Z:{2:.3f}'.format(GeoMagnetic_X, GeoMagnetic_Y, GeoMagnetic_Z))
            #print ('Acceleration X:{0:.3f} Y:{1:.3f} Z:{2:.3f}'.format(Acceleration_X, Acceleration_Y, Acceleration_Z))
            Roll,Pitch,Heading = self.computeAngle(GeoMagnetic_X,GeoMagnetic_Y,GeoMagnetic_Z,Acceleration_X,Acceleration_Y,Acceleration_Z)
            self.callbackFunc(Roll,Pitch,Heading)

class AlpsSensor(Peripheral):
    def __init__(self,callback):
        Peripheral.__init__(self,"28:A1:83:E1:58:96")
        callbackFunc = callback
        self.setDelegate( NtfyDelegate(btle.DefaultDelegate,callback))

    def setSensor(self):
        # モーション(動き)検知 100ms間隔(モーション系センサのみ)
        # alps.writeCharacteristic(0x0018, struct.pack('<bbb', 0x20, 0x03, 0x00), True)
        # alps.writeCharacteristic(0x0018, struct.pack('<bbb', 0x20, 0x03, 0x01), True)

        self.writeCharacteristic(0x0013, struct.pack('<bb', 0x01, 0x00), True)
        self.writeCharacteristic(0x0016, struct.pack('<bb', 0x01, 0x00), True)

        self.writeCharacteristic(0x0018, struct.pack('<bbb', 0x2F, 0x03, 0x03), True)
        self.writeCharacteristic(0x0018, struct.pack('<bbb', 0x01, 0x03, 0x03), True)
        self.writeCharacteristic(0x0018, struct.pack('<bbb', 0x04, 0x03, 0x01), True)
        self.writeCharacteristic(0x0018, struct.pack('<bbbb', 0x06, 0x04, 0x64, 0x00), True)  # 100msec

        self.writeCharacteristic(0x0018, struct.pack('<bbb', 0x2F, 0x03, 0x01), True)
        self.writeCharacteristic(0x0018, struct.pack('<bbb', 0x20, 0x03, 0x01), True)
閾値定義ファイル「constant.conf」
計算したピッチ、ロール、ヘディングがあらかじめ決められた範囲に入ったかを調べるために使用する閾値「thresholdAngl」は次のように設定されます。単位は「°」で、ピッチとロールは0°を中心とした絶対値の角度で示し、ヘディングは0°を中心として時計回りと反時計まわりの角度で示します。この値はプログラム起動時に読み込まれます。
# 閾値データ
[THRESHOLD]
thresholdAngl= 10
プログラムの実行
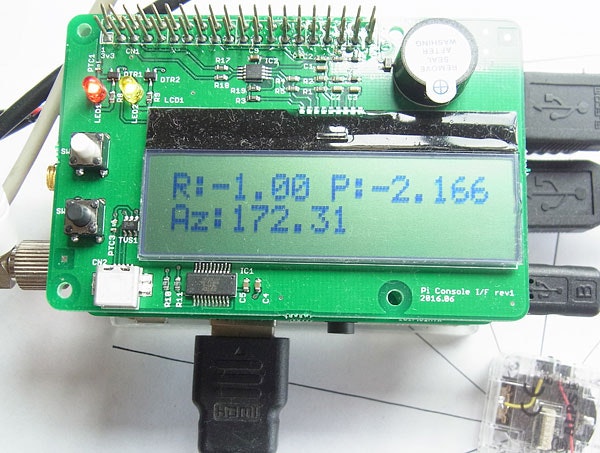
プログラムを実行し、アルプスIoT Smart Moduleを水平に置き、ヘッディングを0°を挟んで350°~10°の範囲にすると、PiConsole I/Fの電子ブザーが鳴ります。また、円周を30°で分割した目盛上にアルプスIoT Smart Moduleを置いて回転させると、それに伴いPiConsole I/Fのテキスト表示ディスプレイのヘディングが変化します。ピッチ方向に傾けて0±10°以下になるとLED(黄)が点灯し、ロール方向に傾けて0±10°以下になるとLED(赤)が点灯します。
PiConsole I/Fのテキスト表示ディスプレイの表示と、LEDの表示を次に示します。「R」はロール、「P」はピッチ、「Az」はヘディングを示します。
また、実行画面に表示されるロール、ピッチ、ヘディングの計算結果を次に示します。
$ python actionmain.py
Roll:-0.913 Pitch:-2.199 Heading:172.232
Roll:0.913 thresholdAngl:10.000
Roll:-0.913 Pitch:-2.405 Heading:172.427
Roll:0.913 thresholdAngl:10.000
Roll:-0.956 Pitch:-2.244 Heading:172.255
Roll:0.956 thresholdAngl:10.000
Roll:-1.204 Pitch:-2.406 Heading:172.674
Roll:1.204 thresholdAngl:10.000
Roll:-0.952 Pitch:-2.275 Heading:172.906
Roll:0.952 thresholdAngl:10.000
Roll:-1.001 Pitch:-2.127 Heading:173.081
Roll:1.001 thresholdAngl:10.000
Roll:-1.124 Pitch:-2.205 Heading:172.412
Roll:1.124 thresholdAngl:10.000
Roll:-0.878 Pitch:-2.088 Heading:171.820
Roll:0.878 thresholdAngl:10.000
Roll:-1.080 Pitch:-2.284 Heading:172.091
Roll:1.080 thresholdAngl:10.000
Roll:-0.998 Pitch:-2.161 Heading:173.172
Roll:1.041 thresholdAngl:10.000
Roll:-1.041 Pitch:-2.455 Heading:173.014
Roll:1.041 thresholdAngl:10.000
Roll:-0.959 Pitch:-2.167 Heading:173.473
Roll:0.959 thresholdAngl:10.000
Roll:-0.917 Pitch:-2.207 Heading:173.490
Roll:0.917 thresholdAngl:10.000
Roll:-0.956 Pitch:-2.118 Heading:173.107
Roll:0.953 thresholdAngl:10.000
Roll:-0.921 Pitch:-2.218 Heading:173.077
Roll:0.921 thresholdAngl:10.000
Roll:-0.915 Pitch:-2.161 Heading:172.723
Roll:0.915 thresholdAngl:10.000
^Cexithandler !!
(4, 'Interrupted system call') error occurred
Exception btle.BTLEException: BTLEException() in <bound method AlpsSensor.__del__ of <alpsaction.AlpsSensor instance at 0x767684b8>> ignored