Raspberry Pi 3に3GPI(Raspberry Pi向け3G通信モジュール)を接続し、環境センサモジュール「BME280」の環境(温湿度・気圧)データを、HTTPSプロトコルを用いてAzure IoT Hubに送信します。Raspberry Pi 3に実装されるAzure IoT Hub用のプログラムは、Microsoft Azure IoT device SDK for Cを使用します。3GPIは、Azure IoT Certified device を取得しており、同梱されている接続設定済Raspbian入microSDカードにより、Raspberry Pi 3を起動すると、3GPIを使用してPPP接続が可能となり、Microsoft Azure IoT device SDK for Cをダウンロードすることにより、Azure IoT Hubに接続可能なプログラムが開発できることが保証されています。Microsoft Azure、Device、Windows PC間の接続を次に示します

3GPIは、Raspberry Pi専用に開発された3G通信モジュールで、携帯電話網で通信するため、国内のほぼ全域で使用できます。3GPIのSIMカードに、今回はIoT向きの従量課金のSORACOM Airを利用します。3GPIにSORACOM AirのSIMカードを挿入すると、自動的にPPP接続によりIPアドレスが割り当てられ、簡単にネットワークへの接続が可能となります。
Azure IoT Hub へは、3GPIを使用して接続します。IoT Hubはあらかじ作成しておきます。BME280からの環境データは、HTTPSプロトコルにより3GPIからIoT Hubに転送し、DeviceExplorerに表示します。なおDeviceExplorerには、作成したIoT Hubをあらかじめ登録しておきます。
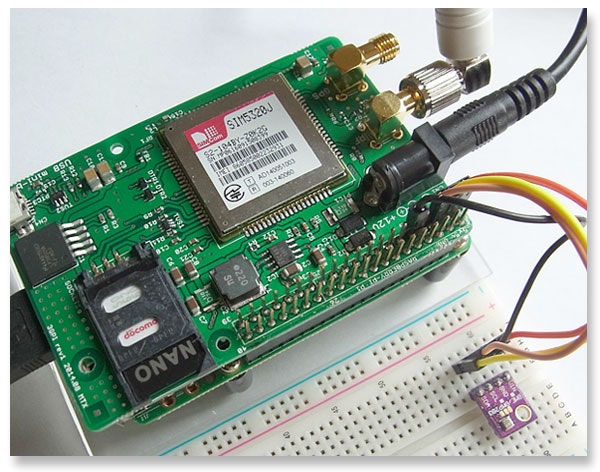
Raspberry Pi 3と3GPIとBME280の接続
次のようにRaspberry Pi 3に3GPIを接続し、BME280をI2Cインタフェースで接続します。Raspberry Pi 3と3GPIは40本のピンで接続し、USBケーブルで接続します。3GPIは標準SIMサイズのため、ナノSIMの場合、アダプターを付けて装着します。付属しているACアダプタを3GPIに接続すれば、Raspberry Pi本体にも電源が供給されます。BME280は、3GPIのボード上から出ているI2Cインタフェース用のpinに接続します。このpinはRaspberry Piの40本のpinと同じ接続になっています。詳細については、「3GPi on Raspberry Pi 2 + SORACOM Air SIMでインターネットに接続する」や「RaspberryPi 1 Model B で3GPIを使うにはニッパーが必要だって話」を参照してください。
3GPIが、Raspberry Pi 3に正常に接続されていることを、次のコマンドで確認します。3GPIは、USBデバイス「ttyUSB3」として認識されています。
# nmcli c
NAME              UUID                                  TYPE     DEVICE
gsm-3gpi-iij      38298e50-ec1f-4ebf-81cf-dd1d35e3acf0  gsm      --
gsm-3gpi-soracom  9c14b0aa-0cb8-4b08-8c02-08c73b95cabd  gsm      ttyUSB3
soracom3g         6a3d9e17-e66e-427e-9050-752d3b54283c  gsm      --
ppp0              5949063a-1e06-464b-816e-1ff055dd68d0  generic  ppp0
soracom3g         7498c543-444b-451d-b66d-d636311476f3  gsm      --
またBME280が、Raspberry Pi 3に正常に接続されていることを、次のコマンドで確認します。I2Cのポートが、「76」になっていることを確認します。
# i2cdetect -y 1
     0  1  2  3  4  5  6  7  8  9  a  b  c  d  e  f
00:          -- -- -- -- -- -- -- -- -- -- -- -- --
10: -- -- -- -- -- -- -- -- -- -- -- -- -- -- -- --
20: -- -- -- -- -- -- -- -- -- -- -- -- -- -- -- --
30: -- -- -- -- -- -- -- -- -- -- -- -- -- -- -- --
40: -- -- -- -- -- -- -- -- -- -- -- -- -- -- -- --
50: -- -- -- -- -- -- -- -- -- -- -- -- -- -- -- --
60: -- -- -- -- -- -- -- -- -- -- -- -- -- -- -- --
70: -- -- -- -- -- -- 76 --
次のコマンドで、PPP接続にIPアドレスが割り振られていることを確認します。ppp0に「10.180.248.128」が割り当てられています。
# ifconfig
eth0      Link encap:Ethernet  HWaddr b8:27:eb:84:4a:ba
          UP BROADCAST MULTICAST  MTU:1500  Metric:1
          RX packets:0 errors:0 dropped:0 overruns:0 frame:0
          TX packets:0 errors:0 dropped:0 overruns:0 carrier:0
          collisions:0 txqueuelen:1000
          RX bytes:0 (0.0 B)  TX bytes:0 (0.0 B)

lo        Link encap:Local Loopback
          inet addr:127.0.0.1  Mask:255.0.0.0
          inet6 addr: ::1/128 Scope:Host
          UP LOOPBACK RUNNING  MTU:65536  Metric:1
          RX packets:0 errors:0 dropped:0 overruns:0 frame:0
          TX packets:0 errors:0 dropped:0 overruns:0 carrier:0
          collisions:0 txqueuelen:0
          RX bytes:0 (0.0 B)  TX bytes:0 (0.0 B)

ppp0      Link encap:Point-to-Point Protocol
          inet addr:10.180.248.128  P-t-P:10.64.64.64  Mask:255.255.255.255
          UP POINTOPOINT RUNNING NOARP MULTICAST  MTU:1500  Metric:1
          RX packets:144 errors:0 dropped:0 overruns:0 frame:0
          TX packets:188 errors:0 dropped:0 overruns:0 carrier:0
          collisions:0 txqueuelen:3
          RX bytes:11464 (11.1 KiB)  TX bytes:13737 (13.4 KiB)

wlan0     Link encap:Ethernet  HWaddr b8:27:eb:d1:1f:ef
          UP BROADCAST MULTICAST  MTU:1500  Metric:1
          RX packets:47 errors:0 dropped:47 overruns:0 frame:0
          TX packets:0 errors:0 dropped:0 overruns:0 carrier:0
          collisions:0 txqueuelen:1000
          RX bytes:18732 (18.2 KiB)  TX bytes:0 (0.0 B)
各コマンドの実行結果はリダイレクトによりファイルに保存し、取得してます。
Azure IoT device SDKのコンパイル
Azure IoT device SDKをRaspberry Pi 3にダウンロードし、ソースファイルを編集して、ビルドを行い、HTTPプロトコルのサンプルプログラムの実行ファイルを作成します。以下のコマンドは。全てroot権限で実行します。なお、HTTPSプロトコルにより、IoT Hubに接続するために、必要となるHTTPSプロトコル用のサンプルソースの編集と、BME280用のセンサ情報収集プログラムについては、項目「Azure IoT Hubへの接続のためのソースコードの修正」に詳細を示します。
最初に、次のコマンドで、Raspberry PiにAzure IoT device SDKをダウンロードします。
# git clone --recursive https://github.com/Azure/azure-iot-sdks.git
フォルダ「./azure-iot-sdks」にSDKがコピーされたことを確認し、次のコマンドでディレクトリ「azure-iot-sdks」に移動します。
# cd azure-iot-sdks
次のコマンドを実行して環境を構築します。サンプルを実行するために必要な追加コンポーネントのインストールの問い合わせには、全て「y」と答えます。
# sudo c/build_all/linux/setup.sh
項目「Azure IoT Hubへの接続のためのソースコードの修正」に従って、IoT Hubに接続するためのHTTPSプロトコル用のサンプルソースコードの編集と、BME280用のセンサ情報収集プログラムを修正し、次のコマンドでサンプルアプリケーションをビルドします。
# ./c/build_all/linux/build.sh
HTTPプロトコルのサンプルプログラムの実行ファイル「iothub_client_sample_http」が、次のディレクトリに作成されていれば、ビルドは成功です。
# ls /root/cmake/iothub_client/samples/iothub_client_sample_http
Azure IoT Hubへの接続のためのソースコードの修正
コンパイルする前に、プライマリキー接続文字列の埋め込みと、BME280からのセンサ情報をメッセージに編集するために、ダウンロードしたソースコードを修正し、センサ情報をメッセージに編集するロジックを追加します。
サンプルプログラムへの接続文字列の埋め込み
ファイル「./c/iothub_client/samples/iothub_client_sample_http/iothub_client_sample_http.c」をエディタで開き、データ定義部分の次に示すコード「[device connection string]」を、項目「DeviceExplorerでのIoT Hubの設定」で取得したManagementタブの「Raspbian3GPI」の「ConnectionString」で置き換えます。
                              *
                              *
/*String containing Hostname, Device Id & Device Key in the format:                         */
/*  "HostName=<host_name>;DeviceId=<device_id>;SharedAccessKey=<device_key>"                */
/*  "HostName=<host_name>;DeviceId=<device_id>;SharedAccessSignature=<device_sas_token>"    */
static const char* connectionString = "[device connection string]";
                              *
BME280からのセンサ情報のメッセージ編集
環境センサモジュール「BME280」から環境(温湿度・気圧)データを読み取り、次のようにメッセージに編集します。詳細のセンサ情報収集プログラムは、raspberry pi 3でC言語による環境センサー「BME280」の接続のmain関数のコードを編集し、関数名を「bme280_main」、戻り値をchar*として、センサ情報をjson形式で編集した文字列とします。
void bme280_main(char* sensor)
{
    unsigned char osrs_t = 1;             //Temperature oversampling x 1

                       *
                       *
	hum_act = (double)hum_cal / 1024.0;
	sprintf(sensor, "{\"TEMP\": %.2f,\"PRESS\": %.2f,\"HUM\": %.2f}",temp_act,press_act,hum_act);
}
Azure IoT Hub に送信するメッセージは、ファイル「./c/iothub_client/samples/iothub_client_sample_http/iothub_client_sample_http.c」のiothub_client_sample_http_run関数を次のように編集して、「bme280_main」を組み込みます。
                       *
                       *
for (i = 0; i < MESSAGE_COUNT; i++)
{
//                    sprintf_s(msgText, sizeof(msgText), "{\"deviceId\": \"myFirstDevice\",\"windSpeed\": %.2f}", avgWindSpeed + (rand() % 4 + 2));
    bme280_main(msgText);
    if ((messages[i].messageHandle = IoTHubMessage_CreateFromByteArray((const unsigned char*)msgText, strlen(msgText))) == NULL)
    {
        (void)printf("ERROR: iotHubMessageHandle is NULL!\r\n");
    }
                       *
コンパイラに依存しないビルド自動化のコマンド「CMake」により、BME280用のセンサ情報収集プログラムもコンパイルしてリンクできるように、「./c/iothub_client/samples/iothub_client_sample_http/CMakeLists.txt」を次のように編集します。「bme280.c」をコンパイルの対象にし、BME280用のセンサ情報収集プログラムが、C言語ライブラリ「wiringPi」を使用しているため、target_link_libraries関数にライブラリ「wiringPi」を追加します。
                       *
                       *
if(WIN32)
	set(iothub_client_sample_http_c_files ${iothub_client_sample_http_c_files} ./windows/main.c)
else()
	set(iothub_client_sample_http_c_files ${iothub_client_sample_http_c_files} bme280.c ./linux/main.c)
endif()

                       *

target_link_libraries(iothub_client_sample_http
# iothubclient is here only because locking... in gballoc no less.
	iothub_client
	iothub_client_http_transport
	wiringPi
)
                       *
Azure IoT Hubの作成・登録
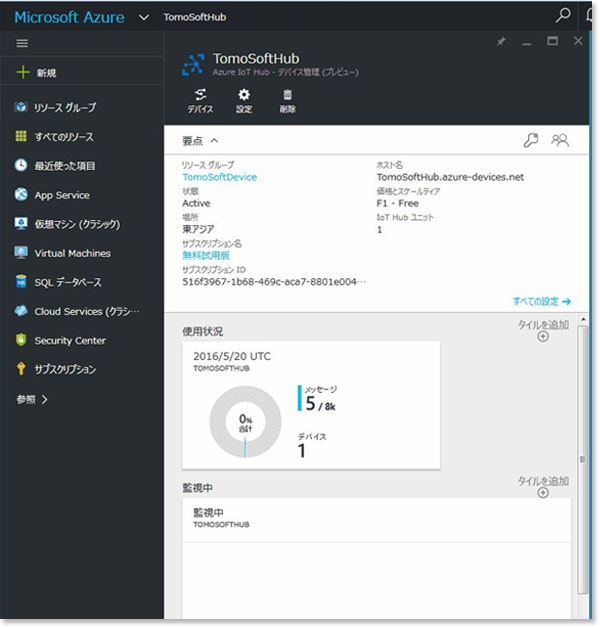
あらかじめ作成しておいたMicrosoftのアカウントを用いて、Azure ポータルサイトにアクセスします。IoT Hubを作成するには、左側メニューより「新規」を選択して、「Azure IoT Hub」を選択し、必要な設定を行います。作成が完了すると、ダッシュボードに作成したIoT Hubが表示されるので、クリックすると次の画面が表示されます。

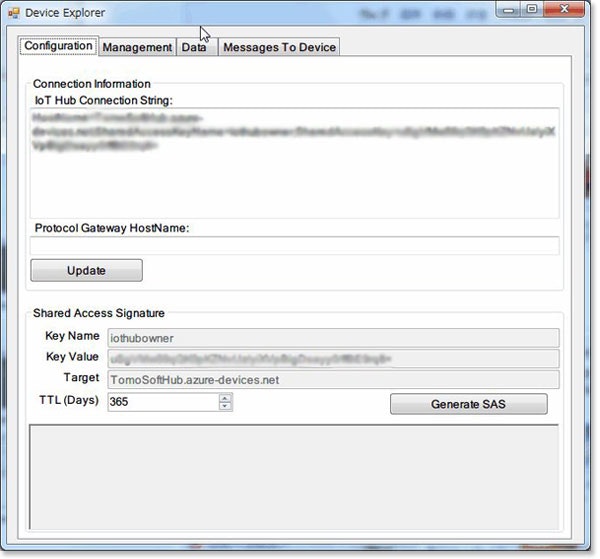
DeviceExplorerで使用するプライマリキー接続文字列は、「設定」より「共通アクセスポリシー」を選択し、「iothubowner」をクリックして、「プライマリキー接続文字列」に表示される内容を使用します。
DeviceExplorerでのIoT Hubの設定
「Azure IoT HubでDeviceExplorerの使用方法 」に従ってインストールしたDeviceExplorerを実行して、Configurationタブの「IoT Hub Connection String」に項目「Azure IoT Hubの作成・登録」で取得した「プライマリキー接続文字列」を設定して、Updateボタンを押すと、「Shared Access Signature」にKey NameやValueの値が表示されます。次に、Managementタブを選択してCreateボタンを押し、「Device ID」に適当な名前を入れてCreateボタンを押すと、「Devices」にデバイスが新規に追加されます。今回はDevice IDを「Raspbian3GPI」にしました。この生成されたデータの一部「ConnectionString」を、項目「サンプルプログラムへの接続文字列の埋め込み」で示すサンプルプログラムの「device connection string」に設定します。
Azure IoT Hub への環境データの送信
Raspberry Pi 3が、BME280から環境データを取得し、SORACOM Airを利用した3GPIを経由して、Azure IoT Hubに環境データを送信し、DeviceExplorerに表示します。
最初にAzure ダッシュボードから作成したIoT Hubを起動しておきます。次にDeviceExploreのDataタブを選択し、Monitorボタンを押します。そしてRaspberry Pi 3から、作成したHTTPプロトコルのサンプルプログラムを、次のコマンドで実行します。
# ./cmake/iothub_client/samples/iothub_client_sample_http/iothub_client_sample_http
DeviceExplorerのDataタブに、受信した環境データが次のように表示されます。
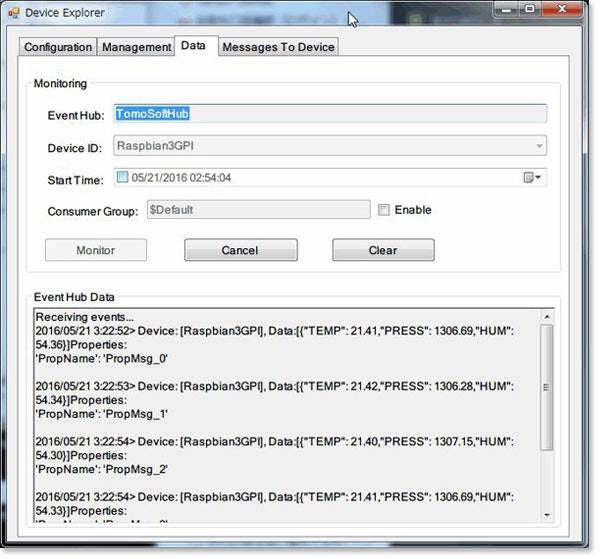
DeviceExplorerのDataタブのEventHubDataに表示されたデータを、次に示します。サンプルプログラムに設定したBME280からの環境データの他に、タイムスタンプおよびDevice IDが付与されています。
Receiving events...
2016/05/21 3:22:52> Device: [Raspbian3GPI], Data:[{"TEMP": 21.41,"PRESS": 1306.69,"HUM": 54.36}]Properties:
'PropName': 'PropMsg_0'

2016/05/21 3:22:53> Device: [Raspbian3GPI], Data:[{"TEMP": 21.42,"PRESS": 1306.28,"HUM": 54.34}]Properties:
'PropName': 'PropMsg_1'

2016/05/21 3:22:54> Device: [Raspbian3GPI], Data:[{"TEMP": 21.40,"PRESS": 1307.15,"HUM": 54.30}]Properties:
'PropName': 'PropMsg_2'

2016/05/21 3:22:54> Device: [Raspbian3GPI], Data:[{"TEMP": 21.41,"PRESS": 1306.69,"HUM": 54.33}]Properties:
'PropName': 'PropMsg_3'

2016/05/21 3:22:54> Device: [Raspbian3GPI], Data:[{"TEMP": 21.42,"PRESS": 1306.25,"HUM": 54.35}]Properties:
'PropName': 'PropMsg_4'
Raspberry Pi 3で出力されたメッセージを次に示します。5個のメッセージが転送され、いずれも送信結果がOKになっていることが確認できます。
Starting the IoTHub client sample HTTP...

Info: IoT Hub SDK for C, version 1.0.6

IoTHubClient_LL_SetMessageCallback...successful.

IoTHubClient_LL_SendEventAsync accepted message [0] for transmission to IoT Hub.

IoTHubClient_LL_SendEventAsync accepted message [1] for transmission to IoT Hub.

IoTHubClient_LL_SendEventAsync accepted message [2] for transmission to IoT Hub.

IoTHubClient_LL_SendEventAsync accepted message [3] for transmission to IoT Hub.

IoTHubClient_LL_SendEventAsync accepted message [4] for transmission to IoT Hub.

Confirmation[0] received for message tracking id = 0 with result = IOTHUB_CLIENT_CONFIRMATION_OK

Confirmation[1] received for message tracking id = 1 with result = IOTHUB_CLIENT_CONFIRMATION_OK

Confirmation[2] received for message tracking id = 2 with result = IOTHUB_CLIENT_CONFIRMATION_OK

Confirmation[3] received for message tracking id = 3 with result = IOTHUB_CLIENT_CONFIRMATION_OK

Confirmation[4] received for message tracking id = 4 with result = IOTHUB_CLIENT_CONFIRMATION_OK

^C
#
Raspberry Pi 3の出力されたメッセージを保存した実行ログは、scriptコマンドを使用して取得しています。
Azure IoT Hubでデータの送信を確認すると、次のように5個のメッセージの送信を確認できます。
参照URL
-
Run a simple C sample on Raspberry Pi 2 device running Raspbian
Raspberry Pi上でMicrosoft Azure IoT device SDK for Cをダウンロードしてコンパイル・実行する方法 -
Azure IoT Hubを使ってみた
Azure IoT Hubの作成・登録およびDeviceExplorerでのIoT Hubの設定方法