
やりたいこと
- [chenge photo]ボタンを押すと、カメラロールが起動して写真を選択できる
- 選択した写真が、UIimageViewに表示される
- [send]ボタンを押すと、画像がParse上のDBに保存される
実によくありそうなシチュエーションなんですが、
iOSはなかなか資料が見つからないですね・・
これがThe Best Wayかはともかく、自分なりに導いた答えを記録しておきます。
環境
・Xcode 6.1
・シミュレータ:iOS8.0 & iPhone6
・objective-C 使用
1.ストーリーボードの設定
画像入力に必要な要素は2つ
・UIImageView (カメラロールで選択された写真を表示する)
・UIButton:Chenge Photo (カメラロール起動用)
・UIButton:send (データ保存用)
※ 画像以外の要素については別途解説
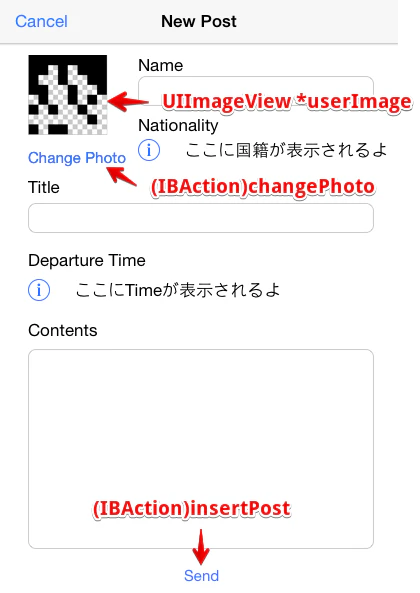
UIimageViewはプロパティとして、
UIButtonはActionメソッドとして接続します。
@property (weak, nonatomic) IBOutlet UIImageView *userImage;
- (IBAction)changePhoto:(id)sender;

- (IBAction)insertPost:(id)sender;
2.UIImagePickerControllerでカメラロール呼び出し
コピペさせていただきましたmm
カメラロール起動→写真選択までの動きは、すでに用意されているので使っちゃいましょう。
まずはDelegateを追加
@interface AddPostViewController ()<UIImagePickerControllerDelegate, UINavigationControllerDelegate>
 ・・・
@end
つづいて、カメラロールを起動するコードをかきます。
ストーリーボードで設定した、[Change Photo]ボタンが押された時のアクションの中に、下記のコードをぶちこみます。(私もコピペしましたw)
// カメラロールの起動と画像選択処理
- (IBAction)changePhoto:(id)sender {
    UIImagePickerControllerSourceType sourceType
    = UIImagePickerControllerSourceTypePhotoLibrary;
    if ([UIImagePickerController isSourceTypeAvailable:sourceType]) {
        UIImagePickerController *picker = [[UIImagePickerController alloc] init];
        picker.sourceType = sourceType;
        picker.delegate = self;
        [self presentViewController:picker animated:YES completion:NULL];
    }
}
この時点で起動してみると、カメラロールが立ち上がるはず!
でもこのままでは画像を選択したあとになんの処理もされないので、
画像選択後に何をすべきかを書いていきましょう。
今回の画像選択の目的は、
①UIimageViewにセットしたい
②Parseに保存したい
のふたつですね。
// 画像選択後の処理
- (void)imagePickerController:(UIImagePickerController *)picker
didFinishPickingMediaWithInfo:(NSDictionary *)info
{
    UIImage *image = [info objectForKey:UIImagePickerControllerOriginalImage];
	 // カメラロールの画面が閉じられたあとの処理を記述
    [self dismissViewControllerAnimated:YES completion:^{
        // ①選択した画像をUIimageViewに表示
        self.userImage.image = image;
        // ②Parseに保存するため、Data型にコンバートして格納
        self.imgData = UIImageJPEGRepresentation(image, 0.5f);
    }];
}
②にある0.5fは画質を半分にするという意味だそうです。
この時点で写真を選ぶと、UIimageViewへの表示はできているはず。
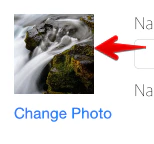
あとは、Data型に変えたimageデータを、ParseのDBに保存しましょう!
3.ParseのDBに保存
PFFileを生成して画像を保存します
参考:How to upload an image to Parse.com from UIImageView
PFFileについてはこれがわかりやすい→[Parse][iOS] PFFileの使い方
sendボタンを押した時の処理に、PFFileに変換してからPFObjectに入れてsaveします
- (IBAction)insertPost:(id)sender {
	PFObject *insertObject = [PFObject objectWithClassName:@"Post"];
	・・・
	// imgDataから、Image.jpgという名前でPFFileを生成
    PFFile *imageFile = [PFFile fileWithName:@"image.jpg" data:self.imgData];
	// 作ったimageFileを、PFObjectの一部として保存
    insertObject[@"userImg"] = imageFile;
	・・・
	// 作ったPFObjectをParseに保存
    [insertObject saveInBackgroundWithBlock:^(BOOL succeeded, NSError *error) {
        if (!error) {
            NSLog(@"Save成功");
        }
        else{
            NSLog(@"Error: %@ %@", error, [error userInfo]);
        }
    }];

    // まえの画面(Post一覧)に遷移
    [self dismissViewControllerAnimated:YES completion:nil];
}
ParseのCoreにアクセスしてみると、image.jpgという名前で画像が挿入されているのがわかります。
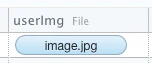
今回は画像のINSERTまでなのでここまで!
他の要素のINSERT方法、取得方法も随時アップします〜