前置き
人の声に応じていい具合に光るものを作って欲しいという依頼があったので,ここにメモとして残しておきます.
開発環境
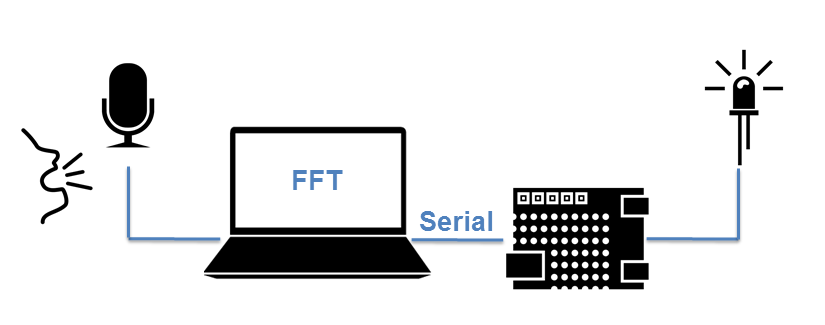
手軽にLEDを光らせるために,今回はArduino Unoを用いました.また,マイクから入力された声に反応させるためには,ある程度の解析が必要になるので,Arduino上ではなく,openFrameworksで音声解析したものをシリアル通信で送ることにしました.
OS: windows7 64bit
IDE: visual studio 2015
Arduino: 1.6.8
openFrameworks: 0.9.0
使用したLEDはこちらのカラーLEDです.
oF側
oFでは,マイクから入力した音声をFFTにかけて解析,特定の周波数成分に応じたパラメータをArduino側にシリアルで送ります.
FFT
FFTとはFast Fourier Transform(高速フーリエ変換)のことです.oFではアドオンとしてofxFftが使えます.また単純に音源をFFTしたいときは標準クラスのofSoundPlayerのメソッドofSoundGetSpectrum()を使えるようです.今回は,マイク入力をより簡単に扱いたかったので,oFフォーラム内のこのサンプルを参考にさせて頂きました.
まず音周りの設定をします.
//outputは0チャンネル,inputは1チャンネルに設定
ofSoundStreamSetup(0, 1, this, 44100, buffer_size, 4);
フォーラムで参考にしたFFTクラスのインスタンスmyfftを生成して,音が鳴ると呼び出されるofApp::audioReceived内に以下のようにすると,magnitudeに結果が入ります.
myfft.powerSpectrum(0, (int)fft_size, audio_input, buffer_size,
        magnitude, phase, power, &avg_power);
シリアル通信
Arduino側にFFTの結果を逐次送るためにシリアル通信を行います.今回はofxSimpleSerialというアドオンを用いました.以下のような感じ.
serial.setup("COM9", 9600); //Setup()内でArduinoのポート番号と通信速度を設定
serial.writeByte(value); //byte型の値を送る
例えば3つの値を送る場合は,後でArduino側で識別するためにヘッダを付けます.
//例えば帯域に分けて送りたい場合
serial.writeString("H");
serial.writeByte(valueLow);
serial.writeByte(valueMid);
serial.writeByte(valueHigh);
Arduino側
Arduinoでは,シリアルでパラメータを逐次受け取り,それをもとにLEDの輝度を変化させます.
Adafruit Neopixel ライブラリの使用
カラーLEDを比較的簡単に制御できるライブラリがあったのでこれを利用します.使用法はここやライブラリのソースに詳しく載っています.
シリアル通信
oFからの信号を受信します.前述のように複数の値を送っている場合,ヘッダで認識します.
int low, mid, high;
if(Serial.available() >= sizeof('H') + sizeof(byte)*3){
  if(Serial.read() == 'H'){
    low = Serial.read();
    mid = Serial.read();
    high = Serial.read();
  }
}
今回は13番ピンに6個のLEDを直列に繋ぎました.以下のような感じに.
#include <Adafruit_NeoPixel.h>
#include <string.h>

#define LED_OUTPIN 13
#define NUM_LED 6
Adafruit_NeoPixel RGBLED = Adafruit_NeoPixel(NUM_LED, LED_OUTPIN, NEO_RGB + NEO_KHZ800);

void setup() {
  Serial.begin(9600);
  RGBLED.begin();
  RGBLED.show();
}

void loop() {
  int low, mid, high;
  if(Serial.available() >= sizeof('H') + sizeof(byte)*3){
    if(Serial.read() == 'H'){
      low = Serial.read();
      mid = Serial.read();
      high = Serial.read();
    }

    for(int i = 0; i < 6; i++){
      if(high > 245) high = 245;
      RGBLED.setBrightness(10 + high);
      int r = 250 - 40 * i;
      int g = 10 + 40 * i;
      int b = abs(sin(2*PI/30000*millis())) * 200;
      RGBLED.setPixelColor(i, r, g, b);
      RGBLED.show();
    }
  }
}
テストの様子
実際に光らせている様子がこちら.
![]()
