みなさん、こんにちはこんばんは!
株式会社情創 技術開発局
贅肉を気にし始めた @TEBASAKI です。
今回は Thymeleaf Layout Dialect について解説していきます。
Thymeleaf Layout Dialect とは
これまでは html のヘッダーやナビゲーション、フッターなどの各ページの共通部分は、それぞれの html ファイルに記述しており、管理するのが面倒でした。
テンプレートエンジンThymeleaf の Thymeleaf Layout Dialect は、テンプレートの再利用を可能にします。この機能を使用することで、共通部分はベースとするテンプレートページとして管理でき、そこに各ページのコンテンツデータを埋め込んで各コンテンツのページを生成できます。
base の概念
共通部分の変更の際にすべての html ファイルを変更するのは非常に手間がかかります。
そこで共通部分を base として管理し、コンテンツ部分については別に作成します。
そして base にコンテンツ部分を埋め込むことで、実際に表示するページを作成します。
これにより共通部分は base を変更するだけで済みます。
Decorator と Fragment
Thymeleaf Layout Dialect では base の部分を Decorator 、コンテンツ部分を Fragment と表現します。
Decorator と Fragment についてのイメージは以下の通りです。
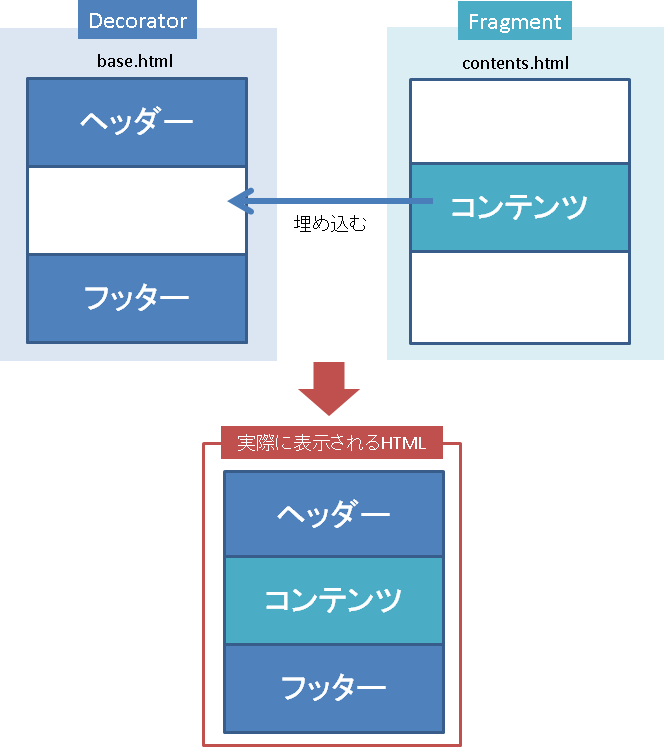
Decorator のコンテンツ表示部分に Fragment を埋め込み、組み合わせて一つのページにします。
Decorator である base.html と、Fragment である contents.html の詳細については後述の実装部分で解説します。
実装
実装の流れをデモを使って説明していきます。
Thymeleaf Layout Dialect を使用するために
Thymeleaf Layout Dialect は Thymeleaf の機能の一つなので、build.gradle は第15回のものを使えば利用できます。
しかし Decorator と Fragment には、それぞれ役割に応じた記述が必要です。
base.html
先述した通り base にはヘッダーやナビゲーション、フッターなど、各コンテンツページの共通部分を記述します。
今回使用する base は下記の通りです。
<!DOCTYPE html>
<html xmlns           ="http://www.w3.org/1999/xhtml"
      xmlns:th        ="http://www.thymeleaf.org"
      xmlns:layout    ="http://www.ultraq.net.nz/thymeleaf/layout">
<head>
    <meta http-equiv="Content-Type"    content="text/html; charset=UTF-8">
    <title>thymeleaf base</title>
</head>
<body>
    <!-- header -->
    <header>
        <div align="center" >header</div>
        <hr />
    </header>

    <!-- contents -->
    <div layout:fragment="content">Contents is here!</div>

    <!-- footer -->
    <footer>
        <hr />
        <div align="center">footer</div>
    </footer>
</body>
</html>
<html>
Thymeleaf Layout Dialect では layout 属性を使用するので、html タグで名前空間を指定します。
<head>
head タグ内に記載した内容は title タグを除きコンテンツを埋め込む際に出力されるので、contents.html で再度記述する必要はありません。
<body>
内容はシンプルにするため、ヘッダー、コンテンツ表示部分、フッターのみとしました。
コンテンツの表示部分は layout:fragment 属性を指定します。
このタグで囲まれた"Contents is here!"の部分が、 後述する Fragment において layout:fragment="content" の属性を持つ部分に置き換わります。
なお、Fragment で 同じ属性値をもつタグが存在しなかった場合、デフォルトで"Contents is here!"が表示されます。
コンテンツの html
Decorator に埋め込むコンテンツを記述します。
<!DOCTYPE html>
<html xmlns           ="http://www.w3.org/1999/xhtml"
      xmlns:th        ="http://www.thymeleaf.org"
      xmlns:layout    ="http://www.ultraq.net.nz/thymeleaf/layout"
      layout:decorator="base">
<head>
    <title>Contents</title>
</head>
<body>
    <div layout:fragment="content">
        <!-- コンテンツ内容 ここから -->
        <table class="table">
            <thead class="sunflower">
                <tr>
                    <td>ID</td>
                    <td>NAME</td>
                </tr>
            </thead>
            <tbody th:each="list : ${beans}">
                <tr>
                    <td class="text-str" th:text="${list.id}"></td>
                    <td class="text-str" th:text="${list.name}"></td>
                </tr>
            </tbody>
        </table>
        <!-- コンテンツ内容 ここまで -->
    </div>
</body>
</html>
<html>
Fragment では埋め込み先の Decorator を指定する必要があります。
html タグの layout:decorator 属性に Decorator のファイル名を設定します。
拡張子は必要ありません。
今回は先述した base.html を指定しています。
<head>
タイトルは基本的には Fragment で指定したものが優先されます。
<body>
<div layout:fragment="content">で囲まれた部分が実際に埋め込まれる部分となります。
今回は第15回と同様のテーブルデータを表示しています。
動作確認
実行して動作を確認してみます。
コントローラの記述
TestController.java を以下のように変更します。
変更箇所は、第15回の home メソッドの返り値だけです。
package com.qiita.demo.web.controller;

import java.util.List;

import org.springframework.beans.factory.annotation.Autowired;
import org.springframework.stereotype.Controller;
import org.springframework.ui.Model;
import org.springframework.web.bind.annotation.RequestMapping;

import com.qiita.demo.domain.tbl.TestBean;
import com.qiita.demo.service.test.TestService;


@Controller
public class TestController {

    @Autowired
    private TestService testService;

    @RequestMapping("/test")
    public String home(Model model) {
        List<TestBean> list = testService.selectAll();
        model.addAttribute("beans", list);
        return "contents";
    }
}
呼び出す html ファイルは Fragment を指定します。
Fragment 内で Decorator を指定しているので、Fragment を呼べば自動的に埋め込みが行われます。
ビルド&実行
前回までと同様にプロジェクトを右クリック→Gradleから、すべてリフレッシュを行い、bootRun で実行します。
http://localhost:8080/test にアクセスすると以下の画面が表示されます。
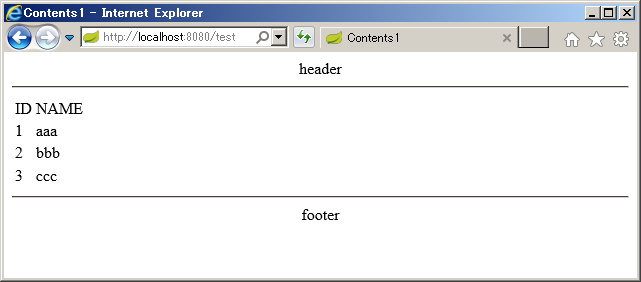
画面のコードを表示してみると、Decorator に Fragment が埋め込まれていることが確認できます。

以上のように、Thymeleaf Layout Dialect を使えば大量のhtmlファイルを修正する手間が省け、作業が捗ります。
今回はここまでです。
最後まで読んでいただき、ありがとうございました。
それではみなさん、またお会いしましょう!