こんにちは @sho5nn です。
この記事は [Android Advent Calendar 2014] (http://qiita.com/advent-calendar/2014/android) の9日目の記事です。ご覧いただきありがとうございます。
今日は以下の3つをお話したいと思います。
- Material design / Shadow とは
- Shadow をより Shadow に
- Shadow をより Shadow にして得たノウハウなど
Material design / Shadow とは
Material design
Google I/O 2014 にて Google が提唱したデザインガイドラインです。プラットフォームやデバイスを限定することなく、原則に基づいて一貫性のある体験をユーザーに提供します。詳しくは以下のリンクや、その他の解説サイトをご覧ください。
- http://www.google.com/design/spec/material-design/introduction.html
- http://static.googleusercontent.com/media/www.google.com/ja//design/material-design.pdf
Shadow
Material design では、UI のメタファーの1つに「紙」を取り入れており、それを表現する要素の1つに Shadow があります。

Shadow 描画時に参考になる値を記載した画像が、http://www.google.com/design/spec/material-design/introduction.html の中にあったのですが、何故か現在は見当たらないので、以下に載せておきます。(もしかしたら非推奨になったのかも…?)

上記の画像で説明すると、Shadow は TopShadow と BottomShadow の 2枚のレイヤーに分かれて構成されています。z-depth = 5 を例にすると以下のようになります。

微妙に異なる値の Shadow が重なることで、他のマテリアルとの関係性を明確に示しながら空間を創り出す Shadow となります。
Shadow の描画方法
API level:21
API level:21 で追加された android.view.View#setElevation(float) を使えば簡単に実現可能です。面倒な 9-patch 画像の用意も、gradient を埋め込んだ shape を定義した hoge.xml を drawable フォルダにぶち込む必要もありません!やったね!
API level:20 以下
Api level:20 以下では、たとえ [android.support.v4.view.ViewCompat#setElevation(View, float)](http://developer.android.com/reference/android/support/v4/view/ViewCompat.html#setElevation(android.view.View, float)) を呼び出しても 何も起こりません。 ViewCompat クラスをご覧頂ければわかりますが、setElevation(View, float) が実装されていないからです…
http://www.reddit.com/r/androiddev/comments/2kd843/so_how_are_you_guys_doing_with_your_current/
9-patch 画像や、 hoge.xml を drawable フォルダにぶち込むなど、従来の方法であれば実現可能です。
Shadow をより Shadow に
Movement of material には、以下の文章が記述されています。
Material can move along any axis.
マテリアルは X,Y,Z 軸に沿って移動することが可能です。

Z 軸に沿って移動すれば当然 Shadow も変化します。

しかし、例えば単純に Shadow を z-depth=1 から 5 へ瞬間的に変化しただけでは、Material design の原則の1つである Motion provides meaning には程遠くなります。Shadow もアニメーションをしながら変化することで、より良い体験をユーザーに与えます。
例として、z-depth 1 から 5 へアニメーションをさせる場合、 TopShadow と BottomShadow それぞれの変化する値は以下になります。
Top Shadow の変化
| z-depth 1 | z-depth 5 | |
|---|---|---|
| color | 12% black | 30% black |
| y - offset | 1dp | 19dp |
| blur | 1.5dp | 19dp |
Bottom Shadow の変化
| z-depth 1 | z-depth 5 | |
|---|---|---|
| color | 24% black | 22% black |
| y - offset | 1dp | 15dp |
| blur | 1dp | 6dp |
しかし、Shadow の描画方法によってはそれを表現することが難しく、私はいろいろと模索をしたのですが、とてつもなく頭が爆発しそうでした。
9-patch 画像で Shadow を描画してるなら…
9-patch 画像では、描画サイズに応じて伸縮はしますが、Blur (ぼかし) 効果や y軸のオフセットまでは変化させられません。color は、alpha を弄ればなんとかなりそうな気もしますが…頭が爆発します。
<shape> タグを用いた hoge.xml を読み込んで ShapeDrawable として描画しているなら…
<layer-list> タグで <shape> を何個も重ねたり <gradient> タグを駆使したりして、擬似的に Blur 効果を表現することは可能ですが、動的な変化をさせるとなると…頭が爆発します。
そこで私は、半ば強引な心意気で、Shadow の動的な変化を可能とする実装を試みました。
ZDepthShadowLayout
ソースコードはこちら
gif のため Blur 効果の見栄えが悪いですが実機では問題なく綺麗に Blur ってます

使い方はこんな感じです。
<RelativeLayout
    xmlns:android="http://schemas.android.com/apk/res/android"
    xmlns:shadow="http://schemas.android.com/apk/res-auto"
    android:layout_width="match_parent"
    android:layout_height="match_parent">

    <app.mosn.zdepthshadowlayout.ZDepthShadowLayout
        android:layout_width="wrap_content"
        android:layout_height="wrap_content"
        shadow:z_depth="z_depth1"
        shadow:z_depth_shape="rect"
        shadow:z_depth_padding="z_depth5">

        <TextView
            android:layout_width="wrap_content"
            android:layout_height="wrap_content"
            android:padding="16dp"
            android:text="Change ZDepth"
            android:background="@android:color/white"/>

    </app.mosn.zdepthshadowlayout.ZDepthShadowLayout>

</RelativeLayout>
Shadow を付けたい View を、ZDepthShadowLayout に内包します。
実際に Shadow の描画を担っているのは ShadowView であり、ZDepthShadowLayout は自動的に ShadowView を index 0 へ addView します。

Attribute の指定は以下のものがあります。
<app.mosn.zdepthshadowlayout.ZDepthShadowLayout
    shadow:z_depth="z_depth1"
    shadow:z_depth_shape="rect"
    shadow:z_depth_padding="z_depth5"
    shadow:z_depth_animDuration="150"
    shadow:z_depth_doAnim="true" />
| Attribute | 説明 |
|---|---|
| z-depth | Shadow の深さ |
| z_depth_shape | Shadow の形 |
| z-depth_animDuration | z-depth 変更時のアニメーション時間 |
| z-depth_doAnim | z-depth 変更時のアニメーション可否 |
| z-depth_padding | Blur を描画するのに必要な余白 |
| z-depth_paddingLeft | Blur を描画するのに必要な左側の余白 |
| z-depth_paddingTop | Blur を描画するのに必要な上側の余白 |
| z-depth_paddingRight | Blur を描画するのに必要な右側の余白 |
| z-depth_paddingBottom | Blur を描画するのに必要な下側の余白 |
<?xml version="1.0" encoding="utf-8"?>
<resources>
    <declare-styleable name="ZDepthShadowLayout">
        <attr name="z_depth" format="enum">
            <enum name="z_depth0" value="0"/>
            <enum name="z_depth1" value="1"/>
            <enum name="z_depth2" value="2"/>
            <enum name="z_depth3" value="3"/>
            <enum name="z_depth4" value="4"/>
            <enum name="z_depth5" value="5"/>
        </attr>
        <attr name="z_depth_shape" format="enum">
            <enum name="rect" value="0"/>
            <enum name="oval" value="1"/>
        </attr>
        <attr name="z_depth_padding" format="enum">
            <enum name="z_depth0" value="0"/>
            <enum name="z_depth1" value="1"/>
            <enum name="z_depth2" value="2"/>
            <enum name="z_depth3" value="3"/>
            <enum name="z_depth4" value="4"/>
            <enum name="z_depth5" value="5"/>
        </attr>
        <attr name="z_depth_animDuration" format="integer"/>
        <attr name="z_depth_doAnim" format="boolean"/>
    </declare-styleable>
</resources>
android.support.v7.widget.Toolbar にも対応
多少やっつけ感はありますが、左右と上部の padding を無くすことで android.support.v7.widget.Toolbar にも対応できます。
<app.mosn.zdepthshadowlayout.ZDepthShadowLayout
    android:id="@+id/zDepthShadowLayout_toolBar"
    android:layout_width="match_parent"
    android:layout_height="wrap_content"
    android:layout_alignParentTop="true"
    shadow:z_depth="z_depth1"
    shadow:z_depth_shape="rect"
    shadow:z_depth_paddingLeft="z_depth0"
    shadow:z_depth_paddingTop="z_depth0"
    shadow:z_depth_paddingRight="z_depth0"
    shadow:z_depth_paddingBottom="z_depth5">

    <android.support.v7.widget.Toolbar
        android:id="@+id/toolBar"
        android:layout_width="match_parent"
        android:layout_height="wrap_content"
        android:minHeight="?attr/actionBarSize"
        android:background="?attr/colorPrimary"/>

</app.mosn.zdepthshadowlayout.ZDepthShadowLayout>
Animation
TopShadow と BottomShadow の color, y-offset, blur の各値を ValueAnimator を用いて変化させ、onAnimationUpdate が呼ばれるたびに invalidate() を呼び出して再描画しています。
protected void changeZDepth(ZDepth zDepth) {

    int   newAlphaTopShadow      = zDepth.getAlphaTopShadow();
    int   newAlphaBottomShadow   = zDepth.getAlphaBottomShadow();
    float newOffsetYTopShadow    = zDepth.getOffsetYTopShadowPx(getContext());
    float newOffsetYBottomShadow = zDepth.getOffsetYBottomShadowPx(getContext());
    float newBlurTopShadow       = zDepth.getBlurTopShadowPx(getContext());
    float newBlurBottomShadow    = zDepth.getBlurBottomShadowPx(getContext());

    if (!mZDepthDoAnimation) {
        mZDepthParam.mAlphaTopShadow        = newAlphaTopShadow;
        mZDepthParam.mAlphaBottomShadow     = newAlphaBottomShadow;
        mZDepthParam.mOffsetYTopShadowPx    = newOffsetYTopShadow;
        mZDepthParam.mOffsetYBottomShadowPx = newOffsetYBottomShadow;
        mZDepthParam.mBlurTopShadowPx       = newBlurTopShadow;
        mZDepthParam.mBlurBottomShadowPx    = newBlurBottomShadow;

        mShadow.setParameter(mZDepthParam, mZDepthPadding, mZDepthPadding, getWidth() - mZDepthPadding, getHeight() - mZDepthPadding);
        invalidate();
        return;
    }

    int   nowAlphaTopShadow      = mZDepthParam.mAlphaTopShadow;
    int   nowAlphaBottomShadow   = mZDepthParam.mAlphaBottomShadow;
    float nowOffsetYTopShadow    = mZDepthParam.mOffsetYTopShadowPx;
    float nowOffsetYBottomShadow = mZDepthParam.mOffsetYBottomShadowPx;
    float nowBlurTopShadow       = mZDepthParam.mBlurTopShadowPx;
    float nowBlurBottomShadow    = mZDepthParam.mBlurBottomShadowPx;

    PropertyValuesHolder alphaTopShadowHolder     = PropertyValuesHolder.ofInt("alphaTopShadow",
            nowAlphaTopShadow,
            newAlphaTopShadow);
    PropertyValuesHolder alphaBottomShadowHolder  = PropertyValuesHolder.ofInt("alphaBottomShadow",
            nowAlphaBottomShadow,
            newAlphaBottomShadow);
    PropertyValuesHolder offsetTopShadowHolder    = PropertyValuesHolder.ofFloat("offsetTopShadow",
            nowOffsetYTopShadow,
            newOffsetYTopShadow);
    PropertyValuesHolder offsetBottomShadowHolder = PropertyValuesHolder.ofFloat("offsetBottomShadow",
            nowOffsetYBottomShadow,
            newOffsetYBottomShadow);
    PropertyValuesHolder blurTopShadowHolder      = PropertyValuesHolder.ofFloat("blurTopShadow",
            nowBlurTopShadow,
            newBlurTopShadow);
    PropertyValuesHolder blurBottomShadowHolder   = PropertyValuesHolder.ofFloat("blurBottomShadow",
            nowBlurBottomShadow,
            newBlurBottomShadow);

    ValueAnimator anim = ValueAnimator
            .ofPropertyValuesHolder(
                    alphaTopShadowHolder,
                    alphaBottomShadowHolder,
                    offsetTopShadowHolder,
                    offsetBottomShadowHolder,
                    blurTopShadowHolder,
                    blurBottomShadowHolder);
    anim.setDuration(mZDepthAnimDuration);
    anim.setInterpolator(new LinearInterpolator());
    anim.addUpdateListener(new ValueAnimator.AnimatorUpdateListener() {
        @Override
        public void onAnimationUpdate(ValueAnimator animation) {
            int   alphaTopShadow     = (Integer) animation.getAnimatedValue("alphaTopShadow");
            int   alphaBottomShadow  = (Integer) animation.getAnimatedValue("alphaBottomShadow");
            float offsetTopShadow    = (Float) animation.getAnimatedValue("offsetTopShadow");
            float offsetBottomShadow = (Float) animation.getAnimatedValue("offsetBottomShadow");
            float blurTopShadow      = (Float) animation.getAnimatedValue("blurTopShadow");
            float blurBottomShadow   = (Float) animation.getAnimatedValue("blurBottomShadow");

            mZDepthParam.mAlphaTopShadow = alphaTopShadow;
            mZDepthParam.mAlphaBottomShadow = alphaBottomShadow;
            mZDepthParam.mOffsetYTopShadowPx = offsetTopShadow;
            mZDepthParam.mOffsetYBottomShadowPx = offsetBottomShadow;
            mZDepthParam.mBlurTopShadowPx = blurTopShadow;
            mZDepthParam.mBlurBottomShadowPx = blurBottomShadow;

            mShadow.setParameter(mZDepthParam, mZDepthPadding, mZDepthPadding, getWidth() - mZDepthPadding, getHeight() - mZDepthPadding);

            invalidate();
         }
     });
    anim.start();
}
Shadow をより Shadow にして得たノウハウなど
View のサイズからはみ出た blur は切り取られる
仮に、以下のように 100x100 の ShadowView の中で ShapeDrawable を描画したとします。
// ShadowView のサイズは 100 x 100
int viewWidth = 100;
int viewHeight = 100;

// ShapeDrawable は ShadowView のサイズにちょうど収まるようにする
mRectF = new RectF();
mRectF.left   = 0;
mRectF.top    = 0;
mRectF.right  = viewWidth;
mRectF.bottom = viewHeight;

ShapeDrawable shape = new ShapeDrawable(new RectShape());
Paint paint = shape.getPaint();
paint.setColor(Color.argb(56, 0, 0, 0));
paint.setMaskFilter(new BlurMaskFilter(blurPx, BlurMaskFilter.Blur.NORMAL));

canvas.drawRect(rect, paint);
期待した表示は、ShadowView のまわりに blur が描画されたものでしたが、

実際の表示は、ShadowView からはみ出た部分は切り取られてしまいました。

なので、blur をかける部分の大きさも考慮しつつ ShapeDrawable と ShadowView のサイズを決める必要がありました。
各 View のサイズの決め方
blur の大きさを考慮しつつ ShadowView のサイズを決定する必要がありますが、ZDepthShadowLayout に add される 他の View のうち最も大きい View に合わせて ShadowView のサイズを決定する必要もあります。
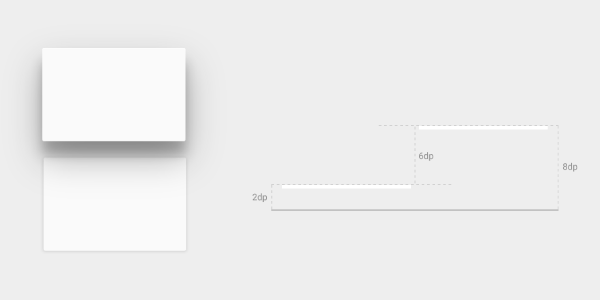
そこで以下の画像のようなレイアウト構成で組みました。
例として、add された 他の View が 200x200 、blur の大きさが 50 の場合です。

ZDepthShadowLayout には、blur の大きさ分の padding を指定します(実際はY軸の offset 分も足してます)。ShadowView のサイズは、ZDepthShadowLayout のサイズと同じにします(padding を無視)。
そして、ZDepthShadowLayout に対して ViewGroup#setClipToPadding(false) を呼び出すことで、ZDepthShadowLayout の padding 領域に描画されている ShadowView もしっかり描画されます。
雑感
Material design に対応するのはかなり難しいと思います。まず、
- Material design が提唱された理由
- Material design が目指すところ
- Material design の原理・原則
これらを踏まえた上で、 Material design に沿う理由、沿うことでアプリケーションはどうなるか、沿うことでユーザーに何を与えるのか、などなどデザイナーもエンジニアも理解していきたいところですね。