はじめに Introduction
GPUを利用して3D描画を高速化できても、それをリモートのクライアントからも利用できないと意味がありません。
ここでは、VirtualGLを利用して、3Dグラフィックスをリモートから高速に描画する方法をご紹介します。
NVIDIAの公式ガイドによると、Tesla M60を仮想化して、リモートから3Dグラフィックスを高速描画するためには、XenDesktopもしくはVMware Horizonを使用することになっています。しかしこれらのデスクトップ仮想化技術は大掛かりでコストもかかります。
ここではオープンソースのVirtualGLとTurboVNCを利用して、仮想化されたGPU環境のデスクトップ画面をリモートのPCで描画、操作するための手順を紹介します。
Even if you can speed up 3D rendering using the GPU, it is meaningless unless it can be used from remote clients.
Here, we will show you how to draw 3D graphics remotely from the remote using VirtualGL.
According to NVIDIA's official guide, in order to virtualize Tesla M60 and draw high-speed 3D graphics remotely, XenDesktop or VMware Horizon is supposed to be used. But these desktop virtualization technologies are massive and costly.
Here, we introduce the procedure for drawing and manipulating the desktop screen of the virtualized GPU environment on remote PC using open source VirtualGL and TurboVNC.
VirtualGLのダウンロード Downloading VirtualGL
VirtualGLのインストール手順はこちらにあります。
The installation procedure of VirtualGL is here.
https://cdn.rawgit.com/VirtualGL/virtualgl/2.5.2/doc/index.html#hd004001
VirtaulGLのダウンロードサイトはこちらです。
The download site of VirtaulGL is here.
https://sourceforge.net/projects/virtualgl/files/2.5.2/
以下のコマンドを実行して32ビット版と64ビット版をダウンロードします。
Execute the following command to download 32-bit version and 64-bit version.
# wget https://sourceforge.net/projects/virtualgl/files/2.5.2/VirtualGL-2.5.2.x86_64.rpm/download
# mv download VirtualGL-2.5.2.x86_64.rpm
# wget https://sourceforge.net/projects/virtualgl/files/2.5.2/VirtualGL-2.5.2.i386.rpm/download
# mv download VirtualGL-2.5.2.i386.rpm
VirtualGLのインストール Installing VirtualGL
次のコマンドを実行して、32ビット版と64ビット版のVirtualGLをインストールします。
Execute the following command to install 32-bit version and 64-bit version VirtualGL.
# yum install VirtualGL*.rpm
VirtualGLのセットアップ Setting up VirtualGL
次のコマンドを実行して、X Windowを停止します。
Execute the following command to stop the X Window.
# init 3
次のコマンドを実行して、VirtualGLを構成します。
Execute the following command to configure VirtualGL.
# /opt/VirtualGL/bin/vglserver_config
もし次のようなエラーが表示されたら、前提パッケージをインストールします。
If you get an error like the following, install the prerequisite package.
ERROR: SELinux is enabled, but the semanage program is not installed.  This
program is usually contained in a package called "policycoreutils" or
policycoreutils-python or "policycoreutils-python-utils".  On systems with
YUM or DNF, try running "yum install /usr/sbin/semanage" or
dnf install /usr/sbin/semanage.
# yum install "policycoreutils" "policycoreutils-python" "policycoreutils-python-utils"
再び、VirtualGLの構成を行います。
Again, we will configure VirtualGL.
[root@caepbs99 ~]# /opt/VirtualGL/bin/vglserver_config
1) Configure server for use with VirtualGL
2) Unconfigure server for use with VirtualGL
X) Exit

Choose:
1

Restrict 3D X server access to vglusers group (recommended)?
[Y/n]


Restrict framebuffer device access to vglusers group (recommended)?
[Y/n]


Disable XTEST extension (recommended)?
[Y/n]
n
... Creating vglusers group ...
... Granting read permission to /etc/opt/VirtualGL/ for vglusers group ...
... Setting SELinux contexts to allow vglgenkey to run within GDM ...
... Modifying /etc/security/console.perms to disable automatic permissions
    for DRI devices ...
... Creating /etc/modprobe.d/virtualgl.conf to set requested permissions for
    /dev/nvidia* ...
... Attempting to remove nvidia module from memory so device permissions
    will be reloaded ...
ERROR: Module nvidia is in use by nvidia_modeset
... Granting write permission to /dev/nvidia-modeset /dev/nvidia0 /dev/nvidiactl for vglusers group ...
... Modifying /etc/X11/xorg.conf.d/99-virtualgl-dri to enable DRI permissions
    for vglusers group ...
... Modifying /etc/X11/xorg.conf to enable DRI permissions
    for vglusers group ...
... Adding vglgenkey to /etc/gdm/Init/Default script ...
... Enabling XTEST extension in /etc/gdm/custom.conf ...
... Setting default run level to 5 (enabling graphical login prompt) ...
... Commenting out DisallowTCP line (if it exists) in /etc/gdm/custom.conf ...

Done. You must restart the display manager for the changes to take effect.

IMPORTANT NOTE: Your system uses modprobe.d to set device permissions. You
must execute rmmod nvidia with the display manager stopped in order for the
new device permission settings to become effective.


1) Configure server for use with VirtualGL
2) Unconfigure server for use with VirtualGL
X) Exit

Choose:
x
X Windowを起動します。
Start X Window.
# init 5
vglusersグループにvncuserユーザを登録します。
Register the vncuser user in the vglusers group.
# usermod -aG vglusers vncuser
/etc/groupを確認します。
Check /etc/group.
# cat /etc/group | grep vglusers
vglusers:x:501:vncuser
以降の手順はVNC Viewerを使って行います。
VNC Viewerで接続しているデスクトップ画面で操作します。
The following procedure is done using VNC Viewer.
Operate on the desktop screen connected with VNC Viewer.
$ xauth merge /etc/opt/VirtualGL/vgl_xauth_key
$ xdpyinfo -display :0
$ /opt/VirtualGL/bin/glxinfo -display :0 -c
設定を確認する Confirm settings
VirtualGLが正しく導入されて、Direct Renderingが有効になっているか確認します。
Make sure VirtualGL is installed correctly and Direct Rendering is enabled.
$ vglrun /opt/VirtualGL/bin/glxinfo -c
vglrunコマンドは、OpenGLアプリケーションをVirtualGL上で稼働させるために必須です。
The vglrun command is mandatory for running OpenGL applications on VirtualGL.
glxinfoの出力に下記の2行が存在することを確認します。特にdirect renderingがYesとなっていないと、Softwareによる描画になり非常に低速となってしまいます。
Make sure the following two lines are present in the glxinfo output. Especially if direct rendering is not Yes, it will be rendered by Software and it will become very slow.
direct rendering: Yes
OpenGL renderer string: Quadro FX GRID M60-8Q/PCI/SSE2
サンプルアプリケーションを実行します。
Run the sample application.
$ vglrun /opt/VirtualGL/bin/glxsphere64
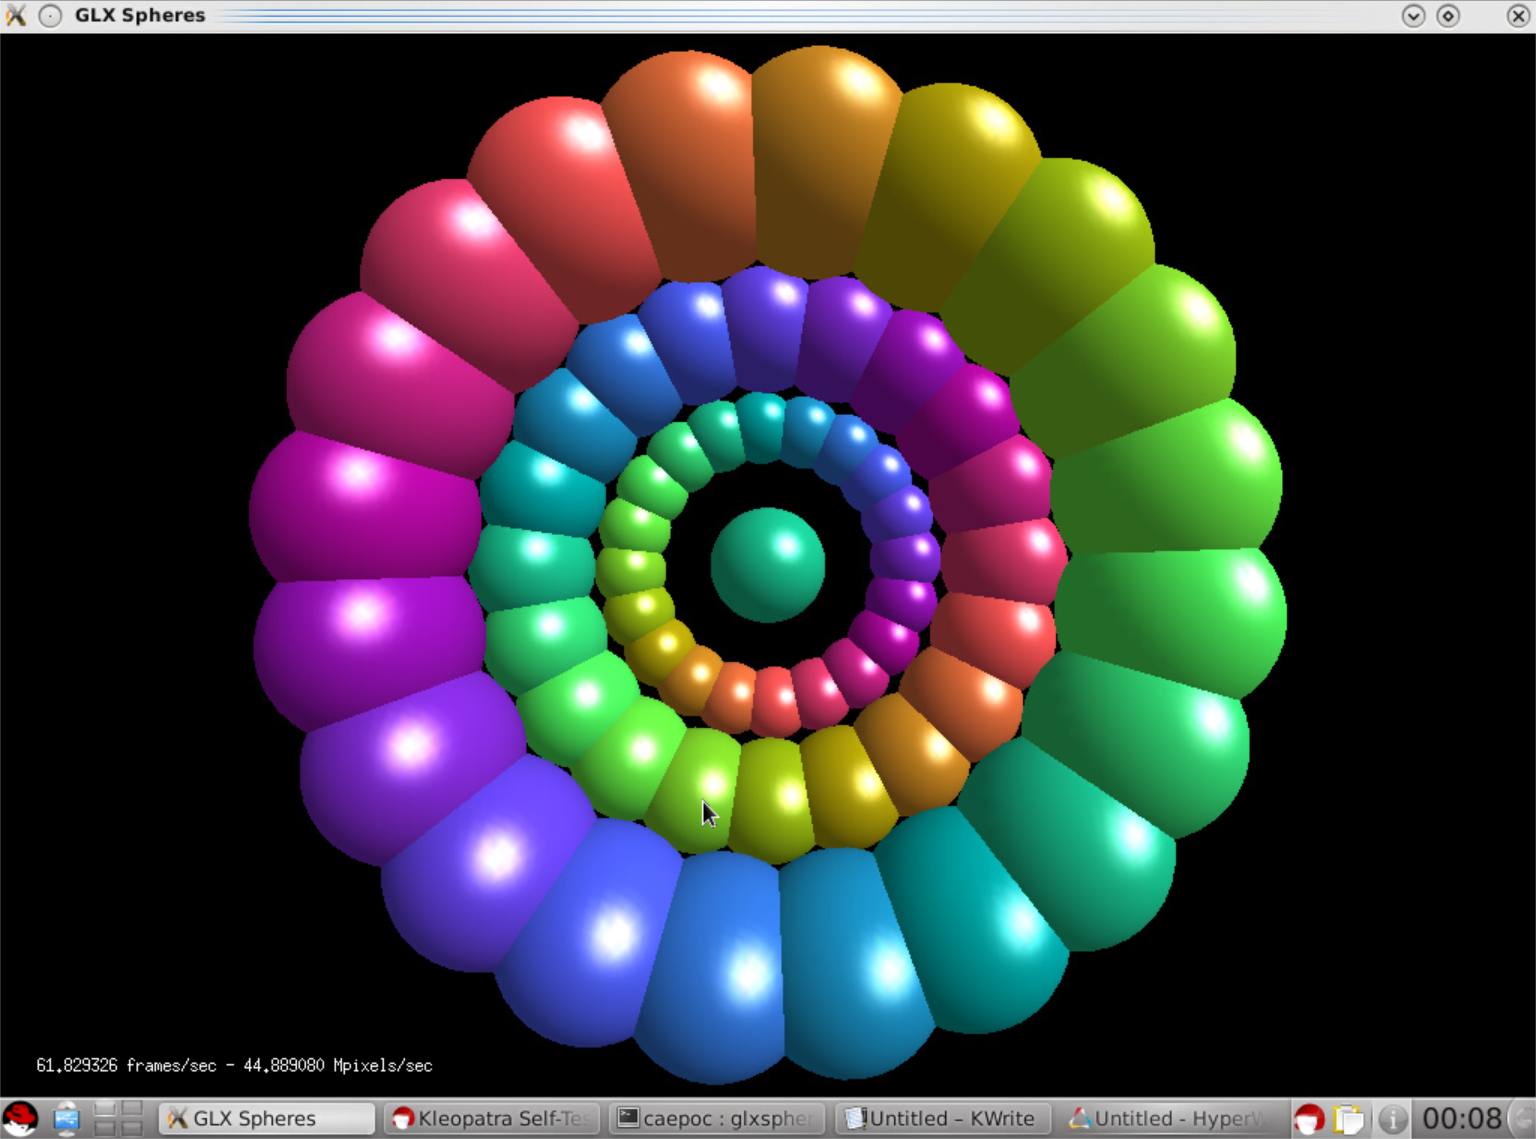
なめらかに画像が回転している様子が見えると思います。
You may see a smooth image rotation.
以上でセットアップは完了です。
This completes the setup.