はじめに Introduction
SoftLayerのLinux Guest OSのデスクトップ画面のグラフィックスを高速に転送して、クライアントPCで操作するのに最適なVNCをセットアップしてみたいと思います。
Linuxのデスクトップ画面をPCから操作するには、PC版のX-Windowサーバを使用する方法もあります。例えば、XmingなどのフリーソフトウェアをPCにセットアップすれば、デスクトップ画面を表示することが可能です。しかし、この方法はX-Windowの描画コマンドをすべて伝送するため、動画などのグラフィックスを表示するには適していません。
VNCは画面の変化点だけを伝送するため、帯域の細いWAN経由でも早い描画を可能にしています。
VNCにはいろいろな派生がありますが、ここではVirtualGLプロジェクトでも推奨している高速なTurboVNCを使用します。
I would like to transfer the graphics of the desktop screen of SoftLayer Linux Guest OS at high speed and set up the best VNC to operate on the client PC.
There is also a way to use the PC version of the X-Window server to operate the Linux desktop screen from the PC. For example, by setting up free software such as Xming on the PC, it is possible to display the desktop screen. However, since this method transmits all X - Window drawing commands, it is not suitable for displaying graphics such as moving images.
Since VNC transmits only the change point of the screen, it enables fast drawing even through a narrowband WAN.
There are various derivations in VNC, but here we use the high speed Turbo VNC recommended in the VirtualGL project.
RedHat 6.3にTurboVNCサーバをセットアップする Set up TurboVNC server on RedHat 6.3
TurboVNCのダウンロード Download TurboVNC
TurboVNCのインストールイメージは以下のサイトからダウンロードできます。
The installation image of TurboVNC can be downloaded from the following site.
https://sourceforge.net/projects/turbovnc/files/
# wget https://jaist.dl.sourceforge.net/project/turbovnc/2.1.1/turbovnc-2.1.1.x86_64.rpm
TurboVNCのインストール Install TourboVNC
次のコマンドを実行してTurboVNCをインストールします。
Execute the following command to install TourboVNC.
# rpm -U turbovnc-2.1.1.x86_64.rpm
VNC設定ファイルの編集 Edit VNC setting file
エディタで下記のファイルを編集し、VNCで接続するユーザとその属性をセットアップします。
Edit the following VNC setting file and set user and attributions to use VNC.
# vi /etc/sysconfig/tvncservers
下記の内容を入力して保存します。
"vncuser"は一般権限のアカウントであればなんでも結構です。VNC接続の際に使用します。
下記の意味は、ディスプレイ番号1はroot、ディスプレイ番号2はvncuserで接続することを意味しています。画面のサイズも指定しています。
Enter the following contents and save.
"vncuser" can be used as long as it is an account with general authority. It is used for VNC connection.
For the meaning below, it means that display number 1 is root and display number 2 is connected with vncuser. The screen size is also specified.
VNCSERVERS="1:root 2:vncuser"
VNCSERVERARGS[1]="-geometry 1024x768"
VNCSERVERARGS[2]="-geometry 1024x768"
VNCパスワードの設定 Set VNC password
VNCで接続するユーザ毎にVNCパスワードを設定します。
まずrootユーザのVNCパスワードを設定します。
Set the VNC password for each user connected with VNC.
First, set the VNC password of the root user.
# /opt/TurboVNC/bin/vncpasswd
同じパスワードを2回入力します。
Viewオンリーかどうか聞かれるので「n」を入力します。
Enter the same password twice.
Enter "n" as it will ask if it is View only.
vncuserユーザにスイッチします。
Switch to vncuser user.
# su - vncuser
vncuserユーザーにもVNCパスワードを設定します。
Set VNC password to vncuser user.
$ /opt/TurboVNC/bin/vncpasswd
VNCサーバを起動します。
Start VNC server.
# /etc/init.d/tvncserver start
失敗する場合は、/var/log/messagesを参照してください。
If it fails, see /var/log/messages.
VNCサーバの稼働状況確認 Check the operation status of the VNC server
rootユーザで確認します。
Check with root user.
# /opt/TurboVNC/bin/vncserver -list

TurboVNC server sessions:

X DISPLAY #     PROCESS ID
:1              4511
次にvncuserユーザでも確認します。
Next, check with the vncuser user.
# su - caepoc
$ /opt/TurboVNC/bin/vncserver -list

TurboVNC server sessions:

X DISPLAY #     PROCESS ID
:2              4556
Windows 10にTurboVNC Viewerをセットアップする Set up TurboVNC Viewer on Windows 10
Windows版TurboVNCのダウンロード Download TourboVNC for Windows
以下のサイトからダウンロードします。
Download from the following site.
https://sourceforge.net/projects/turbovnc/files/
今回用いたのは以下のバージョンです。(64ビット版)
This time, we used the following version. (64 bit version)
https://jaist.dl.sourceforge.net/project/turbovnc/2.1.1/TurboVNC64-2.1.1.exe
インストール Install
TurboVNC64-2.1.1.exeを実行し、デフォルトパラメータでインストールします(特に変更するオプションはありません)。
Run TurboVNC64-2.1.1.exe and install with default parameters (there is no option to change in particular).
VNC Viewerの起動 Start VNC Viewer
TurboVNC Viewerを起動します。
Start TourboVNC Viewer.
VNC Server欄に接続先のホスト名またはIPアドレスと、ディスプレイ番号をコロン記号(:)で区切って入力します。
In the VNC Server field, enter the host name or IP address of the connection destination and the display number separated by a colon (:).
Connectボタンを押します。
Press connect button.
下記のようなエラーメッセージが出る場合は、サーバー側でtcpdumpを取るなどして現象を解析します。
If the following error message appears, analyze the phenomenon by taking tcpdump on the server side.
筆者が確認したところ、VNCサーバはVNC接続要求を受け付けると、クライアントのIPアドレスにICMPを投げるようです。
As I confirmed, VNC server seems to throw ICMP to client IP address when accepting VNC connection request.
しかし、SoftLayerの仮想マシンからSSL VPN Clientに対してPingが通りません。VPNの設定の問題なのか、SoftLayerの途中経路の問題なのか確認する時間がありませんでしたので、代替策としてSSH Tunnelを使うことにしました。(Windows FirewallはすべてDisableにしてもうまくいきませんでした)
However, Ping does not pass from the SoftLayer virtual machine to the SSL VPN Client. Since I did not have time to check whether it was a VPN configuration problem or a SoftLayer midway path problem, I decided to use SSH Tunnel as an alternative. (Disabling all Windows Firewall did not work)
SSH Tunnelのセットアップ Setup SSH Tunnel
ここではPuTTYを使ってSSH Tunnelを設定します。
Here we will configure SSH Tunnel using PuTTY.
1.PuTTYを起動します。 Start PuTTY
2.メニューからConnection→Dataを開きます。Open Connection → Data from the menu.
Auto-login欄にvncuserと入力します。
Enter vncuser in the Auto-login field.
3.メニューからConnection→SSH→Tunnelsを開きます。 Open Connection → SSH → Tunnels menu.
Source Portに1234を入力します。この番号はクライアント側のポート番号なので未使用であれば何番でも構いません。
DestinationにVNCサーバのIPアドレスとポート番号をコロン記号(:)でつないで指定します。
Enter 1234 in Source Port. This number is a port number on the client side so you can use whatever number it is unused.
Specify the Destination by connecting the VNC server's IP address and port number with a colon (:).
4.Addボタンを押します。Press Add button
5.メニューからSessionを開き、設定を保存します。 Open Session menu and save settings
6.OpenをクリックしてSSH Tunnelを張ります。 Crick Open and establish SSH Tunnel
VNC Viewerの起動 Start VNC Viewer
VNC Server欄には「localhost:1234」と入力し、Connectボタンを押します。
In the VNC Server field, enter "localhost: 1234" and press the Connect button.
デスクトップ画面の表示に成功しました。
The desktop screen was successfully displayed.
トラブルシューティング Trouble shooting
入力できない Can't enter anything
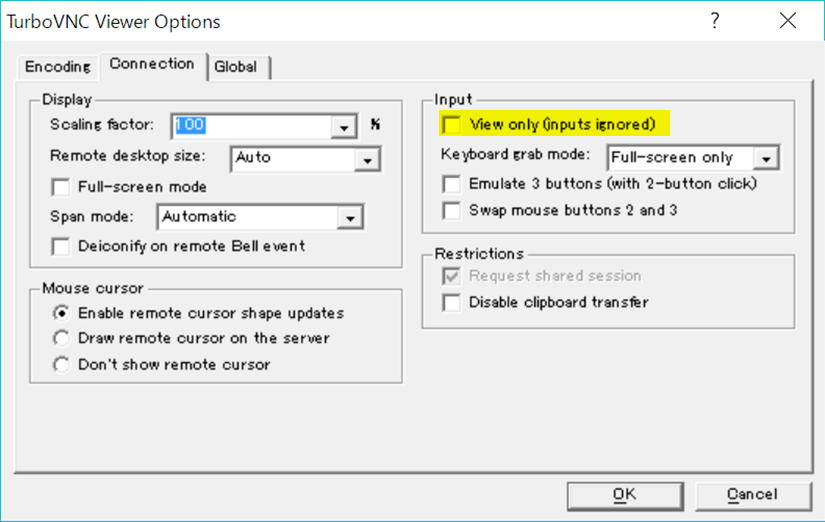
デスクトップ画面は表示されるものの、一切入力もマウス操作もできない場合、VNC ViewerがView Onlyモードで稼働している可能性があります。
VNC ViewerのOptionボタンをおしてConnectionタブのView Onlyにチェックが付いていたらチェックを外してください。
Although the desktop screen is displayed but the input and the mouse operation can not be performed at all, there is a possibility that the VNC Viewer is running in View Only mode.
If the Option button of the VNC Viewer is on and the View Only box on the Connection tab is checked, uncheck it.
画面が真っ黒 Black screen
デスクトップ画面が真っ黒のまま何も表示されない場合は、VNCサーバのログを確認してください。
If the desktop screen is black and nothing is displayed, VNC
Please check the server log.
$ cat ~/.vnc/<hostname>:<display number>.log
.Xauthorityが書き込み不可でエラーになっているケースがありました。そのような場合は.Xauthorityを削除して、VNCサービスを再起動します。
There were cases where .Xauthority was writable and an error occurred. In that case delete .Xauthority and restart the VNC service.
VNCサーバの再起動方法 How to reboot VNC server
以下のコマンドでVNCサーバを再起動できます。
You can restart the VNC server with the following command.
# /etc/init.d/tvncserver restart
なお、VNCサーバを再起動する際は、SSH Tunnel用のセッションをクローズしてください。
When restarting the VNC server, close the session for SSH tunnel.


