Odometry(オドメトリ)とは、一般的にはエンコーダや加速度センサから得られる移動変化量のことですが、RGB-Dカメラを用いたオドメトリ(Visual Odometry)といえば、カメラの移動量(回転行列と平行移動ベクトル)のことです。SLAMはこれに加えて、マップ最適化や閉ループ検出処理がないといけません。
サンプルプログラム
OpenCVのサンプルプログラムにあるrgbdodometry.cppを実行してみました。
インクルードファイル
#include "opencv2/imgproc/imgproc.hpp"
#include "opencv2/calib3d/calib3d.hpp"
#include "opencv2/contrib/contrib.hpp"
#include "opencv2/highgui/highgui.hpp"
#include <cstdio>
#include <iostream>
#include <ctime>
#include <opencv_lib.hpp>
名前空間
using namespace cv;
using namespace std;
Depthから3次元点群を生成する関数
static
void cvtDepth2Cloud(const Mat& depth, Mat& cloud, const Mat& cameraMatrix)
{
	const float inv_fx = 1.f / cameraMatrix.at<float>(0, 0);
	const float inv_fy = 1.f / cameraMatrix.at<float>(1, 1);
	const float ox = cameraMatrix.at<float>(0, 2);
	const float oy = cameraMatrix.at<float>(1, 2);
	cloud.create(depth.size(), CV_32FC3);
	for (int y = 0; y < cloud.rows; y++)
	{
		Point3f* cloud_ptr = (Point3f*)cloud.ptr(y);
		const float* depth_prt = (const float*)depth.ptr(y);
		for (int x = 0; x < cloud.cols; x++)
		{
			float z = depth_prt[x];
			cloud_ptr[x].x = (x - ox) * z * inv_fx;
			cloud_ptr[x].y = (y - oy) * z * inv_fy;
			cloud_ptr[x].z = z;
		}
	}
}
変換行列(4×4)で3次元点群を変換する関数
※カメラ0(Image0)からカメラ1(Image1)へ変換
template<class ImageElemType>
static void warpImage(const Mat& image, const Mat& depth,
	const Mat& Rt, const Mat& cameraMatrix, const Mat& distCoeff,
	Mat& warpedImage)
{
	const Rect rect = Rect(0, 0, image.cols, image.rows);

	vector<Point2f> points2d;
	Mat cloud, transformedCloud;

	cvtDepth2Cloud(depth, cloud, cameraMatrix);
	perspectiveTransform(cloud, transformedCloud, Rt);
	projectPoints(transformedCloud.reshape(3, 1), Mat::eye(3, 3, CV_64FC1), Mat::zeros(3, 1, CV_64FC1), cameraMatrix, distCoeff, points2d);

	Mat pointsPositions(points2d);
	pointsPositions = pointsPositions.reshape(2, image.rows);

	warpedImage.create(image.size(), image.type());
	warpedImage = Scalar::all(0);

	Mat zBuffer(image.size(), CV_32FC1, FLT_MAX);
	for (int y = 0; y < image.rows; y++)
	{
		for (int x = 0; x < image.cols; x++)
		{
			const Point3f p3d = transformedCloud.at<Point3f>(y, x);
			const Point p2d = pointsPositions.at<Point2f>(y, x);
			if (!cvIsNaN(cloud.at<Point3f>(y, x).z) && cloud.at<Point3f>(y, x).z > 0 &&
				rect.contains(p2d) && zBuffer.at<float>(p2d) > p3d.z)
			{
				warpedImage.at<ImageElemType>(p2d) = image.at<ImageElemType>(y, x);
				zBuffer.at<float>(p2d) = p3d.z;
			}
		}
	}
}
メイン関数
int main(int argc, char** argv)
{
①valsはカメラの内部パラメータ(Kinect出荷時の内部パラメータ)であり、焦点距離(fx, fy)、画像中心(cx, cy)とすると、fx = 525, fy = 525, cx = 319.5, cy = 239.5。カメラ歪(distCoeff)はなし。
	float vals[] = { 525., 0., 3.1950000000000000e+02,
		0., 525., 2.3950000000000000e+02,
		0., 0., 1. };

	const Mat cameraMatrix = Mat(3, 3, CV_32FC1, vals);
	const Mat distCoeff(1, 5, CV_32FC1, Scalar(0));
②画像セット(RGBとDepth)を2つ読み込み、
- 剛体変換
- 回転行列のみ
- 平行移動ベクトルのみ
を求めるオプション(-rbm, -r, -t)をつける。
	if (argc != 5 && argc != 6)
	{
		cout << "Format: image0 depth0 image1 depth1 [transformationType]" << endl;
		cout << "Depth file must be 16U image stored depth in mm." << endl;
		cout << "Transformation types:" << endl;
		cout << "   -rbm - rigid body motion (default)" << endl;
		cout << "   -r   - rotation rotation only" << endl;
		cout << "   -t   - translation only" << endl;
		return -1;
	}

	Mat colorImage0 = imread(argv[1]);
	Mat depth0 = imread(argv[2], -1);

	Mat colorImage1 = imread(argv[3]);
	Mat depth1 = imread(argv[4], -1);

	if (colorImage0.empty() || depth0.empty() || colorImage1.empty() || depth1.empty())
	{
		cout << "Data (rgb or depth images) is empty.";
		return -1;
	}

	int transformationType = RIGID_BODY_MOTION;
	if (argc == 6)
	{
		string ttype = argv[5];
		if (ttype == "-rbm")
		{
			transformationType = RIGID_BODY_MOTION;
		}
		else if (ttype == "-r")
		{
			transformationType = ROTATION;
		}
		else if (ttype == "-t")
		{
			transformationType = TRANSLATION;
		}
		else
		{
			cout << "Unsupported transformation type." << endl;
			return -1;
		}
	}
③カラー画像はグレースケールに変換し、Depthはメートルに変換する。ここでは、0~4mのDepthデータのみを用いている。
	Mat grayImage0, grayImage1, depthFlt0, depthFlt1/*in meters*/;
	cvtColor(colorImage0, grayImage0, COLOR_BGR2GRAY);
	cvtColor(colorImage1, grayImage1, COLOR_BGR2GRAY);
	depth0.convertTo(depthFlt0, CV_32FC1, 1. / 1000);
	depth1.convertTo(depthFlt1, CV_32FC1, 1. / 1000);
④TickMeter tm;は処理時間を測る。tm.start();からtm.stop();までの時間を測ることができる。tm.getTimeMilli()で時間[ms]を表示する。あとは、変換行列を求めるための設定(iterCounts, minGradMagnitudes)。
	TickMeter tm;
	Mat Rt;

	vector<int> iterCounts(4);
	iterCounts[0] = 7;
	iterCounts[1] = 7;
	iterCounts[2] = 7;
	iterCounts[3] = 10;

	vector<float> minGradMagnitudes(4);
	minGradMagnitudes[0] = 12;
	minGradMagnitudes[1] = 5;
	minGradMagnitudes[2] = 3;
	minGradMagnitudes[3] = 1;

	const float minDepth = 0.f; //in meters
	const float maxDepth = 4.f; //in meters
	const float maxDepthDiff = 0.07f; //in meters
⑤オドメトリを推定する関数(Direct Method)と変換行列の表示
tm.start();
bool isFound = cv::RGBDOdometry(Rt, Mat(),
grayImage0, depthFlt0, Mat(),
grayImage1, depthFlt1, Mat(),
cameraMatrix, minDepth, maxDepth, maxDepthDiff,
iterCounts, minGradMagnitudes, transformationType);
tm.stop();
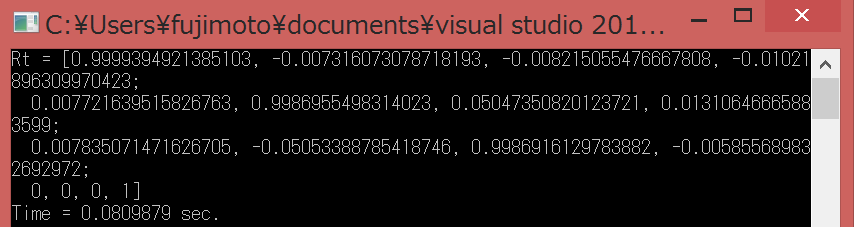
cout << "Rt = " << Rt << endl;
cout << "Time = " << tm.getTimeSec() << " sec." << endl;
if (!isFound)
{
cout << "Rigid body motion cann't be estimated for given RGBD data." << endl;
return -1;
}
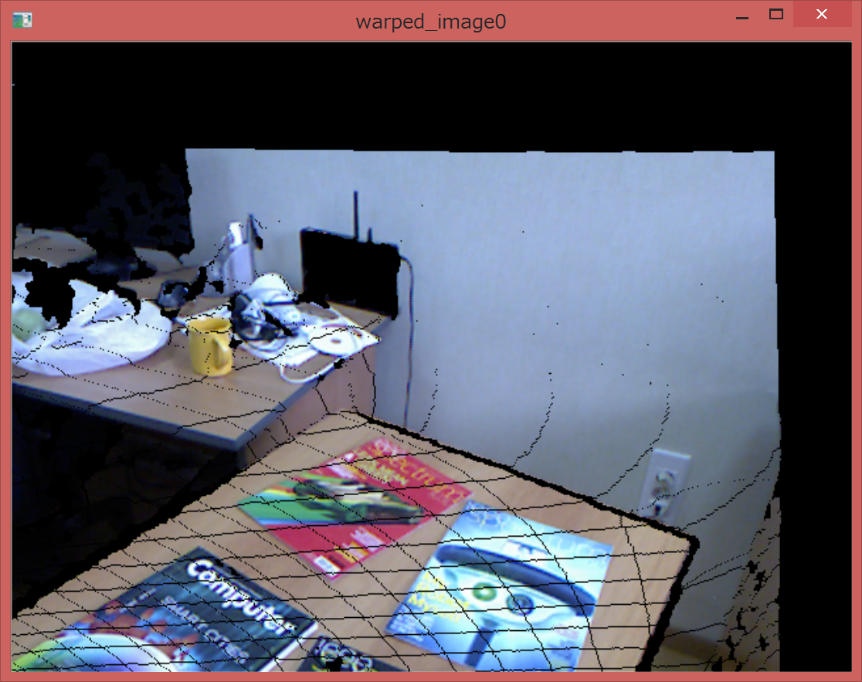
⑥Image0をImage1に変換した画像warpedImage0を表示して終了。
	Mat warpedImage0;
	warpImage<Point3_<uchar> >(colorImage0, depthFlt0, Rt, cameraMatrix, distCoeff, warpedImage0);

	imshow("image0", colorImage0);
	imshow("warped_image0", warpedImage0);
	imshow("image1", colorImage1);
	waitKey();

	return 0;
}
サンプルの画像セットはOpenCVの中にあります。
\opencv249\sources\samples\cpp\rgbdodometry\
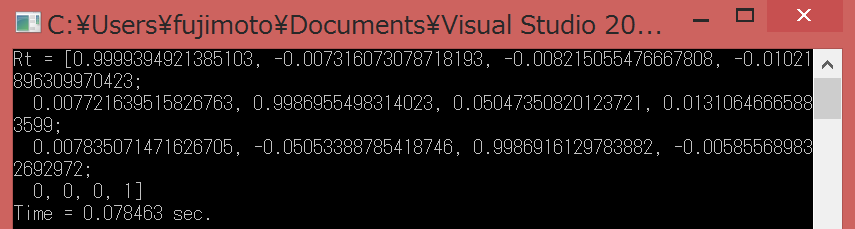
PPLで並列化したソースコードをgithubにあげます。速度は全然変わりませんw 実行する際、Debuggingの設定(コマンドラインから引数を与える)を行ってください。
C:\opencv249\sources\samples\cpp\rgbdodometry\image_00000.png C:\opencv249\sources\samples\cpp\rgbdodometry\depth_00000.png C:\opencv249\sources\samples\cpp\rgbdodometry\image_00002.png C:\opencv249\sources\samples\cpp\rgbdodometry\depth_00002.png -rbm
動作環境
- Windows8.1(RAM 8GB, 2 cores @ 2.1GHz)
- OpenCV2.4.9
- Visual Studio 2013
処理時間
-
rgbdodometry
-
pplで並列化(2重ループくらいじゃ速度は変わりません)