-> 前回からの続き
5. .concurrent属性 / .initiallyinactive属性
DispatchQueueはlabelとqosの他にattributesという属性をつけることができる。
.concurrentと**.initiallyinactiveの二つがあり、どちらもキューではなくWork Itemを制御する**ものです。
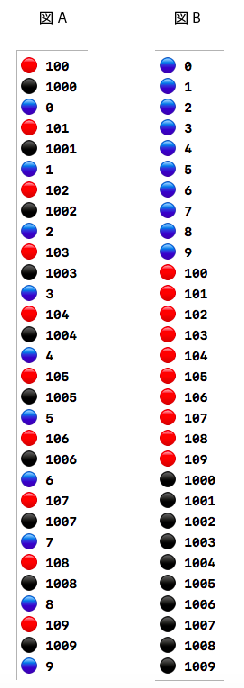
A .concurrent
同じ同じキューの中で、Work Itemを同時処理させる属性。(結果は下A図)
    let anotherQueue = DispatchQueue(label: "com.ayakosayama.anotherQueue", qos: .utility, attributes: .concurrent)

     func attribuesTest(){

        anotherQueue.async {
            for i in 0..<10{
                print("🔵",i)
            }
        }

        anotherQueue.async {
            for i in 100..<110{
                print("🔴",i)
            }
        }

        anotherQueue.async {
            for i in 1000..<1010{
                print("⚫️",i)
            }
        }
    }
B .initiallyInactive
WorkItemをキューの中で待機させておく。実行処理を別で書かないと発動しない。(結果は下B図)
    var inactiveQueue: DispatchQueue!
    let anotherQueue = DispatchQueue(label: "com.appcoda.anotherQueue", qos: .utility, attributes: .initiallyInactive)

    func attribuesTest(){

        inactiveQueue = anotherQueue

        anotherQueue.async {
            for i in 0..<10{
                print("🔵",i)
            }
        }

        anotherQueue.async {
            for i in 100..<110{
                print("🔴",i)
            }
        }

        anotherQueue.async {
            for i in 1000..<1010{
                print("⚫️",i)
            }
        }
    }
実行メソッド
        attribuesTest()
        if let queue = inactiveQueue{
            queue.activate()
        }
6. global()でフリーなキューをランダムで選ぶ
これまでは自分でカスタムキューを作ってきましたが、システムがバックグラウンドで作ったdispatch queueのコレクション、つまりグローバルキュー(global queues)を使うこともできる。
    func globalQueue(){
        let globalQueue = DispatchQueue.global()

        globalQueue.async {
            print(globalQueue.label)  // com.apple.root.default-qos
            for i in 1..<1000{ print("⚫️",i)}
        }
    }
この場合は処理が短い&使われてなかったので、デフォルトのQOSが選ばれている。
7. delayqueue.asyncaAfter()でキューの遅れる時間を制御する
以下のように、キューの処理を2秒遅らすというプログラムを書いて実行してみます。
    func queueWithDelay(){
        print(Date())

        let delayqueue = DispatchQueue(label: "com.ayakosayama.delayqueue", qos: .userInteractive)

        let additinalTime:DispatchTimeInterval = .seconds(2)
        delayqueue.asyncAfter(deadline: .now() + additinalTime){
            print(Date())
        }
    }
結果:ちょうど2秒遅れてprint(Date)されている!
2017-07-11 21:14:13 +0000
2017-07-11 21:14:15 +0000
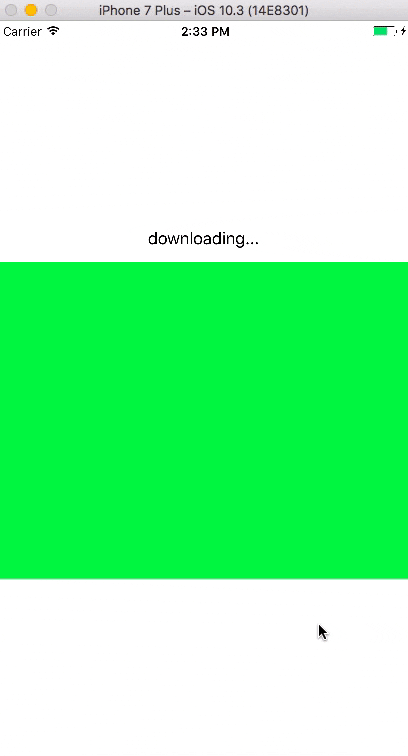
8. コールバック関数で、ダウンロード後UIに画像を描画する
    @IBOutlet weak var imageView: UIImageView!
    @IBOutlet weak var label: UILabel!

    func fetchImage(){
        label.text = "downloading..."
        let imageURL: URL = URL(string: "https://worldstrides.com/wp-content/uploads/2015/07/12-Chureito-pagoda-and-Mount-Fuji-Japan.jpg")!

        (URLSession(configuration: URLSessionConfiguration.default)).dataTask(with: imageURL, completionHandler: { (imageData, response, error) in

            if let data = imageData {

                DispatchQueue.main.async {
                    self.label.text = "finished downloading!"
                    self.imageView.image = UIImage(data: data)
                }
            }
        }).resume()
    }
imageViewに画像を表示させたい!という処理ですが、
UIに表示させるコマンド(imageview.image = UIImage(data:data))が画像ダウンロード前に実行されると、ダウンロードが終わっても表示されない!
そこで上記のように、
DispatchQueue.main.async {}で覆ってあげるとよい。
おしまい!