はじめに
さて、前回の使ってみよう編で、TypeScript 2.3 のLanguage Service Pluginの概要や使い方について記載しました。
Language Serviceにpluginが差し込めるようになったといっても、plugin自体が数える程度しか出回っていません。
無いなら作ればいいじゃない、ということで、今日はLanguage Service Pluginの実装方法を解説していきたいと思います。前半で基本的なpluginの構造を、後半で多少実践的な内容をtipsとして取り上げます。
なお、tipsの方については自作のLanguage Service Pluginが元ネタです。
はじめてのLanguage Service Plugin
Pluginのエントリポイントを作成する
Language Service Pluginのエントリポイントは次のような形式になります。
import * as ts from 'typescript/lib/tsserverlibrary';

const factory: ts.server.PluginModuleFactory = (mod: { typescript: typeof ts } ) => {
  const pluginModule: ts.server.PluginModule = {
    create: create,
  };
  return pluginModule;
}

function create (info: ts.server.PluginCreateInfo): ts.LanguageService {
  return info.languageService;
}

export = factory;
create という名前の関数を用意して、そいつがLanguageServiceを返せばいいだけです1。
plugin適用前のLanguageServiceは、create関数の引数に格納されて渡されるため、必要なメソッドだけ置き換えて返却します。
簡単ですね。
Pluginに機能を追加する
このままだと何も意味がないpluginなので、機能を1つ追加してみます。
ここでは、getQuickInfoAtPosition というメソッドを置き換えてみます。
このメソッドは「現在のカーソル位置にある識別子がどのようなものなのか」を返す役割をもちます。平たく言えば、IDE側からはツールチップを実装するために呼びだされる機能です。
先述のindex.tsにおけるcreateメソッドを次のように書き換えてみます。
function create (info: ts.server.PluginCreateInfo): ts.LanguageService {
  const ls = info.languageService;

  // オリジナルのメソッドを退避しておく
  const delegate = ls.getQuickInfoAtPosition;

  // tooltip用のメソッドを上書き
  ls.getQuickInfoAtPosition = (fileName: string, position: number) => {
    const result = delegate(fileName, position); // 元メソッドを呼び出す
    if (!result.displayParts || !result.displayParts.length) return result;
    // 結果を修正する
    result.displayParts = [
      { kind: "", text: " 🎉🎉 " },
      ...result.displayParts,
      { kind: "", text: " 🎉🎉 " },
    ];
    return result;
  };

  return ls;
}
ここでは結果を賑やかすために ![]() の絵文字を追加してみました。
の絵文字を追加してみました。
Pluginの動作を確認する
早速pluginを動かしてみましょう。
index.tsをtscでコンパイルし、my-first-plugin/index.js に出力しておきます。
pluginを利用する側のprojectをtest-my-first-pluginという名前のディレクトリに用意しておきましょう。
下記のディレクトリ構成を想定しています。
+--- my-first-plugin/
|   |  node_modules/
|   |  index.js
|   |  index.ts
|   |  package.json
|   |  tsconfig.json
|   \  yarn.lock
|
\--- test-my-first-plugin/
    |  node_modules/
    |  main.ts
    |  package.json
    |  tsconfig.json
    \  yarn.lock
前回投稿でも記載したとおり、Language Serviceのpluginはtsconfig.jsonのplugins配列に設定します。
{
  "compilerOptions": {
    "module": "commonjs",
    "target": "es5",
    "noImplicitAny": false,
    "sourceMap": false,
    "plugins": [
      { "name": "../my-first-plugin" }
    ]
  }
}
本来はname にはnpmのパッケージ名を指定するのですが、Node.jsの require よろしく相対パスで指定することも可能です。
ただし、1点だけ注意です。 (plugin探索パスの起点については、v2.5.2で修正されました)
test-my-first-pluginからではなく、test-my-first-plugin/node_modules からの相対パスで指定する必要があります。
さて、動作の準備が整いました。おもむろにVSCなどを立ち上げてみましょう2。
cd test-my-first-plugin
code main.ts
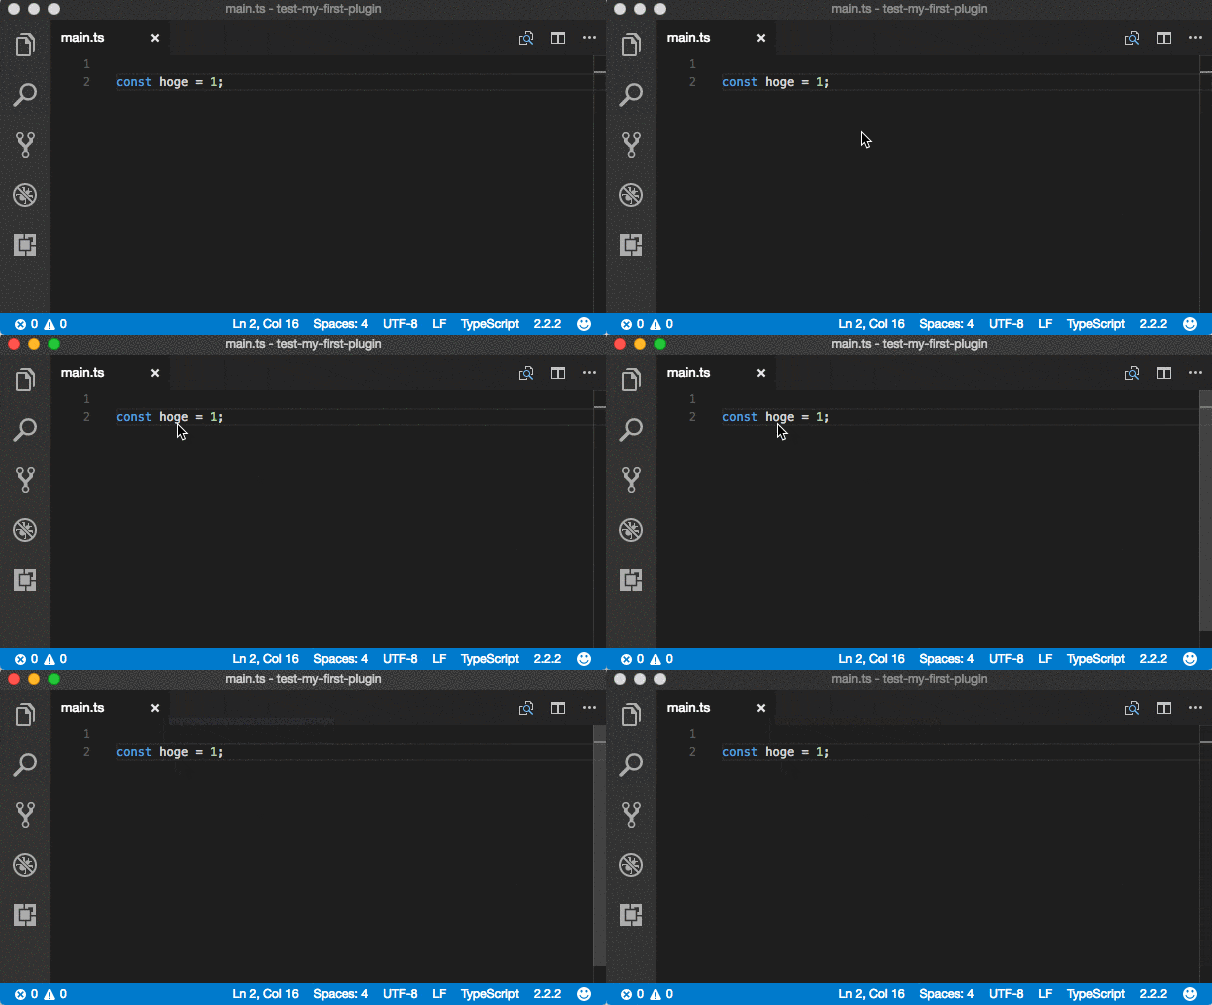
見てのとおり、tooltipに ![]() が表示されました。
が表示されました。
簡単ですね!
Plugin開発 tips
ここからは、もう少し実践的な内容を書いておこうと思います。
Pluginにオプションを渡す
plugin自体の挙動にオプションを設けて、ユーザーが設定可能にしたくなることもあるでしょう。
ts.server.PluginCreateInfo に生えているconfigプロパティにはtsconfig.jsonのpluginsセクションに記載しているpluginの情報が渡ってきます。
すなわち、tsconfig.jsonに次のように書いておくと、
  "plugins": [
    { "name": "../../my-first-plugin", "hoge": "foo" }
  ]
下記のコードでオプションhogeの値が取得できます。
assert(info.config.hoge === 'foo');
CLIからPluginを動作させる
Pluginの開発中に、機能の確認のためだけに一々エディタを立ち上げたりするのはとても非効率的です。
もちろんunit testを書いておいて、実エディタでの動作確認を最小に済ませるのは当たり前なのですが、e2e testはどうすんの?という疑問は残るでしょう。
そこで活躍するのがtsserverです。
使ってみよう編でも触れた通り、エディタがLanguage Serviceへアクセスする際は、大概はtsserverを経由します。
tsserverはLanguage Serviceをホストしたスタンドアロンなサーバプログラムです。
作成したpluginも動作しますし、標準入出力を介したコマンド送信が可能です。
詳細は別エントリに書いているので、そちらを参照して欲しいのですが、さきほど作成したpluginの場合は、次のような入力ファイルを用意しておき、
{ "seq": 0, "type": "request", "command": "open", "arguments": { "file": "main.ts", "fileContent": "const hoge = 1;", "scriptKindName": "TS" } }
{ "seq": 1, "type": "request", "command": "quickinfo", "arguments": { "file": "main.ts","offset":7, "line":1 } }
下記のコマンドでtsserverに流し込みます。
./node_modules/.bin/tsserver < input.json
すると、次のような出力が得られます。
Content-Length: 129
{"seq":0,"type":"event","event":"configFileDiag","body":{"triggerFile":"main.ts","configFile":"tsconfig.json","diagnostics":[]}}
Content-Length: 264
{"seq":0,"type":"response","command":"quickinfo","request_seq":1,"success":true,"body":{"kind":"const","kindModifiers":"","start":{"line":1,"offset":7},"end":{"line":1,"offset":11},"displayString":" 🎉🎉 const hoge: 1 🎉🎉 ","documentation":"","tags":[]}}
見辛いようであれば、jqなど使って適当に整形しましょう。
./node_modules/.bin/tsserver < input.json | tail -n 1 | jq .body > out.json
{
  "kind": "const",
  "kindModifiers": "",
  "start": {
    "line": 1,
    "offset": 7
  },
  "end": {
    "line": 1,
    "offset": 11
  },
  "displayString": " 🎉🎉 const hoge: 1 🎉🎉 ",
  "documentation": "",
  "tags": []
}
tsserverを叩く方法を抑えておけば、Node.jsのchild process forkを使うなどすることで、簡単にe2e用のテストスクリプトを用意することもできます。
どんなコマンドがあるか分からない? https://github.com/Microsoft/TypeScript/blob/v2.3.0/src/server/session.ts#L100 読めば大体分かるよ。
Logを出力する
ところで、plugin作成中、「ちょっとdebug目的で...」などと軽い気持ちで console.log(...) を叩くのはNGです。
先述した通り、tsserverからpluginが呼びだされた際に標準出力が汚れてしまうと、VSCなどの連携するエディタ側が予期せぬ動きをする可能性があります。
ログ出力が行いたい場合、TypeScriptが用意しているloggerを利用しましょう。
const info: ts.server.PluginCreateInfo;
info.project.projectService.logger.info('ログ!');
tsserverのログ出力是非は環境変数 TSS_LOG で制御できます。
export TSS_LOG="-file tsserver.log -level verbose"
tail -f tsserver.log
ASTから情報を引っこ抜く
Language Serviceのinterfaceを眺めてみるとわかりますが、多くのメソッドがファイル名を引数にとるように定義されています。
pluginが提供する機能は「いま開いている.tsファイルの構造を読み取って、情報を付与する」というケースが多いことを考慮すると、AST(抽象構文木)が欲しくなりますよね?むしろ欲しがれ。
こういった処理は languageService.getProgram() から ts.Program を持ってきてしまえば楽勝です。
const program = info.languageService.getProgram();
const source = program.getSourceFile('hogehoge.ts') as ts.Node;
// AST Nodeをvisitする処理など...
例えば「現在のカーソル上にあるNodeの情報を取得したい」であれば、次のように記述できます。
const program = info.languageService.getProgram();

export function findNode(sourceFile: ts.SourceFile, position: number): ts.Node | undefined {
  function find(node: ts.Node): ts.Node|undefined {
    if (position >= node.getStart() && position < node.getEnd()) {
      return ts.forEachChild(node, find) || node;
    }
  }
  return find(sourceFile);
}

const fileName = 'hogehoge.ts', position = 20;
const nodeOnCursor = findNode(program.getSourceFile(fileName), position);
おわりに
このエントリでは、TypeScript Language Service Pluginの作成方法を述べてきましたが、如何でしたでしょうか。
tips等いくつかの内容を書いてきましたが、結局のところ既存pluginのコードを読むのが一番勉強になるのではと思っています。
個人的には下記の2つが分量的にも程よかったです3。
冒頭にも書いたとおり、まだまだpluginの数は少ないので、是非何か作成して公開してみてください。それでは、また。
2017.04.20 追記
@vvakame さんが https://github.com/vvakame/typescript-plugin-example のレポジトリにサンプルを公開してくれました。感謝です...!
2017.05.24 追記
英語ですが、TS公式wikiにもpluginの作り方が記載されています https://github.com/Microsoft/TypeScript/wiki/Writing-a-Language-Service-Plugin
