色んな方が試されているRaspberry Piのおしゃべりですが、Node.jsを使ってブラウザから喋らせてみました。
環境
- Raspberry Pi2 ModelB (raspbian-wheezy・Node.js v4.2.4)
- PLANEX 無線LAN子機 (USBアダプター型) GW-USNANO2A (FFP)
- サンワサプライ USBスピーカー(ブラック) MM-SPU8BK
Raspberry Pi本体のセットアップやNode.jsのインストールは済んでいるという環境です。Node.jsを利用するのは初めてなので、出来る限り既存のパッケージを利用しようと考えました。
インストール
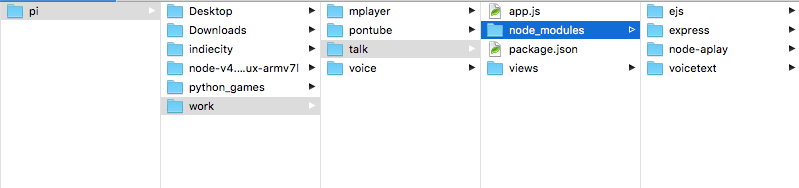
ディレクトリは以下の位置に作りました。
pi@raspberrypi ~/work $ mkdir talk
必要なパッケージ類をインストールします。
$  npm init

$  npm install express --save

$  npm install ejs --save

$  npm install voicetext --save

$  npm install node-aplay --save
ファイルは二つだけ作成しました。
 ~/work/talk/app.js

 ~/work/talk/views/talk.ejs
ファイル構成はこんな感じです。
Raspberry Piで合成音声を喋らせる。
こちらを利用してHOYA社のVoiceTextWebAPIから合成音声を取得します。wavファイルのRaspberry Piでの再生は
こちらを利用します。
//パッケージの読み込み許可
var express = require('express');
var ejs = require("ejs");
var VoiceText = require('voicetext');
var Sound = require('node-aplay');
//ファイル読み込み許可
var fs = require('fs');
//ブラウザ操作用のejsファイルのレダリング
var app = express();
app.engine('ejs',ejs.renderFile);
app.get('/', function(req, res){
res.render('talk.ejs',
{title: 'Raspberry Pi Talk'});
})
//合成音声の読み込みとwavファイル作成・再生
var voice = new VoiceText('xxxxxxxxxxxxxxxxx');
app.get('/control', function (req, res) {
console.log(req.query);
var text = req.query.text ? req.query.text : "";
var name = "ポンダッド"
if(text == "はじめまして"){
text = "はじめまして、わたしはラズベリーパイって言います。"
}else if(text =="わたしは" + name + "です"){
text = name + "さん、よろしくね"
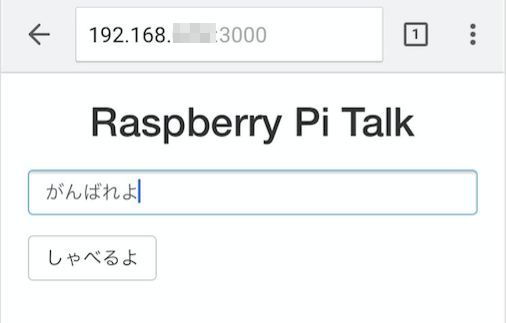
}else if(text == "がんばれよ"){
text = name + "お前も、がんばれよ。"
}
var speaker = req.query.speaker ? req.query.speaker : voice.SPEAKER.HARUKA;
var emotion = req.query.emotion ? req.query.emotion : voice.EMOTION.HAPPINESS;
var emotion_level = req.query.emotion_level ? req.query.emotion_level : voice.EMOTION_LEVEL.LOW;
var pitch = req.query.pitch ? req.query.pitch : 100;
var speed = req.query.speed ? req.query.speed : 100;
var volume = req.query.volume ? req.query.volume : 100;
voice.speaker(speaker)
.emotion(emotion)
.emotion_level(emotion_level)
.pitch(pitch)
.speed(speed)
.volume(volume)
.speak(text, function(e, buf){
return fs.writeFile('./talk.wav', buf, 'binary', function(e){
if(e){
return console.error(e);
}
new Sound('talk.wav').play();
})
});
res.send(text);
});
//ローカルサーバーの起動
var server = app.listen(3000, function () {
var host = server.address().address
var port = server.address().port
console.log('This app listening at http://192.168.x.xx:',port)
});
19行めより合成音声の作成になります。app.getのパスを/controlとしています。
これによりここでは192.168.x.xx:8000/control?text=〇〇〇〇という形で送られてきたGETリクエストの変数名textと引数〇〇〇〇を受け取ることが出来ます。
基本はこの引数を喋らせるのですが、今回は2,3のキーワードに対して返答をするようにしました。
あとはパッケージのドキュメントに沿って記述しました。wavファイルを保存して、再生させます。
ブラウザで操作する
<!DOCTYPE html>
<html lang="ja">
<head>
    <meta http-equiv="content-type"
        content="text/html; charset=UTF-8">
    <meta name="viewport" content="width=device-width, initial-scale=1.0,user-scalable=no">
    <title><%=title %></title>
     <link rel="stylesheet" href="https://maxcdn.bootstrapcdn.com/bootstrap/3.3.6/css/bootstrap.min.css" type="text/css" />
    <link rel="stylesheet" href="https://maxcdn.bootstrapcdn.com/font-awesome/4.5.0/css/font-awesome.min.css">
    <style>
     article{
       margin: 20px;
     }
    </style>
    </head>
<body>
    <header>
        <h1 class="text-center h2"><%=title %></h1>
    </header>
    <article>
    <form>
    <div class="form-group">
    <input class="form-control" type="text" id="query">
    </div>
    <input  class="btn btn-default" type="reset" value="しゃべるよ" onclick="send()" />
  </form>
    </article>
    <script src="http://ajax.googleapis.com/ajax/libs/jquery/2.2.2/jquery.min.js"></script>

    <script>
        var send = function() {
                var msg = document.getElementById('query').value;
                $.get("http://192.168.x.xx:3000/control", { text: msg } );
            };

    </script>
</body>
</html>
app.js の9行めよりこのtalk.ejsのレダリング指示を出しています。cssやjsのファイルを設置する際はもう少しレダリングの記述が増える為1ファイルにまとめました。
(BootstrapとJQueryはCDNで読み込んでいます)
JQueryのAJAXリクエストを利用して、フォームのinputより登録されたtextをGETリクエストとして送信します。
$.get("http://192.168.x.xx:3000/control", { text: msg } );
この部分が
http://192.168.x.xx:3000/control?text=msg
と送信されるので変数msgを引数としてvoicetextに引き渡すことが出来ます。
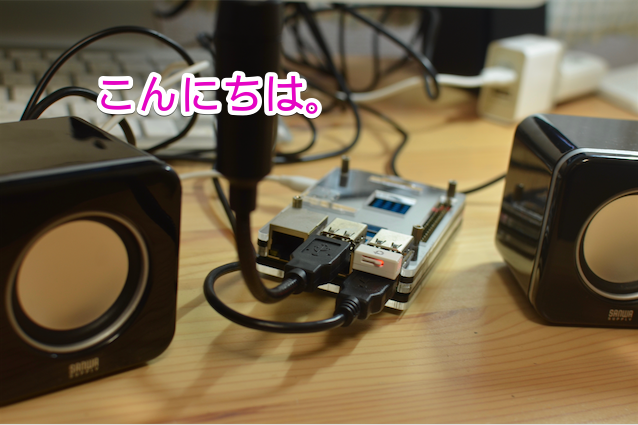
こんな感じ
アプリはsshより起動させます。
pi@raspberrypi ~/work/talk $ node app.js
This app listening at http://192.168.x.xx: 3000
ブラウザ側はhttp://192.168.x.xx:3000で開けます。
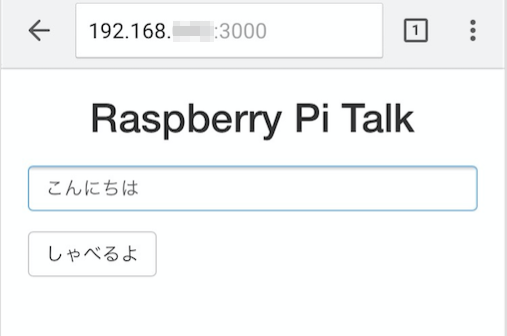
入力した言葉を返します。
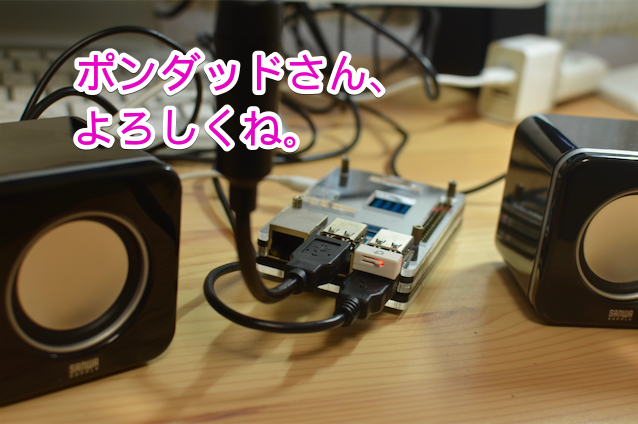
名前を変数nameで登録したのでこんな返事もします。

こんな言葉を投げかけると。
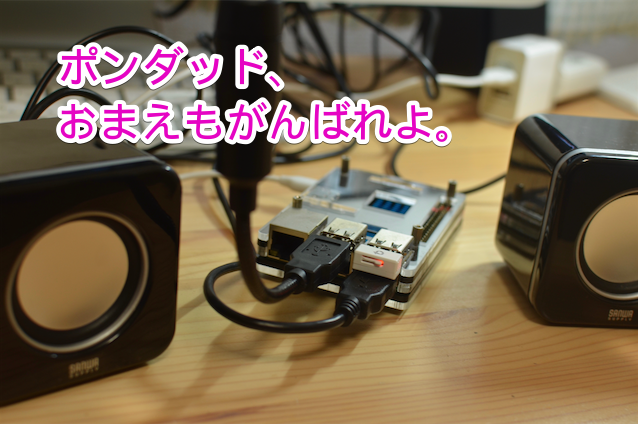
・・・。