#はじめに
VPSやAWSって便利ですよね。
git repositoryとして使ったり、メールサーバとして使ったり。自宅サーバのインストール作業って地味に時間がかかるので、僅かな手順で構築が済んじゃうのはとても魅力的です。
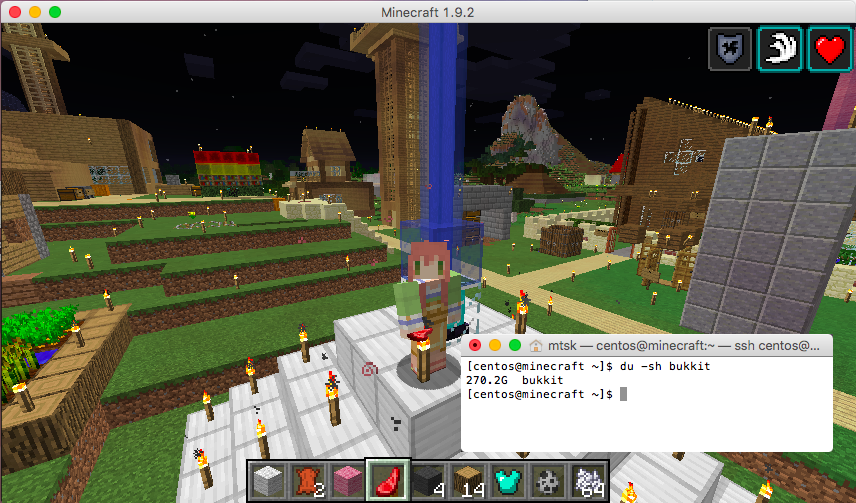
でもデータ量が多かったりして金銭的な面からクラウドに置きたくないものもあったりする訳じゃないですか、マインクラフトとか。
それだけのための自宅サーバ立ち上げはなんだかばからしいし、別目的でも使えるようにKubernetesでDocker管理-ってのも一つの候補なんでしょうけど、準仮想化じゃなくてVPSのような完全仮想化環境が欲しかったりするし。なら最近ちまたで話題のOpenStackでもいれてみよーじゃないか。そんな流れでこの記事を書きました。
※ 記事の作成にあたってはmasahixixiさんの記事1を大変参考にさせて頂きました。ありがとうございます。
#OpenStackについて
OpenStackはNASAと一企業(Rackspace Hosting)が作り始めたAWSライクなプライベートクラウド環境を提供するためのソフトウェアです。qemuとかKVMとかで動く完全仮想化環境を管理するので、LinuxだけじゃなくてWindowsだとかも動かせちゃいます。
AWSのEC2やS3と互換性を持たせているので、AWS上にインスタンスをお持ちの方はOpenStackに移行させることも出来るみたいです。
#必要なもの
- 4GB以上のメモリ、仮想化拡張機能対応のCPUと有線LAN対応のNICを持つPC1台以上
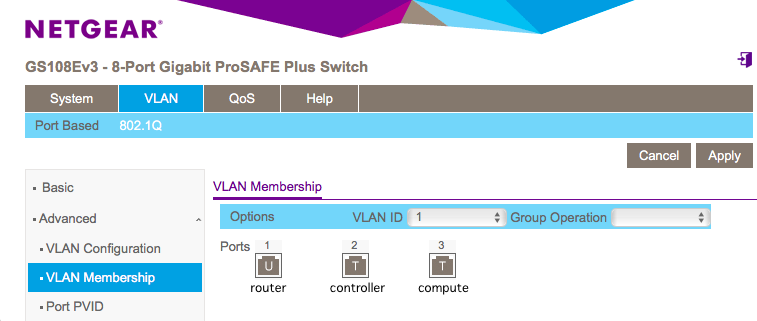
- VLAN対応のL2SW(たとえばこんなの)
#事前準備または前提
- 英語環境でのCentOS 7のインストール
- minimal構成
- 下記コマンド実行済み
# 時刻設定
yum -y install ntpdate lvm2
ntpdate ntp.nict.jp
systemctl enable ntpd
systemctl start ntpd
# パッケージ更新
yum -y update
# SELinux解除
setenforce 0
sed -i "s@=enforcing@=permissive@g" /etc/selinux/conf
# NetworkManager自動起動解除
systemctl disable NetworkManager
-
Physical Volume
-
cinder-volumesという名前のphysical volumeを
pvcreateで作成- 今回はcontroller nodeへ
-
VLAN2
-
下記要領で構築
 [router]--(internet)
    |10.1.1.1
  [L2SW]
    |
----+------------------------+--------------------- 10.0.0.0/8 external network (dhcp/vlan id=1)
    |10.0.0.1                |10.0.0.2
 [controller]             [compute]
    |  |192.168.1.1          |  |192.168.1.2
----|--+---------------------|--+------------------ 192.168.1.0/24 managing network (static/vlan id=2)
    |192.168.100.1           |192.168.100.2
----+------------------------+--------------------- 192.168.100.0/24 tunnel network (static/vlan id=3)
設定ファイルは次の通り。
DEVICE=enp2s0
TYPE=Ethernet
BOOTPROTO=none
ONBOOT=yes
DEVICE=enp2s0.1
BOOTPROTO=dhcp
ONBOOT=yes
VLAN=yes
DEVICE=enp2s0.2
BOOTPROTO=none
IPADDR=192.168.1.x # x=1:controller/compute, x=2,..:compute nodes
PREFIX=24
NETWORK=192.168.1.0
ONBOOT=yes
VLAN=yes
DEVICE=enp2s0.3
BOOTPROTO=none
IPADDR=192.168.100.x # x=1:controller/compute, x=2,..:compute nodes
PREFIX=24
NETWORK=192.168.100.0
ONBOOT=yes
VLAN=yes
上記設定完了後は下記コマンドでネットワークを再起動してください。
※ 設定の反映と同時に、L2SW側のタグVLAN機能を有効化して下さい。
# restart network
systemctl stop NetworkManager && service network restart
VLAN ID=1のネットワークの設定例. U Untagged, 至router; T Tagged
実際にはinterfaceの設定は2段階に分かれます。
external networkから各インスタンスにアクセスできるようにするためには、rdoprojectのNeutron with existing external networkという記事3に従って、OpenStackインストール後にcontroller兼networkノードのifcfg-enp2s0.1とifcfg-br-exを次の通り書き換える必要があります。
DEVICE=enp2s0.1
VLAN=yes

TYPE=OVSPort
DEVICETYPE=ovs
OVS_BRIDGE=br-ex
ONBOOT=yes
DEVICE=br-ex

TYPE=OVSBridge
DEVICETYPE=ovs
ONBOOT=yes

BOOTPROTO=static
IPADDR=10.0.0.1
NETMASK=255.0.0.0
GATEWAY=10.1.1.1
DNS1=10.1.1.1
DNS2=8.8.8.8
書き換えた後は再起動でもすると良いと思います。
#OpenStackのインストール
PackStackのインストール
RedHatからCentOS/RHEL向けにOpenStackのインストーラが提供されています4。
途中まではその手順に従ってインストールを進めてください。
yum install -y centos-release-openstack-mitaka
yum -y update
yum install -y openstack-packstack
packstack --gen-answer-file=mitaka
Answerfileの設定
answer-fileはOpenStackの各サービスに対する設定が盛りだくさんのファイルです。
デフォルトで生成されたものとのdiffをとったので参考にして下さい。
(networkingにnovaは利用されないにも関わらずnovaの設定をしていたりと、一部ちょっと試行錯誤の結果というか、無駄がありますが目をつむって頂ければ…)
@@ -92,14 +92,14 @@

 # Server on which to install OpenStack services specific to the
 # controller role (for example, API servers or dashboard).
-CONFIG_CONTROLLER_HOST=10.0.0.1
+CONFIG_CONTROLLER_HOST=192.168.1.1

 # List the servers on which to install the Compute service.
-CONFIG_COMPUTE_HOSTS=10.0.0.1
+CONFIG_COMPUTE_HOSTS=192.168.1.1,192.168.1.2

 # List of servers on which to install the network service such as
 # Compute networking (nova network) or OpenStack Networking (neutron).
-CONFIG_NETWORK_HOSTS=10.0.0.1
+CONFIG_NETWORK_HOSTS=192.168.1.1

 # Specify 'y' if you want to use VMware vCenter as hypervisor and
 # storage; otherwise, specify 'n'. ['y', 'n']
@@ -118,7 +118,7 @@
 # CONFIG_NEUTRON_LB_INTERFACE_MAPPINGS, CONFIG_NEUTRON_OVS_TUNNEL_IF.
 # This is useful for cases when interface names are not same on all
 # installation hosts.
-CONFIG_USE_SUBNETS=n
+CONFIG_USE_SUBNETS=y

 # IP address of the VMware vCenter server.
 CONFIG_VCENTER_HOST=
@@ -136,15 +136,15 @@

 # (Unsupported!) Server on which to install OpenStack services
 # specific to storage servers such as Image or Block Storage services.
-CONFIG_STORAGE_HOST=10.0.0.1
+CONFIG_STORAGE_HOST=192.168.1.1

 # (Unsupported!) Server on which to install OpenStack services
 # specific to OpenStack Data Processing (sahara).
-CONFIG_SAHARA_HOST=10.0.0.1
+CONFIG_SAHARA_HOST=192.168.1.1

 # Specify 'y' to enable the EPEL repository (Extra Packages for
 # Enterprise Linux). ['y', 'n']
-CONFIG_USE_EPEL=n
+CONFIG_USE_EPEL=y

 # Comma-separated list of URLs for any additional yum repositories,
 # to use for installation.
@@ -277,7 +277,7 @@
 CONFIG_AMQP_BACKEND=rabbitmq

 # IP address of the server on which to install the AMQP service.
-CONFIG_AMQP_HOST=10.0.0.1
+CONFIG_AMQP_HOST=192.168.1.1

 # Specify 'y' to enable SSL for the AMQP service. ['y', 'n']
 CONFIG_AMQP_ENABLE_SSL=n
@@ -299,7 +299,7 @@
 # installation was not specified in CONFIG_MARIADB_INSTALL, specify
 # the IP address of an existing database server (a MariaDB cluster can
 # also be specified).
-CONFIG_MARIADB_HOST=10.0.0.1
+CONFIG_MARIADB_HOST=192.168.1.1

 # User name for the MariaDB administrative user.
 CONFIG_MARIADB_USER=root
@@ -350,7 +350,7 @@
 CONFIG_KEYSTONE_IDENTITY_BACKEND=sql

 # URL for the Identity service LDAP backend.
-CONFIG_KEYSTONE_LDAP_URL=ldap://10.0.0.1
+CONFIG_KEYSTONE_LDAP_URL=ldap://192.168.1.1

 # User DN for the Identity service LDAP backend.  Used to bind to the
 # LDAP server if the LDAP server does not allow anonymous
@@ -754,33 +754,33 @@
 CONFIG_NOVA_PCI_PASSTHROUGH_WHITELIST=

 # Private interface for flat DHCP on the Compute servers.
-CONFIG_NOVA_COMPUTE_PRIVIF=
+CONFIG_NOVA_COMPUTE_PRIVIF=192.168.1.0/24

 # Compute Network Manager. ['^nova\.network\.manager\.\w+Manager$']
 CONFIG_NOVA_NETWORK_MANAGER=nova.network.manager.FlatDHCPManager

 # Public interface on the Compute network server.
-CONFIG_NOVA_NETWORK_PUBIF=eth0
+CONFIG_NOVA_NETWORK_PUBIF=10.0.0.0/8

 # Private interface for flat DHCP on the Compute network server.
-CONFIG_NOVA_NETWORK_PRIVIF=
+CONFIG_NOVA_NETWORK_PRIVIF=192.168.1.0/24

 # IP Range for flat DHCP. ['^[\:\.\da-fA-f]+(\/\d+){0,1}$']
-CONFIG_NOVA_NETWORK_FIXEDRANGE=192.168.32.0/22
+CONFIG_NOVA_NETWORK_FIXEDRANGE=192.168.1.0/24

 # IP Range for floating IP addresses. ['^[\:\.\da-
 # fA-f]+(\/\d+){0,1}$']
-CONFIG_NOVA_NETWORK_FLOATRANGE=10.3.4.0/22
+CONFIG_NOVA_NETWORK_FLOATRANGE=10.0.1.0/24

 # Specify 'y' to automatically assign a floating IP to new instances.
 # ['y', 'n']
 CONFIG_NOVA_NETWORK_AUTOASSIGNFLOATINGIP=n

 # First VLAN for private networks (Compute networking).
-CONFIG_NOVA_NETWORK_VLAN_START=100
+CONFIG_NOVA_NETWORK_VLAN_START=11

 # Number of networks to support (Compute networking).
-CONFIG_NOVA_NETWORK_NUMBER=1
+CONFIG_NOVA_NETWORK_NUMBER=9

 # Number of addresses in each private subnet (Compute networking).
 CONFIG_NOVA_NETWORK_SIZE=255
@@ -821,7 +821,7 @@
 # Comma-separated list of network-type driver entry points to be
 # loaded from the neutron.ml2.type_drivers namespace. ['local',
 # 'flat', 'vlan', 'gre', 'vxlan']
-CONFIG_NEUTRON_ML2_TYPE_DRIVERS=vxlan
+CONFIG_NEUTRON_ML2_TYPE_DRIVERS=vxlan,flat

 # Comma-separated, ordered list of network types to allocate as
 # tenant networks. The 'local' value is only useful for single-box
@@ -907,7 +907,7 @@
 # Interface for the Open vSwitch tunnel. Packstack overrides the IP
 # address used for tunnels on this hypervisor to the IP found on the
 # specified interface (for example, eth1).
-CONFIG_NEUTRON_OVS_TUNNEL_IF=
+CONFIG_NEUTRON_OVS_TUNNEL_IF=192.168.100.0/24

 # Comma-separated list of subnets (for example,
 # 192.168.10.0/24,192.168.11.0/24) used for sending tunneling packets.
@@ -916,7 +916,7 @@
 # This is useful when you add existing nodes to EXCLUDE_SERVERS
 # because, in this case, packstack cannot modify the IP filtering of
 # the existing nodes.
-CONFIG_NEUTRON_OVS_TUNNEL_SUBNETS=
+CONFIG_NEUTRON_OVS_TUNNEL_SUBNETS=192.168.100.0/24

 # IP version of network. Optional. Defaults to '4'. ['4', '6']
@@ -1150,7 +1150,7 @@
 CONFIG_HEAT_DOMAIN_PASSWORD=PW_PLACEHOLDER

 # Specify 'y' to provision for demo usage and testing. ['y', 'n']
-CONFIG_PROVISION_DEMO=y
+CONFIG_PROVISION_DEMO=n

 # Specify 'y' to configure the OpenStack Integration Test Suite
 # (tempest) for testing. The test suite requires OpenStack Networking
@@ -1231,11 +1231,11 @@
 CONFIG_CEILOMETER_METERING_BACKEND=database

 # IP address of the server on which to install MongoDB.
-CONFIG_MONGODB_HOST=10.0.0.1
+CONFIG_MONGODB_HOST=192.168.1.1

 # IP address of the server on which to install the Redis master
 # server.
-CONFIG_REDIS_MASTER_HOST=10.0.0.1
+CONFIG_REDIS_MASTER_HOST=192.168.1.1

 # Port on which the Redis server(s) listens.
 CONFIG_REDIS_PORT=6379
バグとり
CONFIG_USE_SUBNETS=yの設定(interfaceをenp2s0などのIF名称では無く192.168.1.0/24などのCIDR形式で指定出来るようになる設定)を有効化するため、一部ファイルを修正する必要があります。
下記の要領で修正して下さい。
@@ -77,7 +77,10 @@

             for interface in info['interfaces'].split(','):
                 interface = interface.strip()
-                ipaddr = info['ipaddress_{}'.format(interface)]
+                if 'ipaddress_{}'.format(interface) in info:
+                    ipaddr = info['ipaddress_{}'.format(interface)]
+                else:
+                    continue
                 netmask = info['netmask_{}'.format(interface)]
                 subnet_b = netaddr.IPNetwork('{ipaddr}/{netmask}'.format(**locals()))
                 if subnet_a == subnet_b:
@@ -877,6 +877,7 @@
         else:
             manifestdata += "$create_bridges = false\n"
         # neutron ovs port only on network hosts
+        tmp_iface_arr = iface_arr
         if (
             agent == "openvswitch" and (
                 (host in network_hosts and tunnel_types)
@@ -893,6 +894,7 @@
         # network hosts.
         manifestdata = getManifestTemplate('neutron_bridge_module')
         appendManifestFile(manifestfile, manifestdata + '\n')
+        iface_arr = tmp_iface_arr


 def create_sriovnicswitch_manifests(config, messages):
@@ -30,7 +30,10 @@
             lookupvar('interfaces').split(',').each do |interface|
               interface.strip!
               ifaddr = lookupvar("ipaddress_#{interface}")
-              ifcidr = IPAddr.new ifaddr
+              ifcidr = nil
+              if !ifaddr.nil?
+                ifcidr = IPAddr.new ifaddr
+              end
               if cidr.include?(ifcidr)
                 translated.push(interface)
               end
修正が完了したら、以下のコマンドを実行してOpenStackをインストールして下さい。
# 予期せぬネットワーク切断等でプロセスが死ぬのを防ぐためnohupで実行
nohup packstack --answer-file=mitaka &
fg
(SSHパスワードの入力)
(ctrl+z)
bg
tail -f nohup.out
#インストール後の後処理
最後はインスタンス実行のための環境を作って終わりです。
外部ネットワークとプロジェクト準備
事前準備のVLANの項で記載した2段階目の書き換えを行った上で実行して下さい。
# setting external network
. keystonerc_admin
neutron net-create external_network --provider:network_type flat --provider:physical_network extnet  --router:external
neutron subnet-create --name public_subnet --enable_dhcp=False --allocation-pool=start=10.0.1.1,end=10.0.1.254 --gateway=10.1.1.1 external_network 10.0.0.0/8
# creating project and intermediating router before setting private network
openstack project create --enable internal
openstack user create --project internal --password foo --email bar@corp.com --enable internal
export OS_USERNAME=internal
export OS_TENANT_NAME=internal
export OS_PASSWORD=foo
neutron router-create router1
# router1 <-> external network
neutron router-gateway-set router1 external_network
# setting private network
neutron net-create private_network
neutron subnet-create --name private_subnet private_network 192.168.100.0/24
# private network <-> router1 <-> external network
neutron router-interface-add router1 private_subnet
Dashboard(Horizon)へのexternal network側からアクセス有効化
185行目あたりを次のように編集した後にsystemctl restart httpd。
#    ('http://cluster2.example.com:5000/v2.0', 'cluster2'),
#]

-#OPENSTACK_HOST = "127.0.0.1"
-#OPENSTACK_KEYSTONE_URL = "http://%s:5000/v2.0" % OPENSTACK_HOST
+OPENSTACK_HOST = "10.0.0.1"
+OPENSTACK_KEYSTONE_URL = "http://%s:5000/v2.0" % OPENSTACK_HOST
 #OPENSTACK_KEYSTONE_DEFAULT_ROLE = "_member_"
-OPENSTACK_KEYSTONE_URL = "http://192.168.1.1:5000/v2.0"
+#OPENSTACK_KEYSTONE_URL = "http://192.168.1.1:5000/v2.0"
OPENSTACK_KEYSTONE_DEFAULT_ROLE = "_member_"

# Enables keystone web single-sign-on if set to True.
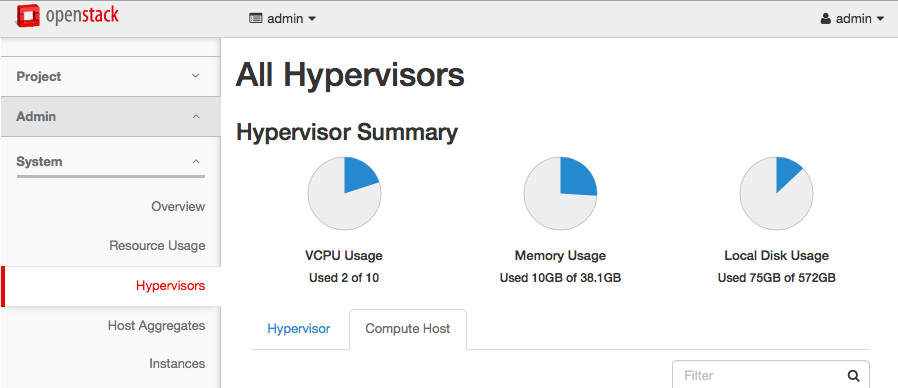
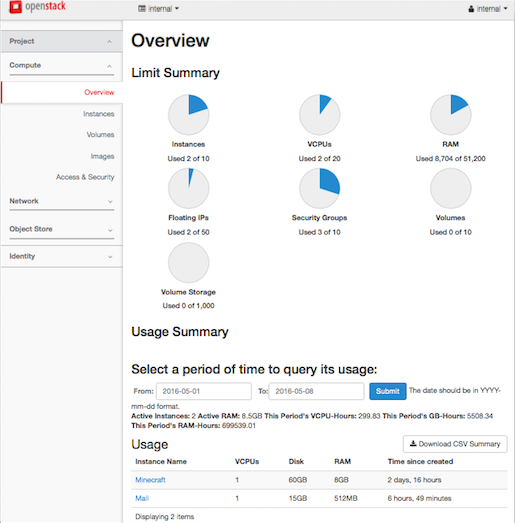
#完成図
インスタンスが自身の環境に好きなだけ作れるのはなかなかきもちーですね。
しかしRDO, ほとんどなにも分からず導入できちゃうのは危険だ…。
資格試験なども最近できてきたみたいなので、取り急ぎ構築できちゃった方は実際に使いつつ、こういう本で勉強しながら仕組みを学んでいくと良いかもしれません。
#参考にしたサイト、記事