Genuino 101を始めました。
漂流しています…
覚えとして記録します。
【目標】
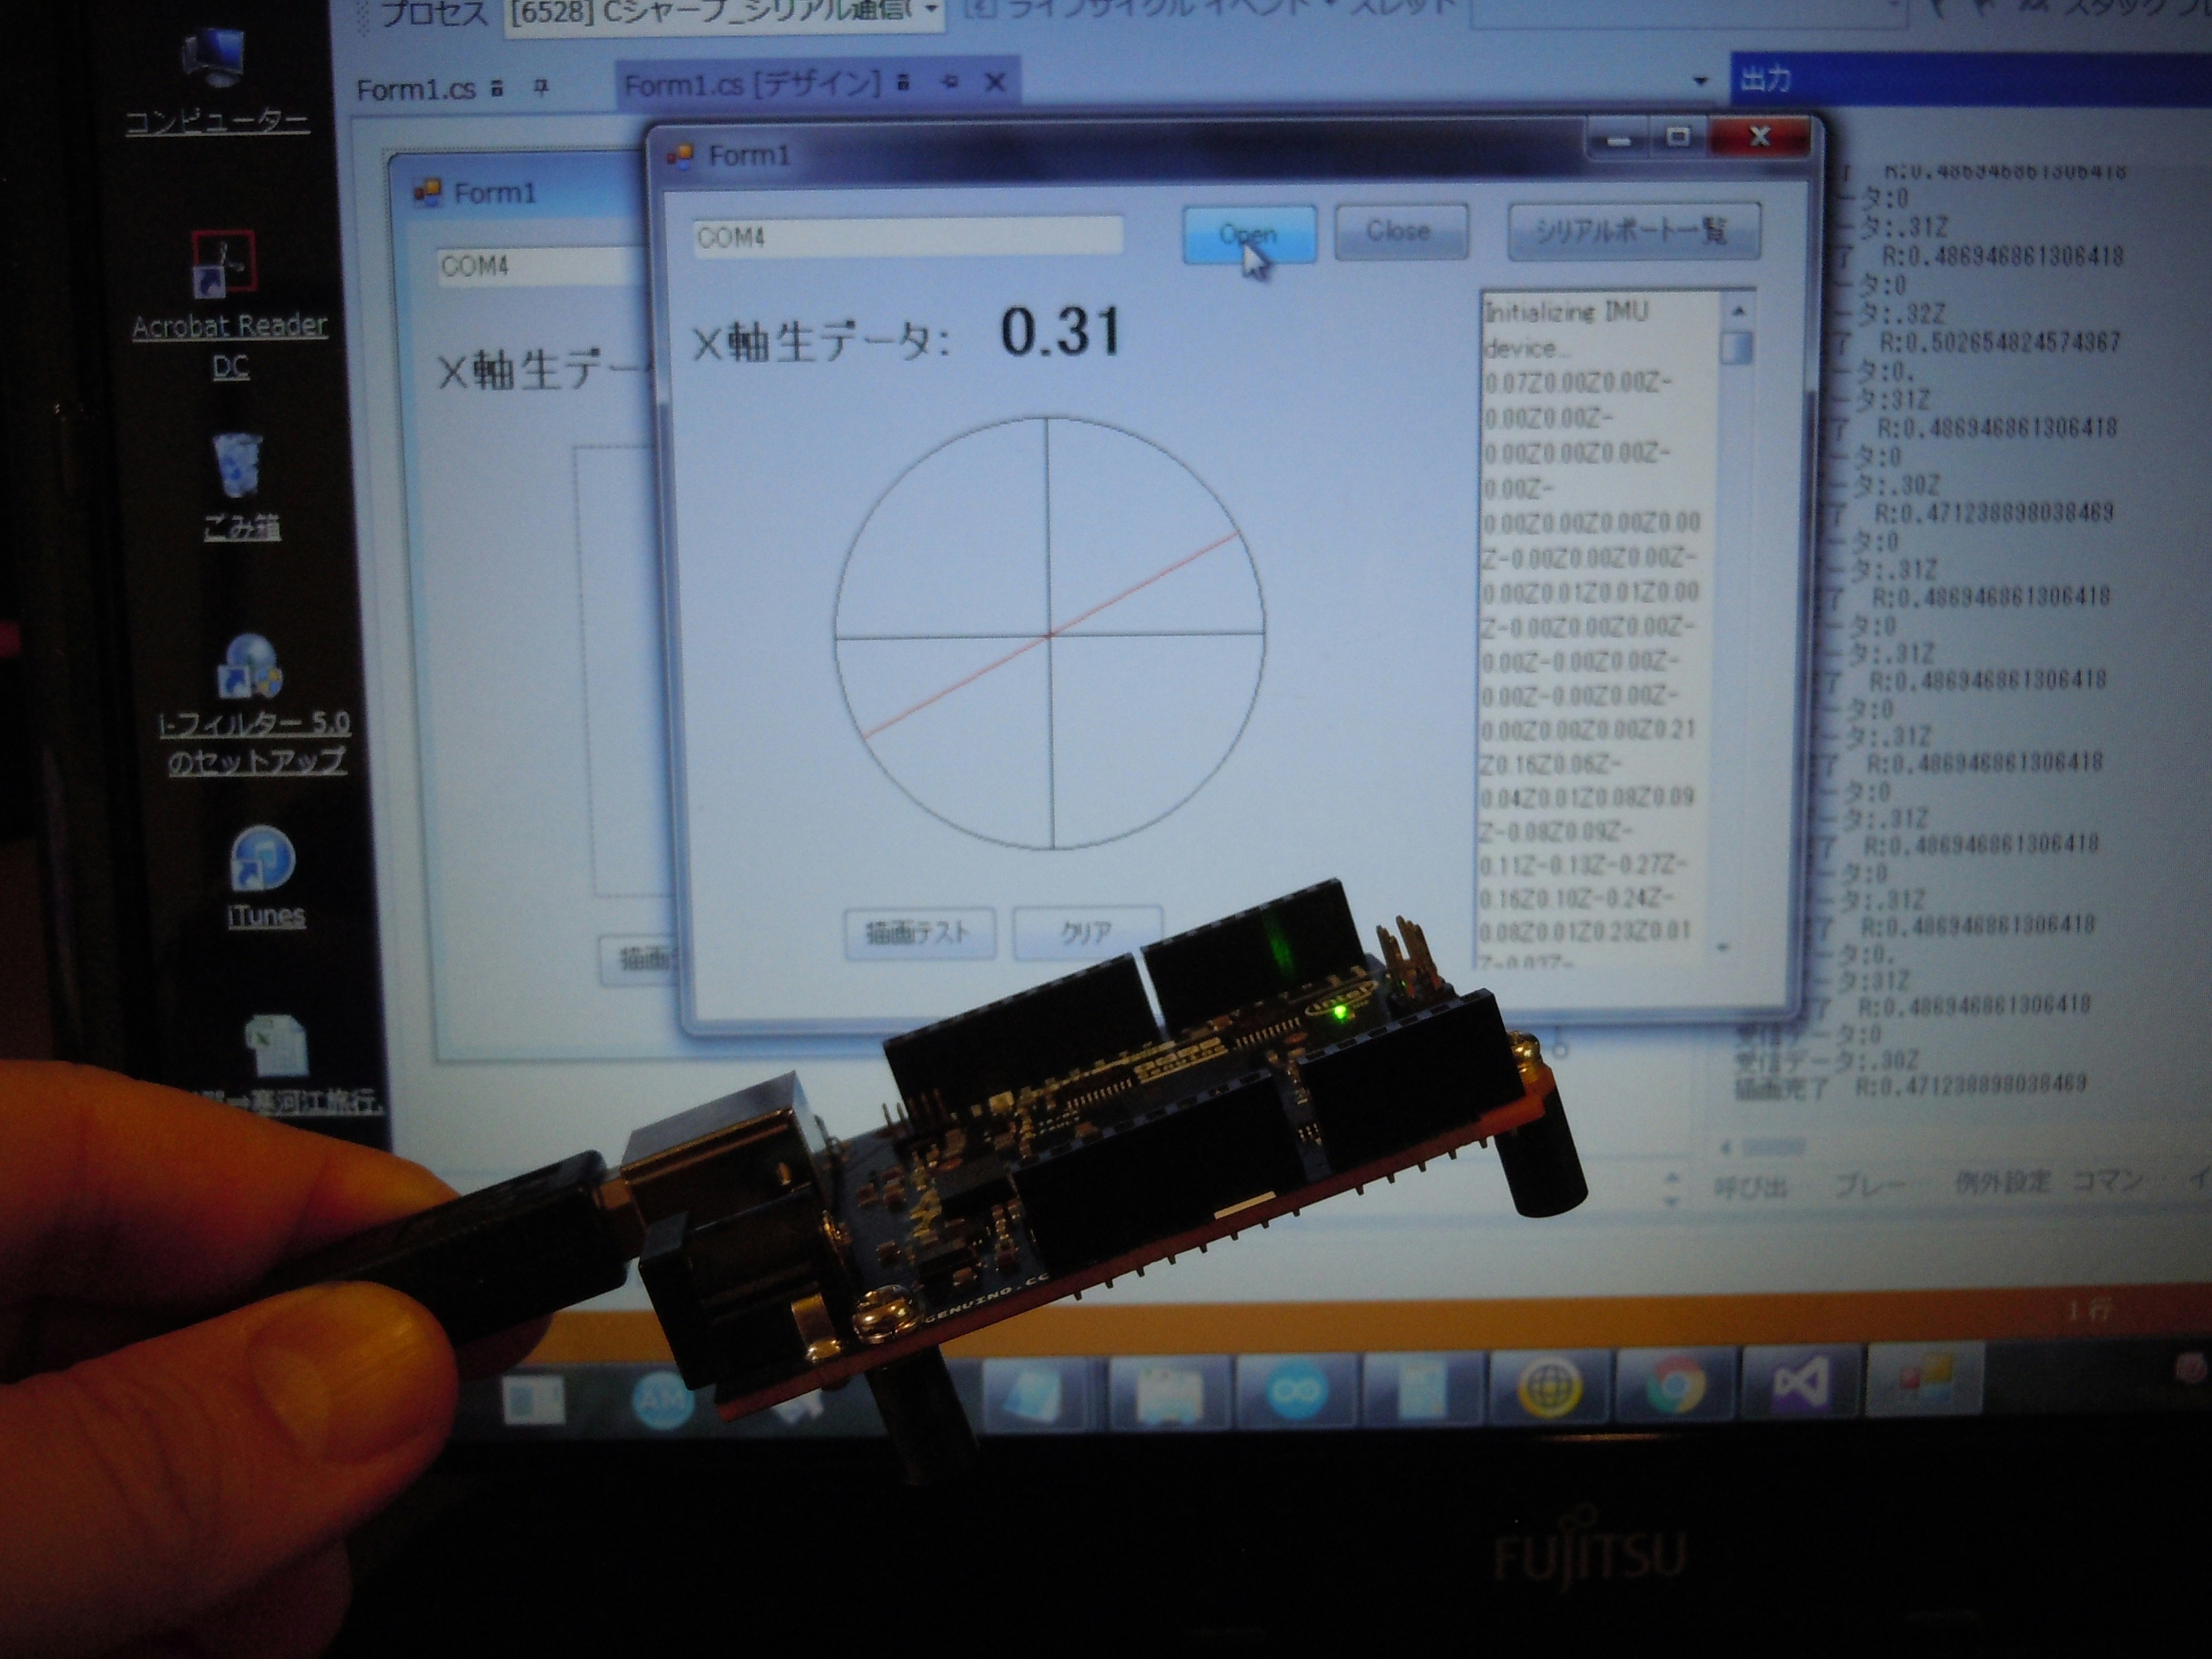
Genuino101の加速度センサx軸出力を、シリアル通信経由でPCへ出力し、C#のフォームアプリ上で角度をグラフィック表示する。
【解らなかったこと】
なんとか動いたが、
1.データの区切りをどうしたら良いのか?
delay(50)毎に送信するので、データはほぼ垂れ流し状態。
このデータをどう区切るのか悩んだ。
改行記号(\r\n)だとフォームアプリのrichTextBoxなどで確認しづらくなったので、代わりにデータの最期に”Z”を付加した。
そしてフォームアプリ側で”Z”を頼りにデータを切り出した。
C#側で、this.serialPort1.NewLine = "\r\n"; のような設定をしておけば、勝手にデータの区切りを入れてくれるのか???
2.受信データがぶち切れ
C#側のthis.serialPort1.ReadExisting();でデータを受け取るが、データが1~3文字程度にテキトーに切られた状態になっている。
これを文字列に一旦蓄積して、”Z”を頼りにデータを切り出した。
もっとスマートな方法は無いのか???
【コード】
下手ですがこんな感じです…
Genuino101
#include "CurieIMU.h"

void setup() {
  Serial.begin(9600); // initialize Serial communication
  while (!Serial);    // wait for the serial port to open

  // initialize device
  Serial.println("Initializing IMU device...");
  CurieIMU.begin();

  // Set the accelerometer range to 2G
  CurieIMU.setAccelerometerRange(2);
}

void loop() {
  float ax, ay, az;   //scaled accelerometer values

  //途中で通信が途切れた場合の処理。効果、要否は未確認。
  if(!Serial){
    Serial.begin(9600); // initialize Serial communication
    while (!Serial);    // wait for the serial port to open
  }

  // read accelerometer measurements from device, scaled to the configured range
  CurieIMU.readAccelerometerScaled(ax, ay, az);

  // display tab-separated accelerometer x/y/z values
  //Serial.print("a:\t");
  Serial.print(ax + 0.07);   //ここで補正値をいれちゃう
  //Serial.print("\t");
  //Serial.print(ay);
  //Serial.print("\t");
  //Serial.print(az);
  //Serial.println();

  Serial.print("Z");

  delay(50);
}
C#
        private void buttonOpen_Click(object sender, EventArgs e)
        {
            try
            {
                if (serialPort1.IsOpen)
                {
                    MessageBox.Show(this.textBox1.Text + " はすでに開かれています。", "エラー", MessageBoxButtons.OK, MessageBoxIcon.Error);
                }
                else
                {
                    // ポート番号文字列=this.textBox1.Text, 115200bps/N81/ハードウェアフロー/UTF8/改行=CR
                    this.serialPort1.PortName = this.textBox1.Text;
                    //this.serialPort1.BaudRate = 9600;
                    //this.serialPort1.Parity = System.IO.Ports.Parity.None;
                    //this.serialPort1.DataBits = 8;
                    //this.serialPort1.StopBits = System.IO.Ports.StopBits.One;
                    //this.serialPort1.Handshake = System.IO.Ports.Handshake.RequestToSend;
                    this.serialPort1.Encoding = Encoding.ASCII;
                    //this.serialPort1.NewLine = "\r\n";
                    serialPort1.Open();
                    Debug.WriteLine("PortをOpenしました。");

                    //↓追加してみた。これ重要
                    serialPort1.DtrEnable = true;
                    serialPort1.RtsEnable = true;

                }
            }
            catch (Exception ex)
            {
                MessageBox.Show(ex.Message, "エラー", MessageBoxButtons.OK, MessageBoxIcon.Error);
            }

        }

        private void buttonClose_Click(object sender, EventArgs e)
        {

            serialPort1.Close();
            serialPort1.Dispose();

        }

        private void serialPort1_DataReceived(object sender, System.IO.Ports.SerialDataReceivedEventArgs e)
        {
            // 受信文字列の取得
            //Debug.WriteLine("文字列を受信しました");

            string receivedData;
            try
            {
                receivedData = this.serialPort1.ReadExisting();
                //受信データ += receivedData;
                受信データ = receivedData;
                //receivedData = receivedData.Replace(this.serialPort1.NewLine, "\r\n");
                Debug.WriteLine("受信データ:" + 受信データ);

                受信データ = "";     //Debug.WriteLineしたのでクリアしとく。

            }
            catch (Exception ex)
            {
                receivedData = ex.Message;
            }

            // richTextBox側のスレッドに AddRecievedDataメソッドのポインタを渡して、
            // 受信文字列を追加させる
            AddRecievedDataDelegate add = new AddRecievedDataDelegate(AddRecievedData);
            this.richTextBox1.Invoke(add, receivedData);

        }

        private delegate void AddRecievedDataDelegate(string data);

        private void AddRecievedData(string data)
        {

            this.richTextBox1.Text += data;     //ここにはつらつらと文字列を追加する。

            //本命! この変数にデータを蓄積しZを確認したところで、
            //データを切り出す。
            TempStr += data;

            if (TempStr.Contains("Z"))
            {
                TempStr = TempStr.Replace("Z","");
                TempStr = TempStr.Replace("\r\n", "");
                TempStr = TempStr.Replace("\r", "");
                TempStr = TempStr.Replace("\n", "");
                TempStr = TempStr.Replace(" ", "");

                this.label_x.Text = TempStr;    //ラベルに値を書き込み値を保管。

                TempStr = "";

                //PictureBoxに書き込む
                描画();
            }

        }

        private void 描画()
        {
            double d;
            double R;
            float x =0, y = 0;

            if (double.TryParse(this.label_x.Text, out d))
            {
                //doubleに変換可能
                //↓
                //描画先とするImageオブジェクトを作成する
                Bitmap canvas = new Bitmap(pictureBox1.Width, pictureBox1.Height);
                //ImageオブジェクトのGraphicsオブジェクトを作成する
                Graphics g = Graphics.FromImage(canvas);

                //座標軸
                g.DrawLine(Pens.Black, 0, 100, 200, 100);
                g.DrawLine(Pens.Black, 100, 0, 100, 200);
                //基本円
                g.DrawEllipse(Pens.Black, 0, 0, 200, 200);

                //x,yの座標を確定→floatに変換
                R = Math.PI * (d * 90) / 180;  //ラジアンを確保!
                x = (float)(100 * Math.Cos(R));
                y = (float)(100 * Math.Sin(R));

                g.DrawLine(Pens.Red, 100 + x, 100 - y, 100 - x, 100 + y);

                Debug.WriteLine("描画完了 R:" + R);

                //リソースを解放する
                g.Dispose();
                //PictureBox1に表示する
                pictureBox1.Image = canvas;

            }
        }