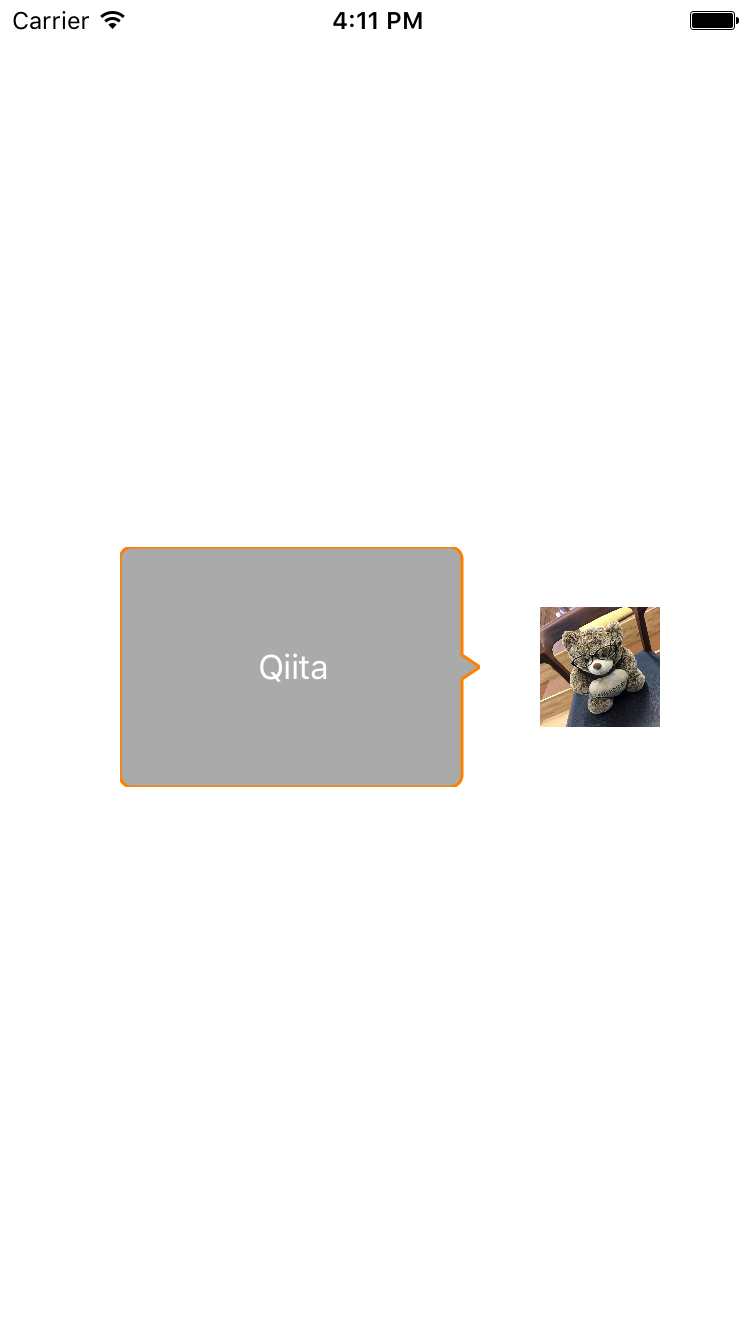
下の画像の吹き出しのようなViewを作ってみます
レンダリング用のProtocolを定義
吹き出しだけではなく、その他のレンダリングするような処理とも共通化したいので先にProtocolを定義しておきます
// レンダリングのProtocol
protocol Renderer {
    associatedtype OptionType

    static func render(in context: CGContext, rect: CGRect, option: OptionType)
}

// パスに沿うレンダリングのProtocol
protocol PathRenderer: Renderer {
    static func path(rect: CGRect, option: OptionType) -> CGPath
}
吹き出し用のRenderer
先程のPathRendererに準拠して吹き出し用のRendererを作っていきます
struct BalloonRenderer: PathRenderer {
    typealias OptionType = Option

    struct Option {
        var cornerRadius: CGFloat
        var fillColor: UIColor
        var borderWidth: CGFloat
        var borderColor: UIColor

        static var `default`: Option {
            return Option(cornerRadius: 6,
                          fillColor: .lightGray,
                          borderWidth: 1.5,
                          borderColor: .orange)
        }
    }

    struct Triangle {
        let width: CGFloat = 9.0
        let height: CGFloat = 12.0
        let yOffset: CGFloat = 54.0
    }

    private static let triangle = Triangle()

    static func path(rect: CGRect, option: OptionType) -> CGPath {
        let path = UIBezierPath()
        path.move(to: CGPoint(x: 0, y: option.cornerRadius))
        path.addArc(withCenter: CGPoint(x: option.cornerRadius, y: option.cornerRadius),
                    radius: option.cornerRadius,
                    startAngle: CGFloat(-M_PI), endAngle: CGFloat(-M_PI_2),
                    clockwise: true)
        path.addLine(to: CGPoint(x: rect.width - option.cornerRadius - triangle.width, y: 0))
        path.addArc(withCenter: CGPoint(x: rect.width - option.cornerRadius - triangle.width, y: option.cornerRadius),
                    radius: option.cornerRadius,
                    startAngle: CGFloat(-M_PI_2), endAngle: 0,
                    clockwise: true)
        path.addLine(to: CGPoint(x: rect.width - triangle.width, y: triangle.yOffset))
        path.addLine(to: CGPoint(x: rect.width, y: triangle.height/2 + triangle.yOffset))
        path.addLine(to: CGPoint(x: rect.width - triangle.width, y: triangle.height + triangle.yOffset))
        path.addLine(to: CGPoint(x: rect.width - triangle.width, y: rect.height - option.cornerRadius))
        path.addArc(withCenter: CGPoint(x: rect.width - option.cornerRadius - triangle.width, y: rect.height - option.cornerRadius),
                    radius: option.cornerRadius,
                    startAngle: 0, endAngle: CGFloat(M_PI_2),
                    clockwise: true)
        path.addLine(to: CGPoint(x: option.cornerRadius, y: rect.height))
        path.addArc(withCenter: CGPoint(x: option.cornerRadius, y: rect.height - option.cornerRadius),
                    radius: option.cornerRadius,
                    startAngle: CGFloat(M_PI_2), endAngle: CGFloat(M_PI),
                    clockwise: true)
        path.close()
        return path.cgPath
    }

    static func render(in context: CGContext, rect: CGRect, option: OptionType) {
        let path = self.path(rect: rect, option: option)

        context.saveGState()
        context.setFillColor(UIColor.clear.cgColor)
        context.fill(rect)

        context.beginPath()
        context.addPath(path)
        context.setFillColor(option.fillColor.cgColor)
        context.fillPath()

        if option.borderWidth > 0.0 {
            context.beginPath()
            context.addPath(path)
            context.setLineWidth(option.borderWidth)
            context.setStrokeColor(option.borderColor.cgColor)
            context.strokePath()
        }

        context.restoreGState()
    }

}
吹き出しView
先程のBalloonRendererを使って実際にViewを作っていきます
class BalloonView: UIView {
    override init(frame: CGRect) {
        super.init(frame: frame)
        commonInit()
    }

    required init?(coder aDecoder: NSCoder) {
        super.init(coder: aDecoder)
        commonInit()
    }

    func commonInit() {
        self.backgroundColor = .clear
    }

    override func draw(_ rect: CGRect) {
        super.draw(rect)

        guard let context = UIGraphicsGetCurrentContext() else {
            return
        }

        let option = BalloonRenderer.Option.default
        BalloonRenderer.render(in: context, rect: rect, option: option)
    }
}
おわり
こんな感じでサクっと書けます。また、Renderのプロトコルに準拠して角丸Viewとかも定義しておくと便利だと思います