iOSでダイアログ表示用のクラスUIAlertViewがiOS8からdeprecatedになるため、
UIAlertViewを使用した際の挙動と推奨されているUIAlertControllerについてまとめました。
(本記事の内容は一般公開されているiOS8の情報に基づいています。
iOS8に関するスクリーンショットは掲示していません。)
iOS8で廃止されるUIAlertViewを使用した際の挙動
deprecatedされたメソッドを使用した場合、アプリが落ちるなどの問題が発生することがありますが、
iOS8 beta2の環境ではシミュレータ・実機ともに問題なく表示できます。
2014/6/24現在では継続してUIAlertViewを使用したままでも問題無いようです。
上記の内容はObjective-Cに関してであり、Swift(iOS8)ではEXC_BAD_ACCESSでアプリが落ちます。
公式にdeprecatedと宣言されているため挙動が変わる可能性は否定できません。
推奨されているUIAlertControllerへの移行をおすすめします。
推奨されているUIAlertControllerのメリット
iOS8以降で利用が推奨されているUIAlertControllerのメリットの1つとして、
レイアウトの自由な変更ができます。
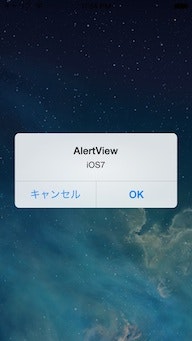
iOS7までのUIAlertViewでは左にcancelボタン、右にotherボタンが配置されていました。
またcancelボタンの文字はBoldのフォントで表示されていました。
(「はい」「いいえ」を逆に表示させたい場合はコード上で指定を逆にして
表示させていた方もいらっしゃるでしょう。)
新しいUIAlertControllerでは左右どちらに何のボタンを配置するのか任意に決められます。
さらにボタンのフォントを以下の3つの中から選ぶことができます。
- UIAlertActionStyleDefault:標準
- UIAlertActionStyleCancel:Bold表示
- UIAlertActionStyleDestructive:文字色が赤色
また - addTextFieldWithConfigurationHandler:を使用することでダイアログ内にTextFieldを挿入させることができます。
iOS7以前のOSをサポートする際の注意点
開発中のアプリの中にはiOS7以前をサポートするアプリもあるかと思います。
そのためにはUIAlertViewとUIAlertControllerをコード内で併用して使い分けることが必要です。
その際にボタンが押された時の処理に注意してください。
UIAlertViewではdelegateメソッドで処理しますが、
UIAlertControllerはクロージャで処理します。
UIAlertViewとUIAlertControllerを併用する際にはボタンが押された時のメソッドを作成して、
そのメソッドを両者で使い回すことをオススメします。
サンプルコード
UIAlertController
Objective-C
UIAlertController *alertController = [UIAlertController alertControllerWithTitle:@"UIAlertControllerStyle.Alert" message:@"iOS8" preferredStyle:UIAlertControllerStyleAlert];

// addActionした順に左から右にボタンが配置されます
[alertController addAction:[UIAlertAction actionWithTitle:@"はい" style:UIAlertActionStyleDefault handler:^(UIAlertAction *action) {
    // otherボタンが押された時の処理
    [self otherButtonPushed];
}]];
[alertController addAction:[UIAlertAction actionWithTitle:@"いいえ" style:UIAlertActionStyleDefault handler:^(UIAlertAction *action) {
    // cancelボタンが押された時の処理
    [self cancelButtonPushed];
}]];

[self presentViewController:alertController animated:YES completion:nil];

- (void)cancelButtonPushed {}
- (void)otherButtonPushed {}
UIAlertView (deprecated in iOS8)
UIAlertView *alertView = [[UIAlertView alloc] initWithTitle:@"AlertView"
                                                    message:@"iOS7"
                                                    delegate:self
                                                    cancelButtonTitle:@"いいえ"
                                                    otherButtonTitles:@"はい", nil];
[alertView show];

...

-(void)alertView:(UIAlertView*)alertView clickedButtonAtIndex:(NSInteger)buttonIndex {
  switch (buttonIndex) {
    case 0:
      // cancelボタンが押された時の処理
      [self cancelButtonPushed];
      break;
    case 1:
      // otherボタンが押されたときの処理
      [self otherButtonPushed];
      break;
  }
}

- (void)cancelButtonPushed {}
- (void)otherButtonPushed {}
Swift
var alertController = UIAlertController(title: "UIAlertControllerStyle.Alert", message: "iOS8", preferredStyle: .Alert)

let otherAction = UIAlertAction(title: "はい", style: .Default) {
    action in NSLog("はいボタンが押されました")
}
let cancelAction = UIAlertAction(title: "いいえ", style: .Cancel) {
    action in NSLog("いいえボタンが押されました")
}

// addActionした順に左から右にボタンが配置されます
alertController.addAction(otherAction)
alertController.addAction(cancelAction)

presentViewController(alertController, animated: true, completion: nil)
参考
公式Class Reference
https://developer.apple.com/library/prerelease/iOS/documentation/UIKit/Reference/UIAlertController_class/index.html#//apple_ref/occ/cl/UIAlertController