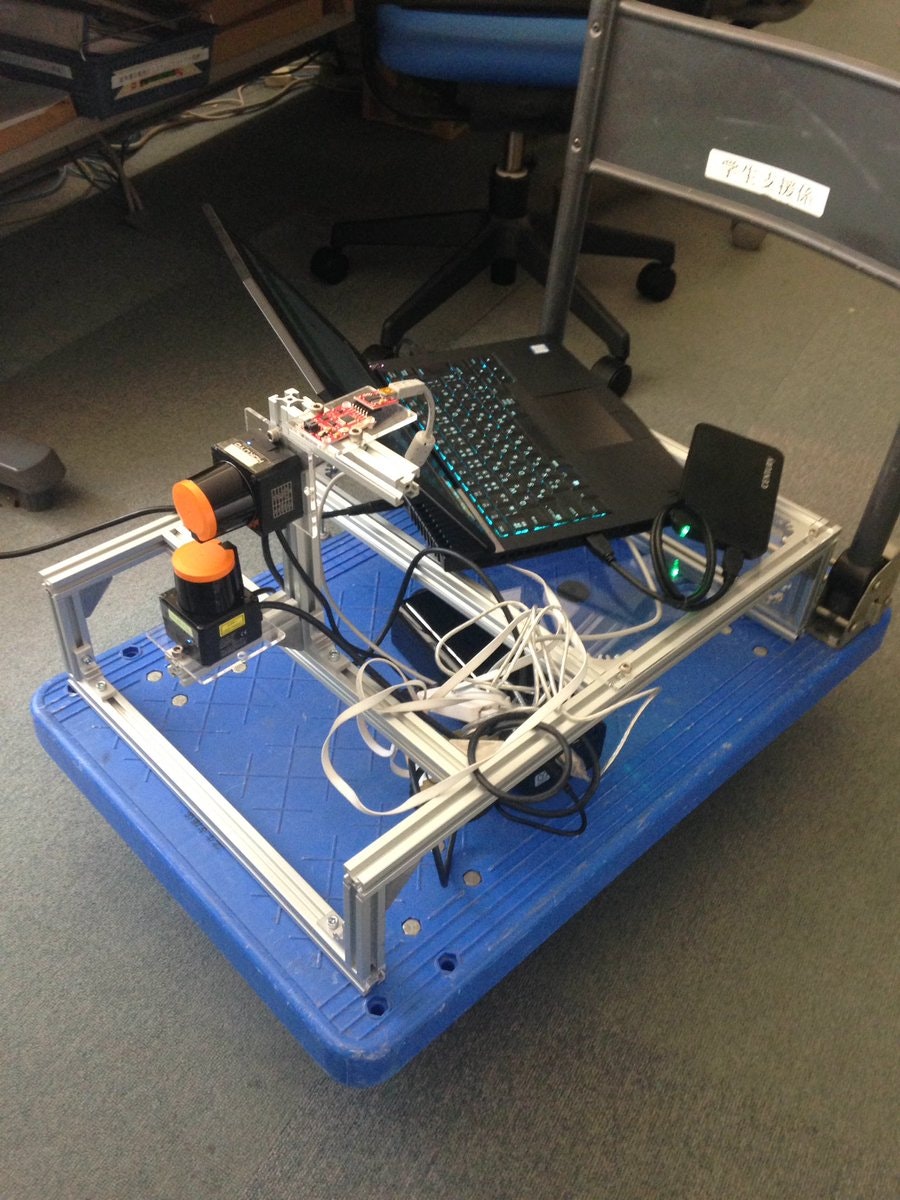
使用機器
Lidar 北陽電機 UST-10LX 2台
IMU 9DOF Razor
こんな感じでセットアップしてます。
準備
ROS
ROS kinetic Kameのインストール
http://wiki.ros.org/ROS/Installation
Cartographerのインストール
https://google-cartographer-ros.readthedocs.io/en/latest/
Demoを動かして動作を確認
Lidar
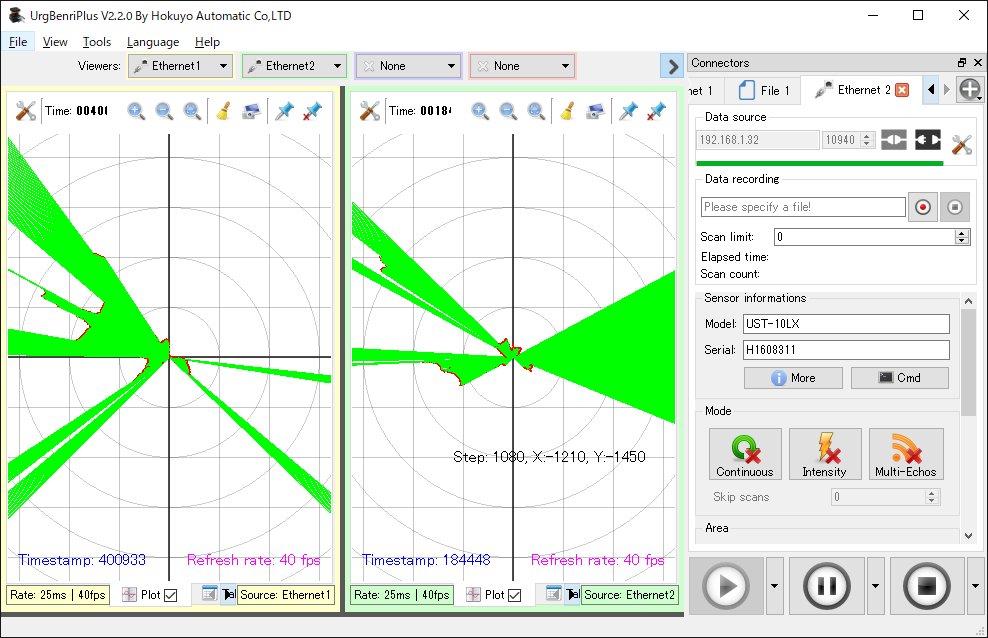
IPアドレスの設定
Windowsで、今回使用する北陽電機のLiderのIPアドレス等を設定し確認ツールで信号が出ているかチェックする。
NODEのインストール
$ sudo apt-get install ros-kinetic-urg-node
NODEの確認
それぞれの端末で
$ roscore
$ rosrun urg_node urg_node _ip_address:="192.168.1.31"
$ rviz
https://sourceforge.net/p/urgnetwork/wiki/ROS%20Support_ja/
* "Global Options->Fixed Frame"を"/laser"に変更します。
* "LaserScan" の表示を追加します。
* 第1エコーを表示するため、"LaserScan->Topic"を"/scan"に設定します。
* マルチエコー機能が対応されている場合、第2エコーを表示するため、"LaserScan" の表示を追加し、その"LaserScan->Topic" を"/secondary_scan" に設定します。それ以降のエコーも同様に設定を行います。
IMU
使ったのはこれ
https://www.switch-science.com/catalog/679/
NODEのインストール
https://github.com/KristofRobot/razor_imu_9dof を参考に
(Arduinoはすでに書き込み済み)
$ sudo apt-get install python-visual

$ cd ~/catkin_ws/src
$ git clone https://github.com/KristofRobot/razor_imu_9dof.git
$ cd ..
$ catkin_make_isolated --install --use-ninja

$ sudo usermod -a -G dialout $USER

$ sudo apt-get install arduino
Arduinoでファームウエアの書き込み。再起動しないとシリアルポートが見つからなかった。
configuration
$ roscd razor_imu_9dof/config
$ cp razor.yaml my_razor.yaml
確認
これのインストールが必要だった。
$ sudo apt-get install python-wxtools
$ source install_isolated/setup.bash
$ roslaunch razor_imu_9dof razor-pub-and-display.launch
キャリブレーション
Proccesingをダウンロードする。(2.XX系)
https://processing.org/
展開して一旦実行し、作業フォルダを作成する。
mkdir -p ~/sketchbook/libraries/EJML/library
cd ~/sketchbook/libraries/EJML/library
https://ja.osdn.net/frs/g_redir.php?m=netix&f=%2Fejml%2Fv0.25%2Fejml-0.25.jar
からファイルを持ってきてEJML.jarにリネームする。
~/catkin_ws/src/razor_imu_9dof/magnetometer_calibration/Processing/Magnetometer_calibration フォルダのMagnetometer_calibration.pdeを実行し、キャリブレーションデータを得る。コンソールに表示されるので、それをmy_razor.yamlに書き込む。
Cartogrpherのサンプルを持ってくる。
$ cd ~/catkin_ws/src
$ git clone https://github.com/ros-japan-users/cartographer_example
lauch/urg.lauch を書き換え
IPアドレスに変更
<launch>
  <node name="horizontal_laser" pkg="urg_node"
    type="urg_node" >
    <param name="ip_address" value="192.168.1.31" />
    <param name="frame_id" value="horizontal_laser_link" />
    <!-- remap from="scan" to="horizontal_laser_2d" / -->
  </node>

  <!-- node name="vertical_laser" pkg="urg_node"
    type="urg_node" >
    <param name="serial_port" value="/dev/ttyACM1" />
    <param name="frame_id" value="vertical_laser_link" />
    <remap from="scan" to="vertical_laser_2d" />
  </node -->

  <include file="$(find razor_imu_9dof)/launch/razor-pub.launch" />

  <node pkg="tf" type="static_transform_publisher" name="imu_link_connect" args="0 0 0 0 0 0 /imu_link /base_imu_link 100"/>

  <param name="robot_description"
    textfile="$(find cartographer_ros)/urdf/backpack_2d.urdf" />

  <node name="robot_state_publisher" pkg="robot_state_publisher"
    type="robot_state_publisher" />

  <node name="cartographer_node" pkg="cartographer_ros"
      type="cartographer_node" args="
          -configuration_directory $(find cartographer_example)/configuration_files
          -configuration_basename urg04x.lua"
      output="screen">
    <!-- remap from="scan" to="horizontal_laser_2d" / -->
  </node>

  <node name="rviz" pkg="rviz" type="rviz" required="true"
      args="-d $(find cartographer_ros)/configuration_files/demo_2d.rviz" />
</launch>
CMakeLists.txtの修正
installにconfiguration_filesを追加
cmake_minimum_required(VERSION 2.8.3)
project(cartographer_example)

## Find catkin macros and libraries
## if COMPONENTS list like find_package(catkin REQUIRED COMPONENTS xyz)
## is used, also find other catkin packages
find_package(catkin REQUIRED COMPONENTS
  cartographer_ros
  razor_imu_9dof
  tf
  urg_c
  urg_node
)

## System dependencies are found with CMake's conventions
# find_package(Boost REQUIRED COMPONENTS system)


## Uncomment this if the package has a setup.py. This macro ensures
## modules and global scripts declared therein get installed
## See http://ros.org/doc/api/catkin/html/user_guide/setup_dot_py.html
# catkin_python_setup()

################################################
## Declare ROS messages, services and actions ##
################################################

## To declare and build messages, services or actions from within this
## package, follow these steps:
## * Let MSG_DEP_SET be the set of packages whose message types you use in
##   your messages/services/actions (e.g. std_msgs, actionlib_msgs, ...).
## * In the file package.xml:
##   * add a build_depend tag for "message_generation"
##   * add a build_depend and a run_depend tag for each package in MSG_DEP_SET
##   * If MSG_DEP_SET isn't empty the following dependency has been pulled in
##     but can be declared for certainty nonetheless:
##     * add a run_depend tag for "message_runtime"
## * In this file (CMakeLists.txt):
##   * add "message_generation" and every package in MSG_DEP_SET to
##     find_package(catkin REQUIRED COMPONENTS ...)
##   * add "message_runtime" and every package in MSG_DEP_SET to
##     catkin_package(CATKIN_DEPENDS ...)
##   * uncomment the add_*_files sections below as needed
##     and list every .msg/.srv/.action file to be processed
##   * uncomment the generate_messages entry below
##   * add every package in MSG_DEP_SET to generate_messages(DEPENDENCIES ...)

## Generate messages in the 'msg' folder
# add_message_files(
#   FILES
#   Message1.msg
#   Message2.msg
# )

## Generate services in the 'srv' folder
# add_service_files(
#   FILES
#   Service1.srv
#   Service2.srv
# )

## Generate actions in the 'action' folder
# add_action_files(
#   FILES
#   Action1.action
#   Action2.action
# )

## Generate added messages and services with any dependencies listed here
# generate_messages(
#   DEPENDENCIES
#   std_msgs  # Or other packages containing msgs
# )

################################################
## Declare ROS dynamic reconfigure parameters ##
################################################

## To declare and build dynamic reconfigure parameters within this
## package, follow these steps:
## * In the file package.xml:
##   * add a build_depend and a run_depend tag for "dynamic_reconfigure"
## * In this file (CMakeLists.txt):
##   * add "dynamic_reconfigure" to
##     find_package(catkin REQUIRED COMPONENTS ...)
##   * uncomment the "generate_dynamic_reconfigure_options" section below
##     and list every .cfg file to be processed

## Generate dynamic reconfigure parameters in the 'cfg' folder
# generate_dynamic_reconfigure_options(
#   cfg/DynReconf1.cfg
#   cfg/DynReconf2.cfg
# )

###################################
## catkin specific configuration ##
###################################
## The catkin_package macro generates cmake config files for your package
## Declare things to be passed to dependent projects
## INCLUDE_DIRS: uncomment this if you package contains header files
## LIBRARIES: libraries you create in this project that dependent projects also need
## CATKIN_DEPENDS: catkin_packages dependent projects also need
## DEPENDS: system dependencies of this project that dependent projects also need
catkin_package(
#  INCLUDE_DIRS include
#  LIBRARIES cartographer_example
#  CATKIN_DEPENDS cartographer_ros razor_imu_9dof tf urg_c urg_node
#  DEPENDS system_lib
)

###########
## Build ##
###########

## Specify additional locations of header files
## Your package locations should be listed before other locations
# include_directories(include)
include_directories(
  ${catkin_INCLUDE_DIRS}
)

## Declare a C++ library
# add_library(cartographer_example
#   src/${PROJECT_NAME}/cartographer_example.cpp
# )

## Add cmake target dependencies of the library
## as an example, code may need to be generated before libraries
## either from message generation or dynamic reconfigure
# add_dependencies(cartographer_example ${${PROJECT_NAME}_EXPORTED_TARGETS} ${catkin_EXPORTED_TARGETS})

## Declare a C++ executable
# add_executable(cartographer_example_node src/cartographer_example_node.cpp)

## Add cmake target dependencies of the executable
## same as for the library above
# add_dependencies(cartographer_example_node ${${PROJECT_NAME}_EXPORTED_TARGETS} ${catkin_EXPORTED_TARGETS})

## Specify libraries to link a library or executable target against
# target_link_libraries(cartographer_example_node
#   ${catkin_LIBRARIES}
# )

#############
## Install ##
#############

# all install targets should use catkin DESTINATION variables
# See http://ros.org/doc/api/catkin/html/adv_user_guide/variables.html

## Mark executable scripts (Python etc.) for installation
## in contrast to setup.py, you can choose the destination
# install(PROGRAMS
#   scripts/my_python_script
#   DESTINATION ${CATKIN_PACKAGE_BIN_DESTINATION}
# )

## Mark executables and/or libraries for installation
# install(TARGETS cartographer_example cartographer_example_node
#   ARCHIVE DESTINATION ${CATKIN_PACKAGE_LIB_DESTINATION}
#   LIBRARY DESTINATION ${CATKIN_PACKAGE_LIB_DESTINATION}
#   RUNTIME DESTINATION ${CATKIN_PACKAGE_BIN_DESTINATION}
# )

## Mark cpp header files for installation
# install(DIRECTORY include/${PROJECT_NAME}/
#   DESTINATION ${CATKIN_PACKAGE_INCLUDE_DESTINATION}
#   FILES_MATCHING PATTERN "*.h"
#   PATTERN ".svn" EXCLUDE
# )

## Mark other files for installation (e.g. launch and bag files, etc.)
install(DIRECTORY
  launch configuration_files
  DESTINATION ${CATKIN_PACKAGE_SHARE_DESTINATION}
)

#############
## Testing ##
#############

## Add gtest based cpp test target and link libraries
# catkin_add_gtest(${PROJECT_NAME}-test test/test_cartographer_example.cpp)
# if(TARGET ${PROJECT_NAME}-test)
#   target_link_libraries(${PROJECT_NAME}-test ${PROJECT_NAME})
# endif()

## Add folders to be run by python nosetests
# catkin_add_nosetests(test)
で、最後に~/catkin_ws/でビルド&インストール
$ catkin_make_isolated --install --use-ninja
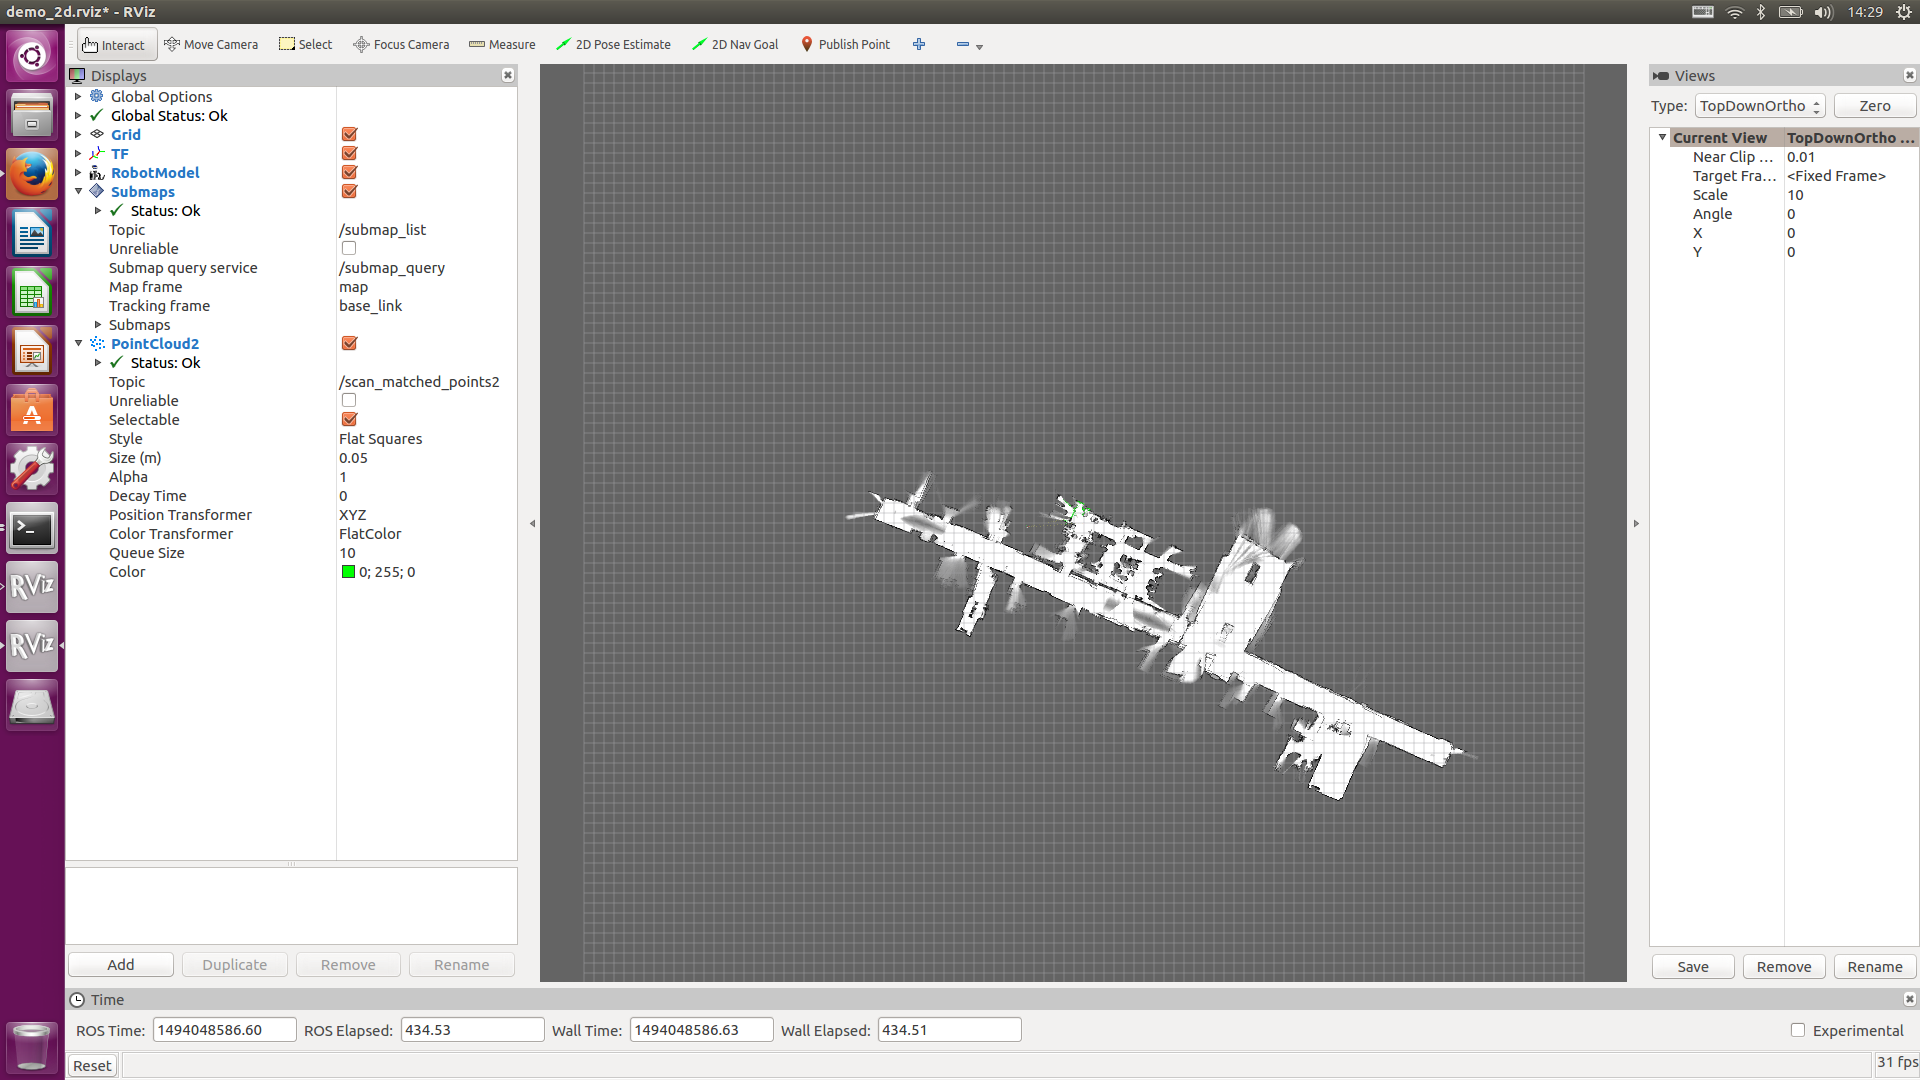
実行
$ source catkin_ws/install_isolated/setup.bash
$ roslaunch cartographer_example urg.launch
動いた。。。この時点ではまだ1台のLidarしか使っていないけど。。。