raspberry-Pi3でcentos7をインストールしてみよう!
必須なもの
raspberry-Pi3(動作確認のため)
PC(windows,mac,linux)
micro-sdカード16G以上推奨
raspberry-Pi3ようのcentos7
http://buildlogs.centos.org/centos/7/isos/armhfp/
上記URLからダウンロード
CentOS-Userland-7-armv7hl-Minimal-1606-RaspberryPi3.img.xz
インストールまでの環境
windows
mac ,linux
windowsとmac,linuxどちらともインストール手順を記載します。
windowsでsetup
インストールするもの
DD for Windows
7zip
CentOS-Userland-7-armv7hl-Minimal-1606-RaspberryPi3.img.xz
早速windowsで作成していく
ダウンロードしたCentOS-Userland-7-armv7hl-Minimal-1606-RaspberryPi3.img.xzファイルを7zipなどで解凍します。
PCにmicro-SDカードを接続する。
DD for Windowsを起動

ディスク選択でusb(micro-SD)を選択
このときに選択したいusbが表示されないことがあります。
その場合は、
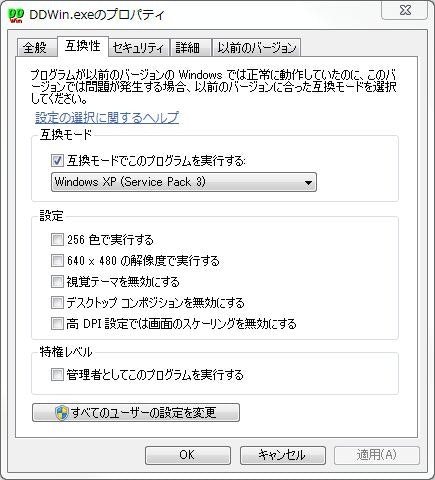
DD for Windowsのexeファイルのプロパティを開き、
互換性のところの互換モードでこのプログラムを実行するを
[Windows XP(servixw Pack3)]
に変更してあげてください。
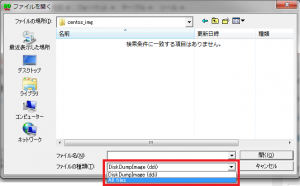
デフォルトでは、.ddiという拡張子しか表示しない設定となっているため、ファイルの種類(I)の項目でALL filesを選択し先ほど解凍したcentosを選択する。
準備ができたら書込ボタンを押してください。
書き込むイメージファイルがよりSDカードの容量が大きい場合、以下の警告が表示されます。問題ないか確認し、問題なければはい(Y)を選択します。

書込みが完了したらwindowsでの作業は終了です。
mac,linuxでsetup
mac,linuxに関してはコマンドベースで進めていきます。
centosイメージをサイトに行きダウンロードまたはコマンドでダウンロードします。
※コマンドの場合は任意の場所へコマンドで移動して
# macの場合 Homebrew
curl -O http://buildlogs.centos.org/centos/7/isos/armhfp/CentOS-Userland-7-armv7hl-Minimal-1606-RaspberryPi3.img.xz

# linuxの場合
wget http://buildlogs.centos.org/centos/7/isos/armhfp/CentOS-Userland-7-armv7hl-Minimal-1606-RaspberryPi3.img.xz
centosイメージを展開します。
解凍するためにはxzコマンドが必要なのでインストールします。
# macの場合 Homebrew
brew install xz

# ubuntuの場合
apt-get install xz

# centosの場合
yum install xz
でインストールすることができます。
# ファイルを解凍する
xz -d CentOS-Userland-7-armv7hl-Minimal-1606-RaspberryPi3.img.xz
それでは、micro-SDに書き込んでいきます。
micro-SDをまずfatにフォーマットし、アンマウントしておきます。
$ df
# -----中略
/dev/disk3s2   120503488      4928 120498560     1%        0       0  100%   /Volumes/CENTOS7  100%   /Volumes/CENTOS7
# このとき /dev/disk3がありますが/dev/disk3s2を選択してください。
$ diskutil umount /dev/disk3s2
micro-SDにosイメージを書き込みます。
$ sudo dd if=CentOS-Userland-7-armv7hl-Minimal-1606-RaspberryPi3.img of=/dev/disk3 bs=8192
$ sync
393216+0 records in
393216+0 records out
3221225472 bytes transferred in 492.534314 secs (6540104 bytes/sec)
これで設定完了です。
CentOS起動+ログイン
micro-SDRaspberry Pi 3に差し込んで起動します。
起動が完了したら、ログインをします。初期で登録されているのは
login : root
password: centos
になります。
CentOS Linux 7 (Core)
centos-rpi3 login: root
Password:
キーボード設定
これをしておかないと直接触るとき大変なので
109キー日本語レイアウトのキーボードの設定をします。
$ localectl set-keymap jp106
$ localectl set-keymap jp-OADG109A

## System Localeを変更もしておきます
$ localectl set-locale LANG=ja_JP.utf8

## localectlで確認
$ localectl
System Locale: LANG=ja_JP.utf8
       VC Keymap: jp-OADG109A
      X11 Layout: jp
       X11 Model: jp106
     X11 Options: terminate:ctrl_alt_bksp
このようになっていれば完了です。
ssh設定
DHCPでもsshはつなげるので
コマンドでipが何になっているのか確認
$ nmcli d show eth0
IP4.ADDRESS[1]: 192.168.x.x
手持ちのmacまたはlinuxで接続確認します。
$ ssh root@192.168.x.x
確認ができればokです。
yumコマンドが効かない
現段階では最新バージョンのcentosでyumコマンドが効きません。
この時早いのがcentos7の最新バージョン
CentOS-Userland-7-armv7hl-Minimal-1606-RaspberryPi3.img
ではなくて、
CentOS-Userland-7-armv7hl-Minimal-1602-RaspberryPi3.img
を使いましょう。
どうしても、最新のバージョンが使いたい!という人はこの作業をしましょう。
もしかしたら、修正されている可能性があるので
yum updateをしておきましょう。
http://mirror.centos.org/altarch/7/kernel/armhfp/kernel-rpi2/repodata/repomd.xml: [Errno 14] HTTP Error 404 - Not Found
というエラーが出た場合は修正する必要があります。
それでは、さっそくやっていきます。
cd /etc/yum.repos.d
vi kernel.repo
kernel.repoというファイルを修正していきます。
このファイルの中に
baseurl=http://mirror.centos.org/altarch/7/kernel/armhfp/kernel-rpi2/
と記述されている箇所があります。
ここを修正してあげます。
baseurl=http://mirror.centos.org/altarch/7.2.1511/kernel/armhfp/kernel-rpi2/repodata/
このように修正してあげます。
このように修正した後にyumコマンドが使えるようになっています。
もし、使えない場合は一度、再起動しましょう。
Rootパーティションのサイズ拡張
私はsdカードは64GBを使ってしたのですが、dfで確認したところRootパーティションが2GBしかとられていませんでした。
$ df -h
Filesystem      Size  Used Avail Use% Mounted on
/dev/root       2.0G  682M  1.2G  38% /
devtmpfs        459M     0  459M   0% /dev
tmpfs           463M     0  463M   0% /dev/shm
tmpfs           463M  6.2M  457M   2% /run
tmpfs           463M     0  463M   0% /sys/fs/cgroup
/dev/mmcblk0p1  300M   66M  235M  22% /boot
tmpfs            93M     0   93M   0% /run/user/0
READMEにはこう書いてあります。
== CentOS 7 userland ==

If you want to automatically resize your / partition, just type the following (as root user):
touch /.rootfs-repartition
systemctl reboot
しかし、この方法でしてみたら、Kernel Panicで起動しなくなってしまいました。
なので、parted使ってrootパーティション拡張します。
$ parted /dev/mmcblk0
GNU Parted 3.1
Using /dev/mmcblk0
Welcome to GNU Parted! Type 'help' to view a list of commands.
(parted) p
Model: SD SA64G (sd/mmc)
Disk /dev/mmcblk0: 61.9GB
Sector size (logical/physical): 512B/512B
Partition Table: msdos
Disk Flags:

Number  Start   End     Size    Type     File system     Flags
 1      1049kB  316MB   315MB   primary  fat16           lba
 2      316MB   852MB   537MB   primary  linux-swap(v1)
 3      852MB   3000MB  2147MB  primary  ext4

(parted) rm 3
Error: Partition(s) 3 on /dev/mmcblk0 have been written, but we have been unable to inform the kernel of the change,
probably because it/they are in use.  As a result, the old partition(s) will remain in use.  You should reboot now
before making further changes.
Ignore/Cancel? i
(parted) p
Model: SD SA64G (sd/mmc)
Disk /dev/mmcblk0: 61.9GB
Sector size (logical/physical): 512B/512B
Partition Table: msdos
Disk Flags:

Number  Start   End    Size   Type     File system     Flags
 1      1049kB  316MB  315MB  primary  fat16           lba
 2      316MB   852MB  537MB  primary  linux-swap(v1)
(parted) mkpart primary 852M 61.9G
Error: Partition(s) 3 on /dev/mmcblk0 have been written, but we have been unable to inform the kernel of the change,
probably because it/they are in use.  As a result, the old partition(s) will remain in use.  You should reboot now
before making further changes.
Ignore/Cancel? i
(parted) p
Model: SD SA64G (sd/mmc)
Disk /dev/mmcblk0: 61.9GB
Sector size (logical/physical): 512B/512B
Partition Table: msdos
Disk Flags:

Number  Start   End     Size    Type     File system     Flags
 1      1049kB  316MB   315MB   primary  fat16           lba
 2      316MB   852MB   537MB   primary  linux-swap(v1)
 3      852MB   61.9GB  61.1GB  primary  ext4

(parted) quit
Information: You may need to update /etc/fstab.
$ reboot
この時点ではまだファイルシステムは拡張されていません。
$ df -h
Filesystem      Size  Used Avail Use% Mounted on
/dev/root        2.0G  682M  1.2G   38% /
devtmpfs         459M     0  459M    0% /dev
tmpfs            463M     0  463M    0% /dev/shm
tmpfs            463M  6.1M  457M    2% /run
tmpfs            463M     0  463M    0% /sys/fs/cgroup
/dev/mmcblk0p1   300M   66M  234M   22% /boot
tmpfs             93M     0   93M    0% /run/user/0
fdiskで見るとパーティションテーブルは書き換わっています。
$ fdisk -l /dev/mmcblk0

Disk /dev/mmcblk0: 61.9 GB, 61924704256 bytes, 120946688 sectors
Units = sectors of 1 * 512 = 512 bytes
Sector size (logical/physical): 512 bytes / 512 bytes
I/O size (minimum/optimal): 512 bytes / 512 bytes
Disk label type: dos
Disk identifier: 0x000703bf

        Device Boot      Start         End      Blocks   Id  System
/dev/mmcblk0p1            2048      616447      307200    c  W95 FAT32 (LBA)
/dev/mmcblk0p2          616448     1665023      524288   82  Linux swap / Solaris
/dev/mmcblk0p3         1665024   120946687    59640832   83  Linux
あとはresize2fsでファイルシステムを拡張します。
$ resize2fs /dev/mmcblk0p3
resize2fs 1.42.9 (28-Dec-2013)
Filesystem at /dev/mmcblk0p3 is mounted on /; on-line resizing required
old_desc_blocks = 1, new_desc_blocks = 8
The filesystem on /dev/mmcblk0p3 is now 14910208 blocks long.
これでrootパーティションが大きくなりました。
$ df -h
Filesystem      Size  Used Avail Use% Mounted on
/dev/root        56G  689M   53G   2% /
devtmpfs        459M     0  459M   0% /dev
tmpfs           463M     0  463M   0% /dev/shm
tmpfs           463M  6.1M  457M   2% /run
tmpfs           463M     0  463M   0% /sys/fs/cgroup
/dev/mmcblk0p1  300M   66M  234M  22% /boot
tmpfs            93M     0   93M   0% /run/user/0
NTP設定
時間も調整しておきます。時間調整を行わないと後述の作業でcurlコマンドがSSL接続できなくてエラーになります。
NTPをインストールしてntp.confを調整します。
$ yum install -y ntp

$ vi /etc/ntp.conf
## 既存のエントリコメントアウトしてntpサーバ追加します。
# server 0.centos.pool.ntp.org
# server 1.centos.pool.ntp.org
# server 2.centos.pool.ntp.org
server -4 ntp.nict.jp
server -4 ntp1.jst.mfeed.ad.jp
server -4 ntp2.jst.mfeed.ad.jp
server -4 ntp3.jst.mfeed.ad.jp
ntpdを有効かして、タイムゾーン変更します。
$ systemctl enable ntpd
$ systemctl start ntpd
$ cp /usr/share/zoneinfo/Asia/Tokyo /etc/localtime
cp: overwrite '/etc/localtime'? y
$ date
## 時間設定の確認
確認ができれば完了です。
Wifi接続設定
この時点ではwlan0が認識されていないので無線LAN用が利用できません。
$ nmcli d
DEVICE  TYPE      STATE         CONNECTION
eth0    ethernet  connected     eth0
lo      loopback  unmanaged     --
githubから必要なFirmwareをダウンロードして配置します。
$ yum -y install git
$ git clone https://github.com/RPi-Distro/firmware-nonfree.git
$ mv /lib/firmware/brcm{,.org}
$ cp -R firmware-nonfree/brcm80211/brcm /lib/firmware/brcm
rpi-updateをダウンロードして実行します。この中でFirmwareのアップデートなどが行われます。アップデート後は再起動します。
$ curl -L --output /usr/bin/rpi-update https://raw.githubusercontent.com/Hexxeh/rpi-update/master/rpi-update
$ chmod +x /usr/bin/rpi-update
$ rpi-update
$ reboot
再起動後、見てみるとwlan0が認識されているのがわかります。
$ nmcli d
DEVICE  TYPE      STATE         CONNECTION
eth0    ethernet  connected     eth0
wlan0   wifi      disconnected  --
lo      loopback  unmanaged     --
後はPCなどと同じように接続設定をしていきます。
$ nmcli d wifi
# -> Wifiアクセスポイントのリストが一覧されます
$ nmcli d wifi connect <your_uuid> password <your_keyphrase>
$ nmcli d
DEVICE  TYPE      STATE      CONNECTION
eth0    ethernet  connected  eth0
wlan0   wifi      connected  <your_uuid>
lo      loopback  unmanaged  --
最後にwlan0に割り当てられたIPを確認します。
$ nmcli d show wlan0
以上で設定終了となります。