はじめに
ros_controlの辺りって,チュートリアルを読みながら作業を進めれば何となく分かった気になるし、まぁ使えるっちゃ使えるんだけど,実際中身はどうなっているんだろう?と,気になったりはしませんか?
名前空間とかクラス名のあちこちにeffortやpositionとかvelocityとか入り込んできているし,容量の悪い私の頭は随分と混乱してしまいました.ROS Wiki を見ても,詳しい解説があるわけでもなく,あとはコードへのリンクがペトッと貼ってあるだけです.
じゃあ,コードを読んで自分で理解しろってことか!と解釈し,理解した内容をメモするに至りました.結論は,普通のPID制御をしているだけなのですが,どんなフローで指令が計算されているかを知った上で使えるようになれば,実装も変わってくるでしょうし,中身が分かれば自分好みに変えちゃうことだってできるわけです.
受け取る指令値と関節に送る指令値の組み合わせによって解釈が変わる部分も存在しており,それらの情報を文字だけで整理すると混乱を招くと判断したため,簡易的なブロック線図を示すことで視覚的にも仕様の理解を支援できるようにしました.
というわけで,コードをトレースしながら理解を深めていくことにします.
扱うコントローラの種類
Controllerが受け取る指令の種類がposition, velocity, effortの3種類,ロボットの関節に送る指令値の種類(HardwareInterface)も同様に3種類ですが,その組み合わせは下記の6通りとなっています.
position_controllers (関節に位置指令を送る)
- Joint Position Controller (位置指令を受け取る)
velocity_controllers (関節に速度指令を送る)
- Joint Velocity Controller (速度指令を受け取る)
- Joint Position Controller (位置指令を受け取る)
effort_controllers (関節に力指令を送る)
- Joint Effort Controller (力指令を受け取る)
- Joint Velocity Controller (速度指令を受け取る)
- Joint Position Controller (位置指令を受け取る)
以上の名称から推察するに,下記のような命名ルールが成り立っていそうです.
-
JointHogeContorollerのHogeには,他ノードから受け取る指令値の種類が入る. -
hoge_controllersのhogeには,ロボットの関節に送る指令値の種類が入る.
この対応関係を表にすると,下記のとおりです.太字で頭大文字が受け取る指令値の種別,全小文字が関節に送る指令値の種別です.
| Position | Velocity | Effort | |
|---|---|---|---|
| position | ○ | ☓ | ☓ |
| velocity | ○ | ○ | ☓ |
| effort | ○ | ○ | ○ |
基本ソフトウェア構成
すぐコードを見たい所ですが,まずはgazeboでros_controlを利用する場合を例に,基本構成をおさらいします.
詳細については,以前に小生が投稿したController と HardwareInterface との間の処理の仕組みに譲らせて頂きます.
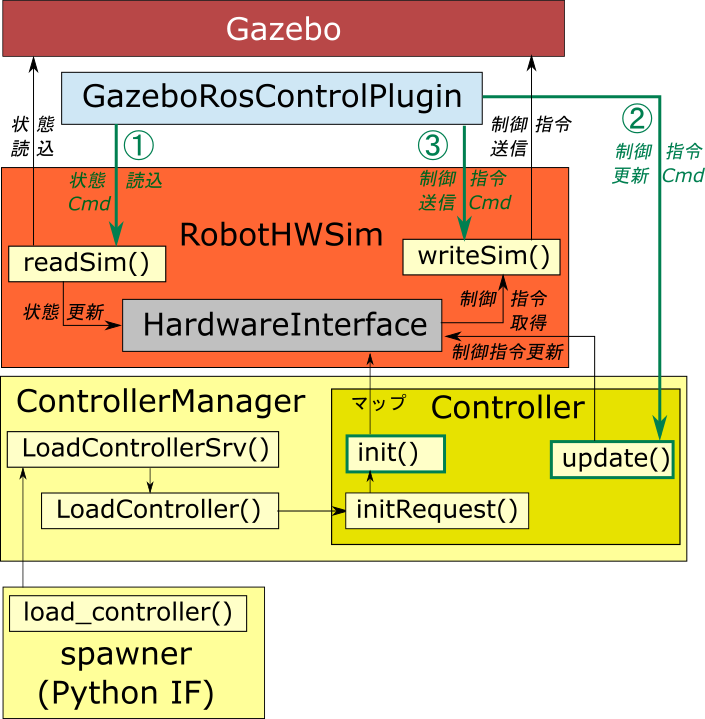
一番大事なのは,GazeboRosControlPluginが定周期で,
- 状態読込コマンドを
RobotHWSimに送信し,gazeboから関節の最新状態を取得する, - 取得した最新状態を基に,
Controllerに制御指令更新コマンドを送信し,指令値を更新する, - 更新された指令値を
gazeboに送信する,
という処理を実行していることです.特に,2 ではController::update()というメソッドが呼ばれますが,これはros_controls::ros_controllersが提供するPID制御の動作を決定づけるメソッドなので,ここを中心に攻めることになります.
更に,実際にPID制御を司るクラスとしてros-controls::control_toolbox::Pidというものが存在しており,制御の実体はそちらにあります.本エントリでは,その中の計算方法まで紐解いていきます.以下の図をイメージしながら読み進めると,理解がしやすくなると思います.
それでは,「扱うコントローラの種類」で挙げたパターンごとに順番に中身を見ていきます.
hardware_interface::PositionJointInterfaceに対応するController
hardware_interface::VelocityJointInterfaceに対応するControllerは,次のとおりです.
position_controllers::JointPositionController
はい,これだけです.
つまり,位置指令を受け取ったら,ロボットの関節に対しても位置指令でしかインターフェースしません.
さっそく,中を追ってみましょう.
position_controllers::JointPositionController
ros_controllers/position_controllers/include/position_controllers/joint_position_controller.h
// 省略
namespace position_controllers
{

/**
 * \brief Joint Position Controller (linear or angular)
 *
 * This class passes the commanded position down to the joint
 *
 * \section ROS interface
 *
 * \param type Must be "JointPositionController".
 * \param joint Name of the joint to control.
 *
 * Subscribes to:
 * - \b command (std_msgs::Float64) : The joint position to apply
 */
typedef forward_command_controller::ForwardCommandController<hardware_interface::PositionJointInterface>
        JointPositionController;
}
// 省略
JointPositionControllerの正体は,ForwardCommandControllerというクラスです.テンプレートクラスとなっており,ここではHardwareInterfaceとしてhardware_interface::PositionJointInterfaceを指定しています.
template <class T>
class ForwardCommandController: public controller_interface::Controller<T>
{
public:
  ForwardCommandController() {}
  ~ForwardCommandController() {sub_command_.shutdown();}

  bool init(T* hw, ros::NodeHandle &n)
  {
    std::string joint_name;
    if (!n.getParam("joint", joint_name))
    {
      ROS_ERROR("No joint given (namespace: %s)", n.getNamespace().c_str());
      return false;
    }
    joint_ = hw->getHandle(joint_name);
    sub_command_ = n.subscribe<std_msgs::Float64>("command", 1, &ForwardCommandController::commandCB, this);
    return true;
  }

  void starting(const ros::Time& time);
  void update(const ros::Time& /*time*/, const ros::Duration& /*period*/) {joint_.setCommand(*command_buffer_.readFromRT());}

  hardware_interface::JointHandle joint_;
  realtime_tools::RealtimeBuffer<double> command_buffer_;

private:
  ros::Subscriber sub_command_;
  void commandCB(const std_msgs::Float64ConstPtr& msg) {command_buffer_.writeFromNonRT(msg->data);}
};

}
他のノードが"command"というトピックに位置指令をパブリッシュしたら,commandCB()がコールされ,command_buffer_に位置指令が入力されます.
定周期で呼ばれるupdate()ではhardware_interface::PositionJointInterfaceにマップされたjoint_に,command_buffer_から取得した位置指令を代入します.
以上です.そうです,JointPositionControllerは,たったこれだけのことしかしていないのです.受け取った指令値を,そのままHardwareInterfaceに横流ししているだけです.すなわち,**転送(Forward)**です.ForwardCommandControllerという名称が付いているのも,これで納得できます.
ブロック線図(?)も,下図のようにとてもシンプルなものになります.
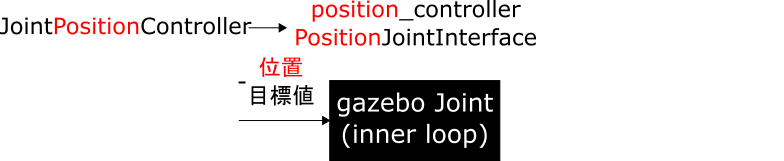
説明のためgazeboと記述していますが,実機に積まれたモータドライバ等でも構いません.実際には,低レイヤーで内部ループが回っているのですが,アプリケーションレイヤーの開発者としては知ったこっちゃないので(当然コードを読めば解析はできますが),ブラックボックスであるという意味を込めて,敢えて黒い箱で書いています.
なお,「これを位置指令としてロボットに送ることを,ロボット側が知っているかどうか」はまた別の話になります.
例えば,実際に指令値をgazebo側に送るDefaultRobotHWSimからしてみたら,このcommandが位置指令なのか,速度指令なのか,はたまた力指令なのかは,この司令だけをもらっても知ったこっちゃありません.
だから,事前にURDFの中で,どのjointがどのHardwareInterfaceを使うのかを,<transmission>タグで教えてあげる必要があります.
<robot xmlns:xacro="http://ros.org/wiki/xacro">
// 省略
    <transmission name="transmission1">
      <type>transmission_interface/SimpleTransmission</type>
      <joint name="joint1">
        <hardwareInterface>hardware_interface/PositionJointInterface</hardwareInterface>
      </joint>
    </transmission>
// 省略
</robot>
あとは,DefaultRobotHWSimが良きに計らって,指定されたHardwareInterfaceに合わせて,自身の持つモデルに対して指令値を送ってくれます.
RobotHWSimやRobotHWのサブクラスを自分のロボット向けに設計するときは,仕様に合わせて作り込むことになります.
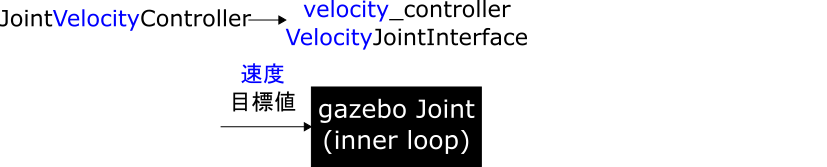
hardware_interface::VelocityJointInterfaceに対応するController
hardware_interface::VelocityJointInterfaceに対応するControllerは,次のとおりです.
velocity_controllers::JointVelocityController- 他ノードから速度指令を受け取り,ロボットの関節に対して速度指令を送信する
velocity_controllers::JointPositionController- 他ノードから位置指令を受け取り,ロボットの関節に対して速度指令を送信する
PositionJointInterfaceでは,自身のインターフェースの種別と同一である位置指令しか受け取ることができませんでしたが,VelocityJointInterfaceは速度指令と位置指令を受け取ることができます.どういう演算によってこれを実現しているのか,見てみましょう.
velocity_controllers::JointVelocityController
まずは,単純な実装であるこちらから.
ros_controllers/velocity_controllers/include/velocity_controllers/joint_velocity_controller.h
namespace velocity_controllers
{

/**
 * \brief Joint Velocity Controller (linear or angular)
 *
 * This class passes the commanded velocity down to the joint
 *
 * \section ROS interface
 *
 * \param type Must be "JointVelocityController".
 * \param joint Name of the joint to control.
 *
 * Subscribes to:
 * - \b command (std_msgs::Float64) : The joint velocity to apply
 */
typedef forward_command_controller::ForwardCommandController<hardware_interface::VelocityJointInterface>
        JointVelocityController;

}
ここではHardwareInterfaceとしてhardware_interface::VelocityJointInterfaceを指定しています.あとは,position_controllers::JointPositionControllerと全く同様です.
実体のコードもros_controllers/forward_command_controller/include/forward_command_controller/forward_command_controller.hで共通となります.
つまり,他ノードから速度指令を受け取ったら,そのまま速度指令をHardwareInterfaceに**転送(Forward)**するだけです.
先ほどと同じブロック線図になります.
velocity_controllers::JointPositionController
では,他ノードから位置指令を受け取り,速度指令に変換してHardwareInterfaceに送る処理はどうでしょうか.
本項は,以降全てに共通する内容を扱う出だしの項であり,ちょっと話が長くなるので,先に簡易的なブロック線図を載せておきます.
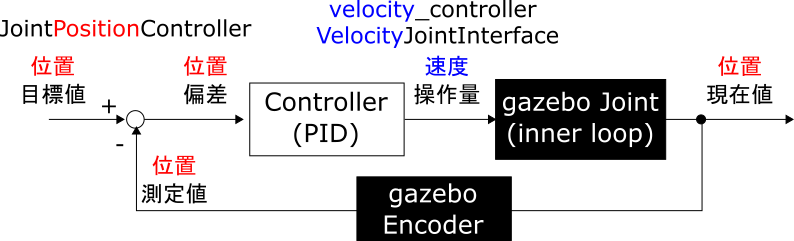
今から対象とするのは,白い箱のControllerの部分です.ちょっと変形しているものも登場しますが,この基本形が分かれば問題ないと思います.では,コードを見てみます.
ros_controllers/velocity_controllers/include/velocity_controllers/joint_position_controller.h
// 省略
namespace velocity_controllers
{

class JointPositionController: public controller_interface::Controller<hardware_interface::VelocityJointInterface>
{
// 省略
  bool init(hardware_interface::VelocityJointInterface *robot, ros::NodeHandle &n);
// 省略
  void update(const ros::Time& time, const ros::Duration& period);
// 省略
};
} // namespace
// 省略
こちらでは,ForwardCommandControllerを使用しません.Controllerを直接継承し,テンプレートにVelocityJointInterfaceを指定しています.
気になるメソッドであるinit()とupdate()もオーバーライドされているようです.ただし,velocity_controllers::JointPositionControllerの場合については,init()の引数の型がVelocityJointInterfaceと明示的に指定された状態で,オーバーライドされています.
【寄り道】init()の引数の型を明示的に指定している件について
init()の引数の型がVelocityJointInterfaceと明示的に指定していることに矛盾はないか,気になりませんか?気になるので,ちょっとだけ寄り道します.
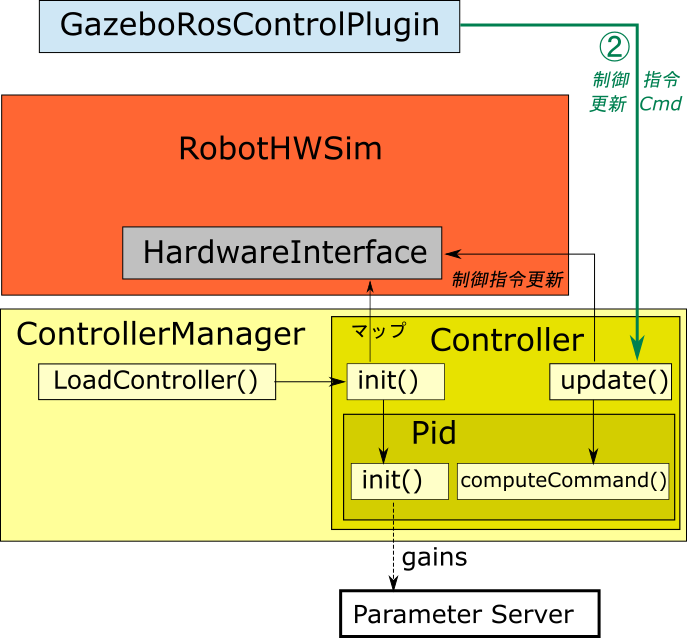
controller_manager/spawnerでControllerをspawnする際のことを思い出しておきます.どのControllerとどのHardwareInterfaceを組み合わせて使うのか,そのHardwareInterfaceが割り当てられるjointが何なのかを,事前に設定してきます.これを,yamlファイルを使って設定する場合が多いです.
hogehoge_controller:
  type: velocity_controllers/JointPositionController
  joints:
    - joint1
    - joint2
この情報があるから,spawn受け側であるサービスサーバにあるControllerManager::loadController()が呼ばれた際には,迷わずinitRequestの引数の型として,VelocityJointInterfaceを指定できるのです.
具体的にコードを追います.以前投稿したController と HardwareInterface との間の処理の仕組み(3. Controllerについて)の中でも追ったことがあるのですが,とても重要な部分なので,ここで追います.
ControllerManager::loadController()が頭です.
ros_control/controller_manager/src/controller_manager.cpp
// 省略
bool ControllerManager::loadController(const std::string& name)
{
// 省略
  try{
    initialized = c->initRequest(robot_hw_, root_nh_, c_nh, claimed_resources);
  }
// 省略
}
// 省略
robot_hw_はRobotHW型で,ロボットが持つjointに関するHardwareInterfaceの情報を全て持っています.
ros_control/controller_interface/include/controller_interface/controller.h
//省略
template <class T>
class Controller: public ControllerBase
{
  virtual bool initRequest(hardware_interface::RobotHW* robot_hw,
                           ros::NodeHandle&             root_nh,
                           ros::NodeHandle&             controller_nh,
                           ClaimedResources&            claimed_resources)
  {
//省略
    // get a pointer to the hardware interface
    T* hw = robot_hw->get<T>();
//省略
    if (!init(hw, controller_nh) || !init(hw, root_nh, controller_nh))
//省略
  }
};
//省略
先ほどの宣言で確認したとおり,velocity_controllers::JointPositionControllerが呼ばれた場合には,テンプレートにはVelocityJointInterfaceが必ず指定され,RobotHWインスタンスからそのポインタが返されます.それをinit()の引数に取っているので,ここまで議論した内容の筋が通ります.
init()の処理
本題に戻り,init()の中身を解析します.
ros_controllers/velocity_controllers/src/joint_position_controller.cpp
// 省略
bool JointPositionController::init(hardware_interface::VelocityJointInterface *robot, ros::NodeHandle &n)
{
// 省略
  // Load PID Controller using gains set on parameter server
  if (!pid_controller_.init(ros::NodeHandle(n, "pid")))
    return false;

  // Start command subscriber
  sub_command_ = n.subscribe<std_msgs::Float64>("command", 1, &JointPositionController::setCommandCB, this);

  // Get joint handle from hardware interface
  joint_ = robot->getHandle(joint_name);

  // Get URDF info about joint
  urdf::Model urdf;
  if (!urdf.initParam("robot_description"))
  {
    ROS_ERROR("Failed to parse urdf file");
    return false;
  }
  joint_urdf_ = urdf.getJoint(joint_name);
  if (!joint_urdf_)
  {
    ROS_ERROR("Could not find joint '%s' in urdf", joint_name.c_str());
    return false;
  }

  return true;
}
PIDコントローラの初期化,指令値のサブスクライバ,jointのハンドルの初期化,urdfのパラメータの取得,と言った流れです.
pid_controller_の正体を見ておきます.
ros_controllers/velocity_controllers/include/velocity_controllers/joint_position_controller.h
// 省略
class JointPositionController: public controller_interface::Controller<hardware_interface::VelocityJointInterface>
{
// 省略
  control_toolbox::Pid pid_controller_;       /**< Internal PID controller. */
// 省略
}
// 省略
このクラスのinit()を見ます.
// 省略
bool Pid::init(const ros::NodeHandle &node, const bool quiet)
{
  ros::NodeHandle nh(node);

  Gains gains;

  // Load PID gains from parameter server
  if (!nh.getParam("p", gains.p_gain_))
  {
    if (!quiet) {
      ROS_ERROR("No p gain specified for pid.  Namespace: %s", nh.getNamespace().c_str());
    }
    return false;
  }
  // Only the P gain is required, the I and D gains are optional and default to 0:
  nh.param("i", gains.i_gain_, 0.0);
  nh.param("d", gains.d_gain_, 0.0);

  // Load integral clamp from param server or default to 0
  double i_clamp;
  nh.param("i_clamp", i_clamp, 0.0);
  gains.i_max_ = std::abs(i_clamp);
  gains.i_min_ = -std::abs(i_clamp);
  if(nh.hasParam("i_clamp_min"))
  {
    nh.param("i_clamp_min", gains.i_min_, gains.i_min_); // use i_clamp_min parameter, otherwise keep -i_clamp
    gains.i_min_ = -std::abs(gains.i_min_); // make sure the value is <= 0
  }
  if(nh.hasParam("i_clamp_max"))
  {
    nh.param("i_clamp_max", gains.i_max_, gains.i_max_); // use i_clamp_max parameter, otherwise keep i_clamp
    gains.i_max_ = std::abs(gains.i_max_); // make sure the value is >= 0
  }

  setGains(gains);

  reset();
  initDynamicReconfig(nh);

  return true;
}
// 省略
パラメータサーバから,PIDゲインを取得しています.例えば,yamlファイルで設定したゲインが,ここで反映されます.
update()の処理
ros_controllers/velocity_controllers/src/joint_position_controller.cpp
// 省略
void JointPositionController::update(const ros::Time& time, const ros::Duration& period)
{
  command_struct_ = *(command_.readFromRT());
  double command_position = command_struct_.position_;
  double command_velocity = command_struct_.velocity_;
  bool has_velocity_ =  command_struct_.has_velocity_;

  double error, vel_error;
  double commanded_velocity;

  double current_position = joint_.getPosition();

  // Make sure joint is within limits if applicable
  enforceJointLimits(command_position);

  // Compute position error
  if (joint_urdf_->type == urdf::Joint::REVOLUTE)
  {
   angles::shortest_angular_distance_with_limits(
      current_position,
      command_position,
      joint_urdf_->limits->lower,
      joint_urdf_->limits->upper,
      error);
  }
  else if (joint_urdf_->type == urdf::Joint::CONTINUOUS)
  {
    error = angles::shortest_angular_distance(current_position, command_position);
  }
  else //prismatic
  {
    error = command_position - current_position;
  }

  // Decide which of the two PID computeCommand() methods to call
  if (has_velocity_)
  {
    // Compute velocity error if a non-zero velocity command was given
    vel_error = command_velocity - joint_.getVelocity();

    // Set the PID error and compute the PID command with nonuniform
    // time step size. This also allows the user to pass in a precomputed derivative error.
    commanded_velocity = pid_controller_.computeCommand(error, vel_error, period);
  }
  else
  {
    // Set the PID error and compute the PID command with nonuniform
    // time step size.
    commanded_velocity = pid_controller_.computeCommand(error, period);
  }

  joint_.setCommand(commanded_velocity);

  // publish state
  if (loop_count_ % 10 == 0)
  {
    if(controller_state_publisher_ && controller_state_publisher_->trylock())
    {
      controller_state_publisher_->msg_.header.stamp = time;
      controller_state_publisher_->msg_.set_point = command_position;
      controller_state_publisher_->msg_.process_value = current_position;
      controller_state_publisher_->msg_.process_value_dot = joint_.getVelocity();
      controller_state_publisher_->msg_.error = error;
      controller_state_publisher_->msg_.time_step = period.toSec();
      controller_state_publisher_->msg_.command = commanded_velocity;

      double dummy;
      getGains(controller_state_publisher_->msg_.p,
        controller_state_publisher_->msg_.i,
        controller_state_publisher_->msg_.d,
        controller_state_publisher_->msg_.i_clamp,
        dummy);
      controller_state_publisher_->unlockAndPublish();
    }
  }
  loop_count_++;
}
// 省略
大きな流れとしては,次のとおりです.
- 位置の現在値を取得する
- 位置の目標値と現在値との差分を算出する
- 差分から速度指令値を算出する
- 算出された速度指令値を
HardwareInterfaceに反映させる - 現在の状態をパブリッシュする
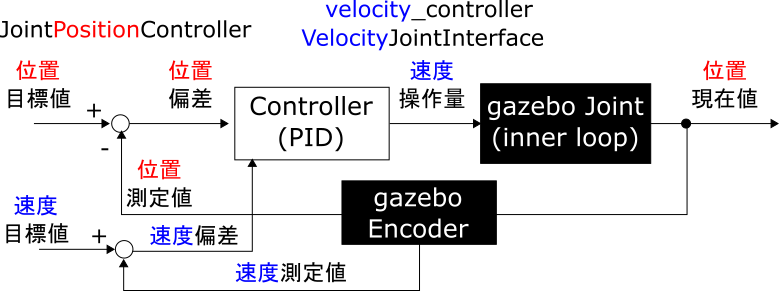
3.について,少し深掘りします.これは,条件によって分岐がされています.
// 省略
  // Decide which of the two PID computeCommand() methods to call
  if (has_velocity_)
  {
    // Compute velocity error if a non-zero velocity command was given
    vel_error = command_velocity - joint_.getVelocity();

    // Set the PID error and compute the PID command with nonuniform
    // time step size. This also allows the user to pass in a precomputed derivative error.
    commanded_velocity = pid_controller_.computeCommand(error, vel_error, period);
  }
  else
  {
    // Set the PID error and compute the PID command with nonuniform
    // time step size.
    commanded_velocity = pid_controller_.computeCommand(error, period);
  }
// 省略
位置指令に加え,速度指令も与えられているかどうかを判定しています.速度指令値が与えられているなら,速度偏差を計算し,速度指令値であるcommanded_velocityを更新しています.一方,速度指令値が与えられていない場合は,内部で速度偏差を計算することになります.
まずは,前者のcomputeCommand()を確認してみます.
見づらくて恐縮ですが,ブロック線図はこのようになります.
これを実現するコードを見てみましょう.
double Pid::computeCommand(double error, double error_dot, ros::Duration dt)
{
  // Get the gain parameters from the realtime buffer
  Gains gains = *gains_buffer_.readFromRT();

  double p_term, d_term, i_term;
  p_error_ = error; // this is error = target - state
  d_error_ = error_dot;

  if (dt == ros::Duration(0.0) || std::isnan(error) || std::isinf(error) || std::isnan(error_dot) || std::isinf(error_dot))
    return 0.0;


  // Calculate proportional contribution to command
  p_term = gains.p_gain_ * p_error_;

  // Calculate the integral of the position error
  i_error_ += dt.toSec() * p_error_;

  // Calculate integral contribution to command
  i_term = gains.i_gain_ * i_error_;

  // Limit i_term so that the limit is meaningful in the output
  i_term = std::max( gains.i_min_, std::min( i_term, gains.i_max_) );

  // Calculate derivative contribution to command
  d_term = gains.d_gain_ * d_error_;

  // Compute the command
  cmd_ = p_term + i_term + d_term;

  return cmd_;
}
PID制御器により,指令値を計算しています.ここでは,下記の一般的な制御則を離散計算したものが採用されています.
\text{command} = K_pe + K_i \int e \; dt + K_d \frac{de}{dt}
微分項の差分の微分値が,速度の差分となっていました.簡単ですが,ここを一応追うと下記のとおりです.
v_{curr} - v_{prev} = \frac{d}{dt}(x_{curr} - x_{prev}) = \frac{de}{dt}
また,積分項についてはバンド幅が定めることができ,それを超えないように閾値処理がされています.積分項が過剰に作用することで,オーバーシュートやハンチングが発生することを抑制するためです.この閾値は,例えばゲイン用のyamlファイルにおいて,i_clamp(最大が正号付き値,最小が負号付き値),またはi_clamp_minとi_clamp_maxを設定することで反映されます.
次に,後者のcomputeCommand(),すなわち偏差の微分値をPID制御器の内部で計算する場合の処理を確認します.
ブロック線図,コードの順に示します.
// 省略
double Pid::computeCommand(double error, ros::Duration dt)
{

  if (dt == ros::Duration(0.0) || std::isnan(error) || std::isinf(error))
    return 0.0;

  double error_dot = d_error_;

  // Calculate the derivative error
  if (dt.toSec() > 0.0)
  {
    error_dot = (error - p_error_last_) / dt.toSec();
    p_error_last_ = error;
  }

  return computeCommand(error, error_dot, dt);
}
// 省略
後退差分によって,誤差の微分値を計算し,その後は前述したcomputeCommand()でPID制御器による指令値の計算を行います.
ここで,誤差の微分値を計算する際に,時間dt.toSec()による除算が入る点に注意が必要です.この時間はROSの制御周期に依存するもので,必ずしも一定ではありません.たまたま周期が短いステップでこの計算がされた場合,速度微分値が極端に大きくなったり,その逆の現象が発生する可能性があります.真面目に制御をしたい場合は,この制御器がそのような特性を持ちうることを良く理解した上で,採用の判断をする必要がありそうです.
hardware_interface::VelocityJointInterfaceに対応するControllerについては,以上です.
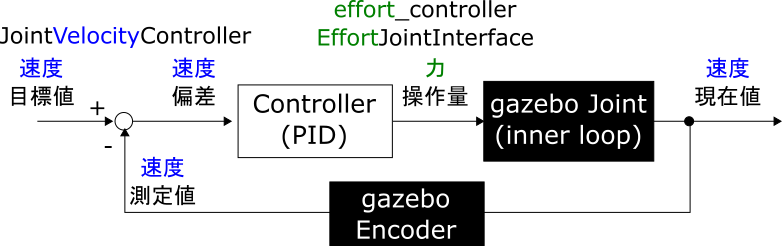
hardware_interface::EffortJointInterfaceに対応するController
最後に,力指令のEffortJointInterfaceについて述べます.これに対応するControllerは,次のとおりです.
effort_controllers::JointEffortController- 他ノードから力指令を受け取り,ロボットの関節に対して力指令を送信する
effort_controllers::JointVelocityController- 他ノードから速度指令を受け取り,ロボットの関節に対して力指令を送信する
effort_controllers::JointPositionController- 他ノードから位置指令を受け取り,ロボットの関節に対して力指令を送信する
effort_controllers::JointEffortController
ros_controllers/effort_controllers/include/effort_controllers/joint_effort_controller.h
// 省略
typedef forward_command_controller::ForwardCommandController<hardware_interface::EffortJointInterface>
        JointEffortController;
// 省略
これについて,もう説明は不要です.力指令値を**転送(Forward)**しています.

effort_controllers::JointVelocityController
init()は前述したものとほとんど同じなので,割愛します.
update()を見ます.
ros_controllers/effort_controllers/src/joint_velocity_controller.cpp
// 省略
void JointVelocityController::update(const ros::Time& time, const ros::Duration& period)
{
  double error = command_ - joint_.getVelocity();

  // Set the PID error and compute the PID command with nonuniform time
  // step size. The derivative error is computed from the change in the error
  // and the timestep dt.
  double commanded_effort = pid_controller_.computeCommand(error, period);

  joint_.setCommand(commanded_effort);

  if(loop_count_ % 10 == 0)
  {
    if(controller_state_publisher_ && controller_state_publisher_->trylock())
    {
      controller_state_publisher_->msg_.header.stamp = time;
      controller_state_publisher_->msg_.set_point = command_;
      controller_state_publisher_->msg_.process_value = joint_.getVelocity();
      controller_state_publisher_->msg_.error = error;
      controller_state_publisher_->msg_.time_step = period.toSec();
      controller_state_publisher_->msg_.command = commanded_effort;

      double dummy;
      getGains(controller_state_publisher_->msg_.p,
               controller_state_publisher_->msg_.i,
               controller_state_publisher_->msg_.d,
               controller_state_publisher_->msg_.i_clamp,
               dummy);
      controller_state_publisher_->unlockAndPublish();
    }
  }
  loop_count_++;
}
// 省略
速度に関する目標との差分を計算して,すぐにcomputeCommand()を実行しています.この場合,PID制御の微分項は加速度を扱うことになります.もし,command_accelarationなどという属性があれば,has_accelarationというフラグで微分項の差分計算を行うことになりそうですが,現状の仕様ではそうはなっていません.effortはあると思うので,同様の思想で拡張はできると思いますが,当方の知識ではこの点を理論的に展開できないので,深追いはしません.
とにかく,ここは普通に後退差分により微分項の近似を行うことになります.
effort_controllers::JointPositionController
ros_controllers/effort_controllers/src/joint_position_controller.cpp
// 省略
void JointPositionController::update(const ros::Time& time, const ros::Duration& period)
{
  command_struct_ = *(command_.readFromRT());
  double command_position = command_struct_.position_;
  double command_velocity = command_struct_.velocity_;
  bool has_velocity_ =  command_struct_.has_velocity_;

  double error, vel_error;
  double commanded_effort;

  double current_position = joint_.getPosition();

  // Make sure joint is within limits if applicable
  enforceJointLimits(command_position);

  // Compute position error
  if (joint_urdf_->type == urdf::Joint::REVOLUTE)
  {
   angles::shortest_angular_distance_with_limits(
      current_position,
      command_position,
      joint_urdf_->limits->lower,
      joint_urdf_->limits->upper,
      error);
  }
  else if (joint_urdf_->type == urdf::Joint::CONTINUOUS)
  {
    error = angles::shortest_angular_distance(current_position, command_position);
  }
  else //prismatic
  {
    error = command_position - current_position;
  }

  // Decide which of the two PID computeCommand() methods to call
  if (has_velocity_)
  {
    // Compute velocity error if a non-zero velocity command was given
    vel_error = command_velocity - joint_.getVelocity();

    // Set the PID error and compute the PID command with nonuniform
    // time step size. This also allows the user to pass in a precomputed derivative error.
    commanded_effort = pid_controller_.computeCommand(error, vel_error, period);
  }
  else
  {
    // Set the PID error and compute the PID command with nonuniform
    // time step size.
    commanded_effort = pid_controller_.computeCommand(error, period);
  }

  joint_.setCommand(commanded_effort);

  // publish state
  if (loop_count_ % 10 == 0)
  {
    if(controller_state_publisher_ && controller_state_publisher_->trylock())
    {
      controller_state_publisher_->msg_.header.stamp = time;
      controller_state_publisher_->msg_.set_point = command_position;
      controller_state_publisher_->msg_.process_value = current_position;
      controller_state_publisher_->msg_.process_value_dot = joint_.getVelocity();
      controller_state_publisher_->msg_.error = error;
      controller_state_publisher_->msg_.time_step = period.toSec();
      controller_state_publisher_->msg_.command = commanded_effort;

      double dummy;
      getGains(controller_state_publisher_->msg_.p,
        controller_state_publisher_->msg_.i,
        controller_state_publisher_->msg_.d,
        controller_state_publisher_->msg_.i_clamp,
        dummy);
      controller_state_publisher_->unlockAndPublish();
    }
  }
  loop_count_++;
}
// 省略
なんと,velocity_controllers::JointPositionController::update()と同一です.速度指令値が与えられているかどうかで,処理を切り替えています.
-
速度指令値が与えられている場合

-
速度指令値が与えられていない場合

考察
以上のControllerは,ブロック線図が全て共通の構成をとっています.つまり,Controllerで閉じた世界だけで考えた場合は,その出力が力か速度かなんて,全く知ったこっちゃないということです.PID制御とは,そういうものです.
どんな指令値を扱いたいかは,ロボットの設計者の思想と,ハードウェアの制約で決めてください,と.実際の挙動の安定性は,gazeboなり実機なりで動かしながらゲイン調整しながら決めてください,ということなのです.
図で表すと,このような感じです.
もちろん,制御対象のブロックを何らかの手法で同定して,コテコテのゲイン調整をしたって構わないわけで,というか本気でやるならそうするべきなのですが,pr2等の既存のソースを参考にした後は,取り敢えず安定したらその値を使っちゃえばいいや,というケースが多いのではないでしょうか?(あれ,私だけ?)
終わりに
既存のros_controllersの制御方法について深掘りをしました.Controllerが受け取る指令値と,HardwareInterfaceが受け取る指令値によって,それぞれパターンが存在することを理解しました.
最後に,以上で得られた内容から抽出される事項をまとめます.
各Controllerのパターンに対する命名ルール
-
JointHogeContorollerのHogeには,他ノードから受け取る指令値の種類が入ります. -
hoge_controllersのhogeには,ロボットの関節に送る指令値の種類が入ります. -
JointHogeContorollerで扱うHogeJointInterfaceのHogeにも,ロボットの関節に送る指令値の種類が入ります.
各Controllerのパターンに対するブロック線図
position_controllers
- Joint Position Controller
velocity_controllers
-
Joint Velocity Controller
-
Joint Position Controller
-
速度指令値も与えられた場合
-
速度指令値が与えられない場合
effort_controllers
-
Joint Effort Controller
-
Joint Velocity Controller
-
Joint Position Controller
-
速度指令値も与えられている場合
-
速度指令値が与えられていない場合
上述しましたが,実機の場合には,gazeboがモータドライバ等に置き換わるだけで,構成自体の本質的な違いはありません.ゲインを変える必要はありますが.
さて,実際に使う場合,上図の黒いブロックは基本的にいじることが出来ないので,Controllerのブロックを調整する必要があります.その調整するパラメータはPIDのゲインになるということです.モデルもよくわかっていないのに,制御量と操作量の次元も違うとなると,調整が大変そうだなぁ,ということは,容易に想像できます.
ですので,PIDベースで高尚な制御をしたければ,黒い部分もシステム同定して,先人の知恵をお借りして丁寧にゲイン設定をしましょう,というお話になるわけです.
まぁ,当方自身が古典制御理論に明るくなくこれ以上深追いできないという事情もありますが(!),ひとまずここまで追えれえば使う分には十分であるとは思います.まずは,色々試して慣れてみようと思います.