概要
- 複数のAWS VPCと事務所との間を IPsecトンネルで結ぶ方法を紹介。最後に設定例あり。
- 事務所からVPCへSSHおよびpingできるようにする
- IPsecゲートウェイは仮想化されたVyOS
- 事務所に複数のIPsecホストを配置
- NAT-Traversalを有効化
- 簡易にトンネルを追加削除
- プロジェクトとトンネル
- 各プロジェクト専用のトンネルを用意
- 各プロジェクトにトンネル設定を委譲
- プロジェクトメンバーのみトンネルを利用可能
現在の状況
- 事務所では、複数のプロジェクトが進行している
- プロジェクトによりメンバーが異なる
- VPCでリモートネットワークを構築しているプロジェクトがいくつかある
- 時々トンネルの追加削除が必要
- IPsecゲートウェイ兼インターネットゲートウェイとして RTX1200
- RTX1200(IPsecトンネルモード)が全プロジェクトのIPsecトンネルインターフェースである
問題
1. プロジェクトに関係なく、誰でもトンネルを利用できる
事務所でデフォルトゲートウェイをRTX1200にして通信すれば、プロジェクトメンバーでなくてもあらゆるVPCへ到達できてしまいます。
プロジェクト毎に専用のIPsecゲートウェイを設置し、VPCへアクセスするためにはまずIPsecホストへのSSHログインを要求するよう変更します。
2. RTX1200の役割が過剰
RTX1200は既にPPPoEルータ, DNSサーバなどであり、さらに全トンネルインターフェースを担うのはSPOFの観点から許容できないと考えました。
また、トンネルの追加削除をはじめとするRTX1200の設定を気軽に行えなくなってきました。
3. トンネルを追加削除できる人が限られる
インターネットゲートウェイ(RTX1200)は、ネットワーク管理者など限られた人が設定権限を持っていることと思います。
インターネットゲートウェイでトンネルするのをやめ、トンネルの追加削除を各プロジェクトに委譲することでワークフローを改善したいと考えました。
4. VPC間のCIDR重複
多数のプロジェクトでVPCを追加削除していると、VPC間でCIDRが重複することが考えられます。
- RTX1200(192.168.0.1/24) <=> トンネルA <=> VPC(10.0.0.0/24)
- RTX1200(192.168.0.1/24) <=> トンネルB <=> VPC(10.0.0.0/25)
この時RTX1200は、ping 10.0.0.1をどちらのトンネルに流せばよいか判断不能となり、事務所からVPCへアクセスできなくなることを懸念しました。
AWS VPCでNAT-Traversalが利用できるようになった ことから、NAT内にIPsecホストを複数設置できればこれらの問題を解決できそうです。
IPsecゲートウェイの選定
IPsecホスト数が増えそう、かつ増減しそうなので、仮想化することにします。
動的ルーティングに対応している中から選ぶとなると予算の都合でVyatta一択ですが、新しいVyOSを試してみます。
IPsecゲートウェイとNATのジレンマ
一般に、IPsecホストをNAT内に配置できない(NATにより問題が起こる or NATできない)というジレンマがあります。
IPsec と NAT/NAPTが共存できない理由 を見て、私なりにまとめてみました。
- NATデバイス はAHをNAT/NAPT可能だが、AHプロトコルは送信元IPアドレスの変更を改ざんとみなす
- NATデバイス がESPパケットをNAPTしようとするが、NAPT先ポート番号部分が暗号化されており分からない
- IKEプロトコルではISAKMPメッセージがUDP500番による通信を要求するため、ポート番号書き換えをともなうNAPTは不可
IPsec はネットワーク層で通信を保護するため、SSL-VPNなどと比べて様々なプロトコル(TCPやUDPなど)をトンネルできますが、上記の理由からNATの影響を受けないホスト(典型的にはインターネットゲートウェイ)をIPsecゲートウェイにするのが一般的なようです。まさに現在の事務所の状態です。
NAT通過のためのNAT-Traversal
NAT-Traversal1 は、クライアント・サーバのどちらか片方または両方がNAT内に存在する場合でも、NATを透過して通信するための仕組みです。
プロトコルとして、STUN, TURN, NAT-Traversal in the IKEなどがあるそうです。
NAT-Traversal in the IKE はIPsecホストをNAT内に配置できるよう、経路上のNAT検出、UDPによるESPパケットのカプセル化などを定めたものです。
なお、AHなしでIPsecを構成することも可能なので(認証はESPで行う, VPCからダウンロードできる設定にもAHは含まれていない)、AHのNAT通過問題には直面しませんでした。
AWSとNAT-Traversal
NAT-Traversalのためには、双方のIPsecゲートウェイがNAT-Traversalに対応している必要があります。
AWSのNAT-Traversal対応発表には、VPGを再作成するよう指示があります。
これを見落としていて、2014年に作成したVPGでNAT-Traversalが有効にならず悩みました。
2014年に作成したVPGで、NAT-Traversalが有効にならない例
NAT-Tがnoになっています。
$ show vpn ipsec sa
Peer ID / IP                            Local ID / IP
------------                            -------------
203.0.113.51                            192.168.0.9

Description: VPC tunnel 1
Tunnel  State  Bytes Out/In   Encrypt  Hash    NAT-T  A-Time  L-Time  Proto
------  -----  -------------  -------  ----    -----  ------  ------  -----
vti     up     n/a            aes128   sha1    no     0       3600    all

$ show log
Dec 22 13:44:33 vyos pluto[2845]: "peer-103.246.151.29-tunnel-vti" #1: initiating Main Mode
Dec 22 13:44:33 vyos pluto[2845]: "peer-103.246.151.29-tunnel-vti" #1: received Vendor ID payload [Dead Peer Detection]
Dec 22 13:44:33 vyos pluto[2845]: "peer-103.246.151.29-tunnel-vti" #1: Peer ID is ID_IPV4_ADDR: '203.0.113.51'
Dec 22 13:44:33 vyos pluto[2845]: "peer-103.246.151.29-tunnel-vti" #1: ISAKMP SA established
Dec 22 13:44:33 vyos pluto[2845]: "peer-103.246.151.29-tunnel-vti" #2: initiating Quick Mode PSK+ENCRYPT+TUNNEL+PFS+UP {using isakmp#1}
Dec 22 13:44:33 vyos pluto[2845]: "peer-103.246.151.29-tunnel-vti" #2: Dead Peer Detection (RFC 3706) enabled
Dec 22 13:44:33 vyos pluto[2845]: "peer-103.246.151.29-tunnel-vti" #2: sent QI2, IPsec SA established {ESP=>0x00000000 <0x00000000}
ESPパケットがUDPカプセル化されることなくRTX1200に到達してしまっています。
# syslog debug on
# packetdump lan3 100
# show log reverse
Searching ...
2015/12/22 14:43:00: LAN3 Rejected at IN(default) filter: ESP 203.0.113.51 > 192.168.0.9 (SPI=0x00000000)
2015/12/22 14:42:51: LAN3 Rejected at IN(default) filter: ESP 203.0.113.51 > 192.168.0.9 (SPI=0x00000000)
VPGの再作成時は「VPN接続」も再作成する必要があります。
VPN接続の削除 -> VPGをVPCからデタッチ -> VPGを新たにつくる -> 新しいVPGをVPCにアタッチ -> VPN接続を新たにつくる という手順になります。
新しいVPGで、NAT-Traversalが有効になった例
NAT-Tがyesになり、enabling possible NAT-traversal with method 3と表示されました。
$ show vpn ipsec sa
Peer ID / IP                            Local ID / IP
------------                            -------------
203.0.113.51                            192.168.0.9

Description: VPC tunnel 1

Tunnel  State  Bytes Out/In   Encrypt  Hash    NAT-T  A-Time  L-Time  Proto
------  -----  -------------  -------  ----    -----  ------  ------  -----
vti     up     2.7K/3.1K      aes128   sha1    yes    981     3600    all

$ show log
Dec 22 13:49:21 vyos pluto[5456]: "peer-203.0.113.51-tunnel-vti" #1: initiating Main Mode
Dec 22 13:49:21 vyos pluto[5456]: "peer-203.0.113.51-tunnel-vti" #1: received Vendor ID payload [Dead Peer Detection]
Dec 22 13:49:21 vyos pluto[5456]: "peer-203.0.113.51-tunnel-vti" #1: received Vendor ID payload [RFC 3947]
Dec 22 13:49:21 vyos pluto[5456]: "peer-203.0.113.51-tunnel-vti" #1: enabling possible NAT-traversal with method 3
Dec 22 13:49:21 vyos pluto[5456]: "peer-203.0.113.51-tunnel-vti" #1: NAT-Traversal: Result using RFC 3947: both are NATed
Dec 22 13:49:21 vyos pluto[5456]: "peer-203.0.113.51-tunnel-vti" #1: Peer ID is ID_IPV4_ADDR: '203.0.113.51'
Dec 22 13:49:21 vyos pluto[5456]: "peer-203.0.113.51-tunnel-vti" #1: ISAKMP SA established
Dec 22 13:49:21 vyos pluto[5456]: "peer-203.0.113.51-tunnel-vti" #2: initiating Quick Mode PSK+ENCRYPT+TUNNEL+PFS+UP {using isakmp#1}
Dec 22 13:49:21 vyos pluto[5456]: "peer-203.0.113.51-tunnel-vti" #2: Dead Peer Detection (RFC 3706) enabled
Dec 22 13:49:21 vyos pluto[5456]: "peer-203.0.113.51-tunnel-vti" #2: sent QI2, IPsec SA established {ESP=>0x00000000 <0x00000000 NATOA=0.0.0.0}
# syslog debug on
# packetdump lan3 100
# show log reverse
Searching ...
2015/12/22 14:42:48: [NAT(1):LAN3] Bound UDP 198.51.100.2.60619 <-> 192.168.0.9.500 ==> 203.0.113.51.500
設定例
VyOS, RTX1200, AWSの設定を紹介します。
IPアドレスの箇所は適宜変更してください。<>内は適宜変更してください。
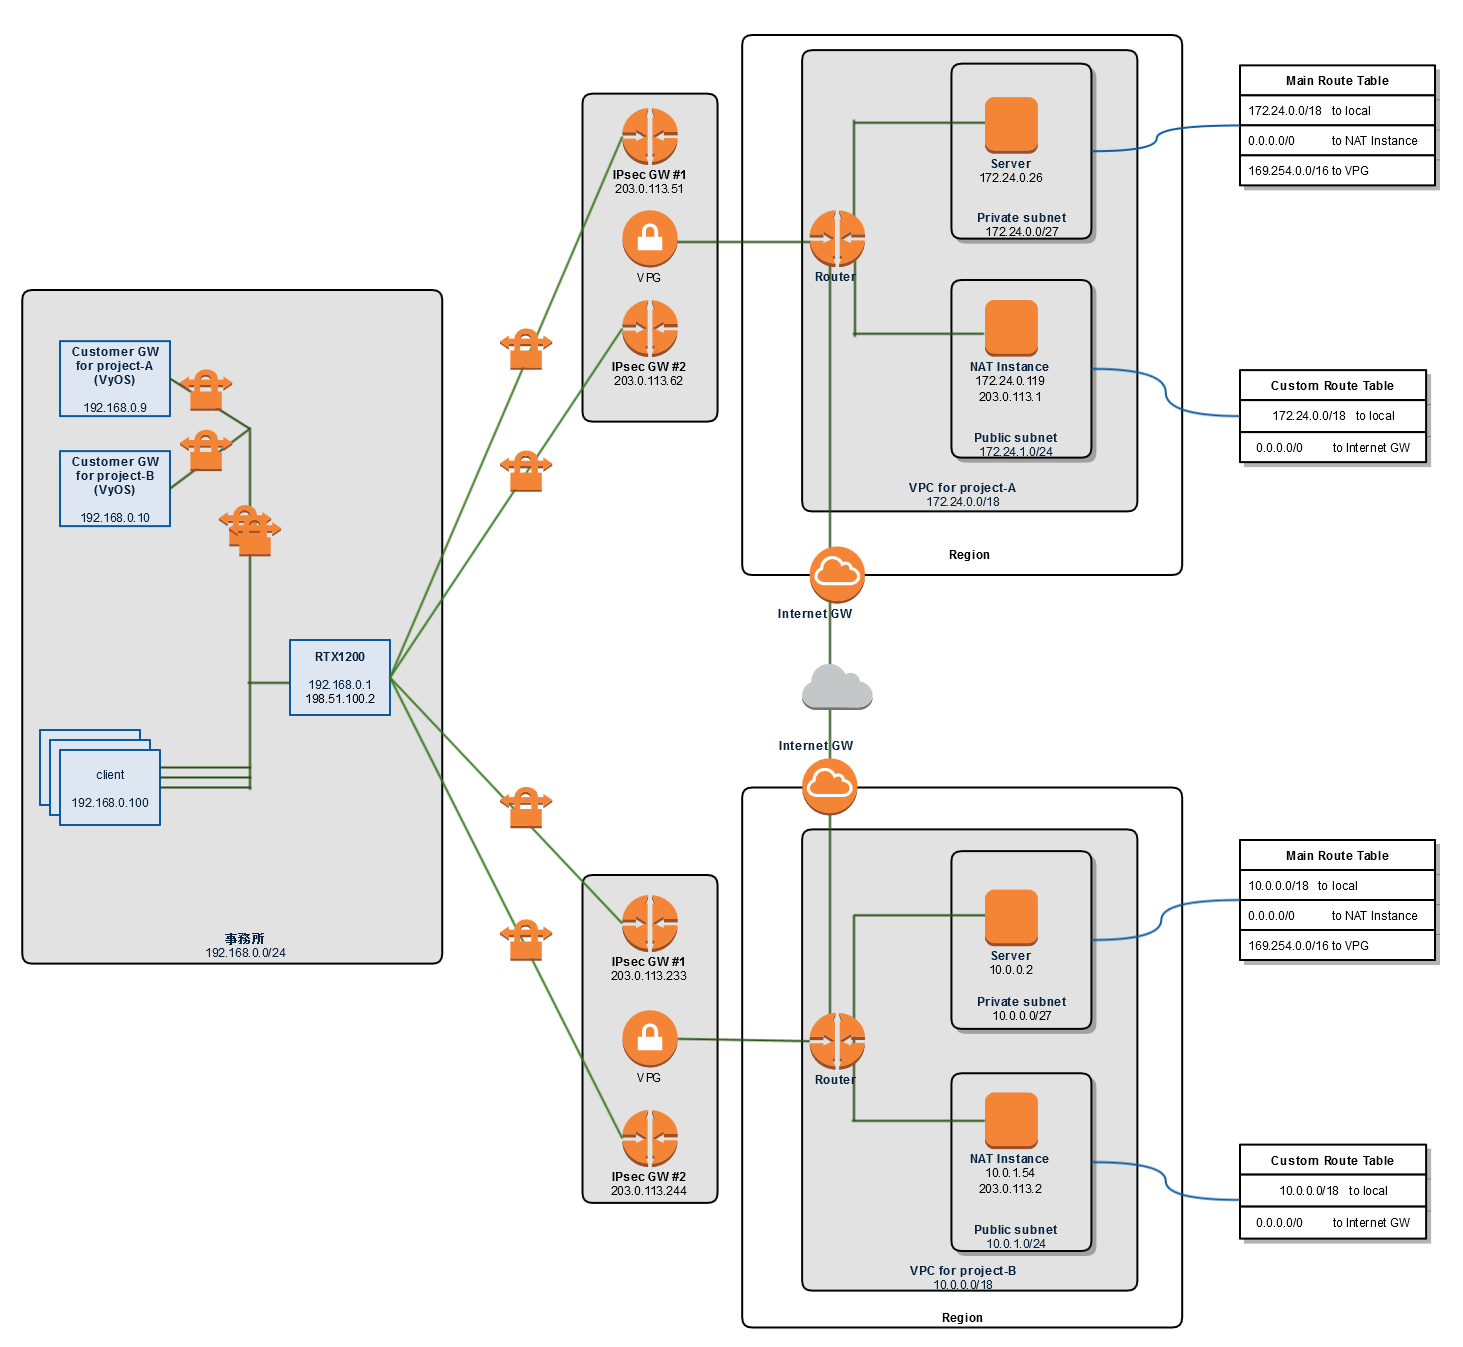
ネットワーク構成図
NATインスタンスありのVPCが2つあり、各VPCに2個のトンネルがある構成です。
VyOS
-
前提
- VyOS 1.1.6をクリーンインストールした
-
AWSの「VPN接続」からVyatta向け設定をダウンロードした
-
set vpn ipsec site-to-site peer <AWSのIPsecゲートウェイIPアドレス> local-address '198.51.100.2'行の、カスタマーゲートウェイ(RTX1200)IPアドレス部分を、VyOSのプライベートIPアドレスに置き換えた。#1, #2両方で置き換える必要があります。- (変更前)
set vpn ipsec site-to-site peer 203.0.113.62 local-address '198.51.100.2' - (変更後)
set vpn ipsec site-to-site peer 203.0.113.62 local-address '192.168.0.9'
- (変更前)
-
以下がCustomer GW for project-A(192.168.0.9)の完全な設定例です。
! as a normal-user
configure

! as an administrator
set interfaces ethernet eth0 address "192.168.0.9/24"
set system gateway-address "192.168.0.1"
set system name-server "192.168.0.1"
set system ntp server "192.168.0.1"
set service ssh port "22"

commit
save
exit

! 以降はSSH可能

! as an administrator
delete system console device ttyS0
delete system ntp
set system time-zone 'Asia/Tokyo'
set system ipv6 'disable'

sudo dpkg-reconfigure locales ! ja_JP.UTF-8 を選ぶ

! enable NAT-traversal
set vpn ipsec ipsec-interfaces interface eth0
set vpn ipsec nat-networks allowed-network 0.0.0.0/0
set vpn ipsec nat-traversal enable

! --------------------------------------------------------------------------------
! IPSec Tunnel #1
! --------------------------------------------------------------------------------
! #1: Internet Key Exchange (IKE) Configuration
!
! A policy is established for the supported ISAKMP encryption,
! authentication, Diffie-Hellman, lifetime, and key parameters.
!

set vpn ipsec ike-group AWS lifetime '28800'
set vpn ipsec ike-group AWS proposal 1 dh-group '2'
set vpn ipsec ike-group AWS proposal 1 encryption 'aes128'
set vpn ipsec ike-group AWS proposal 1 hash 'sha1'
set vpn ipsec site-to-site peer 203.0.113.51 authentication mode 'pre-shared-secret'
set vpn ipsec site-to-site peer 203.0.113.51 authentication pre-shared-secret '<共有鍵>'
set vpn ipsec site-to-site peer 203.0.113.51 description 'VPC tunnel 1'
set vpn ipsec site-to-site peer 203.0.113.51 ike-group 'AWS'
set vpn ipsec site-to-site peer 203.0.113.51 local-address '192.168.0.9'
set vpn ipsec site-to-site peer 203.0.113.51 vti bind 'vti0'
set vpn ipsec site-to-site peer 203.0.113.51 vti esp-group 'AWS'


! #2: IPSec Configuration
!
! The IPSec (Phase 2) proposal defines the protocol, authentication,
! encryption, and lifetime parameters for our IPSec security association.
!

set vpn ipsec ipsec-interfaces interface 'eth0'
set vpn ipsec esp-group AWS compression 'disable'
set vpn ipsec esp-group AWS lifetime '3600'
set vpn ipsec esp-group AWS mode 'tunnel'
set vpn ipsec esp-group AWS pfs 'enable'
set vpn ipsec esp-group AWS proposal 1 encryption 'aes128'
set vpn ipsec esp-group AWS proposal 1 hash 'sha1'

! This option enables IPSec Dead Peer Detection, which causes periodic
! messages to be sent to ensure a Security Association remains operational.
!
set vpn ipsec ike-group AWS dead-peer-detection action 'restart'
set vpn ipsec ike-group AWS dead-peer-detection interval '15'
set vpn ipsec ike-group AWS dead-peer-detection timeout '30'

! --------------------------------------------------------------------------------
! #3: Tunnel Interface Configuration
!
!  The tunnel interface is configured with the internal IP address.

set interfaces vti vti0 address '169.254.28.86/30'
set interfaces vti vti0 description 'VPC tunnel 1'
set interfaces vti vti0 mtu '1436'

! --------------------------------------------------------------------------------

! #4: Border Gateway Protocol (BGP) Configuration
!
! BGP is used within the tunnel to exchange prefixes between the
! Virtual Private Gateway and your Customer Gateway. The Virtual Private Gateway
! will announce the prefix corresponding to your VPC.
!
! Your Customer Gateway may announce a default route (0.0.0.0/0),
! which can be done with the 'network' statement.
!
! The BGP timers are adjusted to provide more rapid detection of outages.
!
! The local BGP Autonomous System Number (ASN) (65000) is configured
! as part of your Customer Gateway. If the ASN must be changed, the
! Customer Gateway and VPN Connection will need to be recreated with AWS.
!

set protocols bgp 65000 neighbor 169.254.28.85 remote-as '17493'
set protocols bgp 65000 neighbor 169.254.28.85 soft-reconfiguration 'inbound'
set protocols bgp 65000 neighbor 169.254.28.85 timers holdtime '30'
set protocols bgp 65000 neighbor 169.254.28.85 timers keepalive '30'

! To advertise additional prefixes to Amazon VPC, replace the 0.0.0.0/0 from the
! the following line with the prefix you wish to advertise. Make sure the prefix is present
! in the routing table of the device with a valid next-hop.

set protocols bgp 65000 network 0.0.0.0/0

! --------------------------------------------------------------------------------
! IPSec Tunnel #2
! --------------------------------------------------------------------------------
! #1: Internet Key Exchange (IKE) Configuration
!
! A policy is established for the supported ISAKMP encryption,
! authentication, Diffie-Hellman, lifetime, and key parameters.
!

set vpn ipsec ike-group AWS lifetime '28800'
set vpn ipsec ike-group AWS proposal 1 dh-group '2'
set vpn ipsec ike-group AWS proposal 1 encryption 'aes128'
set vpn ipsec ike-group AWS proposal 1 hash 'sha1'
set vpn ipsec site-to-site peer 203.0.113.62 authentication mode 'pre-shared-secret'
set vpn ipsec site-to-site peer 203.0.113.62 authentication pre-shared-secret '<共有鍵>'
set vpn ipsec site-to-site peer 203.0.113.62 description 'VPC tunnel 2'
set vpn ipsec site-to-site peer 203.0.113.62 ike-group 'AWS'
set vpn ipsec site-to-site peer 203.0.113.62 local-address '192.168.0.9'
set vpn ipsec site-to-site peer 203.0.113.62 vti bind 'vti1'
set vpn ipsec site-to-site peer 203.0.113.62 vti esp-group 'AWS'


! #2: IPSec Configuration
!
! The IPSec (Phase 2) proposal defines the protocol, authentication,
! encryption, and lifetime parameters for our IPSec security association.
!

set vpn ipsec ipsec-interfaces interface 'eth0'
set vpn ipsec esp-group AWS compression 'disable'
set vpn ipsec esp-group AWS lifetime '3600'
set vpn ipsec esp-group AWS mode 'tunnel'
set vpn ipsec esp-group AWS pfs 'enable'
set vpn ipsec esp-group AWS proposal 1 encryption 'aes128'
set vpn ipsec esp-group AWS proposal 1 hash 'sha1'

! This option enables IPSec Dead Peer Detection, which causes periodic
! messages to be sent to ensure a Security Association remains operational.
!
set vpn ipsec ike-group AWS dead-peer-detection action 'restart'
set vpn ipsec ike-group AWS dead-peer-detection interval '15'
set vpn ipsec ike-group AWS dead-peer-detection timeout '30'

! --------------------------------------------------------------------------------
! #3: Tunnel Interface Configuration
!
!  The tunnel interface is configured with the internal IP address.

set interfaces vti vti1 address '169.254.28.38/30'
set interfaces vti vti1 description 'VPC tunnel 2'
set interfaces vti vti1 mtu '1436'

! --------------------------------------------------------------------------------

! #4: Border Gateway Protocol (BGP) Configuration
!
! BGP is used within the tunnel to exchange prefixes between the
! Virtual Private Gateway and your Customer Gateway. The Virtual Private Gateway
! will announce the prefix corresponding to your VPC.
!
! Your Customer Gateway may announce a default route (0.0.0.0/0),
! which can be done with the 'network' statement.
!
! The BGP timers are adjusted to provide more rapid detection of outages.
!
! The local BGP Autonomous System Number (ASN) (65000) is configured
! as part of your Customer Gateway. If the ASN must be changed, the
! Customer Gateway and VPN Connection will need to be recreated with AWS.
!

set protocols bgp 65000 neighbor 169.254.28.37 remote-as '17493'
set protocols bgp 65000 neighbor 169.254.28.37 soft-reconfiguration 'inbound'
set protocols bgp 65000 neighbor 169.254.28.37 timers holdtime '30'
set protocols bgp 65000 neighbor 169.254.28.37 timers keepalive '30'

! To advertise additional prefixes to Amazon VPC, replace the 0.0.0.0/0 from the
! the following line with the prefix you wish to advertise. Make sure the prefix is present
! in the routing table of the device with a valid next-hop.

set protocols bgp 65000 network 0.0.0.0/0

! プロジェクトメンバーのアカウント作成、鍵登録
set service ssh disable-password-authentication
set system login user mizuno
set system login user mizuno authentication public-keys 'mizuno@tunnel-for-projectA' key '<OpenSSH公開鍵>'
set system login user mizuno authentication public-keys 'mizuno@tunnel-for-projectA' type 'ssh-rsa'
set system login user mizuno level admin ! 「operator」にしたいところだが、operatorではsshコマンドが使えないためやむを得ず

commit
save
sudo reboot
Customer GW for project-B(192.168.0.10)も同様に設定します。
4つのトンネルでBGP番号65000が重複していても問題ありませんでした。
RTX1200
VyOSが起点でAWS IPsecゲートウェイ宛ての UDP500/4500番 通信を、動的フィルタで許可します。
# Interface
ip lan3 address 198.51.100.2/30

# NAT
ip lan3 nat descriptor 1
nat descriptor type 1 masquerade
nat descriptor address outer 1 198.51.100.2
nat descriptor address inner 1 auto

# 動的フィルタのトリガーとなるパケットだけは静的フィルタで許可する必要あり
ip filter 3000 pass 192.168.0.0/24 * udp * 500
ip filter 3001 pass 192.168.0.0/24 * udp * 4500

# 後続の通信は動的フィルタで許可できる
ip filter dynamic 108 192.168.0.0/24 * udp

# ルールの適用
ip lan3 secure filter out 3000 3001 dynamic 108
AWS
VPCルートテーブル
宛先が169.254.0.0/16のパケットは、VPGを経由してトンネルへ流れるよう設定します2。
ネットワーク構成図のMain Route Tableを参照してください。
VPCセキュリティグループ
事務所からServerEC2インスタンスへSSHまたはpingしたい時、Private subnetのInboundには以下2つのルールが最低限必要です。
- SSH from 169.254.0.0/16
- すべてのICMP from 169.254.0.0/16
動作確認
2つのVyOSにおいてStateがup、NAT-Tがyesであること、ServerEC2インスタンスへpingできることを確認します。
vyos@vyos:~$ show vpn ipsec sa
Peer ID / IP                            Local ID / IP
------------                            -------------
203.0.113.51                            192.168.0.9

Tunnel  State  Bytes Out/In   Encrypt  Hash    NAT-T  A-Time  L-Time  Proto
------  -----  -------------  -------  ----    -----  ------  ------  -----
vti     up     21.0K/23.9K    aes128   sha1    yes    1228    3600    all

$ ping 172.24.0.26
PING 172.24.0.26 (172.24.0.26) 56(84) bytes of data.
64 bytes from 172.24.0.26: icmp_req=1 ttl=63 time=75.8 ms
64 bytes from 172.24.0.26: icmp_req=2 ttl=63 time=75.8 ms
^C
--- 172.24.0.26 ping statistics ---
2 packets transmitted, 2 received, 0% packet loss, time 1001ms
rtt min/avg/max/mdev = 75.820/75.851/75.883/0.277 ms
vyos@vyos:~$ show vpn ipsec sa
Peer ID / IP                            Local ID / IP
------------                            -------------
203.0.113.233                           192.168.0.10

Tunnel  State  Bytes Out/In   Encrypt  Hash    NAT-T  A-Time  L-Time  Proto
------  -----  -------------  -------  ----    -----  ------  ------  -----
vti     up     21.0K/23.9K    aes128   sha1    yes    1228    3600    all

$ ping 10.0.0.2
PING 10.0.0.2 (10.0.0.2) 56(84) bytes of data.
64 bytes from 10.0.0.2: icmp_req=1 ttl=63 time=11.4 ms
64 bytes from 10.0.0.2: icmp_req=2 ttl=63 time=12.1 ms
^C
--- 10.0.0.2 ping statistics ---
2 packets transmitted, 2 received, 0% packet loss, time 1002ms
rtt min/avg/max/mdev = 11.461/11.802/12.144/0.358 ms
まとめ
複数のVPCへトンネルするためにインターネットゲートウェイを多数用意すると、WAN IPアドレスも多数必要で高価になってしまいます。
ルータの数も増えてルーティングも複雑になってしまいますが、NAT-Traversalを有効にすることでシンプルかつ安価に複数トンネルすることができました。